DIY wreath of autumn leaves: assembly options. DIY autumn wreath. Master class with photos
A wreath is a beautiful headdress that came into our fashion from ancient times. Only earlier wreaths had a magical meaning, so they were woven only in holidays. Today we use wreaths as hair decorations even in Everyday life. In this article we will tell you how you can do original wreath from natural and decorative materials with your own hands.
For our ancestors, wreaths were a real amulet. They paid Special attention plants that were used for weaving, because each of them had its own sacred designation, suitable for a certain event in life.
- The ancient Romans wove wreaths of laurel leaves on the heads of their emperors to emphasize their power and glory.
- They placed wreaths woven from oak leaves on the heads of great warriors, symbolizing courage and fearlessness.
- Before the feast, Roman men wore wreaths of myrtle, which, according to beliefs in the Roman Empire, was considered a plant that relieves intoxication.
- But crowns of thorns were used to cover the heads of Romans who were sentenced to death. Approximately the same rituals with wreaths existed among the ancient Greeks.
The peoples of Asia also had several interesting traditions related to wreath weaving. For example, brides on their wedding day had to decorate their heads with a wreath of orange flowers, which symbolized fertility. And outstanding writers, poets and playwrights were awarded olive wreaths, which symbolized popular recognition and admiration.

For Slavic peoples the wreath was an integral part of their life. With their help, they demonstrated their status to society, Family status, illnesses and important events:
- Orphan girls wore wreaths with blue ribbons. People who met such girls on the street always tried to feed them and give them something.
- A woman who had just become a mother wore a wreath of fresh roses and green leaves.
- A cornflower blue wreath on a girl’s head meant that she was awaiting a marriage proposal from her beloved.
- A primrose wreath symbolized the loneliness of a beauty abandoned by a young man.
- Periwinkle wreaths were worn by engaged girls.
You could list the types of Slavic wreaths for a very long time, but the essence of each of them is the same - they were a reflection of what was happening in life, and of course, they played the role of decoration.

Modern girls decorate their heads fashionable wreaths without even thinking about their meaning. They buy beautiful ones in the markets finished goods made from artificial flowers and worn every day to complement your bright image. In view of this, we have prepared several interesting master classes with the help of which any girl will be able to make wreaths from different materials with her own hands.
DIY wreath base
One of the most difficult steps in creating any wreath is preparing the base. After all, it should be strong, soft and at the same time practical. From many existing options We have chosen the three most optimal ones.
Branches base
The best natural material for creating the base of a wreath is young long conifers or birch branches. Dried ones will not work because they are no longer elastic and will break the first time you try to bend them. Therefore, we recommend working with freshly cut branches. They need to be prepared as much as possible.
Make a basis for You can also make your own wreath from a grapevine.

Now let's move on to the sequence of actions that must be followed when creating a base from branches:
- Clean the branches from knots and needles, and then sort them by length.
- Decide on the diameter of the future wreath and select it for work required amount twigs. To create a small wreath, a couple of branches will be enough for you; if you are planning a large product, then you will need about 5 branches.
- Connect all the branches together using linen rope. You will get a thin frame, which you will gradually compact by wrapping the remaining branches to it.

- As a result, you should get a fairly dense rim. It needs to be placed under some kind of press so that it lies under it overnight. This way we will achieve the ideal evenness of the base for the future wreath.

Paper base
To make the paper base for the wreath, you will need a lot of newspaper or magazine sheets. You need to twist them into tight tubes, which are then glued together with tape. You will have to make a lot of tubes, because they must be layered on top of each other. As a result, you should have something like this:

You can add density to a paper circle from old nylon tights. Just wrap them around a paper base, securing the ends of the nylon with tape:

It will be very easy to attach any decorations to such a blank. By the way, if you don’t like nylon as a covering for paper, you can use any fabric.
Wire base
Wire is a very convenient material for creating the base of a wreath, but it is very hard, so it can injure the scalp. To avoid injury, the wire is wrapped in a thick layer of hemp or linen thread. You can show your imagination and use any other material - ribbons, foam rubber, and so on.

Base from old wiring
This material is softer than wire, but just as flexible. Therefore, by placing it on your head to measure the diameter of the future wreath, you will only need to cut it to the required length and that’s it. You will not have to perform any other manipulations.

Alternatively, you can use an old hoop, vacuum cleaner hose, or embroidery hoop for the base of the wreath.
DIY wreaths made from natural materials
For making wreaths from natural materials you need to collect as many different leaves, acorns, cones, twigs, dried flowers and berries as possible, since they will be the main decoration of the future headdress.
Since we have already described the options for bases for wreaths, we will not dwell on the stage of preparing them. You can use any of the blanks to attach natural materials to it, which will be discussed below.

DIY wreath on the theme “Autumn”
Going out to the park on an autumn day, you can find a huge amount of beautiful bright leaves and other natural materials from which you can weave a themed autumn wreath. It may be useful to you for a photo shoot or autumn ball your child in kindergarten or at school. We will consider three options for wreaths:
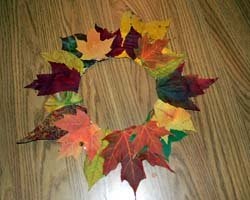
- Wreath of autumn leaves with your own hands

To make this product, you need to collect various fallen leaves so that they are predominantly red and yellow flowers. In this article we offer a manufacturing option DIY maple wreath.
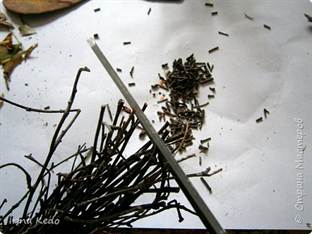
- Each leaf will need to be preserved in paraffin so that they retain their appearance and do not crumble over time.
- To do this, grate an ordinary candle, melt the shavings and dip each leaf into the resulting liquid.
- Instead of paraffin, you can use glycerin, but you will have to spend a little money on it.
- When all the leaves are ready, they can be attached to the base. For this wreath, we recommend using a paper base wrapped in nylon so that you can glue the leaves without bending them.
Handmade maple wreath You can not only put it on your head, you can also decorate your home interior with it.

Rowan wreaths were woven in ancient times. People counted the berries of this tree a strong talisman from evil and corruption. That is why rowan wreaths were placed on the heads of newlyweds and men leaving to fight.
The beauty of rowan wreaths is unique. The scarlet color of the berries and their tart autumn aroma add sophistication to the accessory. At the same time, absolutely anyone can create a rowan wreath. It can be done in two ways:
- Winding rowan bunches one by one with strong threads to a wire base (you can also weave DIY and laurel wreath);
- Stringing each berry on a thread like beads. You should end up with a long garland, which you will need to roll into several layers along the diameter of your head and tie them together with a strong red thread.

- DIY wreaths made from rowan leaves
- To create such a wreath, you will first need to prepare bunches of rowan berry clusters with leaves.
- If you have collected twigs with beautiful leaves, first preserve them in paraffin or glycerin, and then use wire to tie them to a grapevine base.
- If the bunches of rowan berries are separated from the leaves, then you will have to tie these leaves to the bunches using linen thread.

DIY New Year's wreath
To make a New Year's wreath you will need the following natural materials: Christmas tree branches and cones. They need to be tied to a base (preferably wire) according to the already known scheme. The cones can be glued using a glue gun.

If you want to dilute it natural colors, you can additionally use gouache. You can paint Christmas tree needles with white gouache to create an imitation of snow. Alternative option The decoration is to varnish the wreath and sprinkle it with sparkles, which will also create a certain snowy appearance of the wreath.
Wreaths made from fresh flowers by hand
A wreath of fresh flowers is a head decoration for summer, spring and autumn celebrations - weddings, birthdays, engagements. You can use absolutely any flowers that grow in your front garden. In this article we will give an example of how to make a magnificently beautiful wreath for the bride.

Prepare required material and tools:
- Flowers
- Wire for base
- Secateurs
- Floral ribbon
Having prepared all the materials and tools, proceed to creating a wreath:
- Make the base for the wreath - wrap the wire with tape in several layers.

- If you don’t know the exact diameter of the bride’s head, you can make small loops along the edges of the wire, thread a ribbon through them, with which the bride herself will fix the decoration.

- Make bunches of flowers and greenery. Wrap each element together using floral tape;

- Attach each bundle to the base using decorative wires. As a result, you should end up with a beautiful product like this:

DIY decorative wreaths
Difference decorative wreaths from similar products made from natural materials is only that artificial dummies of leaves, fruits, berries and flowers should be used as decoration. They look very nice, but they cost money. We advise you to use them only if you will be wearing a wreath made of decorative elements often.
This is relevant for dance groups who create images for choreographic productions, theater studios, whose costume department is constantly replenished.

Below we present photographs of wreaths from artificial materials. It is not advisable to describe the manufacturing technique, because it is no different from the one that we recommended using to create wreaths from natural materials.
DIY artificial flower wreath


DIY autumn wreath made from decorative materials


DIY ribbon wreath


DIY Greek wreath made from decorative materials

We are surrounded by a lot of information about master classes on creating flowers. self made, that's why we know that you can build on paper flowers serious business: Using them at concerts, summer festivals, warm weather weddings, and the list goes on. Making a beautiful paper flower wreath is easier than you might think. We decided to prepare complete guide for beginners to help our novice needlewomen.
This “Paper Flower Wreath” master class is best done with beginners. So grab a few friends and let us guide you into the creative world of paper flowers. We used the same method to create each flower and leaf on these wreaths.
Materials
- thick kraft paper;
- ribbons;
- wire cutters.
Tools
- glue gun;
- glue gun pencil;
- scissors;
- pencil;
- disposable paper plate.
Instructions

Take your basic materials and stationery and let's get started.
Wire wreath with stems

To begin, unwind enough wire to wrap around the head twice and cut it off with wire cutters. 
Twist the ends of the wire around the resulting circle very tightly so that it is reliable and safe. Double-check that the circle fits well and comfortably on your head, then set it aside. 
Now that you have the base for your wreath, it's time to start creating the flowers! Cut 15 cm of wire using special wire cutters. 
Fold in half and twist the ends together, forming a stem with a small loop at the end. 
Wrap the small loop and the rest of the barrel tightly with kraft paper tape. Please note that the tape holds well when wound on the same tape, so make sure it tightly covers the previous layer and work your way down the stem. 
Advice: the process will go It's faster if you hold the tape diagonally to the stem and twist the stem itself with your fingers. Cut off the excess tape with scissors and wrap it around the tip.
How to make paper flowers and leaves

Nobody wants to waste time cutting out each petal individually. Fold the kraft paper several times like an accordion, bend it 4 cm at a time, then fold it in half and cut out several layers at a time. 
Cut out the petals o round shape with a small loop at the top. Make sure that you cut all layers evenly and that the petals do not move. We made the petals 5 cm wide and 4 cm long, but you can also do this with other sizes. 
While your petals are still in a neat pile, wrap them all tightly around the pencil, then twist each one individually. Make sure that the stripes on the kraft paper line up along the pencil. 
Place a small drop of glue on the stem, about 2.5 cm from the top. 
Let the glue cool for 2 seconds, then glue on your first petal. Press the bottom of the petal onto the stem and glue 5 more petals, wrapping them around the stem. 
Once the 6 petals are glued on, wrap the ribbon around the base of your flower, working your way down the stem and wrap it all the way around. Press the tape well at the base of the flower, this will help it hold firmly enough. 
At this stage your flower may look like a bump, so now is the time to shape those petals. Twist the petals outward, wrapping them around a pencil, and alternatively, twist one or two petals inward, which will give the flower more naturalness. 
Look at this big one beautiful flower! Once you master this, the rest will be easy. 
For orange flowers, cut out the petals a little smaller than for pink ones, about 3 cm wide and 4 cm long, to give the wreath some variety and volume. But the creation process is absolutely the same! 
And those green leaves? Exactly the same, but instead of 6 petals you need to take 2 or 3. 
These bright green companions are simply smaller versions of their dark green friends. Simple enough! 
Put on some good tunes and repeat the process until you have everything you need to create flowers and leaves. We believe that five flowers of each color is enough for a wreath, they cover 2/3 of the wreath in a circle, leaving a little space, which will give your image its own special style and naturalness.
How to make a wreath of paper flowers

The wreath on the left uses 5 flowers of each color. On the middle wreath – 2 large flower, 3 small and 16 leaves. And for the classic one (on the right), 8 large flowers, 12 small and 15 leaves were used completely in a circle. 
Arrange your flowers and leaves along the circle of wire, highlighting your favorite ones in the foreground and framing them with leaves along the entire length. 
Now carefully tighten the wire, leaving the entire structure intact. 
Start twisting the stems of your flowers around the circle of the wreath so that the ends are hidden under the next stem and together they sit beautifully. 
Once you have added all the flowers and leaves, finish off your work with ribbon, wrapping it tightly around the entire circle. Yes, between all the colors. Bend flowers and leaves to reach hard-to-reach areas and exposed wire. 
Now adjust these flowers a little by hand, it will take some time, wrap the petals here and there. It's amazing how kraft paper can behave and change! 

 The paper flower wreath is ready! Get and check these out for yourself. bright colors. Fire pink and orange versus purple and lavender – which one will you choose?

Remember, our Paper Flower Wreath kit contains enough material to create TWO flower wreaths in your favorite color combination.
In the fall, you really want to bring an armful of fallen leaves home, but what to do with them then? We offer you an article with master classes on how to make a wreath of autumn leaves with your own hands.
Simple option
We will need:
- twigs;
- autumn leaves;
- wire;
- ribbon.
We form a circle from the twigs and fasten it with wire. Then we begin to wrap the leaves in a circle; they should overlap.
To hang the wreath, make a loop of ribbon.

Royal flower
Let's make roses from the leaves. To do this they should be slightly damp.
When a certain number of flowers are ready, we prepare a base from thick wire, rolling it into a ring.

Now we can connect the roses in threes and begin attaching these blanks to the base using thread or thinner wire.


This is the wreath we end up with. Also use ribbons for hanging.

Craft with children
Most often we go to the forest or park to admire the leaf fall with our children. We offer you a master class on how to easily make a beautiful wreath by adding creative process child.
It all starts with the collection. Choose different colored leaves: red, yellow, green. Different types: maple, rowan, birch, etc.
From disposable plate let's cut out the base, how to do it is shown in the photo below.


Now it’s the turn of the child’s hands and his imagination. Let your child apply glue and place the leaves on the base in the order that his imagination tells him.


If the branches stick out, they need to be trimmed.
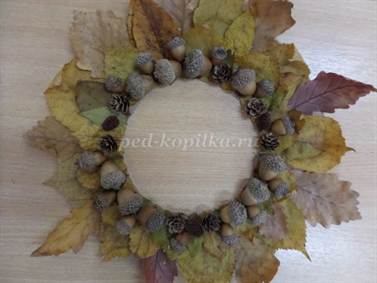
If you and your child have collected not only leaves, but also various cones, then make the next wreath.

For it, you can also use a base from a disposable plate, or you can cut it out of cardboard. Leaves should be glued in several rows and in a checkerboard pattern. For convenience, you can draw several circles.

When you reach the inner circle, start gluing on the rest of the decor. To begin with, let these be large acorns, and between them small cones (for example, alder).

Place small acorns on top into the space between the large ones.
When all Additional materials will be glued or you are satisfied with the existing result, let's start making the loop. To do this, cut out two rectangles from cardboard, and a loop from woolen thread, twine or ribbon. We place it between the cardboards and glue it together.

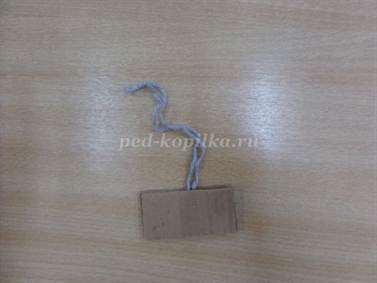
Glue the loop on reverse side wreath and that's it, it's ready.

From leaves and berries of rowan

To create it you will need:
- leaves, it is better to take birch or similar ones;
- rowan berries;
- dried flowers to choose from;
- thin branches;
- cardboard;
- newspapers;
- twine or ribbon;
- masking tape;
- glue.
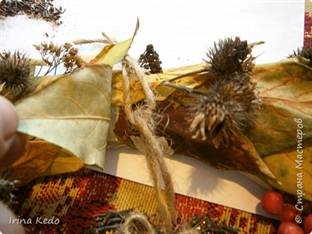
Cut a circle out of cardboard and cover it with several layers of newspaper using masking tape. We add as much paper until we get the desired thickness.


Using the same tape, we begin to cover the surface of the base with overlapping leaves. You can also use glue.


In principle, such a wreath looks beautiful in itself, but let's continue to decorate it. To do this, distribute twigs with berries and sprigs of dried flowers throughout the wreath.


Now put the wreath aside and cut out four hearts from cardboard.
You can make them the same size, or you can make one of the pairs a little smaller than the others, as you decide.
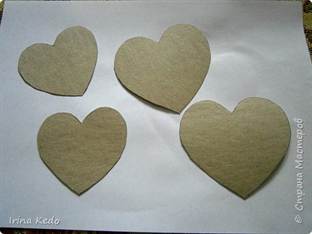
Glue them in pairs, not forgetting to put a loop of twine (or ribbon) between them.

Now we cover each side of the hearts with leaves. We cut off the excess.


Apply glue to the edges of the hearts and sprinkle these places with crumbs from twigs.

We decorate the central part with rowan berries.
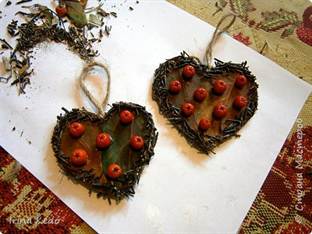
Attach the hearts to the wreath, hiding the loops under the leaves.

This wreath can become a decoration for your home. And since it is made with your own hands and labor and warmth, then it will become a kind of amulet for your family.
paper decoration
Well, what if, for example, the weather does not allow you to collect live leaves or you live far from the park? What now, give up the idea of creating an autumn wreath? Don't despair, there will be help for you colored paper. Here you can also involve children, this will certainly develop not only their imagination, but also fine motor skills. After all, we will make leaves using the origami technique.

Prepare:
- colored paper;
- scissors and stationery knife;
- glue;
- cardboard, preferably thick;
- stapler
We cut out squares with sides of 10 centimeters from paper. We will need 10 pieces for each sheet. The number of leaves will depend on the size of the base.
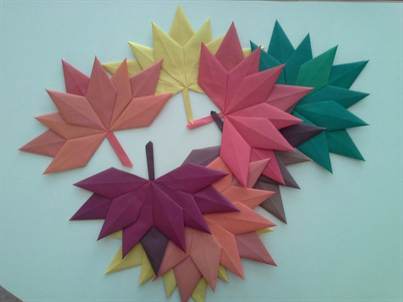
Take six squares and fold them diagonally. Next, we fold both corners to the fold line. We have formed corners at the bottom, we also bend them towards the center. For the other three squares, we will perform only the first stage of adding the right and left corners. But the tenth one will serve as a cutting for the leaves.


When we have prepared all the parts, we begin to glue them together in threes, as shown below.

Then we connect all threes together. We overlap them.


Glue the tenth square onto the back side, trim it along the edge of the sheet, but not the end. We fold this protruding part into a stalk.


Now we cut out the base from cardboard and begin to place our leaves. We overlap one on top of the other with the cuttings inward.


Our autumn wreath is ready. These are the various wreaths that can decorate your home in the fall.
Video on the topic of the article
Since ancient times, women have decorated themselves with wreaths. All kinds of artificial flowers, fresh flowers, stones, ribbons, leaves, and accessories are woven into them.
Today's master class is devoted to decorating the head with artificial flowers and fresh, as well as colorful autumn maple leaves.
All of the examples given are easy to manufacture and assemble at home.
DIY head wreath in Ukrainian style
The manufacturing technique is suitable for beginners. The wreath is made from artificial flowers purchased in advance at the store. It is recommended to use special soft wire for weaving wreaths. It does not have sharp metal ends and is pleasant to the touch.

Materials and tools: soft wire large-diameter brass, copper or decorative wire with paper wrapper, artificial flowers, dark-colored fabric (felt can be used), scissors, thread, decorative tape, instant-drying glue, pliers (if metal wire is used).
Stage 1
A wire is taken and applied to the head in a circle. The excess part is cut off. Both ends twist onto each other in a spiral, as in the photo.

Stage 2
Flowers for a wreath are laid out with your own hands in the order in which they are attached. From suitable fabric Dark colored circles are cut out. All are of different diameters, corresponding to each flower.
Stage 3
One by one, the flowers are glued onto the wreath wire with your own hands, starting with the largest one. WITH reverse side Each one is glued to a circle of fabric. It is important to apply a thick layer of adhesive on the wire, on the circles and on the back of the flower to ensure a good connection.
The Ukrainian style wreath is ready. It is decorated with bows and sprigs of fresh flowers to top it off. This craft can be safely worn in bad weather: the leaves will not deteriorate and the colors will delight you with their constancy.
DIY head wreath made of colored paper
This decoration is made from corrugated colored paper. It can be purchased at any office supply store. The wreath is easy to assemble and has an original idea.

Materials and tools: corrugated paper 7 different colors, soft decorative wire, glue, scissors, pencil, ruler, beeswax, brush.
Stage 1
Decorative wire is taken and cut into sticks 12.5 cm long.

Stage 2
Strips 2 cm wide are cut out of green corrugated paper. It is important to cut them across the lines on the paper, and not along.
Stage 3
Glue is applied to the strips. It is better to do this in the form of droplets, rather than a continuous strip.
Stage 4
Each wire is wrapped in a spiral with a strip of corrugated paper with glue applied. It is recommended to constantly hold the strip of paper while folding, kneading and pressing it. When one paper strip runs out, take a new one with pre-applied glue.
Stage 5
For the future chamomile, take paper orange color. According to the already iconic scheme, a stamen is made from it, as in the photo.

Stage 6
From paper white a rectangle measuring 5/10 cm is cut out. The short side should correspond to the longitudinal lines on the paper.
Stage 7
The rectangle is folded into an accordion. There should be five layers, five folds. The bottom side is cut off and rounded at its corners. And the top one is pointed, as in the photo.
Stage 8
To the left bottom corner a strip of glue is applied, on which a blank with an orange stamen for a do-it-yourself wreath is placed.
Stage 9
Clockwise, a white piece of paper is wrapped in a flower bundle.

Stage 10
The base of the flower is fixed with a strip of green paper, which is wrapped in a spiral 4 cm.
Stage 11
Each petal bends to the side. With the help of a pencil they are given round shape.
Stage 12
Making a poppy flower. Made from red or corrugated paper Pink colour a rectangle measuring 2.5/7.5 cm is cut out. Oblong strips are cut out parallel to the lines on the paper, as in the photo.
Stage 13
The resulting skirt is wound around the tip of the wire according to the already familiar pattern.

Stage 14
A 7.5/14 cm rectangle is made from orange paper. It is folded into five folds into an accordion. Cut out unusual shape, exactly as in the photo.
Stage 15
The pink poppy stamen is wrapped in orange paper, onto which a strip of glue has been previously applied. The base of the flower also turns green corrugated paper, like the previous chamomile.

Stage 16
Each poppy petal is hand-spread for a DIY head wreath. The edges of the paper need to be stretched a little.
Stage 17
Melts beeswax. It is applied with a brush to flowers, petals and leaves. Wax will give the wreath a realistic look, the feeling of real flowers on your head. The flowers take some time to dry. The wax hardens slowly. It is better not to use varnish instead of wax. It has no elasticity after hardening - if you are careless, any petal will simply break and the product will be damaged.
Stage 18
Oblong leaves are cut out of green paper. They are also covered with wax.
Stage 19
The resulting flowers are collected into small bouquets and wrapped in paper. Each bouquet is leaned against the main wire and secured again with paper.
The paper wreath is ready!
DIY autumn wreath
The theme of such a wreath is inspired by autumn motifs. Walking through a park or forest, you can see dry fallen leaves under your feet. Their colors are so varied and attractive. Fantasy plays with ideas and pictures.

Materials and tools: maple leaves, thread, scissors.
Stage 1
For a do-it-yourself autumn wreath, take leaves only with a long and strong stem. They should also bend well.
Stage 2
The first two leaves are taken and placed on top of each other with branches crosswise. The top branch is wrapped around the bottom one and placed along it. This position is fixed with thread.

The weaving technique is similar to the weaving of the well-known dandelion wreath.
Stage 3
So everyone new leaf is placed on top, and its branch is wrapped around the previous one and placed along all the others.
Stage 4
When required length An autumn wreath will be woven with your own hands, the tip is tied with a thread and inserted into the beginning of the first leaf.
Autumn crown made from leaves!
Autumn is a time that inspires us to be creative. Tradition of decorating houses beautiful wreaths exists in many countries. Typically, such decor is made for the Christmas holidays in order to add an elegant and bright element to the interior. They are also popular, which are usually used to decorate doors or walls in the corridor. Flowers, fallen leaves, and cones are used to make them. Unusual decor instantly transforms the space, giving it seasonal color and romance. Autumn wreaths can also be used as decorations for festive events: wedding, anniversary or friendly party.
If you like such accessories, you can make them yourself. Today we will tell you how to make an autumn wreath from materials that can be found in every home - wrapping paper, packages, old books and newspapers.
Wreath of paper bags.

To work you will need the following:
- base circle,
- several paper bags or a small roll of wrapping paper,
- glue gun,
- autumn decorations(acorns, leaves, pine cones, artificial or dried flowers).
1. In our case, a ready-made foam rubber circle is used as the basis for the wreath. You can make a similar blank yourself by securing the ends of the roller with glue. suitable size so that the required shape is obtained. Another option involves using foam rubber or padding polyester in a roll, which should be rolled tightly and secured with threads. The base can also be made from a rolled up thick towel or pulled into a cling film straw. IN as a last resort, you can always use an ordinary swimming inflatable ring for children.

2. Now you need to prepare the paper for further manipulations. Cut off the handles from the bags and separate the bottom and sides so that you get a continuous sheet. Cut identical strips of paper about 2.5 centimeters wide and twist them into thin flagella.

3. Heat the glue in the gun and use it to carefully secure paper strips on a foam circle. Your task is to fix the strands as tightly but aesthetically as possible so that the base is not visible anywhere.

4.
When the wreath is ready, decorate it autumn decor to your taste, using the same glue gun.
Ready! All that remains is to make a comfortable pendant from beautiful ribbon or fabric.

Newspaper wreath.

For this project you will need:
- base circle,
- newspapers or book pages,
- colored paper or scrapbooking paper,
- glue gun,
- pencil.
.jpg)
1. From newsprint or, preferably, cut out identical round-shaped blanks with carved edges, resembling a flower, from thick book pages. The same patterned patterns should be made from colored paper. Please note that for the autumn wreath you will need colored paper or yellow and burgundy scrapbooking paper color range. Using a pencil, give each piece a three-dimensional shape.

2. Using a glue gun, secure the blanks to the base circle, pressing them tightly with a pencil for better fixation.

3. Cover the entire circle with rows of paper “flowers,” alternating colored and newspaper blanks to create an interesting decor with an autumnal character.

4. The finished wreath can be decorated with a beautiful banner. To make it, use thick paper with a suitable pattern. Cut a wide strip out of it, shaping the edges figuratively, and fold the workpiece as shown in the photo below.

5. To put an inscription on the banner, cut out letters from thick paper, oilcloth or any other suitable material and glue them.

6. Secure the finished banner to the wreath using a glue gun.

You can decorate a Halloween wreath using the same method, simply by adding a suitable inscription and a few scary elements.

You can make an autumn wreath out of paper in another way. Simply cover the base circle with decorative paper tape and complete the composition autumn accessories or decorate a wreath paper leaves, cut from newspaper or colored paper.
.jpg)
.jpg)
Experiment with design options to make it your own unique design this beautiful decoration.


