Patchwork scheme step by step description. Patchwork for beginners - techniques and ideas
IN Lately patchwork or patchwork is very popular among craftswomen. And this is not surprising, because products made in this technique harmoniously complement any interior. In addition, this a great opportunity Use leftover fabric scraps. Of course, the very process of creating products in this style requires patience and perseverance from the craftswoman. However, the end result is worth the effort.
 Patchwork or patchwork is a needlework technique that consists of sewing together small pieces of fabric so that as a result of these pieces a geometric pattern is formed. However, creating something in this style is not so easy: this art requires skills in sewing, drawing, design and geometry from the craftswoman.
You can make products in this style both manually and using a sewing machine. The second option is much easier to implement and takes much less time.
In the process of assembling the product, the craftswomen connect the pieces together, creating a geometric pattern in accordance with the chosen scheme. It is important to note that this technique is universal. It is suitable for creating products of any size: from small needle beds, to bags and even blankets.
One of the interesting areas of this type of needlework is. As the name suggests, it originated in Japan. This technique is slightly different from the classical one. So, Japanese patchwork has the following features:

Japanese patchwork is a combination of several techniques at once. At the same time, this use of various techniques makes this technique unique, original and inimitable.
 This is another interesting type of patchwork.
It should be noted that it is very similar to classic version patchwork. However, in the case of this direction, the fabric is assembled not from fabric, but from knitted segments. Therefore, you must first link all the fragments, and then connect them together.
Product Assembly Techniques
An important role in the creation of a patchwork fabric is played by the technique with which the craftswoman assembles the product. The result of all the work depends on how correctly the method of connecting the shreds was chosen. So, the assembly of segments can be done in one of the following ways:
- "Strip to strip";
- "Watercolor";
- "Magic Triangles".
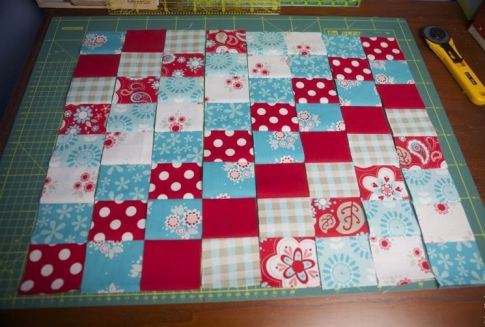
 For beginner craftswomen, the technique is most suitable "quick squares". It is quite simple in execution: a patchwork fabric is assembled from square segments. Inexperienced needlewomen are advised to use squares of four colors.
Technique "watercolor” is very similar to the method described above. But in the case of this technique, many more colors are involved in the process of creating a canvas. You need to stitch the squares according to the following principle: from light to dark or vice versa.
 In the case of technology strip to strip" the main role in creating the pattern is played by stripes that contrast with the main background. In this case, the pattern made from these strips can be anything. It all depends on the intent of the artist.
Drawing of a product made in technology "magic triangles", consists of triangular pieces of fabric. With the help of triangular segments, craftswomen create various geometric ornaments.
Products in various techniques patchwork


Patchwork tools
Properly selected tools greatly facilitate the process of creating a product. And patchwork is no exception. In this regard, it is necessary to responsibly approach the choice of tools for this type of needlework, as well as prepare everything you need in advance. To work in the patchwork technique, you will need:
- Chalk, soap or pencil.
- Graph paper.
- Scissors.
- Needles.
- Needle bed.
- Threads.
- Sewing machine.
- Ruler.
- Centimeter.
- Iron.
- Cardboard.
Iron needed in order to iron the fabric before starting work. In addition, in the process of creating a product, it is necessary to iron segments, seams and blocks. By using pencil or chalk craftswomen transfer the pattern to the fabric. Some, for convenience, are drawn on fabrics and seams. In order for the pattern to be done correctly, it is recommended that beginner needlewomen use graph paper.
Fabric choice
 Before proceeding to the creation of a product using the patchwork technique, it is necessary to choose the right fabrics for future work. First of all, it is worth noting that there are no strict requirements for the composition of patchwork fabrics. However, craftswomen should give preference to cotton, teak or chintz. Such fabrics hold their shape well, so they will not deform during operation.
In addition, for products created using the patchwork technique, you can use old jeans, shirts and other things. Quite often, jeans are used to create blankets. In addition, dense fabrics are well suited for blankets and bedspreads.
As soon as the fabrics for the future product are selected, it is necessary to prepare patchwork patterns and patterns.
 Not less than important element when creating products using the patchwork technique, patterns are used. A pattern is understood as a pattern of details from which a patchwork fabric is assembled. Templates can be made independently or purchased in specialized stores.
To make such a template yourself, you need to draw the outline of the part on a piece of paper or cardboard. Then, stepping back 0.5-0.7 mm, make a second contour for seam allowance. Carefully cut out the blank, and the patchwork template is ready.
Assembly schemes
After all the tools and patterns are ready, you need to choose a scheme for future work. Despite the fact that the creation process may seem rather complicated for inexperienced craftswomen, there are many patchwork patterns that are suitable for those who are just starting to comprehend this skill.
Examples of schemes for assembling products using the patchwork technique


Patchwork for beginners
Patchwork napkin
 In order to create a patchwork napkin, you will need 7 rectangular strips of fabric. The color of these stripes can be any. It is recommended in advance to consider in what order they will be located on the finished product.
Take two strips and lay them on top of each other so that the front side looks inward and the wrong side outward. With a small indent from the edge (0.5 cm), sew these two strips on a sewing machine or by hand. Once you connect these two parts, unfold the resulting rectangle and iron the seam. Sew the rest of the patches in the same way.
Fold the resulting fabric in half with the wrong side up and, stepping back from the edge of 0.5 cm, sew the product on both sides. Then, cutting off the corners, turn the work inside out and straighten the corners. Iron the resulting product. Fold the fabric inward from the unsewn side and sew on a typewriter so that there is a pocket for cutlery on top.
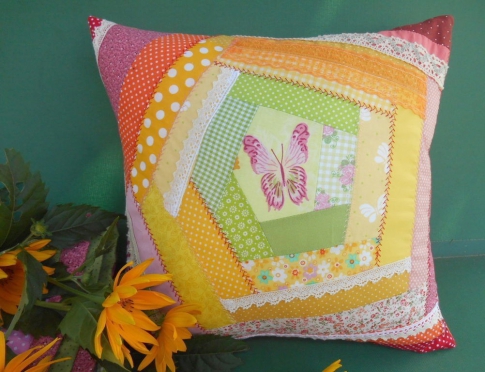
Making a pillow
 Do-it-yourself patchwork pillow will be a great decoration for any interior.
First, decide on the size of the future product. This will determine the number of squares that you need to prepare to create a pillowcase. Having decided on the dimensions of the future product, as well as with the scheme of work, you can begin to pattern shreds. If desired, applications can be sewn to the squares. However, this must be done immediately before assembling the product.
 Once the patches are ready, they can be sewn together. It is recommended to first assemble the horizontal rows, and then connect them together. The seam allowances from the previous line are folded as follows: one up, the other down.
Now we need to prepare the fabric for reverse side and connect it to the side of the patchwork blocks. To do this, fold the pieces of fabric right side inward and sew on a typewriter on three sides. Sew a zipper on the fourth side. The patchwork pillowcase is ready!
More experienced craftswomen can sew a patchwork pillow by making a star pattern from rhombuses..
Patchwork bedspread
Before you start sewing a patchwork quilt, you need to carry out a number of preparatory steps:

For beginners, it is recommended to make a blanket out of squares, as they are much easier to work with. As soon as everything preparatory stages passed, you can start sewing the product. Process of creation patchwork bedspread consists of the following steps:

This is the easiest way to create a patchwork quilt. Experienced craftswomen may prefer more complex patterns.
Products created in the patchwork style will be a great addition to any interior. Of course, mastering this type of needlework is not so easy, but the product obtained as a result of painstaking work is worth the effort. The main thing is to choose the right scheme for the first work. And then the process of creating works in the patchwork technique will give the craftswoman pleasure.
Attention, only TODAY!
Getting started is never easy. Patchwork also needs to be learned. Not everything turns out right away: the hands do not obey, the eye fails. For this, there is the experience of the masters. Having mastered video tutorials, photo materials and a master class with their tips and secrets, you can safely implement any idea - from making a simple oven mitt to a new sofa upholstery.
Patchwork is very popular today - needlework, in which a whole product with a conceived pattern is assembled from colored fabric rags according to the mosaic principle. The result of such a fascinating process can be a recognizable image of some objects, geometric ornaments or fancy patterns. Patchwork ideas can be taken from photo and video tutorials, as well as master classes.
Initially, the patchwork was sewn together due to material savings, and the patchwork had very specific tasks. Now the patchwork technique is the desire to create beauty while enjoying it. magical action. Quilted bedspreads, decorative panels, blankets and pillows, potholders for the kitchen, updated furniture, clothes are pleasing to the eye.

Basicspatchworksewing:
- AccuracyAndaccuracy. The patchwork technique is not a complicated technology, but it is not always easy to realize an idea, as in MK. The guarantee of success in patchwork is accuracy and accuracy. Patterns for potholders or blankets must be accurate and very neatly sewn. The fabric requires pre-treatment (decatation). It must be soaked or washed, dried and ironed, sorted by color.
- JobWithiron. Iron in patchwork - important tool. In the course of work, the seams must be ironed; when decating fabrics, they must also be ironed. Ready-made pot holders or bags are steamed from the front side and always in one direction. The seams also need to be ironed in one direction. Then they will not crumble and will be durable. The seam allowances are smoothed from the inside so that there are no marks on the front side. In complex blocks where seams of different directions occur, the allowances of each next row are ironed in a different direction. On the front side iron at the intersection of the seams. If the strips are too long, they should be placed on ironing board not horizontally, but vertically - they will not wrinkle and stretch. Too much dense fabric moisturize and exfoliate. The fabric is ironed along the share in temperature regime corresponding to the type of fabric.
- secretssewing. Inaccurately sewn fragments of a future potholder or napkin, uneven seams, even a slight mismatch in size will destroy patchwork for beginners. Therefore, the flaps must be sewn very accurately. Beginning craftswomen will be helped by templates in the form of a frame, which are made on millimeter paper with a seam line printed on the fabric. Before starting a grand project, it is recommended to sew a block sample. It will help to check the accuracy of cutting, adjust the work sewing machine. It is easy to see all the errors on the sample - this will save both time and effort.

In general, the patchwork technique should be taken seriously, considering all color combinations even for potholders - after all, they, like sloppy work, can ruin a thing and discourage you from mastering such fascinating needlework.
Master class: a block of squares (video)
How to start patchwork
To begin with, they collect all the scraps of fabrics, sort them by texture and color, and begin to create a scheme. You can also do the opposite: come up with a pattern or find it on MK, photos and videos, and then cut blanks from purchased fabrics.

The second step is to create a sketch of the oven mitt, pillow or napkin. For beginner needlewomen it is better to use ready-made schemes from magazines or MK from the Internet.
The process of connecting patches into a whole canvas:
- Stitching the details of the tack or bedspread;
- Connecting blocks into one;
- Sewing on the lining
In addition to sewing, there is also knitted patchwork, where the flaps are connected to each other with a hook and a contrasting thread.
In addition to threads, fabrics and machines, the patchwork technique uses:
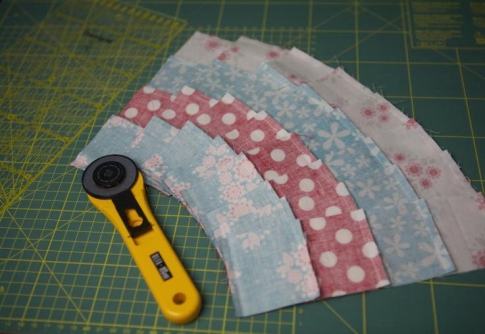
- Roller cutter or scissors;
- Pins, needles;
- Sewing machine;
- Pencil or chalk;
- Cardboard or soft plastic;
- Knitting hook.
In needlework stores you can find patchwork kits - with pattern patterns, MK.


Patchwork: schemes, patterns
You can make patterns and templates yourself or take ready-made patterns from the Internet, books or magazines. Templates are cut along the contour of the part, taking into account the seam allowances. The material for manufacturing can be cardboard, thick paper, plastic. For accuracy, you can stick graph paper on cardboard, and then cut out the figure of the intended size. In the manufacture of curved blanks on the outer contour of the template, it is necessary to make longitudinal cuts-notches - it is convenient to mark the seams on them when connecting the flaps.
Photo and video tutorials on patchwork offer patterns, patterns and MK
Cut rules
The most convenient templates are frames. The inner part must match the dimensions of the fragment in ready-made, the outer one takes into account seam allowances. The width of such a frame is the size of the allowances. When making a pattern, the frame must be circled twice, and cut only along the outer contour. The inner outline will show the seam line. The pattern is transferred to the fabric with chalk or soap, any pen leaves marks on the front side. Cutting is done only along the shared thread, so that later sewn parts do not stretch or warp. Cut out the flaps with ordinary scissors or a special cutter. The roller cutter makes the process much easier by cutting long strips that are easy to cut on larger small parts. You can not do without a cutter when the templates are curved.
Pattern selection
INtechniquepatchworkexists 3 kindproducts:
- canvas, stitchedfromshreds, where the parts gather seam to seam. The shape of the flaps can be regular, geometric (traditional sewing) or arbitrary (crazy patchwork). Watch video tutorials.
- Quiltedproducts(quilting) are sewn from a whole fabric, the pattern on which is created with the help of a stitch.
- Application- pieces of other fabrics are beautifully applied to the base, sewn and quilted.

Patchwork technique for beginners
The pattern can be created on the basis of one repeating figure, for which each part is cut out paper templates and baste a flap to it. The seam allowance is wrapped over the edge and basted again. This is a traditional English technique.
The technique with blocks is more modern: pieces of triangular or square shape sewn into blocks, making up a geometric pattern. A simple block can be made up of a small number of large parts. This kind of work takes less time and effort. It is often used by video lessons and MK.
The technique of patchwork from stripes is also known. It differs from the previous version in that the fragments are collected into strips, then they are combined into a canvas. Block technique is convenient in that the flaps are sewn immediately on a typewriter.
In a crazy patchwork, patches are sewn on as an applique: individual patches of arbitrary shape are beautifully placed on the canvas and sewn on. Potholders, bedspreads, covers come out two-layer.
Patchwork: video tutorials for beginners
Patchwork: a master class for beginners
Special comfort in the interior is created by objects self made in particular, beautiful and comfortable pillows. Let's try to sew a decorative pillowcase with a three-dimensional applique "Rose" according to MK. For work, you can take any patches, the main thing is that they should be successfully combined in color. Do not forget to prepare the fabric - wash, iron.
Master class "Pillow with application"
step by stepinstruction.
- It is convenient to start with the preparation of squares. Their number and size determine the size of the pillow.
- Then cut out a circle from the fabric. Put a piece of fabric and some filler for volume (cotton wool, synthetic winterizer) in the middle. Fasten in a circle machine seam. The middle is done.
- Fold the squares from the flaps diagonally, as in the photo, sew around the middle blank in a circle - 3-5 pieces.
- For the next round, you need to prepare large squares of the corresponding color. Continue to the end of the intended flower size.
- Sewn petals must be cut in a circle.
- Ready-made roses are beautifully distributed on a pillowcase and fixed on the product with a zig-zag seam, a wide dense line. The rose has the appearance of a three-dimensional application.
- If desired, the bouquet can be supplemented with leaves cut from patches suitable color. Look at the photo of the master class step by step. The blanket in MK is made using the “crazy patchwork” technique (you can watch video tutorials), and it consists of 30x30 cm squares. For a single blanket, you need 24 blanks, for a double blanket - 36. Let's say the pattern will be made up of 4 types of fabric.

Master class "Patchwork for beginners - a blanket"
Tools and materials:
- 1 m of fabric of each color (width 220 cm) - 6 or 9 squares 45x45 cm;
- For lining - 170 cm or 220 cm (the stock from below leaves after the blanket is quilted);
- Sintepon of similar sizes;

Step by step instruction MK:
- Cut into squares and arrange in a stack, alternating colors.
- Cut this layer cake diagonally or arbitrarily. It is convenient to cut with a roller knife.
- Take the part from above and shift it down under a stack of the same elements. In the cut stack, there will be 1 part of the 1st color on top and 1-a - the 2nd.
- Sew on the machine all the squares along the cut line.
- On an ironing board, gently iron the seams to one side or flat iron.
- Fold the blanks in a neat pile in the same order - on top are the squares of the 1st and 2nd tones.
- Using a ruler and a knife, cut the entire stack again along any line (the first seam can be crossed).
- Place one of the top pieces down under the stack. Sew and smooth, not forgetting to fold in order - now it's better to combine at the seams.
- The operation is repeated to the last detail. The optimal number of seams is 6-10 horizontally and vertically.
- After ironing the seams, you need to trim the squares to get a figure with a side of 32 cm.
- You can assemble a blanket in different ways: first assemble the front part, then quilt with padding polyester and lining. It's hard on a machine. Or quilt each square separately, cutting the synthetic winterizer and lining.
- Gather the quilted squares together, trim and close the seams narrow ribbon or strips of fabric. It is convenient to assemble according to the scheme: ribbons of 4-6 squares, then sew the stripes.
- Along the edge, the blanket must also be sheathed with a piping made of plain fabric or pieces of patches, as in the photo of MK.
Congratulations on the update!
Quilt technique (video)
Having learned the basic concepts of such a type of needlework as patchwork and having mastered the simplest skills of composing “puzzles” from fabric into a single whole, you can create creative household items or interior decor from different patches.
Patchwork: beautiful and easy for beginners (photo)


If you have colorful scraps of fabric lying around - do not throw them away! Pieces can be used to create new interesting things, such as bright furniture upholstery, patchwork for beginners.
Product types
The patchwork technique is most often used for tailoring interesting furniture upholstery. Depending on which color scheme the work is done, it can be implemented in different designs: bright colors perfect for a nursery, muted cold shades are best placed in the bedroom, and juicy green and yellow colors will look great in the kitchen.
In addition, the patchwork style makes wonderful blankets, blankets, bed linens and kitchen towels. Depending on your idea, you can use fabrics of different shades of the same gamut, or you can give free rein to your imagination and combine patches different patterns and flowers.

For novice masters, there are many interesting ideas, the implementation of which will train and prepare for more difficult master classes. For example, beginners are advised to pay attention to potholders, curtains and wall organizers in patchwork technique.
Preparation for work
The main question for beginners to work in this technique is what tools are needed? Since patchwork is the same sewing, only from patches, you will need thread different colors, needles that are comfortable for you to work with, and sewing machine. You can do without it, but then the workflow will take a little longer.
If you like patchwork, pay attention to the kinusaiga technique - an interesting way to patchwork without using threads and needles.
Templates
Stock up on specialized patchwork templates. They are correct geometric shape, hearts, flowers, polyhedrons and semicircles. You can buy plastic templates at a craft store, or you can draw them yourself and cut them out of cardboard.
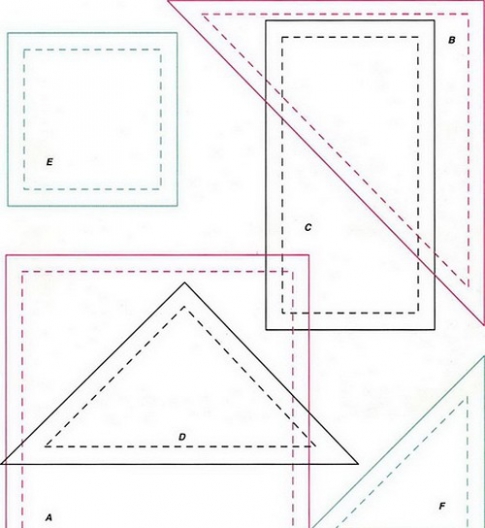
Please note that your homemade template should consist of two contours: the first - the inner one - outlines the shape of your patch, while the outer edge determines the seam allowances. Beginner Tip: Create a stencil with a blank center so you can easily outline both the inside and outside edges of the patch.
Beginning craftsmen can be attracted by such a type of needlework as a crazy patchwork. There are no special rules in this technique: take shreds, ribbons and lace of different colors, textures, sizes and start sewing them to each other in a chaotic manner. To do this, you do not need templates and a sewing machine.
The result is an interesting material that can be used as a material for other types of needlework or as artistically designed curtains, bedspreads.
fabrics
Most often, needlewomen use silk, linen, drape, cotton fabric to create products in the patchwork style. But bright synthetic fabrics will also look good in a common rag mosaic.
To facilitate the work, use the advice of professionals before choosing a fabric:
- linen is easy to cut, so it is used to create products from small patches of intricate shapes;
- cotton fabric will be a good base for a blanket, napkins, pillowcases and towels;
- from drape it is advised to sew blankets, bedspreads and rugs;
- silk is the most difficult to work with, so it is not always possible for novice craftsmen to cope with it. Silk panels and patchwork clothes look best.
Before work, be sure to wash the fabrics and iron them - it is harder to work with dirty wrinkled material than with prepared ones.
Cutting for beginners
Before starting work, decide on the plot of the future product - select schemes on the Internet or come up with them yourself. Prepare scraps of fabric that match your composition in color and size. Give preference to pieces from one type of fabric.
Draw a pattern with a simple pencil, soap or a piece of chalk - gel pens may not wash off. In addition, they push a groove on the fabric, which can no longer be eliminated.
Always place your templates in the direction of the grain thread of the fabric - then the patches will not warp during the sewing process.
If you do not have universal templates, first create a pattern of parts, and then outline it with an outer contour - seam allowances.
Master class: sewing pillowcases
In fact, patchwork work is very easy to complete in just 2 hours, even for beginners. To see this, try sewing a colorful pillowcase for a children's square pillow.
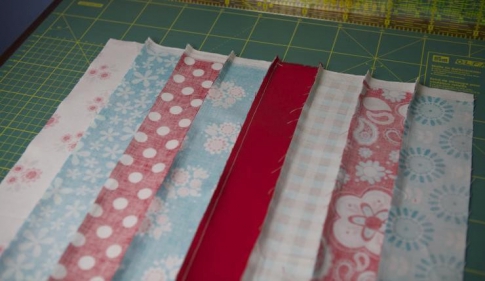
You will need 8 different types of matter, combined with each other in texture and pattern.

The master class provides approximate measurements of the product - they can be changed depending on what size pillowcase you need.
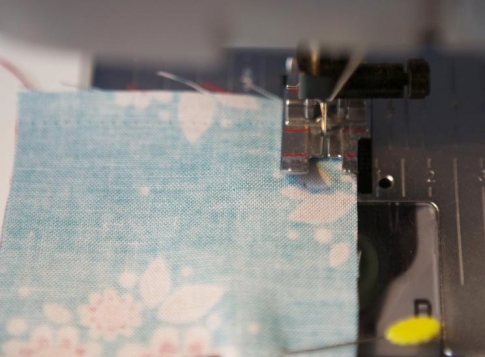
- From each fabric, cut out 1 strip measuring 6.5x55 centimeters. Arrange them as you wish, long sides facing each other.

- Sew the strips together with a simple machine stitch. Allowances of about 6 millimeters should remain each time. If you don't have a special patchwork foot, adjust the standard machine foot for a comfortable fit.
- All the resulting seams must be ironed so that the allowances look in one direction.
- Now sew the first and last strips together so that a "sleeve" is formed.

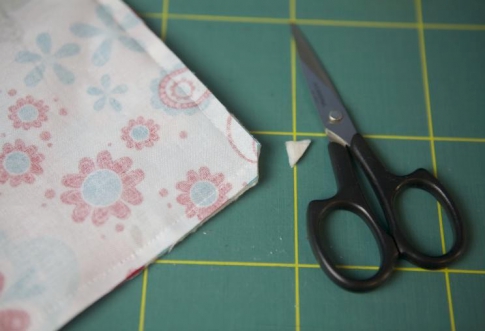
- Draw stripes along the sleeve, perpendicular to the seams, and cut. You should have 8 looped strips.
- Now start tearing apart the stripes, each time stepping back 1 square so that you get 8 ribbons with a different sequence of colors. Lay them out, forming the desired pattern.
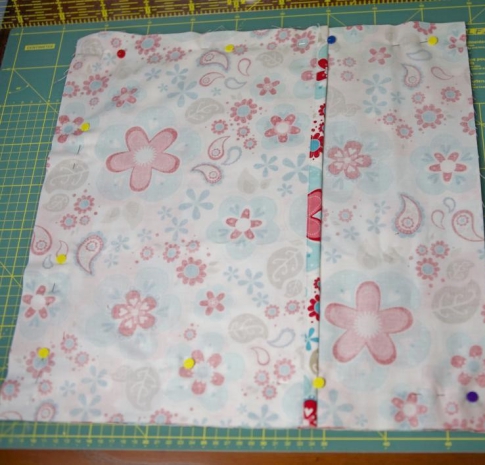
- Take a picture of the resulting pattern so you don't forget it. Now take all the odd stripes - 1, 3, 5, 7 - and iron as follows: the first seam is to the left, the second is to the right, etc.

- With even stripes, do the opposite: the first seam is to the right, the second is to the left, etc.
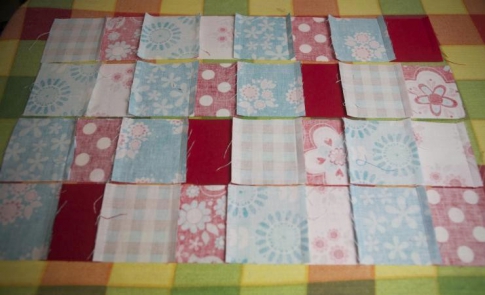
- Put all stripes back in place. Fasten them together and sew on a typewriter with a simple stitch. You followed the 2 previous steps so that the stripes lay perfectly evenly to each other: you can check this by seeing the same “lock” of seams between them as in the image.

- After sewing, turn the pillowcase right side up and iron the seams again. You should get a similar pattern of seams.

The front side of the pillowcase is ready! You have a square with a side of 42 centimeters. You can start sewing the back of it - it will take you no more than half an hour.
- Cut out 2 rectangles with sides 42x30 centimeters. Wrap one edge of each rectangle 2 times 1 centimeter and iron.
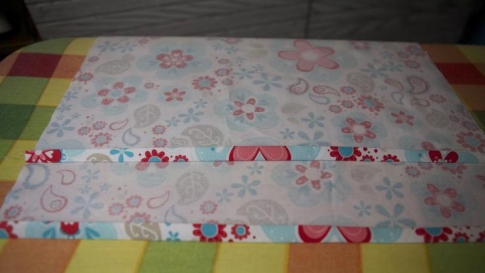
- Attach the rectangles to each other as shown in the photo so that they form a square with a side of 42 centimeters. Pin it to the front of the pillowcase front sides to each other.
- Sew the square around the entire perimeter with a simple stitch, retreating 1 centimeter. Cut off the corners of the pillowcase and sew the edges with a zigzag stitch.
- Turn out ready product and put it on your pillow.

You can learn more about this method of sewing pillowcases by watching the following video tutorial for beginners.
It is better to decorate the finished patchwork product with satin stitch embroidery, cross stitch or ribbons.
IN modern fashion and in the trend itself now things are made by hand, that is, by hand, so it's no secret that many girls, in order to keep up with fashion and current trends they urgently begin to master the basics of handmade, so that later they can boast of exclusive works made by their own hands. One of the techniques that has become popular among fashionistas is called "patchwork" or, more simply, the patchwork technique. In this article, we will take a closer look at how a patchwork for beginners is created step by step.
Thanks to the patchwork technique with the help of textiles, you can decorate any product. But one of the most common is still considered to be the manufacture of bed linen, here the choice is huge, you can make pillows, blankets, bedspreads, blankets and much more using this technique.
Even table textiles are filled with patchwork elements. So popular for their decoration are tablecloths, napkins, towels, potholders, in general, everything that can be associated with this technique.
Patchwork is truly considered a universal art, because there are simply no definite boundaries for its manufacture, so in any interior you can make and pick up furniture covers, curtains, wall panels, rugs.
They even sew clothes - vests, skirts, sweaters. Handbags in this design look very original. This turn of events turned patchwork into an art direction. Patchwork patterns are used in interior decoration, as well as in various areas, industries, and industries. So, starting from finishing telephones and finishing urban transport, the patchwork technique is used. Read about here.
Patchwork for beginners step by step
In order to work in the patchwork technique, you just need to find and prepare pieces of fabric and a base on which all the elements will be connected. But at the same time, if you tune in to create a piece of real patchwork, in this case, any fabrics will not work.
1. First of all, you need to create sketches, sketch out options and choose the one in which the color, texture, ornament will be thought out. As a rule, they choose all the same from those fabrics that are at hand, regardless of what origin the fabric is, whether it is natural or synthetic.
2. Before starting work, it is advised, after the fabrics are selected, to wash them, starch and iron them. As a result, the fabrics will be prepared for work and the product will be immediately saved from unexpected shedding, which can create an unpleasant result of work.
Patchwork fabrics:
- Fabrics such as linen, wool, silk are considered the most suitable, but semi-synthetic fabrics will look great and complement the colors to the prepared sketch.
By choosing only linen, you can clearly help yourself a little with this, because it is well washed, it is quite easy to cut it out of it, and then sew small details. As a result, cotton fabrics are obtained fine products such as napkins, towels, potholders, pillowcases, blankets. - From a fabric such as a drape, you can create such products as a blanket, rug, bedspread.
- Silk is unsurpassed in the manufacture of various kinds of clothing or artistic panels.
- Often, needlewomen try to combine several types of fabrics in one product, which are different not only in color and tone, but also combine completely different types of fabrics, such as chintz and calico, velvet and jeans, silk and chintz, linen and wool.
- If it is necessary to create a base, a fabric with a strong density, such as synthetic winterizer or batting, is mainly used.
Additional material in addition to fabric, which should be considered and prepared, are threads, braid, cords, ribbons, inlays. You should also choose scissors for work, set aside pins and needles for manual work, and when all the parts are connected, you should prepare the sewing machine for work.
There are certain patchwork tips for beginners. And before you start studying needlework, you need to learn a little about it, because it’s not immediately possible to do everything right and quickly, and the eye sometimes fails due to inexperience.
At first, you have to face a lot of problems, from which all desire disappears to continue working, but it’s good that you can look at the works experienced craftswomen, take note of some details, remember the most profitable options and bring them to life.

So where does preparation begin? Each craftswoman should remember that the most important thing in work is accuracy and accuracy, so each stage of work should be done with maximum concentration. Fabrics need to be pre-treated, so decatification is carried out for this. It consists in the fact that the fabrics are washed, dried and ironed.
After that, they sort and set aside to certain templates. These blanks should be prepared in advance by cutting to a specific shape, taking into account seam allowances. They are made mainly of cardboard, it can be made of strong and thick paper. In order for all dimensions to be met, you can stick millimeter paper on them, and only then cut them to the required size.
If the seams are curved, then notches are made on the contour, which are needed to connect the remaining parts. In the same technique, both highly artistic patchwork and products that are simple in design are performed. For this, templates of the same shape are prepared in advance from squares, rhombuses and triangles.
Masters in their work mainly use templates on which additional contours are drawn, the outer one is necessary to separate the cutting line, and the inner one is for the line connecting the seam with other shreds.

In this case, the distance between the contours is considered the usual allowance for seams. Using such ready-made templates you can immediately secure your product in advance from further problems that can ruin it as a result of skew or unnecessary bulges. Most often, newbies face such problems.
There is a specific plan of action when creating a patchwork for beginners:
- So, first you need to come up with and create a sketch of the future product, it can be anything - a rug, a blanket, a bag, a pillowcase. In this figure, you need to immediately consider color solution and a drawing that will be completed in the course of work.
- The next step will be the selection of fabric, templates are made for it, which are then cut out and sewn into a single piece.
- To connect all the flaps, you must first fold them sequentially, and then sew along the inner contour of the templates. More dense templates should first be fixed on the lining and sewn, and if the parts do not have allowances, then immediately sew on the seams.
The most complex ornaments in form look much more advantageous on the product. In order to create these, fabrics of various colors are prepared in advance, but if the work is being done for the first time, it is better to dwell on simpler fabric options and ready-made patterns for now.

When working in the patchwork technique, there are three main types of work:
- In the first type, a canvas is considered, which is assembled from scraps of fabric. The patches may have different shape or geometrically correct, or free.
- In the second type, a whole piece of fabric is used, on which a pattern is created with a stitch.
- The third type is similar to the application.
Patterns can be very diverse, depending on the shreds themselves. According to the traditional patchwork, you can create a canvas from the same patterns, which have exactly the same shape and size. But all of them in the end should create a single pattern, in which there should be symmetry.
Asymmetrical patterns can also be used, but there is another direction for this, which is called crazy patchwork. For its execution, the patterns are sewn together randomly, without a specific sequence. But this direction is not used so often, since it does not fit the traditional direction, which has a sequence in the manufacture of the product.
More often it is used to create something new in fashion or art. Crazy technique, in addition to the listed materials, additionally uses such decorations as fringe, beads, braid, ribbons, sequins. This technique is clearly not similar to the traditional technique, which uses ordinary geometric figures to create perfectly even silhouettes and ornaments.

If we continue to compare traditional patchwork with crazy, we can also note that in traditional version often they use the technique of sewing from patchwork blocks, that is, they are first sewn from ready-made rag squares and create a single element, which is from the main large parts.
So from these squares you can make more complex shapes. These figures can be repeated, for this it is necessary to prepare templates in advance, which should consist of fabric and paper, which were traditionally further fastened.
The remaining seam allowance is folded over and sewn back by hand. Thanks to this English sewing technique, modern patchwork was born.
There is a technique that is more popular in the United States of America. It is called technique when working with blocks. Pieces of fabric are sewn into these blocks, which have the shape of a triangle or rectangle, from which a pattern is created.
Even the most seemingly simple blocks are made of a large number details. They are sewn together, while the time spent on their manufacture is spent much less. Each block has its own brand name, and it depends on the number of stitched parts. So if a block is sewn from nine squares - nine private block, from five squares - five private block and four-part block, which includes from four to sixteen parts.
The technique of stripes is also considered very popular. It is made in the same way as it was described earlier, only at first strips with a width of one piece are assembled, and then they are sewn into a canvas. Both of the described techniques are very convenient to use, since the shreds are immediately sewn on a sewing machine.
Working on the product, you can sew patterns for every taste, because their number can amaze any imagination. In addition to patterns, there are also many techniques for making patchwork.
Patchwork tools
One of the most important tools in the work is considered an iron. It is he who is responsible for creating perfectly even seams. During the manufacture of the product, they will need to be constantly ironed and, by the way, before work, all fabrics must be in excellent condition, and for this they are ironed from all sides.
Both the fabric and the seams are ironed in the same direction to make work easier. Iron allowances are ironed more often from the inside, so that wrinkles do not turn out.
Working with blocks, stroking them in opposite friend to the other direction, and iron only in those places where it is stitched. If necessary, the fabric is slightly moistened, especially if it is strong in origin.
It is also necessary to use templates, they are made in the form of a frame. Inside, its length will be equal to the length of the template, and the outer edge is the same as the part with seam allowances. When performing it, you should first circle it from all sides, then the part is cut out. Outline inside means seam.
The prepared pattern is then applied to the fabric and usually circled with chalk, soap or special pencil. It is necessary to cut the fabric along so that the finished flaps do not bend in the future. You can cut with simple scissors, someone can perform the procedure with a cutter.
Thanks to him, you can do the job much faster, as he is able not only to cut geometrically correct forms but also curved lines and shapes.
In order to conduct your work neatly and not to waste all your efforts, you need to tune in to ensure that all the details are made flawlessly and sewn perfectly. If the work is being done for the first time, beginners are advised to work according to templates and using graph paper.
Before you start more complex samples, you can try to make a trial version, which will help to avoid many problems in order to next work was carried out as it should be without errors and inaccuracies.
History of the patchwork technique
In translation, patchwork means "sewing from patchwork." This sewing technique began to be practiced more than three thousand years ago, so this technique has no homeland. It is known that literally all peoples and countries had the makings of this needlework, which was also called textile mosaic.
But it was in America and Great Britain that this technique turned into something more than sewing. There needlewomen began to create real masterpieces decoratively - applied arts.
It is believed that patchwork initially turned out clearly not out of love for this needlework, but primarily in order to save a little on matter. But subsequently, the craving for beautiful things affected the history of its occurrence.
It is said that in the 16th century fabrics of unusual colors were brought to England. These luxurious and bright fabrics at that time were only available to very wealthy citizens, so it was believed that anyone who had products from these fabrics must be a very wealthy person in the UK. But soon the government banned the import and distribution of Indian chintz, which made it completely inaccessible even to the wealthy population.
Thrifty hostesses came to a common solution to the problem and began to produce various products, canvases sewn just from chintz, and the remaining trimmings remained as a supplement to decorative applications.
Thus, technology migrated from England to other countries, and turned into modern look decorative applied arts. But to this day, although this technique has become native to many peoples, it is still considered a true attribute of the traditional American interior.
It was American craftswomen who made and preserved the tradition of sewing from scraps of fabric, as a result of which this technique became so popular among other handicraft techniques. These two great powers are considered to be the trendsetters in the spread of this technique, where they learned how to make patterns that are quite complex in terms of motives and patterns.
Anglo-American quilting becomes more famous over time and as a result, it has an increasing number of fans and admirers. Despite the fact that men also became interested in making patchwork, who began to apply it on a metal base, canvas, plaster, wood, all the same, women - craftswomen remained true to the real traditions of making this technique and continue to work, as before, with shreds, threads and needle.
Getting started, everything needs to be carefully thought out, because even the wrong colors of the fabric can forever deprive you of interest in continuing to engage in this creative work. Do not be afraid to start, the main thing is to start, and everything else will turn out in the process of getting to know this amazing technique patchwork.
But in order to start working on it, you must first be inspired by the atmosphere of Old England, imagine what you would like to do, prepare a sketch, collect all the necessary materials and do it! And it doesn’t really matter what product you can start and complete it for the first time, the main thing is your mood and desire.
Patchwork for beginners video
Patchwork masters share their secrets. Master Class


