Warmer for a teapot with your own hands. Do-it-yourself heating pad for a teapot - we invite you to a fragrant tea party
If we recall the traditions of tea drinking on Ancient Rus', for many, such cute, original and at the same time funny nozzles will immediately pop up in their memory. At that time, home-made nozzles in the form of various figures were used, and in cartoons we saw how an ordinary felt boot was used for the same purpose. With the advent of electric kettles and the abandonment of bulky samovars, interest in tea did not disappear, but the truth is that the ceremonies of drinking such a drink are no longer so maintained.
Most often, we drink it on the run, getting ready for work, or - more correctly, in a quiet, comfortable environment during the holidays. This is where the accessory forgotten by many comes in handy (though not for the electric kettle itself, but for the teapot) - a do-it-yourself heating pad for the kettle. Patterns can be made easily, sewing is also a small problem. Such a thing will perfectly fit into the interior, and if desired, you can make it look like some kind of plant, animal or any other object. Let's consider in detail how to implement such an idea.
Heating pad for teapot
IN modern world any item can be purchased in the store. Kettle warmers are no exception. Such a thing is useful in the household: it helps keep the water in the kettle hot, makes tea leaves stronger, and is also part of the interior. However, often in the store you do not find what you would like so much that you want to buy.
There is a way out of this situation: we take patterns, fabrics and do what you want.
Pattern of a heating pad for a teapot
Do-it-yourself diagrams and patterns of a heating pad for a kettle found on the Internet are not always suitable for some specific case. Therefore, this method is not the most correct.
In order not to run into problems, it is easier to make a pattern yourself, especially since it is not so difficult. For this you will need:
- A2 or A3 paper. Suitable as graph paper, sold in specialized stores, and regular newspaper.
- Stationery (pencil, eraser, long ruler).
First of all, you need to take measurements of the kettle: width and height, and write these data on a piece of paper so as not to forget.
Important! The height is measured from the base to the top of the lid, and the width is measured from the outermost part of the handle to the end of the spout.
- Lay out the paper on the floor or table.
- Set aside the height of the teapot, adding a couple of centimeters of margin.
- The second number is the width, divide it in half, set aside the resulting figure perpendicular to the height, not forgetting the reserve.
- We connect the extreme points with a quarter of the circle. You can change the shape a little, make it more square.
The pattern is ready! It remains only to cut it, and you can proceed to the next step.
We sew a heating pad
The next step begs the question, how to sew a cover for a teapot with your own hands, having patterns?
For this part of the work you will need:
- Thick fabric for the inside of the heating pad.
- The fabric you like for the outside.
- Insulation (preferably synthetic winterizer or cotton wool).
- Jewelry elements, if you want to complement the finished case.
 Next, we perform the following actions:
- Fold the lightweight fabric in half. We put a pattern to the fold so that when cutting the workpiece from the fabric, a semicircle is obtained. There should be two such details.
- Repeat step 1 for thick fabric. The result should be four blanks: two light and two dense.
- We sew light fabric around the circumference without affecting the base. We repeat the same for blanks made of dense fabric.
Important! For faster and more durable stitching, you can use a sewing machine.
- We sew the blanks at the base, not forgetting to place a warming filler between the two layers of fabric.
- We bend lower part inwards by a centimeter, smooth and stitch.
Important! If desired, you can sew a small loop on top. To decorate a hand-made heating pad on a teapot, you can use miscellaneous products from fabric:
- bows, butterflies and other trifles that can be bought in sewing stores;
- beads and beads;
- embroidery.
Ideas for a heating pad
If you want to make something unique, you can change the scheme a little or even make the case look like some kind of animal, be it a cat, a rooster or a cow.
heating pad cat
To make an ordinary heating pad look like a cat, you need to pick up suitable fabric and add a few elements, for example, a tail, a head with eyes and a nose, paws.
It is not at all necessary to sew everything separately: some parts can simply be drawn. It all depends on your imagination.
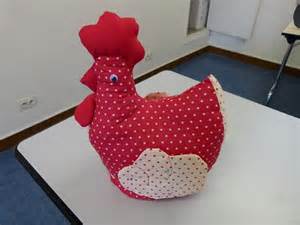
Rooster warmer
How to make a rooster heating pad on a teapot with your own hands? It's a bit more complicated than making a cat:
- Firstly, the shape of the cover should be slightly elongated, and end with a “head”. To this head you need to sew a beak, beard, comb and eyes.
- Secondly, any rooster must have a tail. We make feathers for him each separately. We cut out two arcs from a certain color and sew them together, stuffing them with padding polyester. We sew the finished feathers to the part where the rooster should have a tail.
Important! The splendor of the tail depends on your desire: it may be magnificent or not exist at all. You can make a tail by simply stretching the back of the heating pad a little.
- You can also make wings by simply drawing them or making them out of fabric like a tail.
hot water cow
It is done in almost the same way as a cat. The head should have horns, nose, eyes and ears. The tail is made of a fairly thick rope, at the end there is a brush. You can sew a loop instead of a tail.
A pleasant trifle - a hand-made heating pad for a teapot. Interestingly, even if the family often uses tea bags on the run, the hostess almost always has a heating pad in the kitchen. This is not just a tradition or a tribute to fashion - this is the style of Russian tea drinking.
How to sew a heating pad for a kettle?
To make a heating pad - chicken, we need several pieces of fabric, threads, organza braid, filler and other little things.
1. We place the pattern of the parts of the heating pad on several sheets of paper. On this piece of paper we draw the details of the front of the heating pad and the scallop.

2. At the next stage, we depict the details of the back of the heating pad, the beak and the heart.


4. We cut out the patterns and connect the parts of the heating pad according to the marked letters.

5. Let's start transferring the patterns to the fabric. For the beak and scallop, we fold the red fabric in two layers.

6. Lay out the pattern on the fabric and fasten it with pins. With a pencil, transfer the outline of the patterns to the fabric.

7. We lay a machine line along the marked lines, after which we cut out the scallop and beak with small allowances.

8. Using a plastic stick, turn the parts right side out.

9. Fill the scallop and beak with filler so that the parts take shape, but are not too dense.

10. Sweep the edges of the details hand stitches, comb and beard are ready.

11. We turn to transferring the pattern directly to the chicken. We fold the fabric for the heating pad in two layers.

12. We connect the patterns according to the marks and place them on the fabric. With chalk we outline the main contour of the heating pad.

13. Cut out the main part of the chicken, cut out the details with scissors, leaving a small allowance.

14. On the front of the heating pad, a chicken collar is marked with a dotted line. Cut it along the line. For the collar, choose a gray fabric. With chalk, transfer the outline of the pattern to the fabric.

15. Now cut out the blank for the collar.

16. From cardboard paper according to the pattern, we will make a pattern for the collar. Using a pencil, transfer the collar to the cardboard.

17. Now cut out the pattern.

18. Put a pattern on the collar detail. The pointer shows the cut, which we will iron according to the pattern. On the wrong side, iron the curved cut of the chicken collar with an iron.

19. Under the ironed hem of the collar we pin up an organza ruffle.

20. On the front side, we adjust the collar at the same time as the trim.

21. We pin the beak and scallop to the upper corners of the heating pad with pins. We outline them.

22. Now we sew with a machine stitch in the field. We remove the note.

23. The heating pad on the kettle should keep warm. Therefore, we place a heater between the layers of the lining. We cut out rectangles from the fabric in two layers, making the size of the segments a little larger than the parts of the heating pad.

24. Lay out the filler on one of the layers of the lining. From above we will cover the filler with another layer of fabric.

25. We fasten two layers of fabric together with pins. On the edges and in the middle we lay a machine line.

26. Cut off the edges and get an insulated lining for the chicken.

27. We impose the details of the heating pad on the prepared lining. We pin them with pins. Trim the top lining.

28. In the other upper corner, we fasten the twine tail with pins. We twist the twine into rings.

29. We sew the tail with a machine line.

30. We put the parts of the heating pad together with the front sides inward. We fasten the parts along the upper and side cuts with pins.

31. Separately fold and pin the lining parts together face inward. On one side seam lining, leave the area unstitched.

32. Turn inside out upper part heaters on the front.

33. We put it in the lining.

34. By lower cuts we chip off the lining and the top of the heating pad with pins.

35. We lay out the details of the lining and top of the heating pad in different sides. Through the left hole in the side of the lining, turn the heating pad on the front side.

36. Pin the hole with pins. We build up the area with a machine line.


38. Sweep the bottom of the heating pad with manual oblique stitches. According to the basting, we lay the finishing line.

39. Sew eyes from black beads.

40. Cut out hearts from a gray fabric folded in two layers. Draw the outline of the pattern with a pencil.

41. We pin the ends of the braid with pins to the top of the heart.

42. Put other details of the heart on top. We fasten the parts with pins. We bring the braid into sections that we will leave unstitched. We lay a machine line along the marked lines.

43. We turn the hearts on the front side and at the same time pull out the braid. We fill the hearts with synthetic winterizer.

44. Sew a ribbon with hearts on the back of the warmer chicken. We tie a ribbon bow on the back.

45. Our chicken is ready, let's start sewing napkins. According to the cut out part, we cut out the lining for the bottom. It should be slightly larger than the main part.

46. We combine all the sections with each other, the upper part should be smaller than the lower one, the seams still need to be combined. We grind the details with a machine line. Leave room to turn right side out.
47. We turn out the warmer napkin and sweep the piping on the top of the napkin. We iron the napkin and pin the braid to the seam. We sew it with a machine line on the top. Tie the ends of the ribbon into a bow.

48. The napkin is ready. It is used under the bottom of the heating pad-chicken.

49. Now in your favorite kitchen appeared new item interior, preserving the warmth of tea and the comfort of a home.

A warmer for a teapot a rooster, sewn with your own hands, will help create an atmosphere of comfort and well-being in your kitchen. This simple craft will be a wonderful decoration for a tea party. It can be presented to friends for a family anniversary, for a mother’s, grandmother’s or sister’s birthday.
What kind of heating pad is a rooster, a chicken, a fabulous house
It's nice to drink tea, warmed by a funny hot water bottle on the teapot. What is it for? Such a heating pad appeared thanks to Russian traditions. Earlier in Rus', it was customary to drink tea from samovars. From a small teapot at the top of the samovar, right amount tea leaves in a mug, and boiling water was added from the second large container. We drank tea in a dozen mugs, snacking on bagels and pies. During tea drinking, leisurely conversations were conducted. Thanks to the device of the samovar, the tea did not cool for a long time.
WATCH VIDEO
In our time, the tradition of drinking tea from two teapots has been preserved. In one, a tea leaf is brewed with boiling water based on the number of guests. In another enameled or electric kettle, water is heated. Fragrant herbs are often added to the teapot for taste - mint, linden, chamomile.
In order for the tea leaves to infuse better and not cool down longer, the teapot is covered with a heating pad made in the form of a beautiful toy.
It could be a rooster or a hen fairytale house, lazy cat, doll with fluffy skirt etc. Now is the year of the Rooster, so the do-it-yourself rooster warmer on the teapot is very popular.
What materials to use to sew a fabric teapot house or crochet and knit
You can do the work from pieces of fabric that you have at home or buy at a store that sells scraps of knitwear by weight.
To sew a heating pad for a teapot, you will need the following materials:
- cotton fabric;
- insulation;
- red jersey for scallop and beak;
- synthetic winterizer;
- sewing pins;
- pattern of details on paper;
- 2 black buttons for the eyes;
- sewing machine;
- threads;
- a simple pencil or bar of soap for tracing the outline of the pattern on the fabric;
- lace or ribbons for decoration;
- needle and thread for making hidden seams.
To make the heating pad beautiful, take a bright cotton fabric for the top with a colorful pattern or make the wings and head of a contrasting rooster yellow color. For a knitted cockerel heating pad, you will need the following materials:
- woolen or semi-woolen yarn of different colors;
- 2 hooks of different sizes;
- eye beads.
knitting pattern and detailed wizard class you will find at the end of the article.
Various options with photo
You can sew a cockerel and a chicken on a teapot using various ideas. The body is made in the form of an insulated cap, which looks like a rectangular pillow with sewn-on details - wings, tail and head.
Crocheted cockerel teapot warmer is made on the basis of an African flower pattern of three petals, which is tied around with threads of a different color in the form of a triangle. The tail and beard can be connected arbitrarily, in accordance with the imagination of the master.

Pattern and knitting pattern
To make the cockerel on the teapot with your own hands beautiful and fine, make a pattern on paper according to the template below. The dimensions you need may differ from those indicated. To find them, measure the height of the kettle and its width, taking into account the handle and spout, which must be covered with a heating pad. Warmer on the kettle rooster pattern bases should be a little more sizes kettle.

Crochet a cockerel on a teapot with an African flower pattern. You will need a knitting pattern that looks like this:

Master class for sewing a rooster warmer with your own hands
A do-it-yourself hot-water bottle for a rooster kettle is easily created even by novice craftsmen. This will help in detail. step by step description sewing process:
- Two parts of the body are cut out of the top fabric, taking into account a 1 cm wide seam allowance. The parts are folded with the right sides inward, and sewn on a sewing machine.
- Cut out two parts of the lining and also sew. They connect the details of the top and lining together, laying them side by side, pinning them with pins, sewing them on a typewriter, leaving a hole 10 or 15 centimeters wide. Two parts of the insulation are sewn on a typewriter, and inserted into the workpiece of the body through the hole, the hole is sewn up between the lining and the top blind seam. The cap is ready.


- From the main fabric cut out 4 parts of the wings in mirror reflection with seam allowance. Sew, leaving a few centimeters unsewn. Small notches are made in the corners and the workpiece is turned inside out. The wing is stuffed with padding polyester, and the hole is sewn up with hidden stitches. To form a relief pattern on the wings, they are sewn to the middle of the length with two parallel lines.
- Cut out two parts of the tail from the main fabric with allowances for the seams. Stretch on the machine. Notches are made, not reaching a line of 2 mm. Turn the blank on the front side, and stuff it with small pieces of padding polyester, pushing them into the hole with a long stick. They make a relief pattern of feathers on the tail using 4 lines.

- To make a head, you can take a fabric of a different color, for example, yellow. Two parts of the head are cut out of the fabric using a pattern, in a mirror image, leaving allowances for the seam. Sew up the notches. Fold the parts right sides inward and sew. Turned out on the face, stuffed tightly with padding polyester. Where there will be cheeks, they put two dense synthetic winterizer balls. Attach the head, combining the seams, to the body, and secure with pins. The head of the rooster is sewn with hidden stitches to the body of the heating pad.
- The scallop is cut out of red knitwear using a pattern. Fold the two parts right sides and sew. Since the pieces are small, the seam allowances should be small. Scissors make notches on the seamy side in places where the scallop is bent so that it turns out better. Stuffed with synthetic winterizer. Attach with pins to the head of the cockerel, and sew with hidden stitches.


Tip: Using the same pattern, you can make a chicken heating pad for a teapot. Only she will have a smaller tail, comb and beak, there will be no red beard.
Crochet master class
Crochet a warmer for a teapot cockerel is made using thick yarn to make the product warm and perform its main function of keeping warm well.
A step-by-step description of the work of a cockerel crochet warmer:
- An African flower is knitted from three petals, tying them around with single crochets.

- They take the threads of the main color, for example, beige, knit three rows of double crochets around the flower (more can be, it all depends on the size of the teapot) - this will be a triangular canvas of the body. To make a heating pad, two such parts are made, then fastening them together with connecting loops.
- To make the body part in the shape of a triangle, the knitting is expanded. To do this, knit at the top of the triangle, which will be the head of the rooster, five double crochets. Do the same opposite each corner of the triangular part.

- Rooster wings are knitted using the African flower pattern.
- A comb is knitted from a rooster of red yarn, consisting of three semicircles. The two side parts of the scallop are connected with single crochet stitches, and the central semicircle with double crochet stitches.
- A beak is knitted from one loop with one crochet in three columns. A beard of seven loops and five columns with one crochet consists of two identical parts. The tail is knitted arbitrarily at will from bright threads.
- At the bottom, the cockerel's body is tied with a frill, using three double crochets. Threads for edging are chosen different in color from the body.

At the end of the work, the eyes of the bead are sewn on. A wonderful crocheted cockerel for a teapot is ready! You can brew aromatic tea with fragrant herbs and invite guests for tea.
WATCH VIDEO
The tradition of inviting friends for a cup of tea has been around for a long time. There are people for whom it is completely normal to drink an infusion of something from a bag on the run, but true connoisseurs of the drink assure: only a leaf brewed according to all the rules can give real pleasure. To keep warm, you need not a banal towel, but a heating pad for the kettle. With your own hands, making a pattern, sewing and decorating is not at all difficult.
The easiest option to do. But this does not mean at all that it should be nothing - some decorative elements turn crafts into an interesting accessory for the kitchen. You can make a heating pad on the kettle with your own hands, a master class will help even beginners cope with this task.
If the heating pad completely covers the teapot, in this case you can do without complex pattern. inner surface it is better to make a cap from cotton fabric; as a warming material, you can take a synthetic winterizer, batting or even felt - the main thing is that it provides thermal insulation. The outer layer can be anything, it all depends on the desire of the author and his creative intent.
By wrapping a sheet of paper around the teapot, you can determine the width of the fabric cut. Now you need to set the height, for which you need to connect the paper from the side of the spout and from the side of the handle.
The resulting rectangle is the size for the inner layers of the cap. The outer cut is made a little larger: the fabric should not “stick” to the insulation and squeeze it. All layers must be cut out with seam allowances on four sides, a centimeter or one and a half will be enough. After that, you can start assembling the parts:
- First on cotton fabric ( front side down) you need to lay the insulation, bend 1 cm and sew the bottom edge.
- Wrap the top 2 cm and also stitch, putting the lace inside in advance.
- Now it's the turn of the side seam. The main thing is not to flash the laces, because they need to pull off the top of the bell as much as possible. The base of the heating pad is ready.
How to decorate the outer part of the cap is up to the author of the work: decorate with embroidery, beads, appliqué or drapery. Can you take waffle towel with your favorite ornament or use the technique patchwork. The outer "clothing" of the heating pad can be either removable or sewn to the bell. The assembly principle is the same, but the laces of the base and the front layer must be tied so that the fabric does not move during operation, and a loop must be sewn into the “crown” of the heating pad for convenience.
If there are scraps of fabrics used for outside, it will be very handy to make a few napkin coasters for a cup.
Sewing a heating pad for a chicken-shaped teapot is not as difficult as it might seem. Having prepared the fabric for the inner and outer layers, insulation (batting, synthetic winterizer), threads, scissors, a sewing machine and a needle, you can get to work:

Many people call the heating pad on the teapot by another name - Dunyasha. From a do-it-yourself doll to a teapot according to patterns that were used back in tsarist Russia, creating a samovar grandmother, breathes comfort and warmth. The difference, perhaps, is only in the selection of materials. As for the doll itself, there are many options:
- Russian beauty with a porcelain face;
- funny tilde;
- round-faced rag toy.
The top of an old, but in good condition, plastic doll is fine too. The working part of the product is a skirt, which is made according to the cap principle. Sizes for a doll pattern for a teapot in life size performed with paper wrapped around the teapot.
If the top fabric bottom edge will not be connected to the insulation and the inner layer, you should first make a functional part: spread the insulation between two rectangles of cotton fabric and quilt. The resulting blank is 29x74 cm in size and will become a heat-insulating bell after the side, bottom and top seams are stitched. With the help of an elastic band in the drawstring, the base is pulled together.
Darling Dunyasha
 To make a head for a samovar woman, it is better to take a beige, but you can also use a white one, a square with sides of 29 cm. Put a lump of filler (cotton wool, padding polyester) in the center, wrap it with a cloth and tightly wrap the “neck” with a strong thread. Now you need to securely fix the head by sewing it to a heat-insulating bell, sewn from rectangular blanks measuring 55x23 cm.
Upper removable skirt can be issued in ethnic style, but it is quite acceptable to create a fantasy costume in accordance with the external data of the selected model.
From the same fabric as the skirt, or the same color with a scarf tied on the head, you need to sew sleeves - a tube 20 cm long, fill it not very tightly with holofiber or padding polyester, sew up the edges. The central part of the blank is attached to the head and skirt, the ends are also fastened with several stitches to the base.
The heating pad is ready, it can be performed as a talisman, that is, without certain facial features. But if there is a desire, then eyebrows, eyes, nose and mouth can be embroidered or drawn.
 To make a woman for a samovar, in addition to the head and arms created for Dunyasha, you will need a torso with signs of a portly person. A torso is made from a colored piece of fabric and foam rubber, two cotton balls in fabric covers - it will be a magnificent bust. The functional part of the heating pad (heat-insulating dome) must be sewn from rectangular and quilted blanks measuring 58x27 cm. All parts are sewn with a blind seam.
But you can also complicate the task: make a frame for the product from wire. Three segments of 80 cm each must be folded in half, and then begin to twist them together into one bundle. After 15 cm, at shoulder level, insert a piece 20 cm long between the segments - these will be the arms. Continue twisting the “torso” to the waist (another 10 centimeters), and then spread the ends according to the principle of spider legs: in different directions and with an arched bend outward.
 The frame must be installed on the base and sewn over the dome, and carefully bend the excess wire. The torso is also made on the frame and is immediately connected with strong threads to the bell with a hidden seam. For hands, you can take a ribbon from the remnants of the synthetic winterizer and wrap the frame with it. The head is put on a twist and sewn to the body with a hidden seam. To make a hairstyle or braid braids, you can use floss or woolen threads for hair.
Now the doll needs to be dressed up and decorated. Everything that the author likes will be used: the costume for Maria Ivanovna can even be silk or guipure lined, with beads, embroidery, lace or braid. Here it is important not to lose a sense of proportion and choose the optimal combination of decor and colors.
Methods for making heating pads for a kettle in different techniques a lot, but it's even good: You can choose the option you like. Any of these dolls will add coziness to the kitchen and help make a conversation over a cup of friendly tea heartfelt and unforgettably warm.
Attention, only TODAY!
Winter has come with its long and dark evenings. We are spending more and more time at home. So, finally, you can do needlework! In this article you will see models of covers and warmers for teapots made by hand using knitting needles, crocheted or sewn on sewing machine. It seems, why is it needed, this kettle cover? I agree practical use its pretty debatable. But you can’t refuse decorativeness of these products. Decorate and refresh your kitchen, and certainly attract the attention of guests. This article presents the following models of covers and warmers for the kettle:
- made from fabric
- fabric warmers with appliqué
- heating pads made in patchwork technique
- crochet and knitting
Let's take a closer look at the models of heating pads sewn from fabric on a sewing machine.
Here is a very simple model. Two fabrics are selected according to your own taste and sewn together wrong sides to each other as if you are sewing a bag. Do not sew one side and turn the product through this hole. Then, tucking the edges of the fabric inward, sew the fourth side of the future heating pad. (By the way, a thin batting or synthetic winterizer could be laid between these two fabrics.) Stepping back from the edge of 3-4 centimeters, sew the drawstring on both sides of the future cover. And now just put the kettle on the finished "creation" and lift both edges to the lid of the kettle. Insert the string into the drawstring and tighten it around the kettle. The heating pad is ready!
The next model is perhaps no more difficult to sew than the previous one. The pattern is simple: draw a regular oval and divide it into two parts. The width of the oval should be more than half the circumference of the teapot by 2-3 centimeters. The height of the heating pad can be equal to the height of the kettle, and maybe more.

Of course, the design of your heating pad should match the interior of your kitchen. And, if you are crazy about cats, then sew a cat. But choose suitable color fabrics.

If you are so skilled that you can make embroidery on a teapot warmer, then your work will become even more attractive.

New, 2017 will be the Year of the Rooster Eastern calendar. Perhaps someone wants to sew for themselves or someone as a gift, a heating pad in the form of a cockerel or chicken.
Watch a helpful video that might help you achieve your goal.
Not sure if you can sew a warmer rooster? Then just sew a heating pad with a New Year's story.

I think that any creative work(including sewing a heating pad for a teapot) deserves respect. Moreover, the work done in application technique. Products are made as follows: some shapes are cut out of the fabric and sewn to another fabric selected as a background. Turned out perfectly original products. Such works are also often combined with embroidery.

Watch a master class on making a heating pad for a teapot in the form of a house.
Products made in patchwork technique, require certain skills for their manufacture. You need to learn how to combine and sew fabrics together. First you need to try sewing simple patterns in the patchwork style. If you are satisfied with your products, proceed to more complex forms.

Watch a tutorial on how to sew a patchwork heating pad for a teapot.
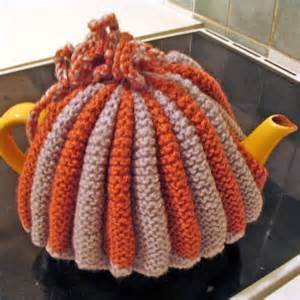
Let's move on to knitted heating pads crocheted or knitted. Of course, those who know how to knit just need to look at some model they like, and then it's skillful hands and several hours of work. And novice needlewomen will have to learn a little or ask more experienced housewives. Start with simple models. Here is a heating pad knitted on the needles. Two identical fabrics are knitted, and then they are sewn together, leaving holes for the handle and spout of the teapot.

There are many simple models. If you are not yet confident in your “knitting” capabilities, learn from simple examples.
For decoration simple heating pads you can take buttons, beads, sequins and others small items that are at home.

Usually, heating pads are knitted on a specific teapot. Therefore, in the process of work, be sure to try on the product.

To make the teapot elegant, it is enough to tie a decoration on the lid.

If you know how to knit well, choose any pattern and get to work.
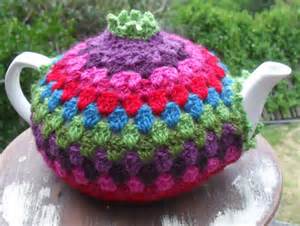
A lot of various models you can come up with a heating pad and finally knit some for your teapot. For example, crocheted different fragments can be sewn together so that you get a heating pad for the kettle.

Tea warmers decorated with flowers have always been and will remain popular. Endless scope for creativity: who will get what flowers.

And the heating pads turn out one more beautiful than the other.

But these “roses” can be assembled even from an ordinary narrow knitted strip!

Not only the floral theme is very popular in knitting tea warmers, but also the berry theme.
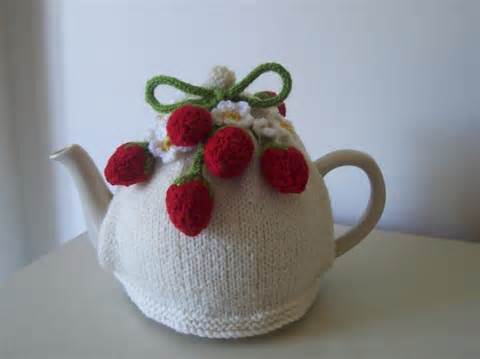
You can combine both berry and flower, if it is difficult to choose what you like best.

Another detailed master class on knitting a heating pad on a teapot using a crochet hook.
Approaching New Year and many are trying to come up with something original in the form of a Christmas tree. We will have a heating pad for the kettle.

Another example of a Christmas tree warmer for festive tea parties.

And someone will want to tie a snowman or Santa Claus and decorate with these new year symbols kettle warmer.
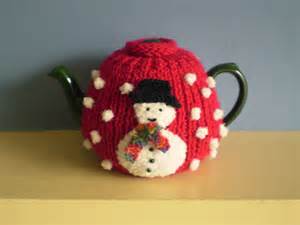
It is not difficult to knit a Christmas tree and a Snowman on knitting needles, and then sew it to a finished heating pad.

Christmas star on dishes, figurines New Year's toys and a teapot in "winter" clothes: pleasant evening Just right for a tea party.

The symbol of the approaching New Year is the Rooster. Chicken is also suitable for a heating pad on a kettle. You can, of course, link this "bird" more vivid and expressive. Here's what you like more.

And here is a heating pad for a teapot in the form of a chicken.

If you want more ideas for decorating a heating pad on a teapot, watch this video. Best wishes to all!


