Christmas trees made of colored paper on the window. How to make a Christmas tree from corrugated paper for the New Year. Volumetric paper Christmas tree
In autumn, more and more often you begin to think about the coming of the New Year with its festive mood, meetings with friends and family and, of course, gifts. Besides, New Year all of us have been associated with a Christmas tree since childhood! Let's talk about her.)
Fortunately, people are increasingly thinking about what not to cut live Christmas tree for the sake of a few public holidays. "Cross" and I fully support this decision and believe that a do-it-yourself Christmas tree is much more interesting and humane! In addition, this great options for those who have nowhere to put big Christmas tree(for example, there is no free space, or on this free space active young child).
We bring to your attention large selection master classes on creating decorative Christmas tree with your own hands, which will serve as a wonderful decoration for your home and original gift for a wonderful holiday!
Christmas tree made of cones
A very original Christmas tree with your own hands can be made from pine cones. But we will not use the whole cones, but only their scales, so that the Christmas tree is not too bulky.

So, to begin with, we will separate its scales from the cone. This can be done with a sharp knife, wire cutters or secateurs.

Be careful, take care of your hands!

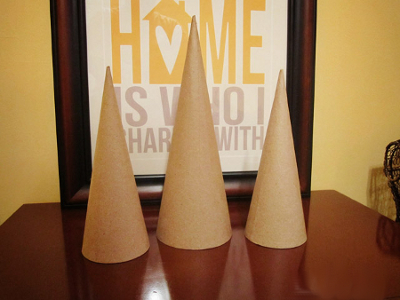
The next step is to make a cone from thick paper or cardboard, which will be the base of our Christmas tree. We turn the paper into a cone, glue it on the side and cut off the excess at the base.


Then we just take the scales in our hands and glue them in a circle, starting from the base of the cone.

You can glue each new row in a checkerboard pattern, you can, as here, one above the other.

You can glue a clove on the top of the Christmas tree (such a spice))

After the glue dries, you can start painting our beauty. To do this, you can take spray paint or regular acrylic paint.
If you choose acrylic paint with a metallic effect, then your Christmas tree will look much more spectacular.

Then we cover the ends of the "twigs" with PVA glue and sprinkle sparkles on them.


This beauty is obtained as a result of these uncomplicated actions:

Exactly according to the same principle, you can decorate the cone with chains and beads, decorative cords, ribbons, braid, etc.

Another very popular way of making artificial Christmas trees with their own hands is their weaving from beads. This is perhaps the most painstaking way, but for lovers of beading, nothing is impossible!
The detailed process of weaving Christmas trees from beads cannot fit in one article, so we share with you links to master classes previously published on "Cross".


Christmas tree made of paper and cardboard
If you have nothing to do in the workplace) or just want to add a little holiday to the office, make a Christmas tree out of paper. What's easier?)

And this Christmas tree is very similar to the design one, don't you think? It's all about color designer cardboard, which is so beautiful and bright that you don’t need to decorate the Christmas tree with anything else) which simplifies the process of making a Christmas tree with your own hands.


Secondly, to make a designer Christmas tree, you can use threads that are wound around paper cone according to the technology of manufacturing openwork balls.

Third, flower mesh and mesh for bouquets.

The manufacturing technology of these three Christmas trees is very similar, so the process of their creation is shown in one master class.
Feather Christmas Tree
Yes, they do too! You can buy feathers in hardware stores, or maybe you have stocks of bird feathers? They can be dyed for brilliance. food coloring. It looks original, beautiful and so airy!
Guys, we put our soul into the site. Thanks for that
for discovering this beauty. Thanks for the inspiration and goosebumps.
Join us at Facebook And In contact with
There is very little time left before the New Year, and it would be time to think about holiday decorations for home. Can buy ready-made options in the store, but it is much better to make original things with your own hands.
We are in website we believe that children should definitely be involved in this case, and we collected great ideas For New Year's crafts.
sock snowman
From unnecessary socks you get such funny snowmen. You will need socks, rice for stuffing, some scraps and buttons. Cut off the toe at the sock, and on the other hand, tie it with a thread. Sprinkle rice, giving round shape, drag the thread again and pour more rice, forming a smaller ball. Sew on the eyes and nose, make a scrap scarf, sew on the buttons. And from the cut off part you get a great hat.
Christmas tree pendants
A cinnamon stick is taken as the basis, several artificial ones are attached to it with glue. spruce twigs and colorful buttons. Such Christmas trees will not only decorate the house, but also fill it with the warming aroma of cinnamon.
Cork deer
bottle caps - great material for crafts. For example, you can make such a cute deer. You will need some corks, glue and various beads to decorate. This is not ashamed to hang on the Christmas tree.
stick crafts
From ordinary ice cream sticks, cute Christmas trees, snowmen and snowflakes are obtained. You need paint, glitter, buttons and a little imagination. Even the smallest children can cope with such crafts.
Christmas trees made of colored paper
Like these ones wonderful Christmas trees can be done by making a cone out of green paper or cardboard and decorating it with different little things. Buttons, pebbles, beads and various paper figures will do.
potato drawings
Snowflakes from pasta
Clip pasta different shapes with glue and cover with silver paint, fasten the tape - unusual christmas snowflake ready.
Snowmen from covers
Cover the metal bottle caps with white paint (it is better to take acrylic) and glue them together, as shown in the picture. Draw a face for the snowman and decorate with a scarf from a bright ribbon. If you glue a loop on top of it, then the snowman can be hung on a Christmas tree.
Crafts from cones
From the cones you can make different animals and any other characters. You will need paints, shreds, buttons and, of course, imagination and inspiration.
Christmas tree made of buttons
Pick up green buttons of different diameters and a few brown ones for the trunk and secure them with a thick thread. Decorate the crown with an asterisk.
painted balls
Place the pieces wax pencils into a transparent Christmas ball, heat it with a hair dryer, constantly twisting it. Melting, the pencils will leave beautiful colored stains inside the ball.
Summary: How to do Christmas tree with your own hands. Original Christmas trees from cones and tinsel. Photos and templates of Christmas trees made of paper. Homemade origami Christmas tree. Candy tree.
Even kids can take part in preparing for the New Year and making New Year crafts with their own hands. For example, Christmas tree even a two-year-old can make from an ordinary cone and plasticine. You just need to teach him to roll balls different colors from plasticine and fix them on the cone. The base of the Christmas tree is a spool of thread wrapped in foil.
Here's more complex options Christmas trees made from cones. In the first case, the bump was painted acrylic paint in green and white colors. In the second variant pine cone decorated with beads.


From a large number of cones, you can make such a Christmas tree with your own hands. The basis for the Christmas tree is a cone made of thick paper or cardboard, which is then pasted over with cones on all sides with a glue gun. Decorate the finished Christmas tree with beads and large beads.

Another very simple homemade tinsel Christmas tree. You can make it in literally five minutes.

To do this, you need to make a cone out of cardboard and stick tinsel on it in a spiral.

Candy tree. DIY candy tree. How to make a candy tree
If before wrapping cardboard cone with tinsel, with the help of adhesive tape, fix sweets on the future Christmas tree, you get a sweet Christmas tree made of sweets. Detailed New Year's master class how to make a Christmas tree from sweets, see the photo below or follow the link. When creating a Christmas tree from sweets, it is convenient to use double-sided tape.


A large number of Christmas trees can be made with your own hands from paper. Let's start with the simplest Christmas crafts.
DIY paper Christmas trees
DIY Christmas tree made of paper (option 1)

Print on thick paper or cardboard and cut out the blanks with scissors >>>> Bend each Christmas tree in half and glue them together. This Christmas tree is made according to the same principle as christmas ball from our previous article. See link >>>>

Made on the same principle openwork Christmas trees from the Country of Masters website.

Epson's Singapore site offers ready-made templates their Christmas trees:


DIY Christmas tree toy (option 2)
If you have an unwanted cardboard box, then from it you can make such a Christmas tree using the same technology.

DIY Christmas tree toy (option 4)

And you can make a curly Christmas tree by pasting the base-cone of cardboard with strips of twisted paper.


DIY Christmas trees made of paper (option 10)
To make such a Christmas tree, you must first cut out circles of different diameters from paper. You will also need a wire and a stand, which will be successfully replaced by a half of a large "kinder surprise". The Christmas tree is easily assembled on a wire, and, most importantly, it is easily disassembled. See link >>>>


Origami tree from a magazine
This origami Christmas tree is very easy to make with your own hands. Small format magazines that can be found in any home are suitable as material.

Work plan:
The procedure described below must be done with each page in the magazine. If the cover is thick, you can simply peel it off (tear it off).
1. We bend the page, the upper right corner, at an angle of 45 degrees to ourselves.

2. Once again, fold the sheet in half diagonally.

3. We pass all fold lines with a fingernail or other object so that they do not open, especially thick pages.
4. bottom corner, which goes beyond the boundaries of the magazine, we tuck it up.

Thus, we add up all the pages in the advertising magazine.

The result is a cute new year origami Christmas tree.

Origami tree from a magazine
Another model of origami Christmas trees from for the New Year. Unlike the previous origami tree from a magazine, the pages here do not fold, but are figuratively cut out according to a template.

The manufacturing principle is very simple. It is necessary to prepare a half-Christmas tree template, circle it on one page and cut it out. Further, the cut page will itself be a template for other pages. You can cut several pages at once, but you should not cut a lot at once, as the cut line will turn out to be uneven (jammed) and the tree will not open well.

The tree itself turns out to be more one-sided; to achieve volume, you can fold and glue 2-3 magazines together. But trust me, she looks good.
Christmas tree origami from modules. modular origami Christmas tree
Collect from triangular modules Origami Christmas tree is not difficult at all. It consists of individual branches, so you can make Christmas trees of a wide variety of shapes and sizes. In addition, from such branches you can make New Year's compositions, make toys, snowflakes, stars. See the New Year's master class at the link >>>>

Christmas tree coloring on the wall
Large Christmas tree coloring on the wall. Separate parts of this New Year's beauty must be printed on 22 A4 sheets and pasted on the wall in the correct sequence. The advantage of this New Year's paper craft is that the Christmas tree is made in black and white, so the printer's ink consumption is small. In addition, this christmas coloring book with many small parts keep the child entertained for a long time. Link >>>>

Do-it-yourself Christmas tree from napkins
Master class on making a very beautiful, unusual Christmas tree from napkins can be found at the link >>>>

How to do christmas trees from corrugated paper
The Land of Masters website invites you to make two Christmas trees with your own hands from corrugated paper.
Option 1. Candles and the Christmas tree itself are made of corrugated tubes. Link >>>>

Using templates, it is easy to make original voluminous paper Christmas trees that are equally good as New Year's interior decor and homemade Christmas tree decorations.
To work, you will need paper or loose cardboard, a template and scissors.
Volumetric Christmas trees made of paper: 3 options
1. Option
Despite the sketchy appearance, the Christmas tree looks beautiful and interesting. To make it, you need a rectangular piece of paper that needs to be folded in half.

The width and length depends on the desired dimensions of the Christmas tree, but it is important to take into account the data of the template so that it fits in the area of \u200b\u200bthe paper folded in half.
Print out the template and cut it out.

Next, you can already make a Christmas tree. But, if you have plain paper. A Christmas tree from cardboard should be done as in my example, since not every printer can use thick paper. That is, circle the printed and cut out template on cardboard and cut it out again, but already a cardboard blank. Alternatively, redraw.

Please note that the direct dotted line should be on the fold of the paper. Cut along the lines should also be from the side of the fold.
You will get such a preparation of a Christmas tree.

Open it for further work.

Then the cut strips need to be directed through one to the other side, making folds on the sides. That is, first bend the second strip inward.

After that, leave the third one unchanged, but direct the fourth strip in the other direction.

Repeat the steps until you run out of stripes. Watch the side folds, it is desirable that they are even. The smallest one can be bent with a thin object - a rod from a pen, a barbecue stick, etc. At the very end, slightly bend the sides. It will turn out such a voluminous Christmas tree made of paper, stable on the surface.

Option 2
Another cute Christmas tree that is easy to make using a template.

Fold the paper in half and cut along all lines except the dotted lines.

Open the workpiece.

Bend the strips to the other side, alternating them through one.

The tree is ready.

3. Option
The template is not much different from the first. The difference is that the lines are straighter here.
Use a template.

Cut out the paper.

Open it and direct the strips in the other direction, alternating them through one. Bend the sides.


These are how you get voluminous Christmas trees made of paper.

They can be decorated paper toys, the most varied New Year's decor, stickers.
Today you will learn how to make a voluminous Christmas tree out of paper with your own hands. This master class describes not one voluminous Christmas tree made of paper, but several at once. different options crafts. Our ready-made templates will help you make them.
Tools and materials Time: 20-30 minutes Difficulty: 2/10
- printed Christmas tree templates on A4 paper;
- scissors;
- glue;
- acrylic paint and brushes;
- fluorescent paint (optional);
- sparkles, decorative snowflakes and other decor of your choice.
Volumetric Christmas tree made of paper - simple and very original way Decorate your home for Christmas and New Year!

These crafts are so easy that you can hook up preschool and toddler kids with no problem. school age to make them! Undoubtedly, you will all have fun creating various compositions from 3D Christmas trees!
Detailed description with photo
We offer you four production options volumetric Christmas tree from paper with your own hands, but if you still don’t have enough of them, you can experiment with the sizes of the trees or create your own template. The possibilities here are endless!
Option 1. Christmas trees with stars
The first option includes a large number of trees, so we suggest starting with it.
Initially print out the templates below on A4 paper.
Template 1
Template 2
The first option assumes that you simply cut out the trees along the contour, and then cut recesses into them along the drawn lines.
Then you need to bend these strips in opposite directions through one. Thus, you have in your hands a ready-made voluminous Christmas tree made of paper!
For the second option, also cut out the trees along the contour. There are no drawn lines inside, which gives you the opportunity to experiment!
Here you can cut out arbitrary lines at the top, and put down stars below using a curly stapler. Or cut out thick lines, and put asterisks between them, or cut out curved lines, or .... In general, fantasy itself will tell you, and below in the photo you can see what happened with us!
Option 2. Christmas tree with a deer
If you want to move on to more complex compositions, try carving a Christmas tree with a deer, the template of which is provided below!
Template 3
To make this Christmas tree, first cut out the deer, then fold the Christmas tree paper in the middle and cut it out. After that, fold the paper for a small tree from the right edge and also cut it along the contour.
If desired, glue decorative stars and snowflakes on the tree, decorate with glitter, etc.
Option 3. Luminous volumetric tree
Print the template below on A4 standard paper.
Template 4
- Cut out the stars and use them as a template for the stars.
- Get your little one to carve the Christmas tree. Let him cut the tree along the contour and internal lines. Depending on your age, you may need a little help.
- Make sure all lines inside are cut.
- Using green or any other paint of your choice, paint the craft in 2 layers. Let it dry well between coats both times.
- Fold up paper strips inside the tree in opposite directions to create a 3D look.
Stars: In this tutorial, we used glow-in-the-dark spray paint that we found at our local craft store to make a 3D glow effect paper Christmas tree. We just sprayed paint on paper and cut stars out of it.
Alternatively, you can buy already finished paper, which glows in the dark, and cut stars out of it.
Glue the stars to your Christmas tree.
A do-it-yourself voluminous paper Christmas tree is ready! We hope our step by step master class with templates you like.
Subsequently, you can use this craft as a small night lamp, but be prepared for the fact that it will last you a very short time!
And as a small surprise, we attach to the master class interesting video, in which a professional decorator will tell you how to make a slightly different, but no less beautiful option do-it-yourself volumetric Christmas tree made of paper.


