What is decoupage? This is an amazing decoration technique! What can be decorated with decoupage? Decoupage technique: decoration of wooden and metal surfaces, glass and ceramics, plastic
Let's start with a definition.
Decoupage is decor technique using a cut (or torn) image, which is glued to the surface of the workpiece and then fixed with varnish. It seems to be nothing surprising and nothing complicated, you say.
About the complex - I, perhaps, agree with you. Every person, even without art education, can easily master this technique if he puts at least a little work and diligence.
However, with the help of decoupage, you can create such beautiful and stylish products. self made that I can't help but call decoupage an amazing technique! Moreover - The possibilities of this technique are simply enormous.! Read on - and you will understand everything yourself.
On what surfaces can decoupage be done?
- On wooden;

- metal;
- plastic;
- On fabric, on leather
- On ceramics (glazed and unglazed), porcelain;
- On cardboard, MDF, papier-mâché;
- candles, nails...
As you can see, we can decorate almost any surface, however, if we work with surfaces that do not absorb primers and paint ( metal, glass, glazed ceramics, porcelain, plastic), then you need to use special soils(I use paints and varnishes in a spray), otherwise the primer or paint will not hold, but will shrink into folds.
What can be decorated with decoupage?
Here everything is limited only by your imagination!
- First, of course, caskets, chests of drawers, mirrors, combs and others cute woman's heart things.
- Secondly, banknotes, magazines, writing instruments, pencil cases, notepads, albums, document covers and other things that will be appropriate not only at home, but also at the workplace (by the way, including men!) decorated flasks, well and gift bottle using the decoupage technique, both men and women will like it: for a wedding, birthday, anniversary or New Year.

- Thirdly, boards, salt shakers, teapots, samovars, trays, candy bowls, shelves, jars and boxes for spices, napkin holders, tea boxes and tea houses, bread bins, hot pads and other items for the kitchen, which must be cozy, because we women spend so much time on it!
- Fourth, bags, clothes and even shoes- any light fabric and leather can be decorated using decoupage technique. And in addition to them, you can decorate yourself with handmade jewelry - beads, rings, earrings, pendants, hairpins, hoops, brooches… By the way, decoupage on fabric is also napkins, tablecloths, pillows, curtains and other textiles (of course, light) handmade.
- Fifthly, without decoupage, well, you can’t do anything in the interior: handmade clocks, paintings, vases, photo frames, chests, in any style modern style and fantasy to noble retro and Louis XVI style.
Take a close look at your hands: you can do all this with your own hands! Yes, yes, with these hands (and if you were told in childhood that “hands grow from the wrong place” - don’t believe it: I assure you, from that :) Try it yourself and you will understand what decoupage is like an exciting hobby from which it is impossible to break away!
Where can I get decoupage blanks?
 Can be decorated Firstly, blanks that are sold in hobby and art stores. They are not processed by anything, they are beautiful, now there is a very big choice wooden blanks and blanks from MDF, papier-mâché, etc.
Secondly, you can restore or decorate those items that are in your home and lost presentable appearance, or you don't like the way they look. In this case, you will have to remove old paint or at least degrease and sand the surface, but it's worth it! After all, you can decorate not only old boxes, trays and salt shakers, but also watches, tables, chairs, and even cabinets and beds!
Third, different old things from flea markets, attics or dusty pantries that bear the stamp of time. They can be made completely new, or you can make them noble-aged, expensive and very refined.
Fourth, Lots of decor items to buy in general stores. If you are lucky and have IKEA in your city, that's just great, but you can also find furniture, dishes, glassware, pots, watering cans, etc. suitable for decorating in other stores. Even gift boxes can be turned into wonderful boxes, which in themselves will be no less valuable than their contents!
What materials are used in decoupage?

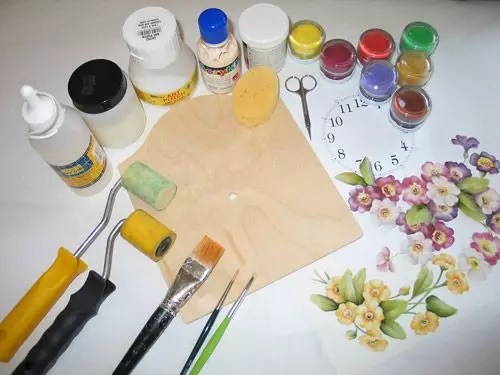
- 1. The blanks themselves or items for decoration.
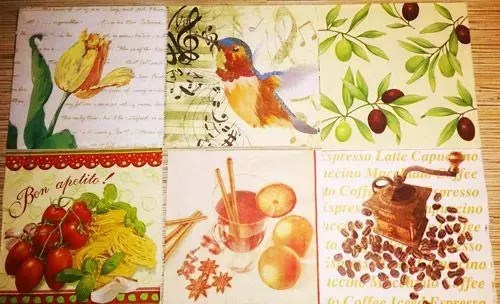
- Images that we will decorate with: beautiful pictures, printouts, magazine clippings, etc.
- Glue (it can be building PVA or special glue for decoupage).
- Acrylic primers, paints and varnishes - respectively for surface priming, painting and protection. Almost all materials are water based, do not smell and are washed with water.
- Brushes, sponges, sandpaper and other tools.
The main stages of work in decoupage (the most general scheme):
1. Surface preparation (sanding, priming, etc.);
2. Gluing a decoupage motif;
3. Intermediate varnish to protect the motif;
4. Painting, other decor techniques (craquelure, aging, gilding, glazing, etc.) - I love this the most!
5. Finishing varnishing.
I am sure that now you have received the most complete answer to your question. "what is decoupage". Want to know more?
Subscribe to and make your first decoupage work! And the first works are always the most beloved, despite the "jambs" :) Subscribe to the course and see for yourself: decoupage is amazing technique decor!
Today we will look at how many wonderful opportunities open up for needlewomen when interesting and original techniques are used!
Different ways of decoupage, a master class for which we will offer in this article, will help you create amazing things with your own hands or decorate existing ones. In addition, we will learn how you can engage in this creativity with children, so that they are also interested, and the work does not suffer from excessive initiative.
Decoupage for everyone
First, let's remember what this decoration technique is by watching the video.
As you can see, in classic version decorating wood or glass surfaces basic scheme without aging or using other interesting points, there is nothing complicated. But creative thought does not stand still and decoupage for everyone acquires new ideas, techniques and trends.
One of the most common ways to create a vintage effect is to apply special compounds and get decorative cracks.
To make cracks in the background before sticking pictures for decoupage, you need to use varnish.
We cover the surface with a brush or sponge and give it time to dry, but not completely, but only until the finger stops sticking. After that, cover it with acrylic paint desired color(you can use both matte and metallic, creating beautiful transitions).
Cracks are formed during the simultaneous drying of the varnish, which is still wet in the depths, and the applied acrylic - the varnish layer breaks the acrylic layer during drying.
An excellent master class "Craquelure with your own hands" will help even a beginner to cope!
Varnishes for craquelure
Instead of a special varnish, undiluted PVA glue can be used in the same way. This type of craquelure technique in decoupage is called one-component.
And we need a two-component one to create decorative coating already on top of the pasted image.
Its essence is the same, but we will use two different varnishes - water-based and non-aqueous. One is applied under the other and, drying, goes with decorative cracks. Each pair of varnishes, depending on the composition and manufacturer, will give its own colorless cracks.
Pigments will help us make them bright: dry pastel, acrylic paint applied with a finger, bitumen, patina and even eye shadow.
It is possible to overwrite the surface only a day after applying the second composition, so that both are completely dry. Then the crackle mesh is covered with ordinary acrylic varnish in several layers to fix the tinted cracks.
scuffs
If the craquelure technique in decoupage seems too complicated or inappropriate, you can age the thing with the help of original scuffs. We will also work on the background before pasting the picture.
To do this, it is enough to use two contrasting colors acrylic paint. We select a combination so that it echoes the pattern - this will do appearance things more harmonious.
First we apply a darker layer - you can do this with a wide brush, without worrying that there will be streaks. If the thing is large, we do it only in those places where we plan to scuff. As soon as it dries completely, rub these places with soap or a candle, shake off the crumbs with a dry soft brush and apply on top light shade paints. After a few hours we take a buff (a file for polishing nails) or a small sandpaper and overwrite the places covered with paraffin - the top layer of paint will come off, revealing a dark substrate. To make it beautiful, the movements should be light and they need to be done in one direction.
Then we work with pictures as usual.
Glaze
An interesting technique used in painting is also good when working with a background for decoupage. Besides, it is quite simple. It is enough for us to use two colors of paint, as in the case of scuffs, but we need to choose not only contrasting ones, but also with different effects.
Matte or glossy acrylic and metallic are best combined with each other. The non-shiny paint will serve as the basis, and when it dries, we will apply a “metallic” shade on top, diluting it with water to obtain a very thin layer.
It is important that the glossy coating lies unevenly. Let there be stripes or strokes - this will give a very beautiful effect.
splashing
The description of this decoupage technique is quite simple, however, as is its execution. Aging the surface with this original technology it is possible both before drawing pictures, and already after, as a final touch before varnishing.
To do this, we need metallic or regular acrylic paint, depending on the desired effect.
To make neat splashes, cover the table or floor with newspaper (polyethylene) and use a wide flat brush and a pencil or thin stick (another brush) to spray droplets.
Decoupage technique: new trends, 3D effect
A very beautiful and original technique in decoupage is the creation of three-dimensional patterns on the surface of the product.
The easiest way is to use structural paste after applying the picture, as additional method product decoration.
Having applied 1-2 layers of varnish on a paper drawing, we take a structural paste and, using a palette knife, “close” the surface areas without a drawing. We can do it with brushstrokes, overlaying material thin layer to achieve a light texture, we can create voluminous details, for example, imitate snow or greenery, or we can immediately scratch patterns with a thin stick. In addition, it is good to use a stencil - the patterns will turn out not only neat, but also completely symmetrical, the main thing is to press it tightly to the surface. . Before that, you can add color by shading areas with acrylic paint, oil pastel or bitumen. Contours
Except structural paste very easy to create small parts through contours. They can draw large areas around decoupage pictures, or you can add droplets to paper drawings.
For example, we make stamens on flowers with gold glitter or supplement snowflakes on Christmas balls.
Imitation lace
Today, the new interesting technique, imitating lace or sewing on surfaces with decoupage already done. This is enough laborious process requiring special skills, but the result is amazing. The lace looks like the real thing!
To do this, we can make a stencil by laying out lace or sewing as we see fit on cardboard. We circle them, cut them out and transfer them to the product, also circling them with a pencil. We make a contour with acrylic paint or immediately with paste from a tube. complete drying the first layer after a few hours, and add the details with a white outline, putting decorative dots. Decoupage technique for children 
Well, how to adapt to this interesting activity children? Very simple!
Decoupage is carried out as usual, but with small details:
Protection
In order for both you and the child to work quietly, the surface must be covered with newspapers or polyethylene. So all participants will feel more confident.
Item
It is worth using a wooden box or a metal can - decorating them for the first time under a "treasury" or a piggy bank will be as easy as shelling pears.
Pictures for decoupage
It is better to choose patterns with a small amount of detail and thin elements - it will be difficult for a child to cut them out easier.
Fantasy and work
Let the pictures and their location on the subject be chosen by the child. So the thing will turn out to be truly loved. But an adult should provide assistance in gluing and smoothing the motive so that the work turns out to be of high quality.
You can varnish together if the selected varnish is water-based. Such material is odorless, but yacht or automobile material will be harmful to a child of any age. If you want to fix the drawing to them, it is better to do it for an adult and in the fresh air.
Decoupage is one of the most popular Lately hobby. But if embroidery, knitting and weaving are familiar, traditional views home art, then decoupage at first glance seems to be something new. Many are interested in what decoupage is and how it happened that he so quickly won a leading position among fashion hobbies.
The history of the origin of decoupage

It's actually quite old art. It is believed that it appeared in Germany in the XV century. Then it was used to decorate furniture.
Note! It was a way to give beauty to interior items without spending too much.
It was even called the "technique of the poor."
What is this technique? Pictures, drawings - in a word, any images - are transferred to objects made of wood, glass, fabric. Then the newly created work is varnished. This is done both for beauty and in order to extend the life of the new-found masterpiece.

In Europe of the Middle Ages, it was fashionable to use inlays in Chinese and Japanese styles. At the court of Marie Antoinette, this art was so popular that almost all court ladies owned it.
Masterpieces of the "art of the poor"

Since those bygone times, the decoupage technique has undergone little change. Only now it is no longer "the art of the poor." By the way, old chairs and tables, very few copies of which have survived to this day, now cost crazy money. Could the masters who created their masterpieces from the cheap materials available to them imagine that in the future people will pay huge sums at auctions in order to purchase home decorations decorated with them using improvised means? After all, no silver, no gold, no precious stones they don’t… These amazing works of art were once considered only an imitation of expensive oriental inlays. Time has passed, and now they can compete in value.
Instructions for a beginner

Is it possible to master this art ordinary person or do you need to have a special talent to create works similar to those of medieval masters? Beginners are always afraid to take on a new business. However, one has only to master the basics - then things will easily go by themselves. After the first successful steps, you will feel inspiration, which, perhaps, will not put you on a par with great artists, but will make it possible to always give original gifts to your loved ones for any occasion.
So, you have firmly decided: from now on - no standard purchases for holidays. No identical cups, no standard chairs, no simple glass vases- now you will present to family and friends only original presents! Then it's time to start learning the basics of decoupage.

What is required for work? To do this, you first need to decide on a gift. Let's say you decide to present a wooden cutting board - a thing that is absolutely necessary for every housewife. In order for it to turn into the original, it will have to be “conjured” a little over it.

You need to stock up in advance:
- a special napkin for decoupage;
- alcohol (possibly vodka);
- acrylic (or water-based) paint;
- PVA glue or acrylic;
- varnish - for example, parquet.
First of all, you need to degrease the product on which the picture will be applied. This can be done with alcohol or vodka. If you skip this stage and immediately go to the main one, then later the image may peel off, and the work will lose all its beauty.

Then apply a primer - for example, acrylic paint. You should wait until it dries completely, after which you can reapply a layer of acrylic paint.

Now the main stage begins. Very carefully, you need to cut out the image on a napkin, after removing the top two layers. Next, evenly distribute the glue and glue the picture on the object.
Note! After that, the napkin should dry completely.

Here you can fantasize a little. For example, when the napkin dries up, tint something, paint on it, shade the background.
The last manipulation is varnishing the finished work. The most stubborn ones try to achieve a complete fusion of the object with the image applied to it, so that they look like a single whole.
Note! It's not as easy as it seems. The varnish will have to be applied many times, always waiting for it to dry.
It may be necessary to apply up to 30 or 40 layers, as on the works of medieval masters. But the result will please: the picture will look as if it is part of the subject, and the varnish will last a long time and will not crack.
In general, this art is available to everyone. . It is not difficult to find decoupage materials, they are inexpensive, and as a result, real masterpieces are obtained that can please loved ones.
Wake up the artist in you

What else can be decorated using this technique? Utensils: plates, glasses and cups. Having bought a set of ordinary glass wine glasses for wine or glasses for juice, you can turn them from consumer goods into individual, "piece" goods, decorating them with stories that are interesting or memorable for the person to whom the gift is intended.

Interesting idea to create and decorate wall clock. In a store selling hobby goods, you need to purchase blanks - a watch mold, the clockwork itself and decoupage napkins with a picture you like.
Note! You can add details: rhinestones, decorative stones, shells, beads, beads.

For a teenage girl or young romantic girl great gift will become a notebook, in the decoration of which elements of decoupage are used. Here, of course, roses, hearts will be good various sizes, angels with rosy cheeks. As an addition, lace, colored rhinestones, even buttons of an unusual shape will serve.
An adult lady will surely like a vase with original picture. Any, even the simplest bouquet, will look much more advantageous in such a vase.

Can't decide where to start your career as a decoupage master? Watch the video - there are lessons for beginners of any degree of complexity, and you can decide what you can do.
To modern man, "pressed down" different templates, the generally accepted standards of thoughts and behavior, the strict framework of office everyday life, it sometimes seems that creativity has remained in distant childhood. It is not true! Give yourself freedom, allow yourself to invent and invent, and the dormant creative vein will wake up again. And you can start with decoupage ...
Video
For novice masters, you definitely need to know different techniques in working on the topic of decoupage. The technology has been developed, already exists and is used by many. But to apply your imagination and use it in your work, no one has canceled. This type of creativity does not stand still and is combined with others. In the previous article, an acquaintance with . Now we are interested in the process itself.
Two-step craquelure in decoupage - technology for beginners
The word craquelure in translation means - cracking of the paint layer or varnish on paintings from temperature and humidity changes, which leads to uneven aging.
Many master classes apply and describe popular technology, such as:
Craquelure pair Maimeri No. 739 and No. 740
The numbers shown are the three digits of the product part number, which can be found on the label at the top left.
These compositions are just a couple, they work only with each other, you cannot replace one or the other step with anything.
Work order (technology):
- Apply the first step - No. 739 - and dry until tacky. It is better to apply the first step with a foam sponge, because it is very difficult to wash a synthetic brush from this composition, it will glue the villi and the brush will have to be thrown away.
- Then the second step is applied with a finger - No. 740. You can also apply it with a brush, but when applied with a finger, you definitely will not leave unsmeared areas, and the layer will come out more uniform.
- Next, the work is left to dry in a warm, dry place. The higher the temperature in the room, the larger the cracks, so if you wish, you can dry the work by the battery in winter or in the sun in summer. You cannot dry it with a hair dryer. Cracks appear within a few hours.
- Then we show cracks by rubbing a small amount of bitumen into the entire surface of the work, oil paint, colorful pigments (metallic pigments are especially effective: gold, bronze, silver), dry pastels or even eye shadow.

We rub liquid materials cotton pad, dry - with a finger. After grouting the cracks, leave the work for 10 - 15 minutes. Then we wash off the second layer along with excess grout under a thin stream warm water. We wash off only with our fingers, gently, but thoroughly - the entire second step should come off.
Shake off drops of water or slightly get wet waffle towel or a lint-free cloth - nothing should stick to the first step.
After drying from water, the work is covered with any finishing varnish - acrylic or yacht.
2. Technology: Shellac - Gum Arabic
These materials are not a pair, you can buy shellac and gum arabic from different manufacturers. Shellac is an alcohol-based shellac varnish.

Gum arabic is a thinner for watercolors.

Both can be bought at the art store.
Work order (technology):
- Shellac is applied in three layers with a foam sponge (this varnish can also ruin a synthetic brush).
- Each layer is dried for 10 minutes. Dry the last layer of varnish until tacky.
- Then apply with your finger and rub in gum arabic. Initially, the gum arabic is collected on the surface in small puddles and the finger slides freely over it, then the finger begins to stick and the gum arabic acquires uniformity and is evenly distributed over the surface. The better we massage the gum arabic. the more beautiful. cracks will be more even.
- Leave to dry for several hours in a warm, dry place. The warmer and drier, the larger the cracks and the faster the craquelure will appear.
- After the cracks appear, we overwrite with the same means. as when working with the previous craquelure pair, and wash off in the same way.
- But as finishing varnish we can only use yacht varnish. Acrylic lacquer, best case, will go into small cracks, at worst it will generally rise like a fur coat.
Technology of two-step craquelure in decoupage (video)
We looked at coating techniques for paints and varnishes. This is not a panacea. Each master has his own zest and his secrets.
Next, consider the application in decoupage: napkins, printouts, decoupage cards, rice paper. The most important thing in any work created using the decoupage technique is a picture, an image. It can be printed on different paper, the difference is in its density. Napkin is the thinnest image carrier that does not require thinning. The printout is the densest, but the easiest to radiate. Decoupage cards and rice paper are more expensive - we will consider them in other articles, in the process of master classes.
In this article, we will analyze the most interesting, simple and effective to use - these are napkins and printouts.
Decoupage napkin with application technique
There are no special napkins for decoupage. You can buy them anywhere, both in special online stores, stores for artists and needlewomen, and in the nearest grocery store. Napkins, as a rule, are three-layer, for work we need only the top, colorful layer, the rest is separated and thrown away.
The main difficulty of decoupage for beginners is how to apply a napkin without folds and tears. Stock up on patience and time, you will spoil a couple of napkins and the skill will develop.
There are several ways to apply a napkin to a surface. You are invited to this - apply a napkin to the water, smooth it and then spread it on the surface, followed by smearing with decoupage glue.
Work process:
- We put a napkin on the treated surface. We take a medium synthetic flat brush, dip it in water and drip into the center of the napkin. We slightly lift the napkin by the edges and lower it to the surface again - look, it lay down completely evenly, without wrinkles. Now it remains not to spoil a good start.

- We lower the brush into the water, take it out and shake off the excess water (too wet the brush will tear the napkin). From the center to the edges, evenly in a circle, straighten the napkin with smooth, accurate movements.

- Hold the brush so that it touches the napkin with the entire surface of the bristles.

- We regularly wet and shake off the brush, and so we move to the very edge. You need to do this quickly enough to prevent the napkin from drying out.

- Ideally, the entire napkin will lie flat, without a single fold. As soon as we put the napkin on the water and leveled it, we immediately repeat the same process, but dipping the brush not in water, but in decoupage glue. From the center to the edges, evenly coat the napkin. It is not necessary to collect a lot of glue on the brush at once, it is better to dip it in glue more often. By the way, glue with this technique is consumed at least two times less than when gluing a napkin directly onto the glue. By applying glue, you additionally level the napkin and remove those folds that nevertheless appeared somewhere.
- After the end of this exciting process, dry the napkin. Can naturally using a hair dryer.
- After complete drying, we critically examine the work. If there is a crease, then it does not matter. We take sandpaper of medium hardness and carefully, gently erase the crease, there will be no trace of it. Do not be afraid. that you will tear off the napkin - if you evenly smeared it with glue and the glue was of high quality, it will be difficult to tear off the napkin. We also cut off the edges of the napkin with sandpaper, holding it at an angle of 45 degrees to the edge of the surface.

You have learned one of the ways to use napkins in decoupage. Know that there are other ways (other technology). To consolidate the material of this article, watch the video and evaluate other methods and techniques of the master in it.
How to glue a napkin in different ways in decoupage (video)
Decoupage printouts and application process (technology)
The use of printouts is technologically very convenient and simple. This technology provides a resource for choosing pictures and bringing your artistic ideas to life. All you need is to find a picture on the Internet, resize it in any graphics editor so that the picture exactly matches the dimensions of the surface on which you will be gluing the printout.
The only fundamentally important thing- the picture should be printed not on an inkjet, but on a laser printer, otherwise the ink will flow and smear when in contact with water or glue. special requirements there is no paper and you can use both photo paper and good office paper. So. you have a printout.
Work order (technology):
- We thin the printout with adhesive tape. We need a simple stationery wide adhesive tape. We impose it with reverse side printouts, lightly stroke with your finger and immediately pull in the opposite direction.

Together with the adhesive tape, a layer of white paper will easily separate, leaving a colorful layer. The adhesive tape must be glued in the direction of the fibers, then when peeling off the adhesive tape, almost the entire unnecessary layer will be separated at a time. If you stick the tape against the direction of the fibers, then only a small part of the white paper will come off with it and you will have to repeat the procedure several times. You run the risk of damaging the ink layer we need on the printout.
- Then you need to lightly stroke the thinned printout with medium grit sandpaper. Iron in one direction, from the center to the edges, do not rub the paper.

We only need to remove excess paper pellets and dust. Cut off the white edges of the printout with a utility knife and a ruler.
- Then soak the printout in water for a minute. This will allow her to soak well.
- Then we will well coat the surface on which we will apply the printout with decoupage glue. The adhesive layer should not be too thin or too greasy, so that the wet printout does not tear during gluing.

- We take the printout out of the water, blot it with a towel and put it on the surface. The printout should lie flat with no wrinkles. We go through the printout with a paint roller from the center to the edges, expelling air bubbles and excess glue from under the printout. Like this interesting technology this method.

- From above we coat the printout with another thin layer of decoupage glue and dry it.

- Cut off the excess printout along the edges with sandpaper. Hold it at a 45 degree angle to the edge of the surface and gently rub until the extra edge of the printout comes off.
- This is how printing technology ends.
How to transfer a printout to any surface (video)
This is where the article ends. In other reviews, decoupage creativity technology will be shown from, subject, crafts. You have to learn how to analyze different masters and heed their advice.
Decoupage is a fascinating and uncomplicated activity that has many techniques and is accessible even to the youngest craftswomen. With it, you can make exclusive interior items that will decorate not only your home, but also the exhibition halls of art galleries. In this review, we will look at how to perform do it yourselfdecoupage for beginners step by step with photo. Do not worry that something will not work out, in fact, everything is very simple. With the help of this technique in your home will gain new life old furniture, dishes, from shoes and many other things.
Decoupage products - works of art
First of all, let's deal with the definitions. Decoupage is gluing a pattern onto a surface. The picture can be placed on wood, leather, fabric, glass and almost any other product.
Reverse decoupage is the same process, which has only one feature - the picture is glued under the material. This can only be done on transparent surfaces: glass and plastic. Of course, the picture in this case is pasted face up.

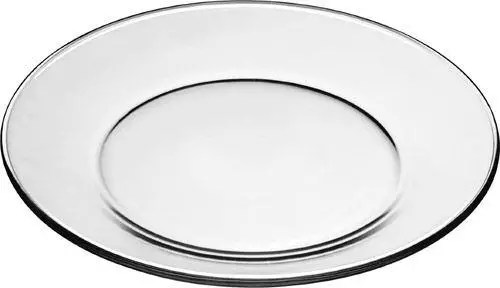
For your information! If a plate is used for direct decoupage, then in the future it will only perform a decorative function. And when using the reverse technique, the dishes can be used in normal mode.
Tools and materials for work
| Materials and tools | Note |
| With this technique, you can decorate a book, dishes, flower pots, bottles, furniture, . In general, literally everything that is in your house. |
| Pictures can be used from special decoupage cards, napkins. In addition, for this purpose, craftswomen use drawings on fabric, old newspapers, and magazine clippings. |
| You can use regular nail scissors or special tool, which is sold in needlework stores, The main thing is that the edges of the blades are very sharp. This is the only way to carefully cut out the desired image on a thin napkin. |
| You will need flat soft brushes. The pile in them should be tightly fixed. A “lost” lint can be a serious problem. It is better to have several brushes of different widths for smoothing and applying glue and varnish. |
| It is best to use ordinary household PVA. You can buy a specialized composition, but it will cost more. From varnishes it is better to give preference to acrylic. It does not emit toxic substances and is easy to use. |
| To decorate the work, acrylic-based paints, sponges, primer, sandpaper, craquelure can be useful. |


Basic tricks
You can fix the pattern on the surface different ways Let's take a look at them:
Method one
A simple technique for decoupage from napkins is to lay it on an object and fix it with glue. After drying, the surface is varnished.

Method two
For reverse decoupage use transparent base. The image is pasted front side to glass. After drying, fix with varnish.

Method three
Artistic composition. For its manufacture, many images are used, which, when glued, are combined into one. To make the picture look like one whole, painting, shadows and accents are added.

Method four
This technique is called "decopatch". For her, they use pictures from magazines, drawings on fabric. To get rid of clear boundaries, the edges of paper drawings are cut off. The surface is completely filled with images.

Method five
Creating a three-dimensional image. This is a technique that requires the talent of an artist. First, an image is pasted from paper napkin. And then a painting is done on it with a careful drawing of all the smallest details.

Decoupage bottles for beginners: step by step with photos and recommendations
- the simplest and most affordable material from which you can make original gift. You can buy a bottle of wine or fill the container with your own drink. Luxurious decoration in any case will impress.

We have already listed the materials and tools necessary for the work, so we will not dwell on this in detail. The only thing that needs to be added to the list is a windshield wiper. They pre-treat the bottle cleared of labels.
Important! It is better to work with a glass vessel with gloves. Your fingerprints are unlikely to have artistic value, so it's best not to leave them.
The sequence of bottle decoupage for beginners, step by step with a photo:
| Illustration | Stage description |
We apply soil  | For priming, you can use acrylic lacquer or PVA. The soil should dry well. |
Making the background  | As a background, you need to take white or light acrylic paint. It may be necessary to apply the composition in two or even three layers in order for the surface to become completely opaque. |
Applying images 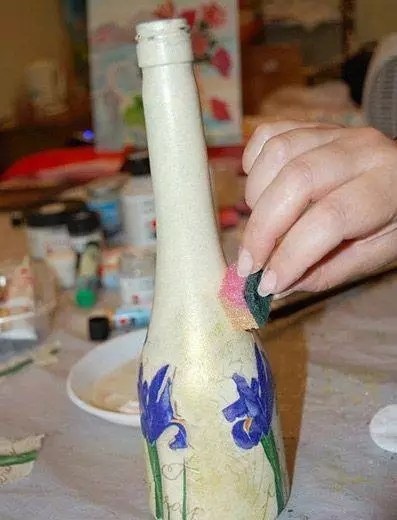 | The pattern on the napkin is carefully cut out with scissors. If the background of the picture and the bottle match, do without scissors, carefully tear off the napkin. To make the drawing on the printout easier to apply, it should be soaked in a plate of water. |
Fixing the drawing  | Lacquer must be applied to the surface of the drawing. This can be done with a soft flat brush or spray gun. Care should be taken that the picture is not covered with folds. It must be gently smoothed with a brush if necessary. |
Finishing  | After complete drying, you can gently sand minor flaws in the work. To emphasize details, use a brush and dark paint. After finishing, apply a final coat of varnish. |
Another option original design- decoupage bottles with tights. Master class on video:
Some decoupage tricks on glass for beginners: step-by-step recommendations with a photo of drawing a pattern from napkins
The first experience of gluing a napkin can be unsuccessful: wrinkles and folds inevitably appear, which spoil the whole result. A few tips on how to avoid this:
- To apply a pattern on a convex surface, you can make “tucks” on it. Cut the edges of the pattern with scissors or even cut out triangular pieces. With the last option, it is better to be careful, there is a risk of spoiling the image if the cut angle is incorrectly calculated.

- You can apply glue to the surface, and then attach the drawing and straighten it with a brush. Another method would be no worse - apply glue on top of the picture, while straightening it.
- If the image is applied to an almost flat surface, you can pour glue into the center, attach a napkin and gently disperse the composition, spreading the material over the surface.
- On a perfectly flat sheet, you can stick an image with an adhesive pencil.
- You can apply a picture with a piece of polyethylene (bag or stationery file). The drawing is placed face down on polyethylene and moistened with water. Then the package with a wet napkin is applied to the pasted surface. The package is removed, the napkin remains.

A simple master class for decoupage shoe boxes
Smooth surfaces cardboard box from shoes - an excellent basis for decoration. Such an interior box will become a favorite place for household trifles.
| Illustration | Stage description |
Surface preparation  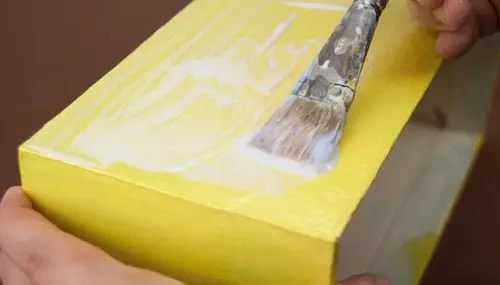 | The corners of the box must be reinforced with pieces of masking tape, then primed with an acrylic primer or paint. After drying, the primer should be lightly treated with fine sandpaper. It may be necessary to repeat the procedure if the layer does not lie flat enough. After you need to paint the box with the color chosen for the background. |
drawing 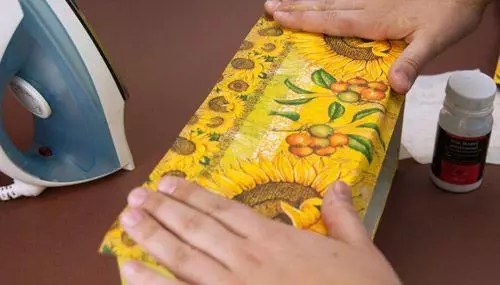 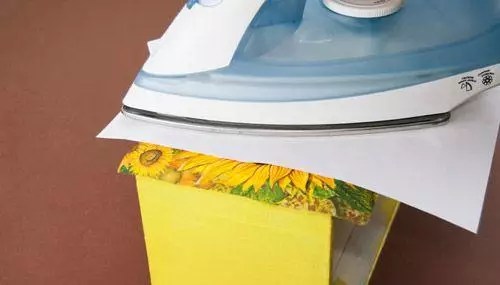 | The place for the drawing is covered with decoupage glue. After the layer has completely dried, a pattern is applied on top and smoothed out with a hot iron through a sheet of paper. After the napkin is covered with a thin layer of varnish. Too thick a layer will cause the pattern to blister. This procedure is repeated over the entire surface of the box. |
Decoration and refinement   | With a foam sponge, background paint and other shades are applied to match the image. Small details are drawn with a brush. To add some casualness, you can splatter white paint on top with the bristles of a toothbrush. Then the final varnish is applied. |

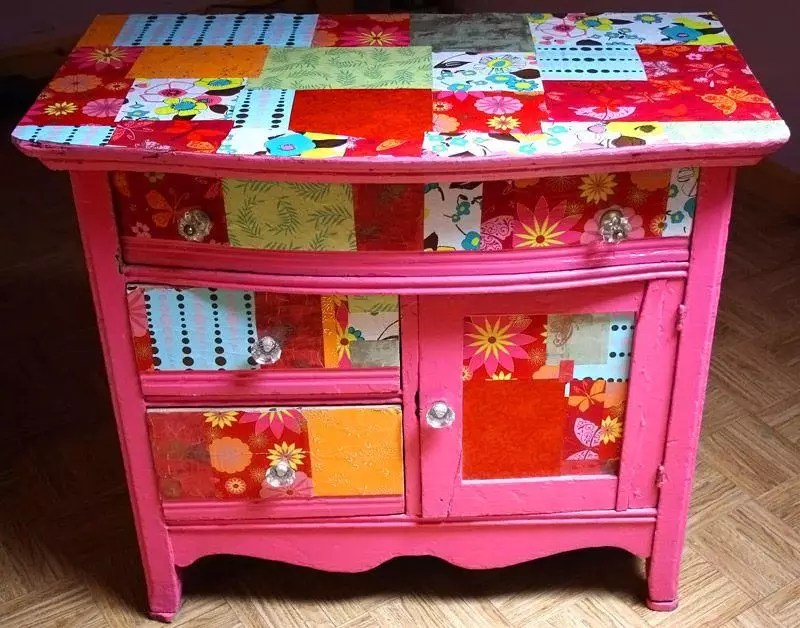
Decoupage furniture in Provence style: a master class for updating a chest of drawers
Testing your strength on simple things, you can safely proceed to decoupage with your own hands with napkins. In addition to the usual list of working materials, wood putty will be required. She pre-levels all the cracks, cracks and other irregularities on the surface of the chest of drawers, cleaned of old paint.
Do-it-yourself kitchen furniture decoupage sequence, photo and description:
| Image | Operation description |
Preparation 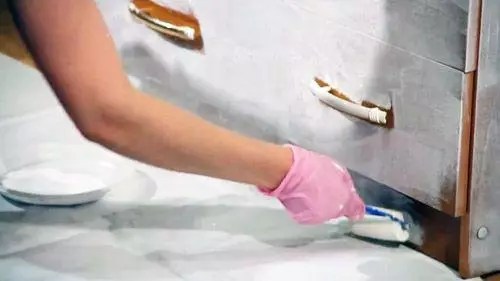 | Furniture must be thoroughly cleaned of all layers, smooth out defects with putty. After drying and grinding, all surfaces are primed and rubbed with sandpaper-zero. |
Preparing pictures  | The pattern on the napkins is carefully cut out or cut off by hand, the bottom layer is removed. The picture is smeared with glue and applied to the furniture. The application is carefully spread with a brush. |
Finish coat  | No need to hurry. All drawings must dry. All furniture should be varnished, not just the place of decoration. On large areas it is convenient to do this from a spray bottle or spray can. So the varnish will lay down in a thin layer. For best effect 3-4 coats should be applied sequentially, waiting for complete drying between treatments. |
 | Result. |
Helpful advice! If you need to apply a pattern on a polished surface, polishing is pre-treated with sandpaper until the shine disappears.
When decoupling furniture with a cloth, the process practically does not differ from that described.
Decoupage master classes on video
As they say, it is better to see once than hear a hundred times. That is why we offer a selection of video decoupage lessons for beginners.


