DIY bead bracelets. DIY bracelets easy and fast
A fashionable bracelet is an indicator of the owner's sense of style and taste. Such an accessory will complement any image and make it complete. The main thing is to choose the color and shape. After all, not every bracelet looks good on everyone. Therefore, you can make the most suitable thing for yourself with your own hands.
Fenugreek
Most fashion bracelets now, which you can do with your own hands, is shamballa. Decide on a color that matches most of the clothes in your wardrobe and start choosing materials. What you need for work:
- Three meters of waxed cord.
- ten beads.
- Scissors.
- Colorless nail polish.
- Board and two nails. This is necessary for weaving. Drive nails into the board at a distance of 30 centimeters from each other, you get a machine. It can also be purchased at a craft store.
This set of materials is suitable for beginner needlewomen. Having learned how to weave a regular Shambhala bracelet, you can master more complex techniques.
How to make a bracelet
- Tie the edge to one nail
- Pull it to another nail, leaving an extra five centimeters, cut it off.
- String existing beads on it in necessary order starting after ten centimeters from the nail.
- Pull the cord well and tie it to the second nail.
- Cut 2.5 meters of cord. Step back two centimeters from the nail and tie through the center of the cut one. That is, the edges from the node should be the same length.
- It should turn out so that left side protruded higher from the node. We start weaving with it. Pass it under the main thread and over the right.
- We draw the right part above the main one and under the left one.
- We tighten. The result was a node that will be used throughout the work.
- If you did everything right, then Right side sticks up higher.
- Now the right segment passes under the main thread and above the left part.
- The left part is above the main and under the right cord.
- We tighten. Weave twenty knots according to this plan.
- You have almost learned how to weave a fashionable Shamballa bracelet. Now we add a bead to the usual knot. We braid it.
- After the three base knots, another one with a bead follows.
- Keep doing this until you run out of beads.
- Weave fifteen more basic knots.
- Remove the bracelet from the machine. Stepping back five centimeters from the base knots, weave two simple knots on the main cord. Cut off the rest.
- Lubricate the last knots with prepared varnish.
- To make a comfortable adjustable fastener, you need to close the edges of the main cord into a circle. We direct the ends of the cords with knots towards each other. With the ropes that did the main work, we make five basic knots.
- On the remaining cord do simple knots cut off the rest. Lubricate with varnish.
You have learned how to make a simple version of the Shamballa bracelet. Experiment with bead diameters, colors, and even the number of rows.
fashion trend
Fashion is very relevant now. Don't be afraid of them a large number, wear on both hands, but make sure that the accessories match in shape, texture or color. Use big sizes. How to do it? You will need an ordinary plastic bottle for the base and improvised materials for decoration. It can be a fabric of different textures, rhinestones, threads, paint, varnishes, brooches.

Progress:
- cut out plastic bottle the bracelet is four centimeters wide.
- If the bottle is colored and you are going to work with transparent material, then glue the base
- Take a fabric with a design that suits you. Cut off a flap that is one and a half centimeters larger than the base on each side.
- Glue a bracelet on them.
- To wrangle inside bracelet, use masking tape.
- Cut out another strip of fabric and glue it inside.
- Sew or glue beads, stones, rhinestones.
A lace or guipure accessory will look very gentle. You don't need to add extra details to it. This fashionable bracelet is notable for the fact that it requires minimal money and time. Each dress can have its own unique decoration.
Ethnic style
What bracelets are fashionable for more than one season? In ethnicity. They are easy to make from felt and floss threads matching it in color. Commonly used red, black, yellow, orange, burgundy, brown, white. As an example, take the felt of the last three colors and suitable threads.

Progress:
- Measure the circumference of your wrist and add three centimeters. This length should be the product.
- Draw circle patterns on paper. Two will be 4 centimeters in diameter, four will be 3, they are used for the base. Only half will be visible, the rest are needed to hide the wrong side. And cut out a few smaller circles for decoration.
- Embroider a pattern on the smallest details, thus attaching them to the middle ones. It can be stitches and zigzags.
- Now connect the middle parts with the largest ones in the same way.
- Collect the bracelet. A photo will help finished product. Fold pairs of circles and connect with a decorative stitch.
- Fasten the pieces to the sides.
- For the fastener you will need two burgundy rectangles and a white one. The last one is a little shorter, make a hole in it for a button
- Sew on a button.
The work is over. You can invent different variants execution of this bracelet, changing the shape of the felt.
Polymer clay
Polymer clay is great material for making a bracelet in ethnic style. Here you can use any colors, patterns and shapes. For work, you will need stacks for plasticine and improvised materials. Twist the bundles, make circles, squares, semicircles, leaves. Try any size. The bracelets are thin, so you need to make several of them at once and wear them together. The material is comfortable and supple, takes shape well, so it will not be difficult to work with it. It can harden in an oven or on its own.

Men's accessory
Fashion made with love, will be a gift for young man, friend or father from a girl. After all, the strong half is not fond of needlework. You can make such a thing according to the technique already known to us, used in weaving a Shambhala bracelet. Just don't use beads. For men fit wider bracelet.
Materials:
- Lace or rope. You need to calculate as follows: per centimeter of the bracelet is 13 centimeters of cord. That is, for a 20-centimeter wrist, 2.5 meters of material is needed.
- Scissors.
- Buckle.
- Lighter.

Progress:
- Tie a knot at one end of the buckle so that different sides from it was the same length of cord.
- We pass the ends into the second part of the buckle. A cord should be stretched as long as a man's wrist.
- Bend the edges of the cord so that you can weave according to the principle of a Shamballa bracelet.
- We skip the left part of the lace under the main threads and above the right part.
- The right thread above the main and under the left.
- Continue until you reach the second part of the buckle.
- Solder the ends to the product with a lighter.
Leather bracelet
To please your man, learn how to make fashion bracelets with your own hands. MC will help you with this. Take a piece of leather and a clerical knife. Progress:
- Cut a rectangle out of leather 3 centimeters larger than the desired size of the product.
- Draw a drawing with a clerical knife.
- Draw simple parallel lines that will later become weaves.
- Cut the design on the skin by about a third of the thickness.
- Cut the strips along the entire depth.
- Tie them together and secure with a stick.
- Punch holes along the edges for fastening.
- Put the bracelet on the jar for ease of use.
- When finished, boil the bracelet along with the jar. At this point, the accessory will take the necessary shape, and the pattern will look like a carving. The boil lasts three minutes.
- Cool the product, correct the defects. Wrap the protruding sides of the skin with a cloth.
- Polish the bracelet sandpaper and coat with shoe cream of a suitable color.

Basic Techniques
The simple techniques described above will help you create a unique trendy bracelet for yourself and your boyfriend. If you creative person, with time and a good imagination, then be sure to try to make an accessory with your own hands.
Always in price, sometimes they look more impressive than jewelry


Learning to make 10 beautiful bracelets
Summer bright bracelet.
Pairs well with a jacket and jeans

you need a brown leather cord, a blue waxed cord, a chain of metal balls and a golden bolt.

Fold the leather cord in half (each side must be at least 50 cm if you want to make a bracelet in two turns). Attach the blue cord.

Now fasten the metal chain with a blue cord, and then thread the beads of the chain between the turns of the blue cord. If you couldn't find a metal chain with beads (usually sold in stores selling accessories for creating jewelry, you can string beads on a thread and use it instead of a chain).

Measure the diameter of your wrist, add 2-3 cm and wrap the blue cord around the leather to this length.

8.
At the end, fasten the metal chain with a few turns of blue cord (as at the beginning), tie a knot along with the leather cord.
Put the bolt on the resulting cord in the knot area, secure it again with a knot.
Cut off the excess length of the cords, the bracelet is ready!


Imitation pearl bracelet

You will need two leather cords about 50 cm long (they can be purchased at any hardware store for making jewelry).

Now we sew artificial beads between two leather cords with a thread and a needle.

So we continue to sew gradually bead by bead.

Sew in the beads to the number that you think is necessary. Don't worry about the stitching threads being visible, we'll hide them for now.

Now with an openwork braid (0.5-0.7 mm wide) tie each cord. So you and the threads will hide under the cord. 
This is what you should end up with - in the middle of the bead, and at the edges of the lace braid.
At the ends, knot both the braid and the cord together.

TURQUOISE BRACELET
Jewelry with turquoise always brings back memories of the blue sea, sunny beaches, hot evenings and even a little “oriental”.
I don’t know what it is connected with, and every person miscellaneous items evoke completely different emotions.
But I can say one thing - turquoise jewelry leaves only a few indifferent.

For a faux turquoise bracelet, we need 2 leather cords Brown 80 m each, artificial turquoise 0.5 mm (approximately 100-120 pcs), thin brown leather thread 100 cm, needle, decorative button, Moment Crystal glue.
1.
We put leather cords on a flat surface parallel to each other at a distance of 1 cm. We thread the leather thread into the needle, fix it on the cord and begin to sheathe the cords, and insert turquoise between the cords.

When the entire length of the cords is sheathed with threads and beads, carefully glue the leather thread on the wrong side (to prevent it from shifting). Wait for complete drying.

On one side of the leather cords, make a ring at the end, and sew a decorative button on the other - this will be the clasp on the bracelet.

5.
Chanel style bracelet
Perfect for a little black dress


We'll need artificial pearl, jewelry fishing line, two types of chain, two connecting jewelry rings, a piece of satin black ribbon (1 cm wide, 20 cm long), scissors.
String faux pearls on a jewelry line. How many beads to string is up to you, but it depends on the diameter of the beads and the width of your wrist, usually 18 to 24 beads are enough.
.
Now put one end of the chain on the fishing line.

Measure the length of the pearl, cut off the same amount of chain, put the second edge on the second edge of the fishing line.
Carry out the same procedure with 2-3 more types of chains.

Now put the edges of the chains on the jewelry connecting rings (rings can be from 0.8 to 1.4 cm in diameter).


Pass through the rings satin ribbon.

Elegant bracelet
Sometimes for a festive exit, our outfit is rather modest, and acquiring some bright accessory no time, no money, no point. Make this accessory with your own hands, like this bracelet.
We will need:
- Watch or bracelet with a fixed base.
- Satin ribbon (2 cm wide, 1.5-1.8 m long).
- Brooch.
- Wire.
1.
From a satin ribbon we begin to make beautiful big bow with many petals.

We fix the petals at their intersection with wire. We attach a brooch in the center of the flower. We fix the bow on the watch (or bracelet).


A universal decoration for military and casual clothing is a denim bracelet. It pairs easily with denim clothing, and with white cotton and natural linen.
DENIM BRACELET

To start, take a small piece brown leather and beat out any inscription with printed letters (although special metal printed letters are needed for this). If you don’t have them, then just cut a 5 * 2 cm segment from the leather.

From old jeans, cut off the belt, measure the width of your wrist. From the side of the belt where there is a hole for the button, cut the width of the wrist along the length. Sew a piece of leather in the middle of the workpiece, sew up the side seam.

sew on beautiful button(it is desirable that it be in a single color scheme with a piece of skin).


Bracelet in 15 minutes
Fast, cheap, attractive - all this can be said about this guipure bracelet, which can be sewn in just under 30 minutes.

We will need:
- Guipure.
- Spandex.
- Beads.
- Thread, needle, scissors.
- Sewing machine.
We sew the spandex to the guipure (if the width of the wrist is about 20 cm, then cut the guipure 40 cm), and only after that sew the spandex.
Sew the edges wrong side inside.
sew on decorative elements and beads.


Victorian bracelet
The Victorian style, both in architecture and in clothing, was distinguished by luxury and beauty. in some quarters of London (and of course the English colonies), entire blocks of the Victorian era have been preserved. The clothes included velvet, lace, shades of gold and warm colors. pastel colors, precious and semiprecious stones. And even today, some jewelry like bracelets in victorian style as relevant as ever.
We will need several types of braid in gold and pastel colors(guipure, satin, velvet), bead thread, gold-tone metal buttons, superglue.

.
We take a cotton base 20 * 10 cm. Fold it in half in width, determine the middle.

We put a braid on one part of the base of the bracelet: in the middle in a fold, on one edge golden velvet, and on the other body guipure. We wanted to sew on dark pink imitation pearls, but they don't fit very well.

We settled on white beads. We sew on the braid blind seams to the base. White beads sew on body guipure.
.
Now we bend the edges of the braid, glue it on the wrong side. Now we glue the edges of the base inward in width. The edges are sewn by hand with a hidden seam.

On one side of the bracelet we sew a metal button in gold.

And on the other side there are two strips of body guipure braid. 

The bracelet is ready 
FABRIC BRACELET
Reincarnation of old grandmother's beads in modern accessory- that's what the next master class offers you.

We will need:
- Wooden or plastic beads (you can even buy them at a flea market).
- Fabric calico with floral print.
- Threads.
- Satin ribbon for ties.
We free the beads from threads, fasteners, fasteners. From the fabric we cut out a strip 7 cm wide, 20 cm long. The length is the length of your wrist + the volume of each bead, but the width of the strip is the width of the widest bead multiplied by 2.


We sew the strip from the wrong side along the length, turn it right side out, iron it.

Now we insert a bead into the inside of the fabric tube, after passing a satin ribbon for a tie into it (into the core), then we tie it with a thread. So we continue until the fabric tube is completely stuffed with beads.

At the end of the bracelet, we cut off the excess fabric (if any), carefully sew the fabric by hand on the last bead.

Creative success!
Knitly.com
Volumetric bracelet made of beads and beads
Weaving jewelry from beads is a whole art, and the works of individual masters are true masterpieces. Looking at the complex interweaving of patterns, ornate shapes and original color combinations, such work seems difficult for beginners. Of course, in order to comprehend the basics of ancient needlework, you need a little theory and practice. Visual beading lessons will help beginners with this. Having learned how to weave bracelets from beads for beginners, you can create amazing collections of designer jewelry as a gift to yourself, loved ones and friends.
The bracelet is one of the most popular jewelry. Fashionistas can wear it to social events, for a walk and even to work in the office, diluting a little strict look. Especially valuable and original jewelry hand made. Despite the fact that beaded accessories are relatively inexpensive, outwardly they are not inferior in beauty to expensive jewelry. Do not assume that such accessories are suitable only for teenage girls. Elegant ladies, lovers of luxury and admirers creative solutions in fashion, beaded jewelry will certainly appeal to you. In shops where craftswomen sell their author's masterpieces, not everyone can afford the price of such products, because handmade work has always been highly valued.
Bracelet with comfortable clasp One size bracelet
 Airy beaded bracelet
 Colored bracelets
Eat perfect solution- learn how to weave beaded bracelets according to weaving patterns for beginners. Having immersed themselves in the fascinating process of weaving, with the help of simple master classes, beginners will be able to create beautiful jewelry in just a few hours.
First of all, it is important to follow simple advice experienced craftsmen:
- Before work, you need to stock up on everything you need. To weave a beaded bracelet, you will need a base (fishing line, thin wire or thread), the material itself, and scissors. Hooks-clasps or carabiners, special thin needles will also come in handy.
 Necessary materials for work
- The choice of material. Beads are the main component of jewelry. To make the product look beautiful and neat, you should stock up on high-quality beads in large quantities.
 Beads for every taste and color
Advice!
Chinese beads are cheaper, but the quality and aesthetics leave much to be desired. Beads can be chipped, non-uniformly colored, unequal in size, which negatively affects the final product.It's better not to skimp and buy quality Czech beads. The choice of needlewomen is presented with an incredible number of colors, textures and shapes of miniature beads, from which it is a pleasure to weave.
- Organizer for work. In order for the work process to captivate and bring pleasure to the craftswoman, you should organize a place so as not to experience discomfort. To organize the beads by color, shape and size, you should stock up on small containers or make a DIY organizer box.
 Convenient organizer
What else might be needed to get the job done? Certainly, free time. The process of weaving is not only a creative process, but also painstaking work that requires concentration, slowness and attention. Following the simplest tips, you can easily weave the bracelet of your dreams.
Weave with our own hands
For beginners, at first glance, weaving a beaded bracelet may seem like a difficult and time-consuming task. The main thing that is required is perseverance, the desire to create something beautiful, as well as a creative mood. To help beginner craftswomen, there are many simple circuits, by embodying which, you will be able to master the skill and share successes in creativity. We offer several lessons on creating bracelets from beads with your own hands.
 Bracelets for all seasons
monastery cross
The basic pattern is called a monastery cross. Having mastered simple weaving, you can create wide baubles by creating original patterns, combining colors and even weaving names or phrases.
 Bracelet with poppies
To work, you need to prepare a monofilament or fishing line for the base, a thin needle and beads. The algorithm is the following:
- We collect four beads on the fishing line, close them in a ring, and bring the needle into the first, second and third. So we get a cross.
 Start of weaving
 - Then again we string three beads onto the base, now we insert the needle into the fourth bead of the previous link. This is how the next cross turns out.
- Add beads in the same way until we weave the first row of the bracelet. right size. You should get a chain of crosses, but it does not look too even.
 Weaving the first row
- We return to the beginning of weaving. We introduce a needle into the side bead of the first link, then we collect three more, forming a cross.
 Weaving the second row
- We bring the needle through the upper bead of the last cross, again we collect two, introducing it into the side of the second link and into the upper bead of the cross.
 Final stage
We repeat weaving until the base of the desired width and length is obtained. Beautiful beaded ribbon gracefully wraps around the wrist. We attach a carbine or clasp to the ends, and the bracelet is ready. Having learned to weave a pattern of a monastery cross, you can create beautiful and original baubles with names, weave any logos or patterns. For this method of weaving, many craftswomen use a loom, which you can buy or make yourself.
 Approximately such an original bracelet is obtained
Cross stitch. Monastery Weaving. (Part 1)
Cross stitch. Monastery Weaving. (Part 2)
Beautiful beaded lace
We offer you to create a luxurious openwork bracelet in just a couple of hours. To work, you need to prepare a fishing line or monofilament, beads at number 11 and 15 of different colors.
 Bracelet with fish and hearts
 Bright, flower bracelet
Attention! When starting to weave according to the scheme, you should have an idea in advance about the future product, take measurements of the circumference of the wrist and the possible width of the accessory.
Step by step algorithm:
- We make a strip that will become the basis of the bracelet. Its width depends on the width of the product, as the weaving will go up.
- We string four beads onto a piece of fishing line or monofilament, closing the element into a square. Weaving is done in one thread, which we use for each bead several times.
- We string two beads on a thread that comes out of the last pair, sends it back to the previous pair, moving from reverse side. Finishing the previous element, we immediately form the next one.
- When the first row is formed, proceed to the second. We string the beads in the following order: first, two beads at number 11, then one at number 15, and again two at number 11. We will direct the needle into the next pair of the first row, pass through it and send it to the next pair to form a new row.
- When all the rows are formed, we complete the weaving. To make the bracelet look neat, by the end we gradually reduce the number of beads until only one bead remains. Attach a clasp to it.
 Weaving pattern
  Here we have such an interesting bracelet
Using this technique, you can weave an elegant set of jewelry, consisting of a bracelet and a fashionable choker around your neck.
Luxurious bracelet made of beads and beads
By combining beads and other materials for needlework, you can create luxurious jewelry worthy of queens. We offer to weave a magnificent bracelet, which in beauty and luxury is not inferior to an expensive one. jewelry. To make the jewelry look truly expensive, we will take beads, bicones and beads for weaving. noble shades, gold or silver, antique bronze or delicate pearls. For the base you need a nylon thread.
 Bracelet with different beads and beads
 Cute wrist bracelet
Thin bracelet made of beads and beads
 Very romantic and delicate bracelet
The work is as follows:
- We use a kapron thread in two additions so that the weaving is reliable and the product does not break during wear. To the end of the thread, folded in a loop, we fasten the lock with a sewing knot.
- We collect six beads, then one bicone and again six beads. With a needle we pass through two large ones, we tighten the first element. On the other hand, we repeat the steps.
- We collect beads again in this order: one large, six small, a bicone and six more small ones. We pass the needle through the previous one, and again we string a large bead. So we repeat until the end of weaving, and at the end we fix it with a lock.
 Lesson on weaving a bracelet from beads and beads
 Very beautiful bracelet in delicate colors
A stylish and elegant bracelet can successfully complement an evening look, become an elegant addition to a touching wedding look.
Bracelet made of beads and beads
Original volumetric decoration
Handmade beaded jewelry will be able to advantageously emphasize any fashionable style. Especially harmoniously they complement outfits in the style of boho or boho-chic, Provence or country. Graceful simplicity, creativity and incredible charisma are inherent in all hand made products, and this is their value. Volumetric decorations today at the height of fashion.
 Tricolor beaded bracelet
 Interesting weaving bracelet
We offer to make a simple but original three-dimensional bracelet with your own hands.
Making it easy:
- We cut several pieces from the jewelry cable. We string beads thickly on each. You can use several shades that harmonize with each other to create fashion effect gradient.
- From one edge we connect all the segments together, hiding them under a hat with a clasp. Similarly, we fix the elements from the other edge.
- We give the bracelet a shape, twisting all the individual segments with a tourniquet, you can also weave a voluminous pigtail.
In such the simplest technique You can also make a beautiful necklace by adding a bracelet.
 Step by step creation bracelet
 This bracelet can be made in any color.
There are many unusual ideas for creating beautiful beaded bracelets for beginners. Feel free to use ready-made master classes, supplementing the schemes with author's elements. The main thing in the art of beading is experience, creativity and skill.
How to make a beaded bracelet with your own hands: master class
Today we offer you to make fashionable bracelets with your own hands.
Thread bracelets have become mega popular today. Such a bracelet is worn not one at a time, but in whole rows in several copies. On the hands of such bracelets look very stylish and fashionable. Well, today we propose to make such a bracelet with your own hands. Look at the photo and video, choose the bracelet you like and start learning. All you need (depending on the type): floss, beads, chain, button, golden nuts, ring, scissors and duct tape. Good luck!
Weaving bracelets
How to make a thread bracelet
You will need: floss thread or lacing, large beads, scissors and button.

Measure the required number of threads so that we get a cut that, folded in half, will be equal to: 1st side 66 cm, 2nd 48 cm. Then, we fold it in half (see photo). You should get 3 identical threads and 1 short one.

At the very top, retreating about 1.5 cm, we make a knot. Cut off the short 4th thread.

Start weaving. Weave 2.5 cm and thread the beads into the left strand.


Again, left-empty-right. Here's what you should be able to do.

Weave on your wrist. At the end, we also simply weave about 2.5 cm (as at the beginning). We make a knot.

We thread a button at one end, two threads in each hole. We tie a knot.

Cut off excess threads. Here we made such a beautiful bracelet made of threads and beads with our own hands.

Ah, here's what they look like in different colors.

And on the arm. Very stylish. Is not it?

Macrame bracelet

To weave a macrame bracelet, you will need: 3.5 m of thin colored lacing, a flat ring, an embroidery needle, scissors, and adhesive tape.

Cut the lacing into pieces: 2 x 70 cm, 2 x 50 cm and one 25 cm. Fold the 50 cm piece in half and pull out the loop on the ring. Also repeat on the other side of the ring (see photo).

We take a 70 cm cut, fold it in half and make an air loop, wrapping it around our 50 cm cut. left side We throw 70 cm of the cut on the right and thread it inward as shown in the figure on the right.

Pull to the end and slide the resulting knot tightly, to the very top.

Now we make an air loop on the other side. This time we throw the right side on top.

Make a tight knot again. Continue weaving macrame: to the left, to the right, to the left, to the right, etc., until the length of your wrist is necessary.

Upon completion of weaving, insert the needle in turn from one side and the other and pull through 2-3 knots as shown in the photo.


Cut off excess threads.

Now take the remaining 25 cm section and pass it through the outer strands on both sides, tie as shown in the photo.

We begin to weave macrame as at the beginning: left, right, left, etc.

Having made 5-6 rows, we also sew them with a needle.

We make knots on both sides and cut off. If the last steps seem difficult for you, you can simply weave macrame around the entire perimeter of the bracelet.

Your original macrame bracelet is ready.

DIY beaded bracelet

For such a bracelet with beads you will need: leather cord, colored lacing, beads connected together, a nut.

Fold the leather cord in half to form a loop, which should be the right size for the nut, as this will be the clasp. Start wrapping the leather cord with colored lacing (6-7 times).

Lay the beads along the cord and continue to wrap each bead with lacing.

Continue wrapping by measuring the length around your wrist.

At the end, make another 5-6 loops and tie a knot with leather lacing, wrapping it around the loops.

Thread the nut and make a knot again, fixing it.

Cut off excess threads.

You can make a whole bunch of such simple bracelets.

On the hands they look very nice and modern.

How to make a friendship bracelet
Another mega popular bracelet is the friendship bracelet, which is woven from colored floss threads.

Those are the ones you'll need.

We take a pair of 6 colored threads. We tie them into a knot, leaving an extra 5 cm. For the convenience of weaving the bracelet, we will fix it upper part tape.

As in the picture: we tie together 2 extreme threads: red and orange.

Pull up and to the right to tighten tightly. Important: do double knots! Now do the same with each color (i.e. red with all colors until it is the extreme one on the other side).

Repeat the same with opposite threads.

When both red threads are in the middle, tie them and pull to the base (also twice).

We repeat weaving to the end. We get a charming rainbow friendship bracelet. You can braid it at the end.

Here, they are our beautiful)))

Isn't it lovely?

Weaving bracelets from threads and chains

All you need is colored threads, a thick bracelet chain, scissors, and stealth.

We divide the threads by color into two thick strands. We grab them with the help of invisibility and begin to pass through the links of the chain.

We carry out the first strand and start it under the other. We also draw the second strand and, again, let it go down.

We repeat the steps to the end and get a chic wicker bracelet.

Wow, very stylish

DIY bracelets video
Related posts:
No related entries found.
Bead bracelets- inexpensive and accessible to anyone decoration that will complement the suit in any style. Beads are very diverse in form and material from which they are made: glass and stone, plastic and wood, metal and bone - just not listed. And if you use various accessories: accessories, ribbons, lace, leather, etc., then the possibilities to create something beautiful and very individual become almost endless. Mankind has been making and wearing bracelets since ancient times. But they did not immediately become an ornament. Their first purpose is amulets, protectors from influences hostile to man. Somewhere this is preserved even now, if the bracelet is made of natural stones. After all, their useful influence and energy are undeniable. But it is enough that you like the decoration and improve your mood.
The simplest DIY beaded bracelets available for making even a child. Yes, and many, probably, made them themselves, having reached their mother's stocks. It is enough just to string the beads on a thread. In general, this option has the right to exist even if you are no longer a child. If the beads are very decorative, and the thread is elastic, then why not. Using accessories, departments with which can now be found even in small towns, you can complicate the design and add decorativeness. IN last resort, the range of online stores selling accessories for jewelry is very extensive. And ribbons, lace, cord, chains are not a problem to find at all.

Bead and ribbon bracelet has many variations. For the simplest, nothing but a narrow thin synthetic ribbon and beads with a sufficiently large hole, we will need nothing. Cut the end of the tape obliquely under acute angle and lightly singe it over the flame of a lighter so that it does not dishevel. Do not overdo it - if you burn too hard, then sagging will form, which will thicken the edge. Stepping back from the opposite melted edge of the ribbon at a distance of 15-20 cm, so that you can then tie a bow, tie a knot, then put a bead on the ribbon close to it, make a knot again and repeat until the bracelet is finished. Finish with a knot. Trim both ends of the tape and melt them. Your bracelet is ready.

Another way is to sew beads onto the ribbon. The distance between them is equal to the diameter of the bead. Having strung a sufficient amount, we trim the ribbon on the thread. We have a very nice decoration. Narrow lace can be used instead of a ribbon. And if you triple the distance between the beads, making three stitches, then appearance decoration will become even more decorative.
For the third option, in addition to beads and ribbons, we need accessories: huggers, pins, a carabiner and a round-nose tool. From narrow tape Let's make roses. We put huggers on the beads with the help of pins and make a loop with round-nose pliers. From the wrong side, with inconspicuous stitches, we sew roses to beads, alternating them with each other. We attach a clasp to the extreme beads. It turned out to be a glamorous bracelet. Its only drawback is that Bottom part flowers do not look very aesthetically pleasing. This is easily fixed by using bracelet connectors, also available from the hardware department - just circles with loops on both sides. Sticking roses on them with a glue gun or instant glue is not difficult. At the same time, the assembly of such jewelry will be much easier, it will look better, and it will be more pleasant to wear it.

Beaded and beaded bracelets can be quite simple if you string beads and beads on a thin silicone rubber band, alternating them with each other. More complex designs are made using weaving and require sufficient perseverance and skill. But it is not the gods who burn the pots, if you wish, you can learn everything, gradually complicating the products.
The sequence of actions can be seen in the diagrams. If the assembly is done on silicone rubber, then you do not need a fastener. The decoration with a clasp looks more elegant. Do not forget to properly fasten the ends of the threads so that your product is not only beautiful, but also durable. You can hide the cut ends inside the beads, if the diameter of the hole allows. If not, then cut them short and lightly melt with a candle or lighter.

Very unusual and beads are obtained if we weave a grid of small pink beads with the usual monastic weaving and diagonally sew an “air” onto this grid. How this same air chain is made: take a thread or fishing line and string beads on it. Using a crochet hook, knit a chain from the fishing line with free loops so that each loop of the chain contains 1-2 beads.
Together with beads, you can include larger decorative beads, pieces of crystals, shells, etc. in separate loops. For one bracelet, the chain length should be 5-7 meters. The hardest part is not to mess it all up. Attach the first loop of the chain with a pin to the pillow and, as you knit it, wrap the "air" around the pillow so that the turns lie side by side without running into each other. You can secure with pins. When sheathing, gradually unwind the chain, removing the pins.

To sheathe, sew the end of the air chain to the corner bead, string three or four “air” loops with an accordion on the needle and attach them through 2-4 beads. That is, you string the loops on the needle that came out of the bead and pull the fishing line through 2-4 beads. At the exit point, pick up air loops on the needle again and pull the thread through the next beads. Move in a diagonal direction along the grid lines. At the edge, do not cast on more than two loops. Having rounded the edge, move in the opposite direction along the adjacent diagonal line. large beads irregular shape can be included in the "air", or you can sew them separately in random order or strung on a needle along with the loops of the air chain. When finished, attach the toggle clasp on the chains to the product along the edges of the bracelet. You can simply make an air loop at one end of the bracelet with a needle and thread or fishing line, and attach a button or a large bead of a suitable color to the second.
How to make a beaded bracelet

How to make a beaded bracelet and chains. We will need the following materials: about a meter of a chain, beads of two colors (you can take contrasting ones - black and red, or, on the contrary, choose a tonal combination), beads for the central row are slightly larger than for the extreme ones, a silicone thread with a total length of about 3 m, scissors and three needles. We divide the chain into segments of 5 links.
We pull the thread into the needles so that it is doubled, and temporarily fix the ends of the thread. Further according to the scheme: first we string a large red bead on the middle thread, then we thread the threads through the links of the chain: the extreme ones - through the first and fifth, the middle one - through the third link. The next step is to string small red beads on the extreme threads, put on a piece of the chain, again a large bead on the middle thread and then a piece of the chain. After that, we string small black beads on the extreme threads, and behind them a chain. Thus, we alternate on the extreme threads after a large bead either red or black. We finish with a chain and tie the threads of each row, carefully tightening them so that there are no gaps between the beads. We hide the ends of the threads in the holes of the beads.
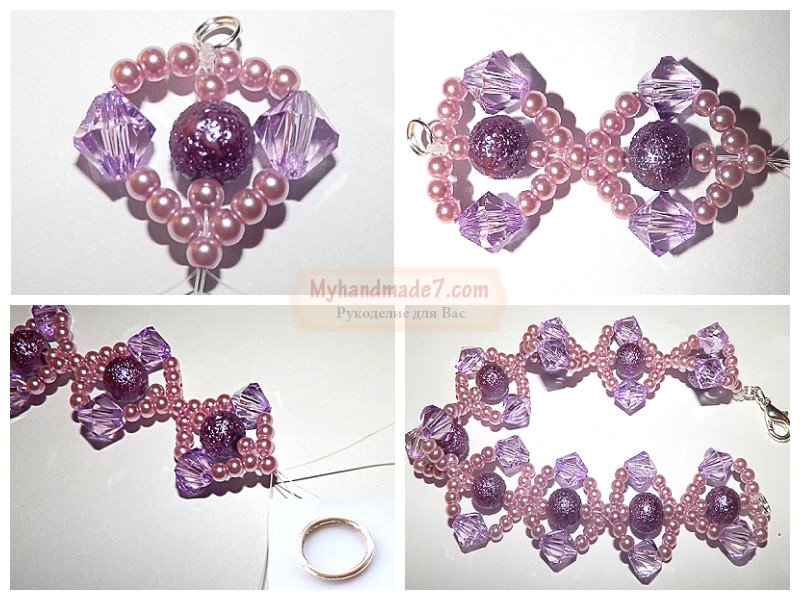
Bead bracelet master class

First, let's prepare the accessories: plastic purple beads with a textured surface with a diameter of 8 mm, artificial pearls with a diameter of 3 mm in a pink-lilac hue, faceted transparent crystal beads lilac color, silicone thread or fishing line, 2 ring-shaped connectors and a carabiner. Cut two pieces of thread about a meter long and tie them on the ringlet so that 4 free ends of the same length hang down.
Of these, two ends will be a double middle thread and two will be single extreme. On the central double thread we string successively a pearl, a large bead and again a pearl. On each of the side threads, we string 3 pearls in series, a faceted crystal and again three pearls. We connect all the threads together and pass them through one pearl. We repeat this sequence of operations again until the product becomes desired length. Having finished work, we tie a bunch of threads to the ring, cut off the excess and slightly melt the remaining tips. We attach a carabiner to one of the rings.
Weaving bracelets from beads- exciting and an exciting activity. And if you still attract imagination and use various auxiliary materials, sometimes completely unexpected, then you can create original and unique products. See how beautiful and feminine jewelry is made when lace and beads are used together. Of course, you can’t create such a decoration in five minutes, but the result is worth it. Plus, they're not that hard to make. We need lace: machine or self made. It is up to you to choose a base from synthetic or natural threads, but keep in mind that the fragment must consist of a whole number of motifs.
Synthetics can be melted around the edge to prevent fraying, while cotton or linen may need to be overcast in problem areas by hand or machine. You can tie the necessary base with a crochet or on bobbins on purpose, then such problems will not arise. Once the base and matching beads are ready, first place the beads on top of the base without pinning to find the best match.
Only then sew them on. Some of the small beads or rhinestones, if they are also used, can be glued with instant transparent glue or a glue gun. For example, white lace and artificial pearls are selected. This bracelet can decorate wedding attire. If you choose linen or cotton lace natural colors, then the beads are suitable wooden, bone or from ornamental stone. For a fastener, sew a button or bead on one end, and make a loop on the other.

It goes well with leather beads. An elegant bracelet is obtained from beads and leather cords. Its production does not take much time. This type of jewelry is unisex, both sexes can wear it, only beads must be selected individually. Take about one and a half meters of leather cord, beads with a diameter of 8-10 mm, a strong thread to match the cord or, conversely, a contrasting one. Fold the cord in half and tie a knot at such a distance from the edge that the prepared button passes into the resulting loop. Fix the loop motionlessly, for example, using a clip-clip on the sheet thick cardboard. In order not to damage the skin, the loop can first be wrapped with a cotton sponge.

Tie the thread to the bottom cord with a strong knot and 2-3 cm from the knot, simply braid the cords so that the thread lies on top of the cord, bends around it and from under the bottom lies on top of the second cord. It turns out like a figure eight from a thread. Then start stringing beads. The thread tension should be sufficient, but not excessive. The thread through the bead should pass twice: first in the forward direction, then in the opposite direction. On one of the cords, each time you can make a fixing coil around the cord. When all the beads are strung, put together the loose ends of the cord and the end of the thread and tie them in a knot. Pass one of the ends through the button and tie a knot from both ends and thread. Trim off the excess. You can additionally fix the tips with glue. Such a bracelet can be made short for one turn around the hand or made long so that you can wrap your hand 2-3 times.

Sometimes a schematic drawing is enough to get the job done. Bead bracelet patterns very easy to find on the internet. Look through the relevant topics in LiveJournal or on specialized resources. If you still have difficulty making a particular model, look for video bead bracelets, which can also be found in abundance on youtube. having mastered various techniques, you can make exclusive jewelry. Headsets from a bracelet and or earrings look very good. And you will not have problems with gifts for relatives and friends either.


