Thread bracelets step by step. How to weave baubles from floss threads: simple ways and methods
Baubles are very decorative female hands, and homemade accessories - even more, because they are unique and emphasize the individuality of the hostess. Look great and the most simple options- it all depends on their performance. You can make amazing floss baubles with your own hands that will look really cool!
We have collected for you several master classes, with the help of which you will learn how to weave bracelets using the thread technique. different types. We will talk about thin and wide baubles: with or without inscriptions, with additional decor or without it. Some weaving lessons will be useful for beginners (if you are one of those who have never made floss baubles, you are here), and experienced craftswomen. We hope that everyone will choose the right option for themselves.
A simple bauble for beginners
You can learn to weave floss baubles from this master class. Here you will need a thread of one (or two) colors and elementary decor. A few minutes of free time - and the bracelet will be ready.

We cut off the thread, which, when folded, will be about 10 cm longer than your wrist. It can be even longer - it will be more convenient to weave. Fold the thread in half, leaving a small loop, and secure it to the table with a strip of thin tape. The second thread should be about 4-5 times longer. Put it under the main thread.

On the left we form a loop and pass the right thread into it. This is the first stitch that is traditionally used in the macramé weaving technique. We tighten the knot.

We make the second loop on the other side. Weaving is the same. We tighten the knot.

Now we repeat the steps one after the other and weave exactly to the middle (determine the length of the future baubles according to your hand beforehand).

At this stage, you can add a bead or a beautiful decorative button to make the bracelet a little heavier, but at the same time make it more beautiful and interesting. Then we continue the already familiar weaving to the second end of the baubles.

At the end, add a small button with beautiful decor so that the bauble is fastened with a loop.

Please note that we fasten it with the same threads. additional loops. Use the needle to pass the thread under the loop. Bite off the extra threads with wire cutters, and set their ends on fire with a lighter to form "knots". Take precautions when working with fire!

A thin bauble made of floss with a small decorative element looks very beautiful both in a single-color version and when combined with two threads of contrasting colors. If you have mastered this master class, then quickly cope with the rest. If you want to try something more complex, see the step-by-step instructions below.
Weaving baubles with an oblique method
Perhaps these are the most popular floss baubles. They look quite difficult to manufacture, but in fact it is not at all the case. With this step by step instructions you will learn how to weave such baubles and not get confused.

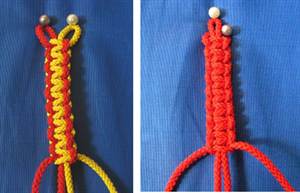
We will need 12 threads - each about 1 meter long. Take 2 strands of six different colors so that the pattern is visible and symmetrical. Mirror them. Tie a knot at the top to tie them together. Fix the “tails” with tape on the table, with a pin on any fabric, or with a paper holder on the ruler.

Spread the threads as far apart as possible and start weaving from the edge that will be on your left. Take the outermost thread and the next one. Pass the first thread under the second from the bottom and tighten the knot (as in the photo). Repeat the procedure to the very center, taking one thread after another without changing the main one. Then repeat the same with two threads of floss, which are located on the extreme side: exactly the same weaving pattern - to the center.

We need to weave so that, as a result, the outer threads move to the center of the baubles, and the inner threads to the outer edge. This means that we again weave the next row from the edge, but this time the main thread will be the one that was originally the penultimate one (in the photo - orange).

The first rows will have to be constantly monitored so as not to confuse anything - constantly hold the bauble with your hands and weave slowly. Then the threads will already line up themselves - you will only twist them in a logical pattern.

So we get a kind of "herringbone". In the process of weaving baubles, the threads will change places several times.

It is not at all necessary to make a bauble from threads of 6 colors - you can make a bracelet with oblique weaving and two-tone. However, if you are a beginner, the first option will be preferable. Everything becomes easier if each new thread is a new color - intuitively you will feel how to weave them in the correct order.
Baubles of direct weaving with drawings
beautiful baubles straight weave you can do it yourself from two or more threads. It is quite easy to do straight weaving. Moreover, you can vary the width of the bracelet: there is not much difference - to weave a thin bracelet or a very wide one, because the labor costs will be approximately the same.

To start weaving a straight bauble, you need to decide on its width and draw a preliminary diagram, marking the threads. Here you can apply and think over any image and letters. Immediately decide what color the pattern will be - for beginners it is better to take 2-3 types of floss and the simplest pattern.

Secure the threads to the cardboard with tape and a paper holder. Let's divide the threads into several categories to make it clearer:
- Main. It should be the same color as you want to see your future accessory. Simply put, this is the background of the baubles. The main thread will be the longest, but do not rush to measure it right away. It will be inconvenient to fiddle with a five-meter floss - leave the thread directly in the finished spool and unwind as needed.
- Auxiliary. This thread is responsible for the color of the pattern. Usually there are several of them, and they should not be too long: within a meter, plus or minus 20 cm. The consumption of the auxiliary thread will depend on the size and complexity of the pattern for the future baubles.
- Additional. There are usually several of them too. IN this case you need to choose a floss of such colors that are needed for decoration and adding minor details. They are woven into the pattern only as needed, and the ends are cut off after weaving is completed.
To weave a straight weave bauble with a pattern with your own hands, you need to choose a pattern. This is the first step. We offer you several options, but you can draw something yourself. To do this, take notebook sheet into a box and fill them with color so that one or another drawing is obtained. A filled cell corresponds to a knot of one color or another - empty cells correspond to the background (this is the main thread).


If there is an empty cell in the diagram, make a knot with the floss of the main thread of the baubles and go through the row to the end. Then go from the opposite edge to reverse side. As soon as a knot of the color of the auxiliary thread is found, take the floss of the corresponding color, and weave the rest of the row with the main one.

Try to start with something simple. You can quite easily make a straight weave with two colors of thread, adding only a few stitches with a thread. contrasting color to make peculiar dots. However, you can immediately take on something difficult.
Bonus: video tutorial
It is possible that you did not quite understand the patterns of weaving baubles with straight or oblique weaving. To make things clearer, we suggest you look at this small video a master class that details how to make a bracelet from floss threads with your own hands. As an example, we chose a pattern for weaving baubles with an inscription (bracelets with a name or quotes are very popular).
Views: 1 850In everyday life, a bracelet is called an ornament that is worn on the hands. They come in different designs, colors and materials.
One of the varieties of the bracelet are baubles woven from threads using the knotted method.

This type of needlework has a fairly ancient origin. Initially, baubles were created by the American Indians for the fraternization ceremony. That is, giving such an ornament to another person was a solemn oath of kindred love and fidelity.

Later, this tradition was borrowed by the hippie movement. And today, most people do not associate baubles with certain symbols, considering them just decoration.
Since ancient times, baubles have been woven exclusively in a knotted way. IN modern world the technique of this kind of needlework has become much larger. Consider the features of some of them, and how to make bracelets from threads with your own hands.

Classic thread bracelet
This name means a product made of floss threads, created in a nodular way. Such weaving can be planar for wide, but not voluminous baubles and voluminous for plaits.

How to make such a bracelet from threads? For a flat bracelet, take 8 strands (more or less). If you plan to make a multi-colored product, in order to maintain symmetry, it is necessary that the number of threads of different colors be the same.

To determine their length, wind the thread around your hand 6 times and then cut off. This is enough to complete a bracelet that will fit your hand.
The colors are arranged in a mirror order. We tie their ends and fasten them with tape to the edge of the table. So it will be more convenient to work.

After that, we begin to make knots. First, we alternately connect the outermost strand with the neighboring two nodes, then through one, and then through two. We do the same on the other side in a mirror order. At the end, the strands that are in the middle are connected twice with each other. We repeat all this until the bauble reaches the desired length.

It is customary to fix more complex schemes of such decorations with the help of schemes indicating the directions of movement of the thread. However, learning to understand them is a whole art. Therefore, video tutorials about bracelets made of threads - best instruction for beginners.


When choosing threads for baubles, be careful. Ever since the hippie days, colors and their combinations have made sense. For example, white was a symbol of freedom, green - nature, red - love. And white with green could mean the image of a person who loves nature.
But the red and white bauble attracted a lot of inappropriate attention from the opposite sex to its owner. Orange, yellow and blue could be a sign of love for the east or simply expose its owner as an eccentric.

Weaving custom baubles
Modern needlework methods significantly expand the range of possibilities for weaving bracelets from threads and created effects. One of the new trends was a bracelet made using the Shambhala method.

From three strands, used for it, one does not move from its place, and the rest wrap around it. It turns out a kind of tourniquet.

To facilitate the task, some use a thin piece of plastic, winding the thread around it. And with the use of a hook, you can combine the knot technique with knitting and create a real masterpiece.
For weaving baubles from threads, more complex devices are also used. So, thanks to the Japanese, a method called "kumihimo" has come down to us.


How to weave bracelets from threads according to their technology? To create such products, a special disk is required. Although some craftsmen can make an imitation of this tool out of cardboard. And the result is no worse than on a professional machine. Photos of handmade thread bracelets will confirm this.

Also in this type of creativity use mills, special machines. In order for her to start weaving a bauble, you just need to turn the side handle.
Additional decor for a bauble
In conclusion, let's talk about how you can further decorate the bracelet we made. Classic variant- string beads or beads on threads. But other, more unusual options. For example, buttons, pendants or rings.

Ornaments with bolts or nuts look extraordinary. Just to make it all look harmonious, gilded details are selected for the warm tones of the threads, and silver-plated for the cold tones.

Thread baubles attract with their variety bright colors which are sometimes lacking in Everyday life. This decoration is practical: it does not deteriorate in the sun or in water. And completely uninteresting for thieves.
The creation of such decorations can become great hobby for children, as it activates finger motor skills, develops imagination and a sense of beauty.

Photo of thread bracelets


A bauble is a handmade bracelet made of beads, thread, wool or leather. Historically, the art of weaving such bracelets originated in the tribes North American Indians where they were decorated with feathers, beads and embroidery. Baubles gained immense popularity in the 60s of the XX century with the development and spread of such a subculture as hippies. Then, these little things began to include not only thread bracelets, but also headbands, decorative bags for documents and small things.
Initially, a bauble is a symbol of friendship and sincere sympathy. They were given as a recognition of eternal devotion, as a symbol of involvement in something, and even as wedding bracelets.
Moreover, even combinations of colors and patterns had their own meaning, which was easily interpreted by those who knew the symbols. Therefore, the colors of the future product were selected carefully and taking into account the personal qualities of the person to whom the bauble was prepared as a gift. Bracelets were made for friends, relatives and loved ones, and it was considered bad form to weave them for yourself.
In principle, you can weave baubles from any convenient material at hand, however, being one of the special types of macrame, they are more often made from woolen threads, iris or floss.
Thread baubles can be woven in two ways - straight and oblique weaving. The first is considered the simplest, but often it is with him that more questions arise. About how to weave beautiful patterns oblique weaving can be learned from special patterns, which will be discussed a little later.
The second, direct weaving, requires great concentration and skill, however, using all the same patterns, you can weave a beautiful name bracelet, a picture bauble or your original print. Cross-stitch patterns, or self-drawn on a notebook sheet, are well suited as patterns.
Direct weaving involves two types of knots - direct and reverse. Moreover, the warp thread and pattern threads always cross (to meet each other).
Before you start weaving your bauble, you need to roughly determine the length of the future product, choose the colors that you like best and arrange them in necessary order. It should be remembered that knitting knots significantly shortens the leading thread, which means that it is necessary to take threads 60-80 centimeters long.
It is not difficult to learn how to weave baubles, the main thing is desire and interest, as well as positive emotions embedded in your creation.
How to fix the threads for weaving baubles?
When weaving, the threads twitch, fall apart and crawl away, which greatly complicates the work. Therefore, weaving baubles begins with its fastening.

You can fasten the future bauble with anything and on anything - at least on hard surface table, even on a soft pillow. It all depends on what position and under what circumstances you do it.
The most simple and convenient way is duct tape. To do this, the threads are laid out in the required order and fixed with a piece of adhesive tape or electrical tape.
All that is needed is to make sure that the thread does not come out from under it and sometimes, for convenience, as we weave, attach the “overgrown” tail to the surface. Thus, you can weave both at the table and by attaching the future product to any other hard surface - a board or a book.
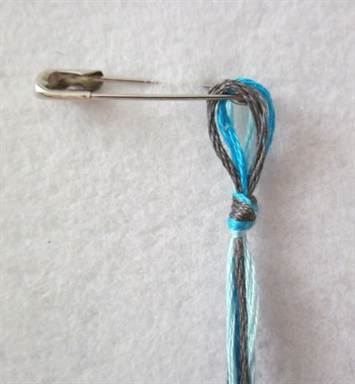
The next method assumes the presence of the usual safety pin. Each thread, taking into account the tail for the tie, is tied in the right order, and the pin itself is attached to the fabric of the pillow, tablecloth, carpet or clothing. However, there is a significant minus - the beginning of the baubles does not always turn out to be even, sometimes you have to straighten it yourself.
You can immediately make a loop fastener on a bauble - it folds in half right amount the thread leading is tied to the place where the loop begins, then the warp threads are braided at once as many times as necessary for the required size of the future loop.
Once you feel enough, you can start weaving itself. The method is convenient for starting direct weaving, which has already been discussed earlier.
You can also use stationery clips, clothespins, fasteners from hardware stores, paper clips, or paper clips.
In general, there are a great many ways to start a bauble. It all depends on the imagination and the means at hand.
Baubles are often woven on the road, in cars, in field conditions. All the methods listed above are good for securing threads in any conditions.
Learn about weaving baubles from threads from the proposed video.
Knots for weaving baubles from threads
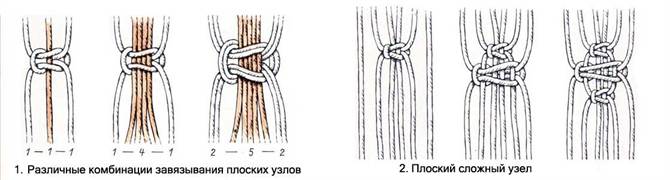
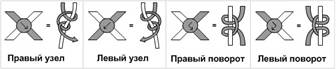
In order to start weaving beautiful thread baubles, you need to remember the four main knots and their designations in the diagrams.
Only two simple (loop) knots are distinguished - the right and left loop knots.

To make the first of them, it is necessary that the working thread is to the right of the knotted one. Rows consisting of such nodes go from right to left.
The working thread for the left loop knot should be in the opposite position. The rows go from left to right.
These knots are usually tied in pairs.
Exist the following types nodes:
- straight (left-left);
- reverse (right-right);
- left tatting (left-right;
- right tatting (right-left).
The execution of these knots can be found out by carefully studying the weaving patterns.
At first, it seems difficult to delve into all the nuances of such a simple matter as fenko weaving, but soon after the start of work, the fingers will automatically begin to tighten the knots, and shift the threads in the right directions.
Patterns of weaving baubles from threads
Like patterns for knitting or embroidery, all these knots in their various combinations with each other can be found in special patterns. For those who are just starting to weave and are not sure that they will be able to create their own unique masterpiece the first time, there are special patterns for weaving baubles from threads, in which everything that was described in the paragraph above is described in detail and clearly.

Finding them is always easy on the Internet or books on needlework - from simple ones with a few threads to more complex and voluminous, 20-30 or even 40 threads.
Some of the simplest baubles are woven without patterns at all. However, in order to weave the original, beautiful bracelet Still, it's worth learning how to parse the circuits. Reading them is not so difficult - you just need to remember the special designations of the four types of nodes and determine what the circuit is - with a full or incomplete cycle.
The cycle is defined by the arrangement of threads. If the diagram shows the correct arrangement of threads and the sequence of colors on both sides of the product, then the cycle is complete.
If the threads from the end and the beginning do not match, then the cycle is incomplete.
Schemes also come with an even and odd number of threads in bundles. This means that one color will be more than another.
It's hard to figure out what's what at first, but Full time job according to the schemes, develops movements to automatism.
How to decorate baubles from threads?
The bauble itself is an original and beautiful decoration that suits almost everyone and everything (with rare, rare exceptions). However, something can still be added to it, making an ordinary bracelet made of strings unique.

There are many funny, cute and beautiful jewelry, which you can always add to your bauble.
For example, a thin bauble can be supplemented by sewing a small chain or a strip of rhinestones to it. And choosing cute beads, sequins and beads, the bracelet can be made in any style - from classic to punk.
Bracelets made from natural fibers (such as wool or cotton) can be added wooden beads or other "natural" materials.
You can decorate your thread product in the style of the Indians, sewing a few bird feathers and beads to the bracelet. Those who know how to embroider can embroider a name or ornament on top of a wickerwork, making a name bauble.
Such jewelry, complemented by beautiful details, can become great gift for a holiday or memorable event. In addition, beautiful baubles are suitable for both adults and children, boys and girls.
In contact with
The classic way to weave "friendship bracelets" is to weave floss baubles. For beginners, this is perhaps the easiest way to find the basis through trial and error, with the knowledge of which you can later create incredibly beautiful wicker things. There is nothing complicated in weaving floss, but you will need a lot of patience: an average one-centimeter-wide bauble is woven for at least an hour. And if such deadlines do not stop you, you can proceed to the creative process.
In order to weave floss baubles you will need: 
- Cut 6 threads so that the length of each is 120-140 cm, divide them by color and carefully tie a knot.

- Fasten the bauble with a pin to the knot and separate the two leftmost threads - it starts with them oblique weaving.

- Put the left green thread from left to right on the right and pass it inside the loop formed. Gently tighten the knot by pulling the right thread up.

- All knots must be double, otherwise the bauble will twist. Tie a second knot like this: this is what you should get. After tightening the knot, the thread with which you tied the second thread should remain on the right.

- Now tie the left yellow thread with the same thread and the same double knot. The green thread again remained on the right.

- Continue braiding the row with the same thread, and when the free threads run out, take a new leftmost thread and tie the next rows in the same way.

- For convenience, when forming a knot, you can fix freely hanging threads with your fingers, slightly pulling them.

- It looks like a bauble with eight rows.

- So, you have woven a bauble to the length you need. Now we need to fix it.

- Divide the threads into three parts and braid an ordinary pigtail out of them. Fix the pigtail at the end with a knot and cut the remaining threads so that you are comfortable. Do the same on the other side, after untying the fixing knot.

- Your first bauble is ready!


- Cut the threads to one length (approximately 100 cm), tie a knot and fix it with electrical tape.

- With the leftmost thread, tie the next two threads in the same way as in the first weaving method.

- Now move on to the far right thread. The knot here is the same as usual, except in mirror reflection. Place the rightmost thread from right to left on the left and under the left thread it into the loop formed. Tighten and make a double knot. In this case, the light thread that was on the edge, after tightening the knot, will remain on the left.

- In the same way, tie the second thread with a double knot.

- You have two light threads left in the middle of the baubles. Tie the left thread with the right thread, as in paragraphs 3-4 - subsequently, all the middle double knots will be tied with the right thread.

- Repeating the previous steps, weave the second row.
Such a type of needlework as weaving baubles has gained extraordinary popularity today. The history of the creation of such a bracelet begins in South and Central America, the Indian tribes did not think how to weave baubles, they made them by weaving feathers, blades of grass and even twigs into them, they were quickly torn and lost, but in this case it was necessary to make a wish, which is necessary it came true, and now it is very easy to make them from floss threads.
Since bracelets were woven not only for their own wearing, but also as a gift, baubles were considered an object with meaning, and not just decoration, later for this reason the hippie community borrowed a bauble as a symbol of belonging to them. In Russia, multi-colored bracelets were also woven, the weaving technique of which included various openwork and embossed knots. Today, weaving baubles is more considered a creation of a decorative accessory, but sometimes these decorations are given as a sign of friendship.
Weave baubles from threads (woolen, cotton and floss), beads, woven and leather laces, leather and satin ribbons. You can weave such a bracelet in several ways: oblique, straight and using the macrame technique, with the addition of beads, beads or chains. But for beginners, the simplest option for weaving their first baubles will be a bauble of 2 threads of different colors.
The first way to weave baubles from floss threads
You will need threads of two different, contrasting colors with a length equal to the girth of the wrist, plus an increase in freedom of fitting, ties and knots along the edges of the baubles that will hold the two threads together, approximately 30-40 cm each.
Two threads must be tied together at one end with a knot, stretch the threads in different sides so that the knot is in the middle, then you can ask someone to help twist the threads of the baubles. One bang holds one end of the common thread, and the other - the second end of the thread, and each begins to twist the thread in one direction and in the opposite direction, i.e. one person twists the thread towards himself, and the other - away from himself. The threads must be kept tight so that they are then correctly and evenly tangled together. The next step is to take the knot with one hand, and the other ends of the thread together in the other hand and let go. The ends of the threads will begin to twist together, only then you need to adjust a little and finally tie a knot at the free ends. That's simple bauble from two threads is ready!
The video material will add clarity to the creation of such a baubles:
The second method of weaving a bracelet
According to this weaving pattern, you can knit a voluminous bauble of two threads (in the photo instead of threads satin ribbons), the thread should not be taken very thin, the pattern will be more clearly visible if the thread is thicker.

And the video will tell you about the thread crossing pattern and the final result:
Weave a product from two threads according to the scheme and description
Requires 2 skeins of floss different color, scissors, a pin and a pillow to which the product will be attached.
Instructions for the weaving pattern
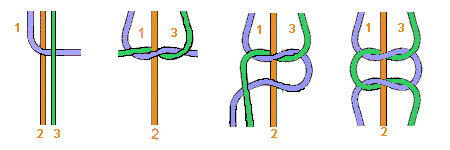
This simple bracelet with a simple ornament for weaving baubles. To more complex schemes it is worth starting after studying simple ones. The length of the threads should be about 1 m, about five times longer than the length of the finished bracelet.
1) Axial (nodular) thread - knots from the working one will be tied on it. The tie of the bracelet is made in a simple way - a knot is tied at a distance of 7-10 cm from the ends of the threads. The resulting knot is pinned to the pillow. Working and nodular threads are located at a distance from each other.
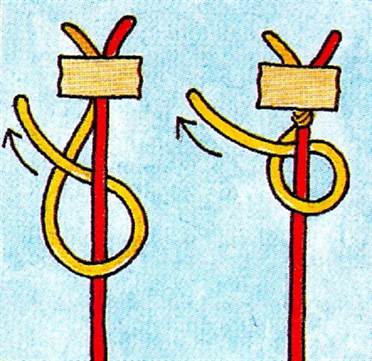
2) Now the left thread is defined as the axial thread, i.e. will impose on her right thread, it must be held with tension, and the right one is the working thread, it wraps the axial (nodular) thread, making a movement from left to right. The tip of the right working thread is pulled out of the loop formed, after which the finished knot is tightened - this is the right loop knot. Then, in the same manner, the second knot is made, not tightening too much, it shifts close to the first knot. It's a double knot. Now the threads change their location and roles, i.e. the axial thread becomes the working one, and the working one becomes the axial (base).


3) The next left loop knot is performed in a similar way, only the direction of the working thread double knot vice versa, from right to left.
4) The next knot that will be needed in weaving baubles is the right and left turn. For a right turn: on the axial thread, make the right loop knot with the working thread, then the left loop knot. For a left turn: the working thread weaves the left loop, and then the right loop.
When a bracelet of two threads is woven of the required length, it is necessary to fix the threads, i.e. tie the ends of the threads in a knot, at the end of the work it is necessary to bring the product into neat appearance- Cut off excess tails with scissors.
When weaving a two-thread baubles has been tried, then you can try working with three, four, and then with more threads.
Weaving from 3 threads of a beautiful baubles
Below are the types of knots that you can choose or alternate in weaving baubles:

1) The first knot on the left in the photo is a double flat knot.
You need to tie it like this: first, the left single flat knot is woven, followed by the right single flat knot under it, so you get a double flat knot, you can weave the whole bauble with such a knot, but to make the knots look even and neat, you need a thread that goes inside the knot, so say, foundation, regularly pull up. The threads that tie the warp (in Fig. 1 and 3) should be four times longer than the thread on which these knots are tied.
A double flat knot can be woven from 4 threads, from five, from six, as many as you like. The photo shows variations of this knot, due only to the number of working and nodular threads.