DIY paper decorations. Making Christmas decorations from paper: the best ideas for creativity
Paper is one of the best materials for creativity. Almost everything can be made from it - from Christmas tree decorations to children's houses and decorations for home performance. In addition, the creation paper decor – great way spend time with children. In this article, we will talk about how to make paper decorations with your own hands.
How to make paper decorations?
The most versatile and popular type of paper jewelry are pompoms.
Depending on the size, they can be used to decorate clothes, accessories or interiors.
Let's take a closer look at the process of creating a paper pom-pom.
We will need colored tissue paper (kraft paper), scissors and thread. We put several sheets of paper on top of each other and collect them with an "accordion". For small balls, 4 layers are enough (2 sheets cut in half), for medium ones it will take about 6-7, and for large ones - at least 8 layers of paper.
The wider the pitch of the "accordion", the more magnificent and airy the pompom will be. But do not get carried away - wide folds are much more difficult to straighten, especially at first.
We tie the middle of the folded sheet with a thread (not tightening, but tightly enough). It is important that the thread is located exactly in the center, otherwise the pompom will be skewed, one-sided. To easily mark the middle, fold the "accordion" in half and tie a thread or wire on the crease. If you plan to hang balloons, make sure that the free ends of the thread are long enough. We cut off the edges of the "accordion". You can cut in a semicircle or a triangle - as you like.

Then, carefully and carefully, so as not to damage the paper, we begin to straighten each sheet individually. Do not pull on the edges of the paper, try to move as close to the center of the sheet as possible, and then straighten the individual layers. It is best to first divide the layers in half, rather than separating one sheet from the total mass. For example, if you have big pompom from 8 sheets, first divide the 4th and 5th layers, and then again divide the resulting groups in half. Do not try to immediately give a pompom desired shape To get started, simply divide the sheets among themselves.

After all the layers of the "accordion" are straightened, we begin to deal with each layer separately. We straighten and stretch each sheet until we get such a cute paper ball.

Making some pom poms different sizes and colors, you can hang them on the wall or lay them out on the table, floor or any other surfaces.

Now you know how to make children's decorations with your own hands and you can easily decorate carnival or holiday costumes.
Also from paper you can make unusual ones for interior decor or photo shoots.
New Year paper crafts
Do-it-yourself volumetric paper snowflake
Such a voluminous snowflake made of paper is a wonderful New Year's decoration for any interior. A paper snowflake will surely please your children, relatives and guests.
For the snowflake big size we use only thick paper, and also add more lines.
The snowflake can be made from paper of any other color - it all depends on the color of your New Year's decor. You can also use wrapping paper.
materials, needed to make paper snowflakes:
six squares, paper cut, preferably white color and identical in size.
Any paper is suitable for making snowflakes. The side of each square cut out of paper can be from 10 to 25 cm.
Tools:
- ruler;
- simple pencil;
- scissors;
- stapler.
Preparation method volumetric snowflakes from paper:
1. Bend each of the six squares diagonally in half. We make markings of three parallel lines on each of them. The width of the segments should be the same. We draw lines with a simple pencil(they are drawn in red in the photo only so that they can be seen better). Then we cut the outlined lines with scissors, starting from the edge and not reaching a little bit (leaving a couple of millimeters) to the middle.

2. Now we open the square folded diagonally and put it face up in front of us.


4. Then we turn the snowflake to the other side and connect the next two strips closest to the center, fasten them with a stapler.

5. We continue to turn the snowflake over and staple the remaining strips with a stapler.

6. We do the same with the five remaining squares of paper. Then we staple the three parts of the snowflake together in the middle with a stapler. We do the same with the remaining three parts of the snowflake.

7. Now we connect these two large parts of the snowflake to each other.

8. At the points of contact of each individual part of the snowflake, we also fasten it with a stapler. This is necessary in order for the snowflake to keep its shape.

9. Now we decorate the snowflake according to our own taste, for example, you can stick sequins, sparkles.
That's all! Christmas decoration is ready! A snowflake can be hung on a Christmas tree, a window, a wall ...
Another version of the snowflake. It is made from two sheets of plain or thicker paper.
1-2. First we bend the sheets as in the figure.
3. Cut out a checkmark from the resulting triangle.
4. We make cuts on the remaining checkmark, but do not cut through to the end, otherwise the snowflake will break.
5. We bend the rays so that the snowflake is voluminous.
6. We bend each middle beam on all four petals of the snowflake inward and glue it in the center.
7. Repeat operations 1-5 with the second sheet of paper. Then we put it under the first half of the snowflake, so that the lower rays are between the upper ones. Then we bend as in paragraph 6, but we glue the rays not in the center, but at the points where the rays diverge at the top snowflake.


Snowflake from strips of paper

See the photo master class for the sequence of making snowflakes:
Prepare two snowflake fragments, each of which is 6 strips of paper, then connect them, as in the photo

We glue the strips, as in the photo, and fix them with paper clips until completely dry.

4.

We made two “half-snowflakes”: 
Add them up back sides to each other
Connecting with glue 
We fix with paper clips, we wait for drying: 
This is how the junctions of the ends of the strips look like: 

And once again, all in one photo:

More difficult option striped snowflakes:


Balls imitating cones from strips of colored cardboard different lengths , rolled accordion


You can also make such snowflakes from old magazines
master class from Tiffany Lin

Tiffany marked out inch petals for future snowflakes. We can focus on two centimeters, for example.
In total, you need to cut 140 strips. Of these: leave 20 strips along the length of the page, cut the next 40 by 1 cm, cut the next 40 already by 2 cm, and cut the last 40 by 3 cm shorter. Refer to the photo above.

Fold each petal using 5 strips of each size. Most long strips, for the central beam of the snowflake, we take it once, the rest twice (once on each side).

We glue and place under the press for the time of gluing.

For reliability, you can temporarily tie the tip of the petal.

In addition, we cut out more strips for the central part of the future snowflake.

We also glue this ring and fix it for the successful setting of the glue.

When the petals are glued, we process the end of the workpiece with a glue gun.

Glue is not to be regretted! We are processing well.
Then glue the petal blank to the central ring.

We act in this way with four petals, gluing them so that we get a cross.

Then glue the remaining petals. This method allows you to glue all the blanks symmetrically.

After that, we glue the petals together so that the snowflake does not fall apart.


Decorate the snowflake with sparkles. 
How to make such snowflakes

Birds of happiness for your home:
Fold the paper in half and cut it out as in the photo on the left: Then unfold the wings and fasten them to the body of the bird. Glue the body halves.


How to make such a snowflake:
Nov 28, 2016 Galinka
Exactly handmade paper decorations can be attributed to the most inexpensive and simplest among all varieties. Of course, to make simple ideas look much more spectacular and more expensive than they really are, more expensive types of material are often used, but before proceeding to work with it, you can practice plenty on ordinary album sheets, office formats, or even newspapers. .
They should not look like simple children's crafts at all, even if they are the simplest and most banal. It's worth playing every basic idea, supplement it with new colors, new related materials to make it exclusive.
In the first example, we will show how you can turn banal snowflakes that we learn to cut literally with kindergarten, in exquisite DIY paper Christmas decorations. Templates for such snowflakes, you can take the most ordinary ones, but the more openwork and thinner the pattern, the more elegant they will look. Among all the templates, it is worth finding one in which the outer ring of the snowflake looks like in the example - that is, it contains round elements. It is to them that we will attach the wire with a small bead planted on it. It is with a wire ring that we will connect all the snowflakes into a single garland, and the base will be a denser material - an elegant braid or satin ribbon.

The task is how to beautifully decorate the house in anticipation of new year holidays, you can find new shapes for familiar crafts. For example, using fishnet mittens or boots that are carved in the same manner as snowflakes. Only in this case, the carving technique does not involve folding into sectors, so each piece will need to be driven under the template and carefully cut out each hole by hand. Let it be a little longer, but with original pendants you can decorate both the Christmas tree and the chandelier, and make a garland out of them.
DIY paper decorations New Year
As we said above, the material for handmade paper decorations New Year
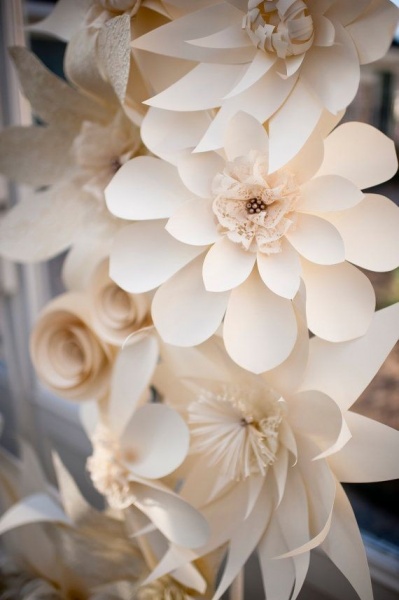
you can take any, even the most inexpensive, but with interesting idea he is transformed beyond recognition. Our next crafts are made on the basis of book pages, such a texture will look great in a Provence or country style interior.

Blanks for pleated flowers, which perform the main decorative function in do-it-yourself paper decorations, photo which you see above will be square sheets. Their length will be the diameter of the future circle, so determine for yourself what it will be, because too small or too large flowers may not be suitable for every interior. Each square is neatly folded like an accordion, so that later the pleating keeps its shape well, smooth each fold with your finger. After that, just bend the resulting strip in half and inner sides fasten together with either glue or a small bracket using a stapler. Similarly, make the second part of the circle, and then connect them together. On one side and the other, additionally provide the center with small circles that we need to pass through the center of the twine in order to seal it. So that the garland does not consist of flowers alone, also make circles contrasting color, but attach them not by stringing, but by sandwich technique. Lay a string on top of one circle, on inner surface paper, apply glue and cover everything on top with another of the same circle. In the same manner, you can do and, only make traditional flowers autumn shades: yellow, red, orange.

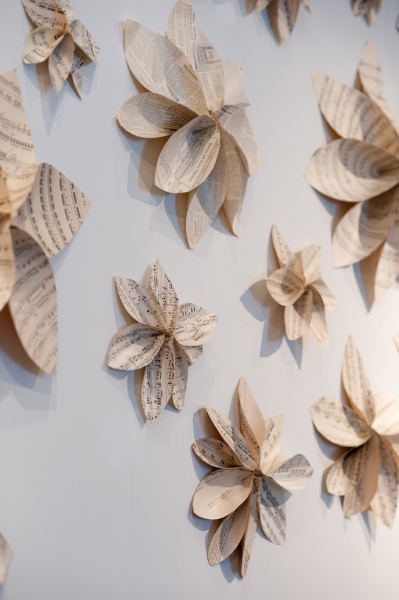
Christmas angels are made in the same technique, which can be used as. For them, it is better to use not book sheets, but musical ones, they will look much more impressive. Whole sheet rectangular shape also folds into a neat accordion, only then it does not bend in half, as in the previous craft, but by one third. Two such blanks in total will give us one figure with wings, it is enough just to fasten the inner sides of the halves with glue. The head for angels can be any small round object, ranging from Christmas ball and ending walnut, a paper body is simply glued to it, and decorated with thin gold threads on top.
How to make DIY paper decoration
In, how to make DIY paper decoration, it may not be difficult at all, especially if you like modern decor with its laconic forms and simple materials.

As an example, we can cite such a garland, which is made on the basis of a ribbon or braid, or maybe even a twisted piece of fabric. Made for data DIY paper decoration templates, literally 3-4 pieces. They can be like pictures with New Year theme(snowmen, Christmas trees, cones, angels), and just symbols you like (stars, hearts, cats, owls, etc.). Using a template, you will need to cut out several identical images, and use either thick plain paper or cardboard for this. For slightly brutal interiors, for example, in a loft style, you can even use corrugated cardboard packaging, it will look appropriate enough. A round hole is made in the upper part of each element (you can punch it with a hole punch) and a base tape is pulled through it. Distribute all the elements along the tape at equal distances and you can decorate the ceiling, window, wall with it.

For garlands, you can also not buy expensive kraft paper, but use postcards that have accumulated on the farm or pieces of thick wallpaper left after repair. They are also beautifully cut according to the template (as an example, you can use the top image), and in this case, unlike the previous one, the template will be the same, but the images on it are different. On each tape you need to glue several identical elements, and between them, for greater decorativeness, string large beads, wooden or glass. If you are decorating not a wall, but a window or a doorway, then the underside of the garland will also be visible. In this case, it would be better to also use the two-layer technique, when the tape is fixed with glue inside two layers of paper.

One more is enough simple idea, which always looks spectacular - bulk star. The material for it should be dense enough to keep its shape well after bending. Special paper for origami, which has the qualities we need to the greatest extent, is also well suited. By the way, it is the kirigami folding schemes (one of the varieties of origami) that can be used to form a star, step by step following the prescribed. Therefore, we give you one of the successful folding schemes below.

DIY paper Christmas decorations
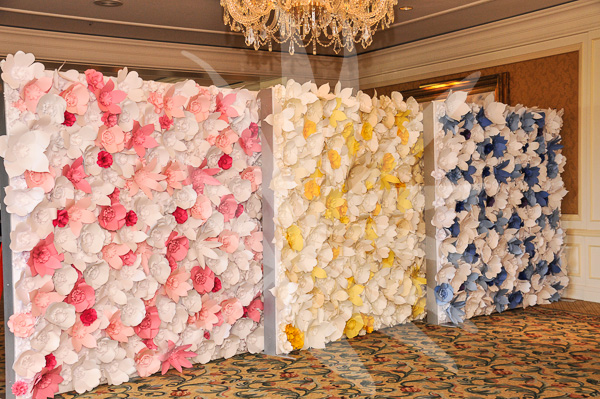
large-scale DIY paper Christmas decorations, which are made for a grand party or a gala dinner party, of course, should be much more complex and larger than all those examples that we talked about earlier. Paper decoration ideas with pom-poms can be used for or an anniversary, but it will be especially true for the New Year.

Pompoms can be made as the main feature of the decor, or combined with balloons This is truly a win-win combination. A lot of material has been written about the technique for creating them, and the techniques may even differ in details, so choose the master class that you like best.

Some ideas can be peeped at the decoration of the hall for the wedding, because the white-pink or white-blue gamma is perfect for New Year's celebrations. Such a flower riot, shown in the photo above, will take a lot of time, but it will look very impressive. You can combine all the flowers into a single canvas and hang it on the wall, under which you put a buffet table.

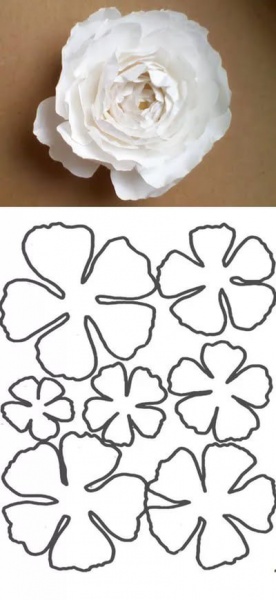
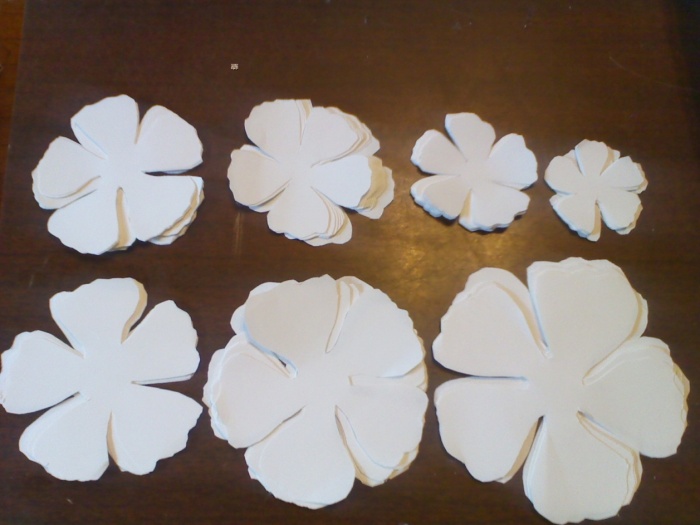
Another difficult, but very effective craft is the topiary, which, before the New Year's holiday, craftswomen try to make in the form of a Christmas tree, that is, a cone is laid at its base. But for decoration use various materials, and fabric, and Christmas tinsel, and tree bark, and cones. But since today we are interested in paper decor options, we have demonstrated one of them above. The surface is completely covered with roses, which are cut out of thick paper (postcards, cardboard). For more details, you can see the master class on step by step photos above: at the beginning, the circle of ornamental cardboard turns into a spiral, which twists into a tight bud, and its ends are fixed with a drop of glue. A twisted spiral is glued to a small base circle of the same color and diameter as itself. It turns out a small colored rose and we need enough of these blanks a large number of. You make the cone, the basis of the topiary, in the same way as in the traditional manner - you twist a sheet of cardboard like a bag, crumpled ones are stuffed inside newspaper sheets so that the cone holds its shape well. Decorate it, starting from the bottom, so that the top layer slightly covers the bottom.
DIY paper window decorations
It is also impossible not to touch the topic do-it-yourself paper window decorations. Since it is rather difficult to fix heavy elements on glass due to weight, it is precisely paper snowflakes, snowmen and hearts remain in the top of popular ideas.

Gluing them to the glass itself, of course, is not at all necessary, then it will have to be washed, and this will not be so fun at all. Much better to make a garland. By connecting several snowflakes vertically on one base, and decorate the cornice with them.

You can generally decorate the cornice with paper flowers so that it looks like a particularly luxurious lambrequin. And down from the flower garland do-it-yourself New Year's paper window decorations, hang narrow satin ribbons. So that the ribbons hang evenly and do not get tangled with each other, place them at intervals, and tie a small bead or other decorative weights at the ends. They will allow self-made filament curtains hang straight and easy to open when needed.
IN Lately becoming more and more popular voluminous flowers to decorate the room. For their manufacture, various materials are used, therefore finished decor available in its price range.
Such original design the hall became flowers fashion trend in interior fashion, so let's take a closer look at the technology of making paper flowers with your own hands.

Paper elements for decorating the hall
You can decorate the hall with various decorative elements. Let's analyze the features of manufacturing with our own hands flower arrangements for the hall.
Advice! You can make paper flowers to decorate the hall for a certain holiday. For example, arrange a living room for a child's birthday, and after the holiday is over, remove it from the walls.

If desired, you can make flower garlands to decorate the hall from shiny or colored paper. interesting view give the living room large paper flowers.

Manufacturing technologies
Currently, interior designers use a variety of technologies to create decorative elements. For example, large paper flowers can be made using the origami technique. Finished items decor will not only decorate the hall, but also bring a festive or romantic atmosphere into the room.
Paper flowers for decorating the hall may differ in color scheme, as well as size. If desired, you can create peonies, dandelions, daffodils, tulips, roses.

The choice of colors depends on personal taste preferences the inhabitants of the apartment, as well as on the purpose of the created decorative elements.
Useful tips, manufacturing technology, features of the distribution of finished flowers in the living room can be found in the video fragment
Attention! Paper flowers used to decorate the hall must be made of safe material.

If your plans include making a garland of homemade large flowers for the ceiling, it is better to make them voluminous, and on the walls it is quite possible to limit yourself to flat decor elements.

Paper manufacturers offer many options, each type has certain performance and aesthetic characteristics.

For the manufacture of paper flowers in the hall, you can use plain white or corrugated paper. For the manufacture of bright garlands from flowers, craft, packaging, musical paper is suitable.
Advice! Musical or newsprint interior professionals advise to apply in cases where it is planned to create a thematic decoration of the living room.
In kindergartens, large flowers made of wrapping paper. For example, you can arrange garlands around the perimeter of the room, consisting of alternating flowers and baskets. Flowers will only perform an aesthetic function, and you can put small sweets in baskets to make a pleasant surprise kids.
Educators choose corrugated paper for classes related to the manufacture of large paper flowers. Such material is not only easy to use, it can be used to create real masterpieces of design art.
Corrugated paper decorations for the hall
It is this type of paper that is considered the most popular material used for making do-it-yourself paper. original jewelry for a variety of living spaces.

For example, you can make small flowers out of such paper, which will become the basis of a voluminous garland.

Among those colors that work particularly well with corrugated material, we note carnations, peonies, as well as a variety of exotic flowers.
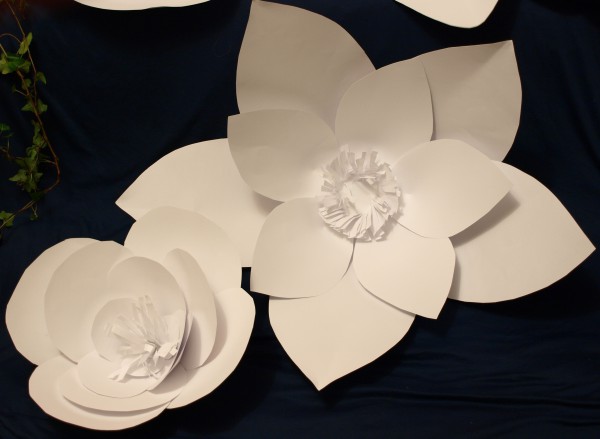
Volumetric dandelions made of white paper can be used as individual elements for decorating walls and ceilings. It is in the manufacture of these flowers that professional designers advise beginners to start decorating the hall with paper flowers.

In order to make such a flower, you need to take a stack of paintings corrugated paper, fold the material in the form of an accordion, then pinch it with a thread in the middle, dissolve the petals on both sides. As a result, we will get fluffy ball reminiscent of a spring dandelion.
Options for decorating the hall with large elements
In interior art, there are several options for decorating a living room with voluminous paper flowers.

You can place ready-made decorations on the ceiling, walls, tulle or curtain. original look have huge flowers that are placed on the floor.
Advice! If it is planned to decorate the walls of the living room with flowers, in this case, you can use both flat and bulk options colors.

Professionals are convinced that daisies are the most profitable option for creating a flat decor. They can be made in different colors th options. For example, make one row of petals from white paper, make the second row yellow. To make the middle of such a chamomile, you can take red paper.

If you have planned the manufacture of voluminous daisies from which the garland will be made, the middle of the flower is also made voluminous. To do this, fluff the circle, making numerous cuts that do not reach the center of the circle.

The ceiling can be decorated with both individual flowers and garlands consisting of small flowers.
If the hall has high ceilings, you can pull the garlands just below the ceiling, making the room mysterious and unusual.

Advice! In a hall with a high ceiling, individual large flowers, suspended on transparent threads from the base of the ceiling, look original.
On the curtains, you can place garlands of small flowers, reminiscent of Hawaiian garlands. Professionals also allow decoration of curtains with separate decorative elements.

This option is suitable for decorating the hall for children's holidays. For example, you can decorate the curtains with exotic colors so that the children who are invited to the holiday have the impression that they are in the African jungle.

Depending on how the mood will change, it will be enough just to change some paper flowers with others without spending Money for cosmetic repairs in the hall.
Corrugated paper is considered by decorators to be a malleable material, convenient for creating decorative elements.

Conclusion
In order to introduce new trends into the interior of the hall, it is not necessary to start a large-scale redecoration. It is enough to arm yourself with paper, scissors, double-sided tape, creative imagination. For a short time period, you can make original volumetric daisies, roses, tulips. Gathering them into a large garland, you can transform the interior of the living room, fill the room with a festive or romantic atmosphere.

The convenience of using paper flowers as decorative elements lies not only in their low cost, but also in the ability to change (if necessary) the design without spending time on it. From simple white office paper, you can create real works of art that will help the owner of the apartment to make his room a source of pride.
Today I have collected several simple, but quite effective ways to decorate a hall (actual, musical) for a children's holiday.
The disadvantage of such an undertaking is that the creation paper decorations takes a lot of time, so if we are talking about decoration school hall, I advise you to conduct several master classes with children of middle and older school age. This the only way get a lot of the same items for holiday decoration.
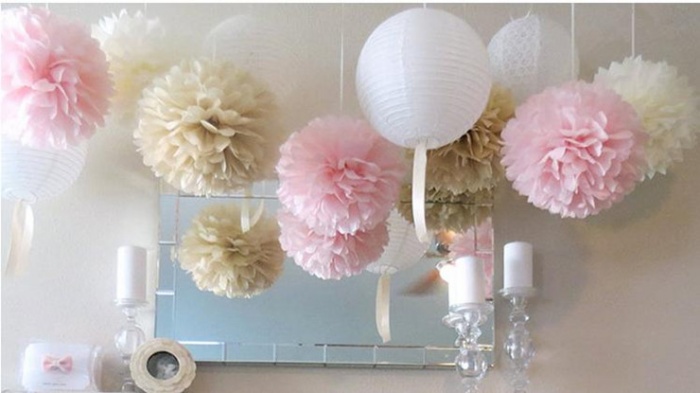
Large voluminous flowers and pompoms
You can buy pom poms in different colors and sizes online. They will be delivered folded, it remains only to fluff.
If you have time and free hands, you can do it yourself.
I will not repeat myself, just send to my article, in which there are three examples fairly large pieces of paper. Just be careful some flowers made from crepe paper hanging balls And outdoor flowers- from thin silence.
We follow the picture, there is a description:
How to decorate the hall with such flowers?
- can be hung from the ceiling
- attach to the edge of the stage (there, as a rule, there is always something to cover :-))
- hang vertically on ribbons around the edges of the stage
- put along the edges of the "carpet" path, along which graduates solemnly walk
Corrugated Paper Flowers
Here you can't do without collective creativity. But! If you make a sketch 2-3 months before the event, it is quite possible to do everything in time. Again I send to my article with 10 workshops on making such flowers and bouquets that will decorate not only the stage, but also holiday tables(follow the picture):
By the way, ideas can be taken from the newlyweds, whose tables are decorated with living plants. What a difference! These are charming examples of flower arrangements, which in paper version will look very festive!

Here I will also mention the “trees of happiness”. They are also made from corrugated paper or colored table napkins. It turns out elegantly, there are a lot of master classes on the Internet, look for it!
How to decorate the hall with voluminous garlands
The bottom line is this: you need to do three-dimensional figures from paper, which are then strung at some distance from each other on threads, fishing lines or thin tapes. Such garlands hanging from the ceiling will greatly decorate the music or assembly hall.
Here is my example - doves in the clouds: I print out the diagram paper dove(By the way,). For one garland, we need two of these birds. Cut and fold along the folds, looking at the picture in the right corner.
We will alternate pigeons with such paper clouds. I don’t give a diagram - we randomly cut out identical parts from 2 sheets of A4 format, bend and fasten in the center with a stapler. IN big figure I cut out a small detail inside. This will also be a small cloud.

All! It remains to collect our thread voluminous garland! I did this with a needle, fastening the details simply with a “step back” seam so that they would not roll down.

How do you like my doves in the clouds? By the way, these garlands spin very beautifully from any movement of air. In the diagram, the dove has legs, but we do not need it to stand on the table, I just made a rounding at the bottom.
Cardboard letters
The inscriptions on the back of the stage - weakness almost always and everywhere. The letters are poorly colored, the letter spacing is not respected, everything, as a rule, looks unprofessional.
If possible, it is better not to do this at all :-). But there are times when inscriptions or numbers are required. For example, a school anniversary.
I suggest decorating large cardboard letters with small flowers from colored napkins. The work is painstaking, but the effect is quite interesting.
Napkins are the most ordinary, small. For one flower you need 2 napkins. Put them folded one on top of the other, draw a circle with the help of a saucer, cut it out. In the center we fasten with a stapler. What to do next, you can see in the picture. We fix the resulting flowers with glue on a cardboard blank with numbers or letters.


wall decorations
In the picture on the left - charming flowers with voluminous petals. Cut out hearts, fold them in half, glue one side. We made them quite large - one petal was from half of the album sheet. A noticeable decoration, no doubt! We fastened them to strips of plain blue wallpaper, decorated the backdrop of the stage.
On right picture- a "musical" wreath of photocopies of musical pages. It's easy to twist the buns, the result is amazing!

Ready-made voluminous paper decorations
Please appreciate my great work - articles with pictures that I have prepared for your convenience. Found best examples design, gave advice on installation and assembly :-). All these elements are quite LARGE, great for the hall, the price is quite convenient.
I wish you pleasant viewing (click on the red words):
 More details here


