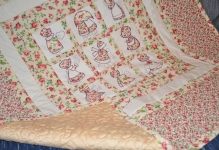
Patchwork in the center with a pattern. Patchwork bedspread with your own hands. How to make a patchwork baby blanket
IN Lately many people prefer to make bedspreads and blankets with their own hands. If you want to sew any item yourself, give preference to the patchwork technique. Blankets made in this style, look very attractive, and are easy to manufacture. You can make this product from the remnants of fabric of different textures.
Making a patchwork quilt is easy. For this you will need sewing machine, thread, needle, scissors and pins.
It is very important to choose suitable fabric for a blanket. Experts advise using a white cotton fabric with a printed pattern. Also, to make a blanket, you will need a synthetic winterizer.

The algorithm for making a blanket is as follows:
- From a piece of fabric, make squares of the required size.
- Put the resulting squares on the surface.
- Sew all squares vertically.
- After that, connect all the received parts into a single canvas.
- Make two strips 16 cm wide.
- Sew the strips to the edges of the quilt.
- Pin the synthetic winterizer to the top of the blanket with needles. Remove excess fabric.
- Use 2 pieces of fabric to make a fabric for the lining. Attach the received details to the main canvas.
- Sew the outline of the resulting product.
Making a patchwork blanket: a master class for beginners
If you are new to technology patchwork, you can use more simple circuits. To make a blanket according to a simplified scheme, you will need a plain calico, a sheet of padding polyester, shreds different color.
First you need to cut at least 50 squares of fabric. The side of each must be at least 21 centimeters. Pieces can be combined different colors. This will help you create a unique pattern.

The algorithm for sewing a blanket for beginners is as follows:
- Lay out the squares on any surface. Form a pattern, and carefully consider the composition of the product.
- Start stitching the patches. Sew strips of squares, and then connect them together. Do not forget to smooth the canvas from time to time. This will keep the fabric from shrinking.
- Make the lining for the quilt. Remember to leave small allowances.
- Fold the fabric, filler and lining. Pin the resulting product with pins.
- Sew the quilt along the edges.
- If necessary, attach the trim to the edges of the blanket.
How to sew a patchwork quilt quickly
Many masters working in the patchwork style adhere to the "quick squares" technique. This technology saves a lot of time.
When making a blanket using the quick square method, you will need several chintz patterns. Before starting work, the fabric must be soaked in hot water and then rinse thoroughly. Then starch the chintz, and go over the material with an iron.

The technique for making a blanket from squares is as follows:
- From 2 pieces of fabric of different colors, cut 2 strips of the same size. Then fold them face to face, and stitch the workpiece along one edge.
- Then cut a strip of chintz, the size of which should be the same width as the two previous strips combined.
- Sew the 3rd strip to the first two. Don't forget to put them face to face. As a result, you should get a semblance of a sleeve.
- Cut the resulting sleeve into several isosceles triangles.
- Prepared fabric for wrong side blankets (for example, chintz or cambric) spread on the surface. Lay out the padding polyester and the detail and double triangles on top (in the turn they should have a square configuration).
- Sew the product around the entire perimeter.
- Make a quilt edging. To do this, you will need a strip of natural fabric. It needs to be stitched to the blanket, and then tucked up, and stitched again.
- Treat all edges of the blanket in the same way.
Do-it-yourself double-sided patchwork bedspread
A double-sided patchwork bedspread looks harmonious if your room is designed in country style. To make a bedspread, you will need threads, a sewing machine, a knife, scissors, fabric patterns.
Before starting work, you need to make squares to create a bedspread. If the size of the finished fabric is 1.5x2.3 meters, it is advisable to use square flaps with a side of at least 23 cm. The size of the padding lining for the blanket should be somewhat smaller than the dimensions of the finished fabric.

The sewing technique of the bedspread is as follows:
- First you need to prepare the fabric. To do this, carefully wash and iron the material. If you are using cotton fabrics, it is recommended to starch them.
- After you have prepared the patches, fold the two squares to each other front side. Don't forget to leave a 1.5 cm allowance.
- Sew two squares.
- Sew another patch to the resulting workpiece. Repeat this procedure until you have a strip of 6 squares. You need to make at least 9 of these strips. After finishing the stitching, iron the resulting workpieces.
- Fold two adjacent strips right side together, and connect them with pins. Stitch the stripes. Repeat this procedure for all stripes.
- Put the finished front part of the bedspread inside out to the top, and put the synthetic winterizer on the canvas.
- Sew the lining to the flaps.
- Make a blank from a piece of fabric, the dimensions of which should be slightly larger than the size of the resulting canvas.
- Fix the workpiece with pins, and stitch it.
- Hem the corners of the resulting product.
DIY patchwork blanket (video)
As you can see, patchwork quilts and bedspreads are very easy to make, even if you are just getting acquainted with the patchwork technique. Master class with step by step instructions set out in this article will help you in mastering patchwork. In order for you to succeed beautiful product watch the symmetry of the blocks, and do not neglect the preliminary decatization of the material.
Patchwork blanket (photo)


First, determine which fabric will be the main one (it should be 4 times more than any other). Wash, dry and iron each piece of fabric well.

Now let's start cutting. Cut the fabric into strips 10 cm thick.

We sew, we iron.

Cut into blocks of 16 cm.

We start assembling the blanket. Preferably on a flat horizontal large surface. This may be the floor (but in the room that is least prone to patency and there is no access for children and animals). First, lay out the blocks with a slope (to the left down of the main color 6 pcs), and then to the left up, and also 6 pcs.

We continue row by row in the same way. It is desirable to lay out the main tone equally in each row.

Here you already have a future blanket. It needs to be stitched.

To do this, from the upper right corner, we begin to sew together, first, small blocks lying next to each other, and then, diagonally.

So we sew the whole blanket.

We iron again.

Now we cut off unnecessary corners around the entire perimeter. Sew on interlining and lining. We quilt a blanket. We sew the edges.

That's it - the zigzag patchwork quilt is ready!

++++++++++++++++++++++++++++


Video Tutorial Patchwork-Stitches
++++++++++++++++++++++++++++++
| Eat different methods accelerated assembly of blocks. But if you are assembling blocks from different small pieces of fabric, then the assembly method on interlining will probably be the most effective. In this way, you can assemble a panel for a bag or pot holder, in a word, everything where you need to achieve the accuracy of matching corners. This method is suitable for assembling blocks from squares, i.e. where there will be seams in two directions - first horizontal, then vertical. | |
 |
1.
We need interlining (the thinnest one will do) with one adhesive side. We line the grid on the non-adhesive side according to the number of required squares. If in the finished product we have squares of 5 by 5 cm, then by adding another 1 cm to the seams on each side, we get a grid on the non-woven fabric with a side of each square of 7 cm. Thus, we should have non-woven fabric 35 by 35 cm. |
 |
2. Usually 1 cm is enough for an allowance, but if the fabric is thick or very loose, then perhaps 1.5 cm can be left. But I'm used to sewing along the edge of the foot, so I make an allowance from this calculation. A dotted line is visible on this grid - this will be the line of the future connecting seam. |
 |
3. The squares cut out of the fabric (necessarily with an allowance!), Put them on the adhesive side of the interlining and iron them. Note that the squares did not join exactly at the butt, this is not scary, it will even, perhaps, be easier to move on to the next operation when it will be necessary to bend the interlining along the marking lines. |
 |
4. Next, we fold the first row on the second along the grid marking line (right sides to each other) and make a line along the interlining according to the marking of the allowance (or focusing on the edge of the foot). |
 |
5.
And in this way we sew all the horizontal rows. Here I already ran ahead and ironed the first seam. I really wanted to see what happens... |
 |
6.
Cut off the fold edge with a roller knife or scissors. We iron out the seams. In the same way, we make vertical seams: fold with the front sides, sew one row, the second ..., cut the edge again and smooth it. |
 |
7. Everything, the canvas is assembled and the corners are connected perfectly. |
 |
8.
Here is what the block looks like from the inside. The advantages of this method: |
++++++++++++++++++++++++++++++
patchwork course

WHAT FABRICS ARE SUITABLE?
It is better if the fabrics are of the same quality. For beginners, cotton fabrics are ideal: products made from them are easy to wash, and most importantly, cut and sew. Choose drawings according to your own imagination. But for starters, it’s better to choose fabrics with a pattern in the same tone and combine them with plain fabrics. It is very important to cut off all the edges from them before starting cutting fabrics. 
WHAT YOU NEED FOR MARKING AND CUTTING
plastic templates
Pencils and markers
Ruler
knife cutter 
WHAT YOU NEED FOR MEASURING AND CUTTING
cutting mat
Round knife-cutter (with a blade in the form of a rotating wheel)
Raster rulers
pins
Scissors 
WHAT YOU NEED TO SIT AND EDGE
Thimble
Pins with heads
safety pins
Paper clips or clips
Pencils
Sewing needles
SIMPLE GEOMETRIC PATTERNS can be cut out using a regular raster ruler. For more complex shapes, use plastic templates instead of paper templates. They are not only more durable, but also transparent, so you can easily see the pattern on the fabric through them. On sale, you can sometimes also find templates with ready-made markup for geometric patterns. 
Fold the ironed fabric twice in the longitudinal direction so that four layers are obtained (the folds should run parallel to the edges). Lay the fabric on the cutting mat with the cuts facing to the right. Place the raster ruler at a right angle to the fold and trim the fabric sections. Unfold the fabric and check if the cuts are straight. IN last resort repeat the operation. 
Rotate the rug together with the fabric by 180 °, now the cuts should be on the left. Measure a strip of fabric. To measure, use the vertical scale on right side rulers. Cut off 3-4 strips. Turn the mat over again and trim the cuts. To get rectangles or triangles, cut the resulting squares accordingly. 
Fold two pieces face to face and sew along one side. Experienced craftswomen grind off the patches with one seam, without cutting the threads and without raising the foot of the machine. Attention: with this method of sewing, several stitches appear between the squares that do not grab the fabric. 
FOLDING PATTERNS
When sewing shreds, be sure to iron the allowances on a darker fabric. To get a square block of scraps, simply sew together two already stitched square scraps so that the patches from different fabrics are staggered. 
FOLDING PATTERNS
You can get stripes from patches in the following way: stitch squares from four square colored patches and rectangles or squares from plain fabric in a checkerboard pattern. After that, stitch again in a checkerboard pattern (with an offset) separate rows of shreds.
In the next photo, you will see that on the bedspread, each inner row consists of plain squares and blocks of four multi-colored patches. 
FOLDING PATTERNS
When the central part of the patchwork product is ready, start sewing the borders. The perimeter of the central part of the product determines the total length of the border. Usually, borders sewn to the sides of the central part are ground off with an “envelope corner”. The length of the border for each side is calculated as follows: the length (or width) of the central part of the product + double the width of the border (for the “envelope corner”) + seam allowances. When stitching the border to the side of the central part of the product, finish the seam, not reaching 6 mm from the corner. At the corners, sew the fabric at an exact 45° angle. Cut off excess allowances, iron the remaining allowances on the border. 
QUILTING
Patchwork quilted products consist of three layers: upper and lower (from patches, or, alternatively, the upper one is made of patches, the lower one is made of plain fabric) and the inner layer (volumetric, which gives the product a special relief when quilting). Before connecting all three layers, carefully iron the top and bottom sides. Lay the bottom side face down and secure to the surface with masking tape. Lay the inner part and the upper side (right side up) on the bottom, evenly smooth and fix from the center to the periphery at intervals of 20 cm with safety pins. If you are going to quilt the product by hand, then sweep all three layers along and across with seam intervals of 15 cm, removing the pins one by one. Only after that, with a thin pencil, draw quilting lines on the upper side of the product. 
STITCHING WITH A SEWING MACHINE
Make sure that the top and bottom sides do not slide against each other. To do this, insert the special, raised foot of the machine. Always sew from the center to the periphery, otherwise waves will appear on the product. So that the seam on the product is almost imperceptible, but a beautiful structure appears, scribble exactly into the seam when sewing patches. At the end and beginning of the seam, make bartacks: lift the bobbin thread up and sew a few stitches of the smallest size. Optimal length bartacks - 7 mm. After you complete the bartack, trim the ends of the threads. Tip: during quilting, roll the free part of the product into a roll - this will make it more convenient for you to work. 
MANUAL QUILTING
With this method of work, the product is stretched into a frame (like an embroidery hoop). Perfect option- handmade frame that can be leaned against the table, as a result you will have free hands. When hand quilting, also sew from the center to the periphery. With a small needle with a thread 50 cm long, at some distance from the starting point, make stitches through all three layers of the product. Sew a few even small stitches in one step, then carefully pull the thread. Tip: It will be easier to work if you are on middle finger working hand put on a thimble, and forefinger with the other hand, which supports the product from below, put on the leather cap. 
First, cut the edging fabric into strips across the grain thread. The width of the edging is approximately 7 cm. The total length of the stitched strips is equal to the perimeter of the product + 15 cm for diagonal corners + lapels at the ends. Sew the strips at a 45° angle into one long strip. Iron the strip by folding it in half, wrong side inward. Now lay out the strip in one layer. Along the top side of the product, trim the cuts of the inside and bottom side. Iron one end inward so that a triangle appears. Starting from this ironed end, pin the strip to the upper side of the product along the entire length of one side with an interval of 10 cm. The edges of the edging lie on the sections of the product. Sew at a distance of 7 mm from the edge of the edging, grabbing all layers of the product. 
EDging: STEP BY STEP
Before reaching 7 mm to the corner of the product, interrupt the seam, perform a bartack. Turn the edging strip at an angle of 45° outward, then turn the strip down so that the fold is exactly at the level of the already sewn edge of the edging. Now sew at a distance of 7 mm from the edge of the piping on the next side of the product, grabbing all three layers. Treat other corners in the same way. When you wrap all sides of the product in this way, i.e. get to the beginning of the edging, cut off the excess edging allowances, tuck the end and finish the seam. Finally, fold the edging to the underside of the product, secure with clips and sew by hand with blind stitches.
Source http://www.burdafashion.com/ru/index/1000001-1623201-1719103-1719104.html
++++++++++++++++++++++++++++++
Love of Quilting - magazine


Patchwork- a type of needlework that was formed due to the need to use it somewhere shreds remaining after pattern and sewing. And if in the old days these were primitive crafts for domestic use, today the technique of patchwork or patchwork turned into a real art that even people can practice unfamiliar with sewing business - create patchwork quilt or a craft is very simple.
Patchwork equipment
patchwork has become so common that in the sale of many needlework stores you can see and purchase special set for patchwork, including all the necessary tools. But for those who are not constantly going to engage in such needlework and do not want to spend money on purchasing such a set, tools that can be find houses absolutely free.
 Tools
Tools To create a patchwork masterpiece you will need:
- scissors or roller blade
- needles
- threads
- pencil
- pins
- centimeter
- paper
- sewing machine (if there is a large amount of sewing)
 Textile
 Besides, materials needed, which can also be purchased at the store or search at home. To create beautiful colorful crafts will be required variegated pieces fabrics and lining - all this can be cut from unusable old clothes, bed linen, scarves, curtains and other unused at home of things.
Quilt sewing techniques for beginners. Easy ways to sew a patchwork quilt with your own hands
There is a large number various styles and technician creating a patchwork quilt. They differ not only the specifics of the creation, but also by the superiority of a certain textures and colors. Consider the most simple techniques patchwork for beginner craftswomen.
 patchwork
 Traditional technique
English or traditional patchwork is considered the most simple and suitable for beginners. His peculiarity lies in the fact that flaps are used for sewing various sizes and forms, which are simply sewn together in an arbitrary order or forming a certain ornament.
 Blanket in traditional technique
  Pieces of various sizes
  Pillows in English technique
  Traditional technique with ornament
 Using this technique, you can sew various household appliances such as potholders, napkins, throws and blankets. The simplicity of the English patchwork also lies in the fact that, as a rule, only the front side is sewn from the flaps, and backside is a single piece of fabric.
 Blanket with a pattern
 Square or chess technique
 Square technique
 This technique involves sewing a quilt from patches sewn into squares of the same size. Making such a blanket is not difficult, but manual stitching details will require a large number time, so to save effort it is better to use sewing machine.
 Blanket in chess technique
  small squares
  Chess technique using squares of arbitrary sizes
 Technique "Watercolor"
Blanket sewn from squares, as in the previous case, but the feature of the technique is special approach to selection colors and color combinations. As a rule, fabric scraps are selected from light shades to the darker, from cold colors to hot ones, etc. Attention is also paid to the texture of the fabric - the flaps should be in harmony with each other.
 "Watercolor"
 Technique "Strip to strip"
To create a product in this technique, fabrics of various colors and textures cut into strips various lengths and widths. Combining them with each other in various patterns, they sew intricate pillowcases and blankets, tablecloths and interior items. Products may also contain geometric figures(most often it is a square in the center), but stripes dominate, which are the basis of the composition.
 stripes
  The technique of stripes with the creation of a square pattern
 Technique "Triangles"
Quilt made from various triangular patches, looks colorful and decorative due to the fact that with the help of these geometric shapes you can create various drawings and patterns. The technique is quite simple and suitable for beginners, and the principle of creating a quilt is to sew the sides isosceles triangles.
 small triangles
  Large hand seams
  intricate pattern
 crazy patchwork
The technique for making such a blanket is chaotic connection patches of various sizes, textures and colors. Connecting with each other, they do not form any pattern or pattern, but are placed in random order. The highlight of such a blanket will be variegation and unusualness.
 crazy patchwork
  The similarity of the drawing in this technique
  Crazy patchwork blanket
 Knitted patchwork
Unlike previous techniques, this patchwork is created without stitching flaps. Firstly, not pieces of fabric are used, but knitted scraps different colors, but made from the same type of thread. Second, these patches contact, rather than sewn, which allows you to create an original knitted blanket in the style of a patchwork.
 colorful squares
  Crocheted patchwork
  Knitted patchwork blanket
 A knitted patchwork is not suitable for all needlewomen, since to create such a blanket you need to be familiar with knitting firsthand both knitting and crochet.
Japanese patchwork
The technique consists in sewing products from patches of various geometric shapes . They can be connected to each other randomly or in a certain application, and the colors must be natural shades .
 Japanese technique
 How to sew a patchwork quilt?
Whatever technique for sewing a blanket you choose, you need to prepare for what lies ahead for you. painstaking work, but its result will more than pay off all the efforts spent. Before starting work, you need to consider what tools will be needed and what fabrics, if necessary, purchase the missing material.
 Tools and materials
 If you do not want to sew by hand, you can use sewing machine - the stitches will be more accurate, and the seam line will be even. Also used in many techniques iron for ironing seams, and instead of scissors, they use roller blade, which will make the job much easier.
 Stencils for patchwork
 Patchwork double-sided quilt
Beautiful and unusual blanket in the technique of crazy patchwork can be created even by a person who hears about patchwork for the first time. Ease of manufacture lies in the absence of any ornament and pattern- nevertheless, the blanket will turn out to be very unusual and will please the eye with a bright colors.
 finished blanket
 First you need to prepare tools and materials that will be needed in the process of creating a blanket:
- 6 pieces of fabric (110 * 140 cm each), the same amount will be needed on the second side of the blanket
- synthetic winterizer (170*220 cm)
- thread, needles, pins
- sewing machine
- roller blade or scissors
- lining
- ruler
- chalk or pencil
The fabric for the duvet should be suitable in texture and color, shreds should be in good harmony with each other. Before you start sewing, the fabric is better wash and iron so that later it does not sit in the finished product.
Work begins with a pattern and cutting of fabric. To create a blanket, you need to cut out from each cut 6 squares with parameters 45x45 cm. We lay out the resulting cuts balls, alternating in the same sequence all the available squares.
 squares
 With roller cutter and ruler arbitrarily cut all the squares along one line. If you are using scissors, then measure out ruler cut line and tag with chalk or pencil, and then cut it out.
 Pattern
 One of the cut pieces put under the bottom stacks in such a way that there are two fragments on top: the first and second colors.
 Squares need to be cut
 After that, by squares sew fragments using a sewing machine. Iron the resulting squares with an iron and fold in the order that the squares were after cutting.
 Sew Fragments
  Another cut and shift
  Fragment squares
  All fabric types should appear in the square
 One of the cut fragments is again shifted to the bottom, after which, as for the first time, it is repeated stitching and ironing.
 Repetition of actions
 Cutting, transferring and further actions are repeated 7-10 times in order to maximize the colors in the squares mixed up. To make this happen faster, you can shift the fragments two or three squares at once down, then these steps will have to be repeated less times.
 Cutting edges
 After out of one-color squares multi-colored patchwork cuts will be made before you have a task trim them so that all their sides are equal 32 cm. Then you can proceed directly to the "assembly" of the blanket, or rather, its tailoring.
With the help of a machine connect the squares into one canvas by sewing them together and iron the seams. In exactly the same sequence, create second side blankets, after which you can sew the product into a single whole. To do this, successively stitched in layers the first layer, synthetic winterizer and the second layer.
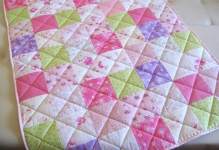
Patchwork: baby blanket for a girl
In the style of patchwork, you can create a cute blanket for girls, choosing fabric cuts as material shades of pink and sintepon. Perfect for this any technique patchwork, but the simplest, which even beginners can perfectly handle, will be the technique chess patchwork.
 patchwork quilt Pink colour
 For interesting checkerboard pattern enough fabrics two shades, but by applying more shades of pink, your product will be more advantageous. Cutting out the squares the same size and connecting them together, placing the colors in a checkerboard pattern, you can quickly and effortlessly sew an original blanket for a child. In order for the seams not to stick out, it is necessary iron them gently.
 Blanket made of large squares
 The manufactured part of the blanket is necessary attach to synthetic winterizer, and with reverse side better use solid cut pink fabric right size: the wrong side will not harm the product at all, but, on the contrary, will give it a decorative effect. Also contribute decorative trim front side, which can be decorated with homemade flowers or bows.
 Chess technique
 Patchwork: a blanket for a boy
To create a warm and beautiful blanket for a boy, it is preferable to choose fabrics blue and blue shades , but they can be multi-colored, variegated and have various patterns. For a patchwork style product you will need:
- several types of fabric combined in texture to create squares
- piece of fabric for the wrong side of the blanket
- synthetic winterizer
- sewing accessories (needles, threads, sewing machine)
- ruler
- scissors
 Baby blanket
 Work sequence:
- Before you start creating baby blanket fabric needed wash and iron(so the finished blanket will not settle after washing)
2. After that, you can measure and cut squares of different colors 27x27 cm. In total such squares need to be created 24
3. Lay out the wrong side of the fabric on a flat surface, which should be a few centimeters larger than the front side and attach a synthetic winterizer to it
5. Lay on the resulting workpiece along the edge, lined up squares and pin them with pins to the workpiece
6. Attach the squares to the workpiece along the bottom and side lines squares, without affecting their upper side, which is again pinned with pins
7. Along the lines, a little tucking the squares to hide their edges, sew all the squares to the workpiece
8. The protruding edges of the blanket can be trimmed and sew on on the sides are small strips of fabric that will hide errors and irregularities
The patchwork style is a godsend not only for needlewomen, but also for lovers of extraordinary things. This trend has been applied in different areas life - in the manufacture of clothing and footwear, in the design of premises, in the production of furniture and carpets. Today we will figure out how to include patchwork in the interior, get acquainted with the techniques for its implementation and give some interesting patchwork ideas.
A bit of history
Patchwork sewing - patchwork - an ancient direction applied arts. Also in Ancient Egypt, Persia, Africa, India and other countries, the manufacture of textile products from multi-colored pieces of fabric sewn together.
Kievan Rus was no exception. Our ancestors also highly appreciated the colorful bedspreads, rugs and other interior items made in this technique.
This direction gained the greatest popularity in the 19th century. It was at this time that mass production of bright printed chintz, cambric, calico and cotton was launched. This led to the fact that many needlewomen began to perform bright pillows, towels, carpets, scarves and patchwork blankets.
DIY patchwork: where to start?
If you have a burning desire to try your hand at patchwork, let's decide what you need for this.
- Textile. You can find suitable scraps of matter in any home: rummage thoroughly in a closet or pantry - there you will find the remnants of fabric from tailoring, bed linen, and so on. A variety of fabrics for patchwork are suitable, but it is desirable that materials that are similar in texture and density are present in one product.
- Sketch. If you have experience in patchwork, making it yourself is easy. But if you are still new to this area, it is better to use drawings from specialized magazines or look for sketches on the Internet.
- Lining fabric. Usually, one-color bright matter is suitable for it, which will go well with the color scheme of the front side of the product.
- Scissors, thick cardboard for templates, chalk or a small bar of soap for marking future flaps, pins and a needle and thread for basting.
- Sewing machine for stitching finished product or a crochet hook with threads (if you use the knitted patchwork technique).
As you can see the list necessary tools quite simple, and you can find it in the house of any craftswoman.
Advice! If you have never experienced patchwork before, and you do not have the right tools, schemes and materials, there are special kits for patchwork on sale. They include right amount patches, templates and schemes.
Interior use of patchwork technique
It is easy to guess that many ethnic interiors are "friendly" with patchwork. In styles such as, Indian, Oriental and some other areas, patchwork products look very organic.
However, not only national and "village" interiors go well with patchwork. Many designers are not afraid to include them in sophisticated styles such as art deco, art nouveau, vintage and so on. Refined armchairs in patchwork technique, as well as small poufs and couches, look great even in baroque.
Strict hi-tech and loft can also be decorated with stylish interior details made in the spirit of bright sewing. Well, kitsch and with their variegation and riot of colors are simply made for a patchwork patchwork.
How can such a direction manifest itself in the interior? First of all, these are all kinds of textile details - curtains and curtains, screens, lamp shades, furniture covers, tablecloths, napkins, mittens, pillows, bedspreads, blankets, bedside rugs and large carpets, wall panels. It is interesting that a set of patches can be made not only from fabric, but also from paper - wallpapers pasted in the form of geometric shapes, intricate patterns and asymmetric patterns look very interesting. flower arrangements on the wallpaper.
Also, when decorating a room in the spirit of patchwork, solid materials can also be used - wall tiles, flooring, tiles and so on.
What types of patchwork exist?
- Traditional patchwork. This direction is based on the game with geometric shapes- most often these are squares, rectangles, rhombuses and triangles, which are sewn into a single canvas. An indispensable attribute of this patchwork technique is the presence of a lining consisting of a single piece of fabric. In the spirit of traditional patchwork, both small interior items (pillows or potholders) and more complex ones (quilts, carpets and bedspreads) are created.
- Crazy patchwork differs from its traditional counterpart in the randomness of patterns that can have any, even the most bizarre shape. As the name implies (crazy means “crazy” in English), the more intricate the patches used, the better. Non-standard applications, wavy lines, the use of beads, beads, buttons and decorative stitches are also welcome. Patchwork bags made in this style look very nice.
- Knitted patchwork implies two options: in the first case, cloth flaps are connected using a crochet hook and thread contrasting colors, and in the second - the elements are knitted initially. To make this type of patchwork bedspread or any other large product will take a lot of time, but the result will be amazing.
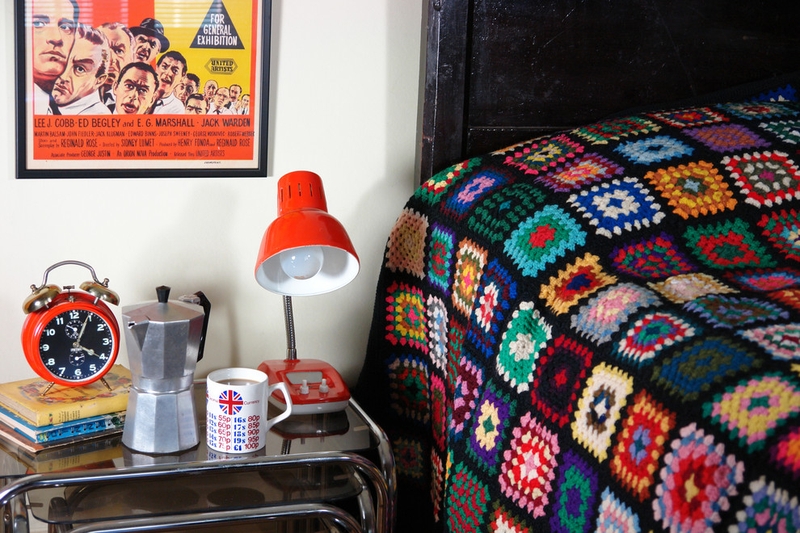
Knitted patchwork is a great home decoration for those who appreciate vintage accessories and unexpected combinations.
Remember we wrote about hygge style? How did you not read? Be sure to read and feel this lifestyle and philosophy of the organization of the Scandinavian interior. The philosophy is very simple: coziness, comfort, nothing superfluous, nothing that could annoy, distract or tire.
Patchwork bedspread in the interior
Maximum soft and comfortable things, a lot of textiles, home, natural materials. The house is calm and safe, friends gather here, it’s not boring to be here yourself, spinning in your favorite handmade blanket and plunging into dreams. By the way, about handmade and bedspread. We offer to bring this luxurious picture to life and create a patchwork patchwork quilt with your own hands.
What materials are needed for a patchwork bedspread
Well, let's start by defining the concept of patchwork. This is such a technique that allows you to sew a whole bedspread, or rug, or even a bag, clothes, stole from many different small patches. Such products are not only warm, which means practical, but very stylish and authentic, which means they can decorate the interior. We will sew a blanket. What we need:
- remnants of various tissues (it is desirable that they be of approximately the same quality, or at least the same thickness);
- ruler, pencil;
- scissors;
- fleece;
- fabric for the wrong side (you can use denim);
- thread, needle or sewing machine;
- for more difficult option you need a diagram.
Technique for creating bedspreads from flaps
For starters, you can try to sew DIY patchwork blanket from squares. Then you can not think about the scheme and it will be easier to sew the bedspread.
From the scraps you need to cut out many identical squares - use a pencil and a ruler so as not to be mistaken in size.
If you have a sewing machine, the process will go much faster. Sew the squares in rows, and then stitch the rows themselves. When the canvas is ready, it must be ironed on the inside to straighten the seams.
 Patchwork bedspread pattern
 Then you need to measure the product in order to cut the appropriate fabric from the fleece. Now lay the cover over the fleece with the right side facing up.
The next step is to cut the canvas out of denim or any other fabric - this will inner side blankets. Next, place the denim right side up on top of the pile of fleece and bedspread.
Your pile can be basted a little, and then stitched. Leave a hole in one of the corners so that the cover can be turned inside out. If you did everything right, then on the one hand you will have denim, on the other - the front side of the patchwork blanket, and inside - fleece. The hole needs to be sewn up. blind seams and iron the finished product again.
 Patchwork quilt pattern
 If you want to increase the size of the blanket, then at the assembly stage, plain strips of fabric can be laid between the squares. So you have a patchwork patchwork quilt ready.
Video instruction for beginners:
Do-it-yourself patchwork blanket: use patterns
More complex scheme will require from you the accuracy of the cut and the eye-diamond. To get started, examine your stock of flaps: what material is a lot, what is less, and what is generally in short supply. Then you can come up with a diagram yourself by drawing it on a piece of paper with paints or pencils, or take ready-made templates.
Remember that it is most convenient to sew the patches together in blocks, and already sew these blocks together. Remember to leave seam allowances, otherwise you will end up with a product that is half as large as you expect.
 Scandinavian motifs
 Patchwork style: bedspread in different techniques
More precisely, the execution technique remains the same, but the products will differ from each other in appearance.


