How to use plastic bottle caps. Crafts from corks. Didactic games with plastic bottle caps - Didactic guide “Find a Pair”
If your child loves soda, don't rush to get rid of it. plastic stoppers, because you can make a lot out of them interesting crafts with your own hands. We have selected several for you original ideas, which every schoolchild or kindergartener will appreciate. Here you will find how to simple crafts, and something that will require a little tinkering. Be that as it may, any of these master classes can be turned into exciting game with kids.
For all these crafts, it is best to use the simplest ones. bright traffic jams from plastic bottles. If you decide to do something big, turn to your friends - nowadays, almost every family often drinks mineral water or lemonade, so it won’t be difficult to collect this goodness. By the way, “hunting” for plastic caps can also be an exciting game.
Choose, get inspired, create!
ABC

We will need:
- bright traffic jams;
- cardboard;
- markers.
Simply cut out circles from cardboard equal to the diameter of the cork. We write numbers or letters on cardboard. You can also write a few syllables or whole words to make sentences.
The cardboard does not need to be glued. This way you can easily replace it during the learning process. A child should like such a developmental activity in the form of a game, and he might also find it interesting to collect plastic caps.
Flower applique

Strictly speaking, this is not really an appliqué. Rather it's three-dimensional picture. But it is done precisely using the appliqué technique.
We will need:
- 18-20 traffic jams;
- plastic bottle;
- straws;
- bright colors;
- cardboard;
- plasticine;
- glue.
A plastic bottle needs to be painted in bright colors. Acrylic paints are best suited for this. Cut a hole in the center of the cardboard for the bottle. We insert it inside and secure it with wire or thread.
We make the stems from plastic straws (we attach them with glue). We arrange the corks in the form of flowers.
If the child is small, you can use plasticine rather than glue. You can also use plasticine to add bright, voluminous colors to our panel. If some details are missing in the picture, draw them.
Volumetric flower

This craft made from plastic corks can become a good gift from a child to a grandmother, sister or mother. Assembling the structure is quite simple, and the result will be very nice.
We will need:
- 8 plugs;
- large lid;
- wooden skewer;
- Super glue;
- acrylic paint.
Make holes in one of the plugs and the lid. Glue the corks together as shown in the photo.
To make a ladybug or any other bug, draw a body using acrylic paint. If you don't have one, you can use nail polish. Wings are cut out of paper if necessary.
If your child likes this craft, you can make a whole “flower garden” with your own hands.
Butterfly

For this craft you will need a lot of corks, but very little effort. This bright one beautiful butterfly It folds up in just a few minutes. Children really like these crafts.
We will need:
- large cardboard;
- watercolor;
- plasticine;
- traffic jams;
- beads.
Draw a large butterfly on a piece of cardboard. She needs to paint over her wings and body. Then, on the bottom side of each plastic plug, attach a small piece of plasticine or drip a little superglue. Place the cork on the drawing.
So you need to fill all the free space. We lay out the body of the craft first, and then fill in the gaps. This unique mosaic can be an excellent educational game.
Rug
This is more of a craft not with children, but for children. We will make a rug with our own hands, which is very useful to walk on barefoot.

We will need:
- at least 100 traffic jams;
- thick fabric;
- awl;
- screeds.
You need to make a hole in each cork using an awl. Fabric base for the rug should be prepared in advance. It is best to choose a dense material and sew it in two layers.
Lay out the corks in the shape of flowers or create any other design. Attach them to a fishing line or using special ties. To back side The rug looked beautiful, you can add another layer of fabric.
You can make a “lawn” with flowers or something else out of plastic corks. Whatever you choose, walking on such a rug will still be useful. Yes, it may not be very pleasant, but it’s fun.
Picture from the box

Perhaps this is one of the most interesting DIY crafts made from plastic corks. We advise you to do it for some family holiday, as it can be a great colorful gift.
We will need:
- big flat box(for example, from an LCD TV or monitor);
- colored cardboard;
- colored paper;
- PVA glue;
- Super glue;
- plastic stoppers different sizes;
- acrylic paints, gouache, watercolor;
- markers;
- family photos graphies
Apply a design to the surface of the box with a simple pencil. It could be trees, a road, a house, flowers or something else. You need to make large parts of the drawing - small parts we'll add it later.
Cut out the largest parts of the applique from cardboard or paper. We glue them on PVA. Next we add planes, boats, a lawn or any other small details. We cut them out of cardboard (you can take corrugated one). We dilute the craft with plastic stoppers. From them we make all volumetric round parts, which you can think of.
Corks with a large enough diameter can be used as photo frames. Insert photos with family faces - it will turn out very interesting. In this way you can even make Family Tree. Is it possible to do big house and “place” a family member in each window.
If you don't want to bother with photos, replace them with pictures of your loved ones cartoon characters your child. Assembling such a craft can be very exciting, and not only children, but also adults enjoy it.
Octopus

It will not be difficult to make such a toy with your own hands, and almost every child will enjoy playing with it. By the way, it is not at all necessary to make an octopus. You can easily turn it into a spider or just a funny little man - it depends on the number of tentacles (or legs).
We will need:
- 8-10 plugs per tentacle;
- fabric rope;
- cover from detergent or air conditioner;
- awl;
- wire;
- blanks for eyes.
You need to make two holes on each plug. Do this yourself, but trust your child to assemble them on a string. Tie a locking knot at the end of each rope.
Gather all the parts together and connect them together with a knot. Wrap the knot with wire.
You can fix our tentacles made of plastic corks with glue. Or take two plugs, make a hole in one and insert them into each other.
If you don’t have blanks for eyes, you can simply draw a face with a marker or glue beads.
By the way, you can make your octopus have very long tentacles if you have enough plugs. Children usually like it when they reach a meter behind the toy.
Mosaic

Laying out mosaics for children is very useful. To make this process even more fun, you can use bright caps from plastic bottles.
We will need:
- a lot of bright traffic jams;
- thick cardboard;
- glue or plasticine.
Lay out a large piece of cardboard on the table. Color it if the child wants it. Pour in plastic cups paste or PVA glue. Dip the brush and attach the corks, folding some shapes (you can draw them in advance).
If you want to make a “reusable” mosaic, then use plasticine. A small ball is enough (we attach it to the smooth part of the lid).
By the way, then this mosaic can be turned into interesting game. Take large, heavy beads and tie them on a string (1-1.2 meters long) to a pencil or pen to make something like a fishing rod. Now let the child move away from the mosaic and try to throw the bead into one of the plastic stoppers. This game helps develop attentiveness, accuracy and dexterity.
Watch

If you have started teaching your child to tell time, a good helper could be a craft made from plastic corks in the form of a clock.
We will need:
- 12 plugs;
- cardboard;
- plastic stock;
- screed;
- large plastic cover.
You can use a plastic lid from chocolate paste as a base - it will be convenient. Place 12 corks around it. You can take white or bright - as you like.
We make numbers from cardboard or paper. Also suitable permanent marker. We place two parts of the spoon in the central part, make a hole and assemble them with a tie. All structures are attached with regular superglue.
With this craft, you can practice telling time with your child at any time convenient for you.
Volumetric animals

Plastic plugs can become the basis of very cute crafts or postcards. Try to make funny animals that will be fun to play with.
We will need:
- felt or foamiran;
- Super glue;
- any decor;
- glue.
The manufacturing technique here is very simple. It is best to use ready-made stencils, or any other animals.
Just transfer the image onto foamiran or felt. Make several blanks, cut them from the selected material. Lightly coat the edges of the cork thin layer superglue. Press it as tightly as possible to the material.
Views: 1,122You already know how much you can do from plastic bottles? The list is really big. However, not all crafts require caps from these same bottles. Don't rush to throw them away. You might be surprised, but they make wonderful crafts. And the matter is not limited to banal applications. Everything is much nicer. Products made from plastic bottle caps are original, practical, cheap and beautiful.
From this article you will learn what exactly can be made from plastic corks to decorate your home, cottage and garden.
Making crafts for children
You can make a lot of useful things out of corks for your child. And if you add to everything the fact that children have wild fantasy, then they should like the products. The first thing about bottle caps is that they can be easily glued to cardboard or to each other. This gives a lot of possibilities. If we divide crafts into criteria, we can distinguish three of them:
- Application.
- Toys.
- All kinds of figures.

If we talk about applications, then everything is very simple. To work you will need a lot of corks, glue and cardboard. It is better if the corks are of several colors and different sizes. So, you can create a variety of compositions. One of the simple ones is a caterpillar or butterfly. You can even make them together with your child. More difficult option- bird. In the photo you can see an example brought to life. This is a parrot made from different corks.

If we talk about toys, then there are a lot of options. Again, one easy option is a cork snake. It's very easy to make. You must have:
- 15 or more multi-colored or plain stoppers.
- Awl.
- Rope.
- 2 eggs from Kinder Surprise.
Making it couldn't be easier. You need to make a hole in the middle of each cork, then thread a strong thread through all the holes and tie a knot at the end. The Kinder eggs will serve as the tail and head. They should also be pierced and connected. The design is flexible and interesting. All that remains is to finish drawing the eyes, nose and tongue.

Using the same principle, you can create little people, a giraffe, a zebra, etc.

For those who like something more complicated, there is an option. The lids make original robots that little kids love so much. Even adults don't mind playing with this toy. And to make it even more interesting for him, create several options. All you need is glue, caps and imagination.

This is not the entire list of crafts. Bottle caps are suitable for making spiders, cars, ladybugs, fish, etc. It all depends on your imagination.
Bottle cap magnets
Everyone loves refrigerator magnets. Without them, the kitchen looks empty. Why can't plastic bottles be these magnets? They just need to be modernized a little. Such crafts will certainly look original and not like everyone else’s.

Note! They can not only please the eye, but also cover up coating defects.
To make similar products from bottle caps, you need to stock up on:
- Multi-colored traffic jams.
- Magnets, they can be purchased at a craft store.
- Glue.
- Alcohol.
- Colored paper and paints.
- Scissors, colored markers.
First, degrease each plug with alcohol. Then place the magnet on the glue with inside traffic jams. Now you need to hide it using colored paper. Cut identical circles to fit into the cork. Make a drawing on them, write something or decorate the cardboard in some way. Then secure them to the bottom. The cork itself can be decorated with a bow or ribbon. So, you can create an alphabet that will help your children develop.

Note! You can leave messages to your spouse or children this way.
Making a garden mat
If you choose the most popular crafts, then a rug made from plastic bottle caps will take one of the first places. This useful thing, which will work everywhere: in the house, at the dacha, in the garden, at work, etc. It’s easy to make it with your own hands. In this case, you have two options for creating:
- A path made from plastic bottle caps.
- Massage mat made from corks.
They differ only in the location of the plugs. In a regular mat, the lids are placed with the flat surface up, but for a massage mat it’s the opposite. Making them is quite simple. The crafts look decent. And if you take into account the cost and ease of production, then there are no complaints about them.

To make a massage mat you will need a base (fabric, cardboard, etc.), an awl, threads and the corks themselves. It is better not to sit them on glue, as it may not withstand the load. The manufacturing technology is simple: make two parallel holes in all corks using an awl. Be careful not to get hurt. If necessary, you can heat the awl. This will make it easier to fit into bottle caps. Now you need to be patient and carefully sew all the plugs to the base. The process is simple, but labor-intensive. Choose the shape of the carpet yourself. It can be a circle, oval, square, rectangle. It all depends on your desire. If you walk on the carpet 15 minutes a day, you can improve your health.

As for a regular rug, everything is done in a similar way. The plugs can be glued together with silicone glue. Thanks to the variety of colors, the rugs will come out with patterns. You can choose the drawing yourself. A garden path is created using the same principle. It perfectly decorates the area, can divide it into zones and make it practical. If you want to walk along the path, then place the lids on cement.

Thread curtains as decoration
These are not all the garden and home crafts of plastic bottle caps that you can make. For cottage owners, curtains from plastic caps- this is a good solution and we need it. Thanks to them, it is created necessary shade in the house, and air can circulate freely in the room.

To create curtains you need to have:
- a lot of bottle caps;
- fishing line or rope;
- awl, hammer and nails;
- needle (if required).

Process of creation:
- Using an awl, make holes in the lids on each side. They should be placed opposite each other.
- Thread the corks onto a fishing line of suitable length. If necessary, make sure the pattern is correct by counting the number of multi-colored items. Make two vertical rows.
- Secure the finished structure with a knot so that the lids do not fall out. You can singe the ends of the fishing line.
- Using the same principle, string the remaining rows of the curtain. Make marks where you need to move to the next row so that they are the same.
- All that remains is to fix the finished cork curtain in a convenient way.
Decorating the garden
If you want to make your garden and the area in front of your dacha attractive, then covers will help you. One option is to create an applique or picture on the fence. This will make the gray and gloomy wooden fence bright and original.

Some people make entire compositions on the fence that you just can’t pass by. And to create a picture you will need small change. Look at the photo below. Imagine how much work the owner did! His patience is enviable.

You can also create figurines and figurines from corks. For example, using wire and caps of different diameters, such a plastic flower bed can appear near the house.

And to surprise you even more, let’s say that some even make garden furniture from lids. Such an original workplace will have no equal among your neighbors. Everyone will want to try your crafts in action.

Let's sum it up
At first glance, it may seem that bottle caps are useless thing, which is only suitable for the trash can. We are confident that our article helped you take a fresh look at these simple products. If you show your imagination, don’t be lazy and take the time, then your dacha, house or garden will be filled with original crafts and even quite functional things.
What to do with caps from plastic bottles, juice packs, yoghurts, ketchups, medicines, various caps and other rubbish? Do not rush to get rid of them - after all, this good material for children's, family and even professional creativity! In addition, today plastic is practically not recycled in our country, and you can help preserve nature without sending another batch of garbage to a landfill. And this is not garbage - but puzzles of future masterpieces. Here are some ideas that can help with this!
"Cover" mosaics
Perhaps almost all crafts with lids involve mosaic technique to one degree or another. But the easiest way to start is with collages. To do this, the children and I collect more colorful lids, wash and dry them, and then sort them by color.
Then we select a pattern and divide it into small squares: each of them more or less corresponds to a color, and you just need to choose a similar cover.
They can be attached to any surface - corrugated cardboard(from large shipping boxes - for example, a refrigerator, etc.), plywood, metal sheet, concrete wall or wooden fence (the main thing is to choose the appropriate glue). There is no need to apply a stencil to the surface: relying on the pattern lined with squares, we lay out the lids close to each other - the mosaic will still turn out smooth.
You can start with small mosaics - to try your hand, and then you can get a taste for it! For example, Nikolai Petryakov is an ordinary resident of Bratsk who creates large-scale mosaics directly on the walls of his house.
In our photo there is a reproduction of Shishkin, and the remaining walls were covered by a self-taught master with some kind of embroidery with patterns. What about “Bears in the Forest” - you can use your favorite images and even family photos if you wish. And if the dacha is absolutely not suitable for this, then almost every yard has uncomfortable fences or garages. Give a gift to some playground!
Here's another lady who can inspire with mosaic ideas - Michelle Stitzlein. She didn't just find plastic lids worthy use, but also figured out how to make the panels more voluminous: to do this, Michelle attaches the covers with the convex part down.
She has a variety of magical scrap art from Starry Night to wall-sized rainbow butterflies - but we love the watermelon! (By the way, the title photo of the post is also her tricks).
Here is a self-portrait from Chicago artist Mary Ellen Croteau - an excellent example of using photos in a mosaic of lids. She worked on it for a whole month - after all, the dimensions of the panel turned out to be 2.5 by 2.1 meters. But what is the result... And don’t worry about the complexity of the task - Mary also started with the simplest drawings.
Toys made from lids
Ladybugs and baby frogs are family friends! It’s not difficult to make them: just paint the lids suitable color Using a black permanent marker, glue on cardboard paws and beady eyes (or you can also use blank eyes, which are sold in craft stores). You can place animals in the garden or on a bookshelf.
Everything for everyday life
The Greek master Athanassios Babalis invented this shopping bag(370 covers) and an ottoman chair (1250 covers) especially for the Green Design 2008 festival in Athens. The work, by the way, is not dusty: we take the lids and put four holes in each at the same distance from each other. For this you can use thin knitting needle for knitting, heated over a gas burner (plastic melts like butter) - just do it without the participation of children.
Then everything is simple: we connect the lids into “chain mail” using fishing line or thick threads, and from this fabric we model either a string bag or massage Mat for legs - with patterns, drawings, creative “chaos” or plain.
And if you fasten the lids with wire, you can get a basket.
Fridge magnets
A necessary thing in the house! They can hold notes and photos, or simply decorate the kitchen. We have two options: emoticons or berries. Making “cherries” is a little more difficult, so it’s better to show the progress of the work on them - and the rest is the same. So, we make a small cut on the red lid and pass a green cord (the stem of the berry) through it. Fill the lid with plasticine, but not to the very edges. We connect the second end of the lace to the other cherry lid. In the middle of the lace we tie a green ribbon with a knot or a bow - these will be the leaves. (depending on size) lightly press into plasticine or glue to the edges of the lid. That's all - where is ours?
Rustling curtains made from lids
Here we don’t need “chain mail” - after all, these are curtains made from separate garlands of plastic covers. Therefore, in each of them you need to make only two holes and string large “beads”. They need to be secured to a wooden block or fishing line stretched in the doorway. If desired, you can organize a simple pattern.
Covers in the garden
Garden furniture can be different: some people have expensive “wicker” from the store at their dacha, while others make it themselves using scrap materials. In the latter case, it can be decorated with plastic covers and create an interesting effect (at the same time masking the imperfections of the furniture).
“Paved” paths are especially good between the beds. Of course, many people want to relax in nature without anything artificial - and would rather prefer stone or gravel.
But covers are a low-budget way to walk through your garden after rain and keep your shoes clean. And it’s also a way of self-expression!
Decorations for a playground or garden bed can be made more functional if you give them the shape of carrots, tomatoes, eggplants and other fruits that grow in the garden. Each bed can be marked with a corresponding “sign” - especially since while the seedlings are small, it is not always easy to understand who is in front of us. We take plywood and cut out a figure template. We nail a longer stick to it and paint the workpiece in desired color. All that remains is to attach the covers using small nails - the plug is ready.
Beads from caps
If you poke a couple of holes in the lids, they can be used along with the rest of the change to create colorful necklaces - they will come in handy in children's games, as garlands for the holidays, or even Christmas tree decorations. And this is just the beginning: in the next issue we’ll see what metal lids can do!
Just think how much garbage in the form of bags, disposable tableware, tubes, various sticks and other small things we throw away every day. Including a huge number of plastic bottles. But all this can be wonderful material for creating various crafts. At the same time, I would like to note that these handicrafts from a plastic bottle are not necessarily intended only to please the eye. You can create very functional things, even furniture.
Do not be surprised. Human fantasy has no boundaries. You will see this for yourself by reading the article and looking at the photos we offer. I hope that these ideas will motivate you to repeat what you saw, or inspire you to create your own unique product, perhaps even call it a work of art. In any case, we wish you patience, perseverance and inspiration.
We will not give master classes here, but will simply show useful ideas, invented by talented people from different countries. A sea of ideas. Be prepared to be shocked in a good way. So, what can you make from an ordinary plastic bottle?
Products from plastic bottles: ideas
vertical garden
Chandelier made from bottle bottoms


Broom for the garden

Jewelry stand


Flowers
Beginning artists can use the bottom of the bottle to draw flowers blooming on trees.

Canopy
You can make such a monumental canopy.


Caskets
Useful boxes for various little things that can get lost.

Christmas tree
New Year is just around the corner. You can start making a Christmas tree. It is simple and uncomplicated in execution.


Fun pots for indoor flowers


Carnival costume
Detail in the photo carnival costume for a matinee in kindergarten.


Boat
Please note - it is functioning!


And here is a video about it:
Ottoman

Curtain
Another use for the bottoms is as a decorative curtain.


Bird feeders

Various flowers


And that's not all. After all, the bottles still have corks. Once in in capable hands with a quick-witted mind, they also get into action. You can create an unusual pattern from multi-colored corks. The idea is interesting because cork is cheap and simple, and the result is simply magnificent. The only problem that may arise is where to get it. a large number of traffic jams Here you can involve all your relatives, friends and acquaintances in collecting.
Here are examples of what products are made from plastic bottle caps.
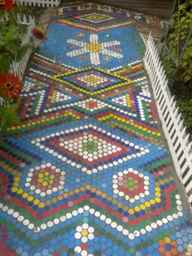
Ornament of the path leading to the country house.
Or even the walls of the house itself.

You can decorate the surface of the table.

But here is an option that is not only beautiful, but also useful application. Cork mat. The front surface is lined with a pattern.

And if you turn it inside out, you get a massage mat against flat feet.

In addition to what we showed you, you can find a lot of tips on how to make products from plastic bottles, video and photo instructions and step-by-step master classes. Search, create, dare and surprise everyone with your creative abilities.
Video selection for you
Many people get true pleasure, making something from materials that, in principle, were not intended for this. Everything goes into use: worn-out car tires, old clothes, wooden and plastic containers, unused dishes and cutlery, metal cans, buttons, toothpicks, etc. Thanks to creative approach and unbridled imagination, real masterpieces, practical and aesthetically attractive products are created from recycled materials. This article will talk about how you can use caps from plastic bottles.
Children's crafts
Children are extraordinary dreamers, capable of discerning in the most unremarkable object interesting toy. Lids are a good material to play with. They are bright, round, and comfortable to hold in your hand. You can build houses from traffic jams, transport them in the back of a car, and replace missing parts in the game with them. You can also create real ones from lids. voluminous toys and make funny pictures and applications.
Snake
Take several lids of the same size. Any color can be chosen. A small hole is made in the center of each cork. The lids are strung on a fishing line, which is secured on one side so that the structure does not fall apart. On the other side, a hollow ball is strung and attached, which will be the head. Eyes and a forked tongue cut out of colored paper are glued onto it. The snake is ready.
Spider
 You will need: black cork, chenille wire similar color, silicone glue. The wire is cut into pieces of suitable length for the paws. Then each piece is bent into a hook at one end and glued with the fold to the sides of the lid. You can glue eyes on the cork.
A lot of different toys It will work if you paint the corks with appropriate patterns that imitate the color of insects or animals.
When it comes to applications, the options are endless. The corks are glued to a base made of thick paper or cardboard in accordance with the planned plan. They are placed either singly or in groups. Suitable parts made of paper, plasticine or other materials are added to the corks. applied creativity. The result is original picture, amusing children and adults.
Cork original mosaic
To make such a composite canvas, you need a large number of corks (preferably of the same size for clarity of the design), a lot of patience and time. There are several ways to create a mosaic, directly dependent on the mounting surface.
On a wooden plane
This could be the wall of a wooden house or a plywood sheet. First, a sketch of the future image is applied to the base, after which the corks are nailed to the base according to the planned plan. It's better to nail down the lids outside outward, so the image looks more aesthetically pleasing. In addition, if necessary, the mosaic can be easily washed.
On concrete or brick surface

The manufacturing technology is the same as when working with a wooden base. Only instead of nails they use a special adhesive composition, sold in construction stores. The work is carried out gradually, in small parts, giving the created canvas time to harden.
As an independent subject
In this case, the covers are simply fastened together in accordance with the plan using special glue. The structure is located both horizontally and vertically, maintaining stability due to its own weight at the support points. However, such mosaics rarely come in large sizes.
Mosaic made from plastic bottle caps - very interesting method decorating unsightly surfaces, which when low cost allows you to transform, for example, an ordinary country house in a painted mansion.
Cork massage mat
Along with its decorative function, this product has a therapeutic and health purpose. Several dozen lids, turned upside down, form an excellent back massager that has a pain-relieving and relaxing effect. To make it you need plastic plugs, strong fishing line, an awl or other object for drilling holes.
Four holes are made in a cross on each lid. The corks are first laid out according to the intended pattern, and the dimensions of the future rug are adjusted. Then they are secured in successive rows with fishing line to each other horizontally and vertically. The ends of the fishing line are soldered or tied into knots to strengthen the craft. Lids can be chosen in any color and size, but always new. Unused material is safer, without nicks or cracks.
DIY garden path
Another interesting way use of plastic lids. A path made in this way has several advantages.
Firstly, it is quite durable. The area lined with lids can withstand heavy weight, equal to the weight of an adult person or a flowerpot.
Secondly, such a track, made according to the right technology, will last more than one year.
Thirdly, it looks beautiful not only in color, but also in the texture of the styling. Such decorative element will add originality and uniqueness to the garden. The path is easy to clean from debris and soil.
 The disadvantages include the fact that in frosty weather the surface becomes slippery. This is inconvenient, especially if you have to use the path often. In addition, its creation requires a large number of lids, which leads to considerable costs.
In addition to plugs, you need cement, sand and construction adhesive. These substances are used to mix the composition that will be the foundation of the future path. First, mark the location and dimensions of the path. Dig a trench 7-10 cm deep, along the edges of which wooden formwork is installed. Fine crushed stone or gravel is poured onto the bottom.
A pre-mixed solution is distributed on top, on which the lids are placed according to the selected pattern. The plugs are recessed to the same depth, level with the general ground level. This must be done quickly and carefully. Then the resulting path is allowed to harden completely, after which it is cleaned and the formwork is removed. A beautiful addition to the completed work will be a border that will give the garden path completeness.
Unusual curtains
Creative people create unique things using any available material. The use of such crafts in everyday life is not only pleasing to the eye, but also brings certain benefits. An excellent example is curtains made from plastic bottle caps.
To make the product you will need: covers in the right amount by color, fishing line, awl. Take the lids, lay them out in the intended order or draw a diagram. Then string two rows at the same time. The length of the fishing line is chosen such that when folded in the middle, two segments are obtained equal to the height of the doorway. Rows of plugs are strung on these two ends of one fishing line, separated by a bend. A knot is made at the bend point of the fishing line for ease of operation. The ends of the fishing line are also secured with knots after the rows are completed.
In this way, all subsequent rows are made in accordance with the selected pattern and dimensions. When the curtains are ready, they are fixed to doorway. The attachment points are knots tied on the bends of the fishing line. First, mark the fixing points of the curtain on the door frame. At these points, nails are driven in with fastening plugs that are not completely completed, the fishing line is hung in “knots” and the nail is hammered in until it stops. This fastening will securely fix the curtains.
Cover curtains are used to decorate country houses or outbuildings. They can be supplemented with appropriate tiebacks or placed as a continuous curtain. This technique is convenient in a summer shower, where an opaque, waterproof fabric is required. In the room, decorated with curtains made of plastic lids, there are several more details made using the same technique. These can be floor mats similar color range or with a repeating pattern, hot pads, interior items covered with lids, etc.
Considering all of the above, we can conclude that plastic bottle caps are a multifunctional material that is pleasant, easy and interesting to work with for children and adults.
In contact with


