How to quickly make a smooth color transition in Photoshop - detailed step-by-step instructions. Gradient. Melanging rules for a smooth color transition
Gradient. Simple knitting rules
beautiful canvas with a smooth transition of colors
The article uses photographs from the Internet: source “Google search”
Gradient is a word from Lat. gradiens, means “walking, growing” or the direction of the greatest increase in a certain value, in our case, the color of the knitted fabric. Simply put, a gradient is called smooth transition from one color to another, and the colors themselves and the number of transitions can be any. For example, you can go from black to white in two steps, or in 5 or 10 steps, choosing between the initial (black) and final (white) shades from dark gray to silver and snow-white.
Also with any other colors and shades


In knitting, multi-colored fabric is used in the most different models and styles for both children and adults.


In general, a sea of imagination and possibilities!!!
You can knit an item with stripes different colors, you can provide for a transition of shades in the process of knitting a pattern, or you can emphasize the “zest” of a thing only through the flow of colors in a regular stockinette (or scarf) surface.
For a SMOOTH transition from one color to another, a simple technique of combining threads is used - melange. Wikipedia defines Melange as “a way of combining and interweaving multi-colored threads for knitting." And to make a gradient fabric we must independently melange the selected colors of yarn: everything is very simple, but effective and beautiful!
Often in finished form“Transition lines” are still noticeable, very fuzzy and blurry, but visually visible.


If the product is knitted with a pattern, for example, braids or any other, then the “visibility” of the stripes blurs, the transition becomes less noticeable

Here is a more striking example for comparison stockinette stitch and drawing

In no case can one say that this is ugly - it’s just a fact)) all products using this technique look very cool and impressive!
BUT! You can achieve an almost perfectly smooth color shift, using the same knitting technique!!!
For example, look


In fact, everything is very simple - this effect can be achieved in two ways:
- The more halftones between the primary colors are used, the more beautiful the result and the less noticeable the transitions, i.e. Using three colors, it is very difficult to achieve the same result as using 9 colors of yarn.
As an example, having 3 skeins *black-gray-white* the overflow will be exactly noticeable stripes, and with 9 thread colors *black/marengo/dark gray/gray/light gray/dark silver/silver/off white/white/snow white*, it will be a much smoother gradient.
- knitting with a larger number of layers of threads, gradually replacing each of them with a new shade, will achieve exactly the smoothness of the color transition.
The pictures above are the second method of the same knitting technique.
There is another option - another technique, for example, jacquard or pattern, where different colors you can introduce it pointwise, in each subsequent row increasing the volume of a new shade and, therefore, achieve a gradual, very “slow” color change.
We are considering a gradient knitting method that involves melange of threads!
A FEW RULES for forming the “necessary” colors when knitting a gradient - melange.
1.Yarn thickness
During the knitting process, our threads will be combined in different combinations, i.e. the working thread will ALWAYS consist of several threads - you can take only 2 primary colors of yarn, BUT the effectiveness of the gradient will depend on the number of folds. Those. when knitting in three threads, the transition will certainly be more noticeable than when knitting with the same yarn in 6 or more folds.
Therefore, the first rule for a great result is that the greater the number of folds of threads, the smoother the transition of shades will be. finished product.
The initial choice of yarn depends on this - focus on the “final thickness” of the thread (= working thread) with which the fabric will be knitted in several folds: if a skein contains 100 g and the length of the thread is 400-500 m, then the thickness is three folds working thread will be quite voluminous, color transitions will be more noticeable. For the same three-layer version of threads, each of which is 700-900 m long and weighs 100 g, the thickness of the working thread will make a thinner fabric. Well, when folded into 6-8 threads for yarn of 1300-1500 m or more, you can hope for an almost “ideal” gradient result.
Your choice of yarn should first take this moment into account!
But, I repeat, this does not mean that knitting in 3 folds is ugly or ineffective - it all depends on the desired model and your choice!
There are three colors of cotton yarn from which a gradient summer blouse should be knitted.

Yarn 50% cotton/50% viscose, length 425 m x 100 g - I will knit with 3-ply thread using knitting needles No. 3.5 (possibly 4.0 depending on individual knitting density).

There are only 2 main colors of yarn - Semenovskaya “Lydia”, 100% wool, length 1613 m x 100 g, colors “Dark blue” and “Iceberg” (turquoise). A hat will be knitted in 8 (!) folds


Please note that in the first example, the “stripes” from the color transitions are noticeable, especially in the area where the melange and main areas change, while when transitioning from not very contrasting shades, the “border” is more blurry. Those. if more shades were used, the flow would be smoother even with a small number of folds of the working thread.

In the 2nd example, on the canvas of the cap, there is no such visible “border” of color even for sharp color tones WITHOUT the use of halftones.
2. How to melange threads
Those. how to form “transitional” thread colors.
The basic rule of melange:
there are areas of primary colors and there are so-called. melange areas of knitted fabric. All sections are knitted with the same number of folds (= working thread): sections of primary colors are a fold of threads of only primary colors, and melange sections are a combination of threads of different colors. Each subsequent transition is carried out by replacing one of the threads in the working thread with a thread of a different color.
For example, when adding 5 threads, the first transition will be made by replacing one of the five threads with a thread of a different color = 4 threads of one color + 1 thread of another color.
The knitting process is performed as follows: having knitted a certain vertical section, we change one of the threads in the working thread to another. We knit the next vertical section and change another thread in the working thread to the same one as the first replacement. And so on - all the threads in the working thread are gradually replaced with a different color.
2.1. We knit with dark yarn in 3 threads of the same (lilac) color to the desired height*
*How to determine the height of the knitting section for uniform distribution of colors along the length of the product - below in the text
This is the first section of the main color.
2.2. First change to lighter yarn (pink) = first melange section. To do this, we replace one of the three threads of our working thread with a pink thread - we get a triple addition of two lilac and one pink thread. This way the lighter thread will be gradually introduced into the fabric.

2.3. Having knitted this segment to the desired height, we replace one thread from the two remaining lilac ones with a pink one - we get a triple addition of two pink threads and one lilac one.

We get a canvas of this type

2.5. The transition from Pink colour to white:
— 2 pink threads + 1 white
— 1 pink thread+ 2 white
- 3 white threads
Thus, the smooth transition from the initial dark color to the final light color is completed.
Nothing complicated or abstruse)))
This is an example for knitting in three colors. In a similar way, we will melange 4 colors (conditionally A, B, C, D), and the transition will be smoother, because the segments will be shorter and distributed as follows:
— 4 threads A
— 3 threads A + 1 thread B
— 2 threads A + 2 threads B
— 1 thread A + 3 threads B
— 4 threads B
Accordingly, the following sections of transitions
Now it becomes clear that the more threads there are in the working thread, the smoother the transition will be, because the replacement occurs gradually and, therefore, the introduction of a new shade is “less” noticeable. Therefore, even knitting with 2 primary colors, but in a larger number of folds of the working thread gives the most spectacular final result of the gradient - example 2))

I think the principle of melange is clear regardless of the number of primary colors and the number of transitions.
3. How to determine the height of the transition segment (vertical section of the canvas)
If your product transitions evenly from one color to another, i.e. all shades will be the same height, then the planned length of the entire product (measured in the center of the product) is from top edge(for example, the neck of a blouse or the bottom of a hat) to bottom edge divide by the number of primary colors - WITHOUT taking into account the melange areas.
In example No. 1 above, there are 3 parts: lilac, pink and white. As an example, let’s take the total height of the blouse to be 72 cm.
72: 3 = 24 cm. That is the complete transition from one primary color to another should be 24 cm. BUT! in each such transition, 3 approaches are used with changing threads = melange sections (3 threads of the same color, 2 of one + 1 of the second color, 1 of one + 2 of the second color), which means we divide each segment of the main color into 3 more parts = each vertical section of knitting, including melange ones, is 8 cm. Well, the number of rows depends on the individual knitting density))
Considering the style, model and number of desired transitions, you can already change to your choice which of the transitions should have a greater height, and which segments will be smaller or the same. In particular, this is very important if the amount of yarn you have is different: there are 4 skeins of one color, and only 1 of others - accordingly, one of the transitions will be more “long”, while the others will be “shorter”. Or just if you wish, one color (or one melange area) in your model should be 2/3 of the entire length as planned))
To knit flower sections of different heights, use the following pattern:
- determine the desired height for each section of the main threads
Example No. 2: for knitting a hat with a working thread in 8 plies of yarn of two colors: the total planned height of the product from the bottom edge to the center of the bottom will be 23 cm. The height of each section of the main colors is 7 cm, respectively, the “middle”, i.e. . The TOTAL height of all melange areas for the transition from one main to the second main color will be 9 cm.
— distribute the total melange area for all colors by the number of transitions
In our example it's like this:
7 threads A + 1 thread B
Those. A total of 7 crossings will be made in this section. As calculated earlier, the total height should be 9 cm, respectively, each individual melange area will be approx. 1.5 cm.
All. The calculations are done!
4. Smooth transition from one area to another melange or plain piece, if there is a small number of folds in the working thread and sufficiently contrasting shades of yarn.
That's pretty too subtle point knitting, because if the number of primary colors is small, for example, our 3 colors in the 1st example, and the color is quite contrasting, then, as mentioned above, there is still a fairly “clear” line of demarcation between different shades.
Use the gradual introduction rule, i.e. you can not knit the entire row at once by replacing one thread, but introduce a new shade by partial knitting, for example, by knitting a small segment in shortened rows, the transition will no longer be clearly “horizontal”.
Or you can use the jacquard technique, literally knitting 1-2 loops every 5-6 cm in a row, accordingly increasing the areas of the new color in the next one.
Another option is to knit a small section of the row with a new working thread, then also knit a small section of the previous shade, and again alternate the “new” and “current” working threads in the same row, knit the next row completely with the previous shade, the next one with the “new” shade : this way the “merging” will not be in a line, but in episodes.
In our first example, the “delimitation” of areas when introducing a white thread is especially noticeable. But I don’t want to “bother” with jacquard or shortened rows)), there are 3 contrasting colors and only 3 folds of the working thread, as planned.
When knitting, I used both partial sections of knitting with different working threads (photo above), and this method: knit the first transition row in alternating mode * 2 stitches of the previous color (it doesn’t matter if it’s a melange row or the main one) and 2 stitches of the “new” color *.
When moving to the main section from *1 pink + 2 white* to *3 white threads* I knitted like this: *2 stitches of the current melange color, the next 2 stitches white* = the whole row is in a checkerboard pattern, and different stitches look the same “variegated” in the general picture.


The next row is knitted in a “new” color - white. But, of course, you can still increase the “height” of introducing the “new” color to get a smoother flow!
On the wrong side of the product, if you knit 2 loops with different working threads, small broaches are formed, as when knitting jacquard patterns- you don’t have to pay attention to them, because they are short, but you can use the rules of jacquard knitting to “eliminate” them, when the broaches “get involved” in the current row.

General form

Example 2. Here, in all transitions, the 1st thread was simply replaced without any additional ways knitting

That's all the rules for knitting a gradient. Uncomplicated and quite effective to obtain a beautiful result in the finished product - knit a variety of and very neat smooth color tints! I hope that both the result of your work and the knitting process itself will bring nothing but pleasure!
A charming manicure with a color transition has become one of the most interesting and striking discoveries of the past year. It is also known under another name - ombre, degrade or gradient manicure.
The design is made in several colors (from two to five). A smooth transition between shades is created, they seem to flow, gradually replacing each other. At first glance it seems that stylish manicure can only be performed by real masters. But the ombre secret is out! You can make a smooth color transition yourself using simple tools and funds!

The number of design options is increasing every day. In ombre, new colors (both similar and radically opposite) are combined, and the direction of the transitions changes.
The most popular types of design:
- horizontal color transition;
- vertical flow of shades;
- smooth color transition diagonally;
- change in shade from one nail to another.
A soft, gradual color transition can be done in different ways. Let's take a closer look at the most popular of them. To complete the design you will need two colored varnishes, cotton swabs, acetone, foil or a plastic plate, white varnish for foundation, base and fixer. And the main “tool” is a sponge. The most ordinary one, for washing dishes, will do.
Let's describe the execution scheme step by step:
- Apply base coat to treated nails. After it has dried thoroughly, coat the plates with white varnish in two layers. This secret is used to make the gradient manicure more vibrant. The surface of the plate will become smooth, and colored varnishes will adhere to it much better.
- Choose polishes that go well together in color. These can be similar shades or radically different. It is worth studying color combinations in manicure and fashionable shades year to be “in trend”.
- Cut the sponge into pieces that are slightly larger in area than the nail plate.
- On a kind of “palette” - thick paper, foil, plastic plate - apply two or three colors closely, without spaces. The borders of the flowers can be slightly shaded using a regular toothpick. Immediately apply a sponge to the varnish so that the product penetrates into the holes. You must not hesitate so that the varnish does not have time to dry.
- Press the colored sponge onto your nail. Using rolling movements, transfer the varnish onto the plate so as to capture the entire base. Blot several times to create a thick, beautiful coating.
- Without waiting completely dry colored varnish, apply a layer of transparent fixative. The roughness that remains after using the sponge will be smoothed out. The transparent finish must be applied in several strokes in the direction from the root of the plate to the free edge.
- Then you need to remove excess polish from the skin around the nail plate using cotton swab and nail polish remover.
Other ombre techniques
Nail designs with color transitions can be done in other ways.
Read also: Manicure on September 1 for girls in grades 8, 9, 10 and 11: spectacular nails for everyone

- The entire plate is covered with one of the selected shades. A different color is applied to the sponge. After that, print it on the plate, starting from the middle of the nail to the free edge. Make several presses, moving the sponge slightly so that the colors mix at the junction of the shades.

- Two colors are applied back to back onto the plate. Then you need to take a clean brush and, without waiting for it to dry, make strokes at the border of shades. This will lead to partial mixing of the varnishes and the formation of a smooth transition from one color to another. The painted surface remains smooth and not rough. This transition technique is called.

- You can transition from one shade to another by using similar polish colors on each nail. Thumb covered dark shade, and the little finger is the lightest. You don't have to buy five different polishes to do this. It is enough to purchase white varnish as a “brightener” and mix it with colored varnish, gradually changing the proportions. This way we will get a soft transition of color from dark to light on all nails.
- It is very difficult to make a transition with a sponge without staining the cuticle and side ridges. Removing excess varnish is not very pleasant; besides, a careless movement can catch the coating, ruining the design. Women practice alternative method: taping the cuticles with tape before applying nail polish. This takes a lot of time. But after removing the tape, the side rollers remain perfectly clean!
- If you cover the skin around the nail thick cream, then it will be easier to clean off excess varnish after the procedure. But the cream should not get on the plate, otherwise the varnish will not adhere well.

- If applied to the tip of the nail dark color, then your nails will look longer.
- On short nails use transitions of two colors. But on long plates, ombre using three or more shades will look harmonious. Beginners are recommended to create a gradient using two colors. Over time, you can increase the number of shades.
- The smaller the holes on the sponge, the more beautiful the design will be. The transition will be softer and smoother.

- Instead of a sponge, you can use a sponge or eyeshadow applicator. In this case, the manicure is more neat, and the periungual space gets less dirty.
- Experts recommend using a different piece of sponge for each nail to ensure the gradient is dramatic rather than messy.

- Colored varnishes can be applied directly to the sponge rather than to foil or paper. You just need to first moisten it with water and squeeze it out a little. Then the sponge will absorb less varnish.
- Some masters recommend using as a base not white, but colored varnish, the lightest of the selected shades.

- If you decide to get your nails done with a color transition using gel polish, then the application technique will not differ significantly. Experts say that ombre with shellac is easy to create with both a sponge and a brush. Of course, you will need a UV lamp to dry each layer. It is also necessary to adhere to all other stages of work that are carried out during a manicure with gel polish: applying a primer, removing the sticky layer.
In this article we will look at popular methods of smooth transitions between images.
Such transitions are necessary when you make complex collages or want to beautifully arrange several pictures in one.
From all the options below: soft eraser, soft brushes and gradient, best method is a gradient. This is what creates a first-class transition, without losing the quality of the original images. See for yourself: using an eraser, we paint over the pixels, but where is the guarantee that you will be able to paint over everything perfectly? Of course, you could spend a whole day in Photoshop, erasing pixel by pixel. But, I believe, “the game is not worth the candle,” since we strive not to spend a lot of time on certain operations and do everything quickly.
A soft eraser and brush are good for feathering out the edges so that the two photos blend together well and don't look out of place because of the hard edges.
Now let's take a closer look:
Soft eraser
Since the eraser tool can be used with brush options, using soft brush You can erase part of an image so that another image located a layer below is visible. Using this technique you can achieve the desired result, but it is also irreversible - if you change your mind and decide to combine the images in a different way, you will have to start all over again.
Once you have placed both images you want to combine into one document (each on a separate layer), follow these steps:
1. Drag the image you want to partially erase to the very top of the Layers palette.
Note
Before erasing, it's a good idea to make a duplicate of the layer you'll be working on in case you don't like the result (press Ctrl+J to do this). To prevent the new layer from disturbing you, its visibility can be turned off (and turned on again if necessary).
2. Select the eraser by pressing the E key and set it to brush mode. To do this, in the options bar, in the Mode drop-down list, select Brush. Then, from the Brush Presets drop-down list, select a soft brush. Make sure the Opacity and Pressure fields are set to 100.

To make the transition even smoother, experiment with the eraser opacity value. By lowering the opacity value, you can create smoother transitions by moving your brush over the desired area rather than making individual clicks.
3. Place the mouse pointer over the image and erase the unnecessary part. If you make a mistake or change your mind at some point, use the History palette to go back a few brush strokes, or undo the last operation by pressing the Ctrl+Z key combination.

Soft brushes and layer masks
An alternative to the eraser is the opposite option - painting a layer mask with a large soft brush. In this case, you are only hiding part of the drawing instead of removing it.
Let's say you want to emphasize how fast a motorcycle goes. Enhance the effect of movement You can do this by adding a little motion blur to your drawing and then hiding some of the blur with a layer mask.
Here's how to create fast movement effect:
1. Open the image and create a duplicate of the original layer by pressing the key combination Ctrl+J.

2. Select the menu command Filters => Blur => Motion Blur. Using this filter, you can create the feeling that an object is moving very quickly. Since the filter blurs the entire image, it becomes difficult to see the desired object in it, so you will have to hide part of the blurred layer by adding a layer mask. To add it, click on the button with the image of a circle in a rectangle at the bottom of the palette.

3. Press B to select the Brush Tool and select a large, soft brush. Set black as your Foreground color.
Let me remind you that when applied to layer masks, painting with black hides what we want. in this case and must be done. Take a look at the bottom of the Tools panel and if they show black and white, then press the X key until the black indicator is on top. If other colors are selected, first set the default colors by pressing the D key, and then press the X key until the black indicator is at the top.
6. Position the mouse pointer over the image and use the brush to hide part of the blurred layer.

Gradient masks
Put the soft brushes aside. Create the smoothest transitions possible possible using gradient - a soft, gradual transition from one color to another. Methods for merging images using soft brushes and gradients are similar in that the images are combined in one document and then a layer mask is added to the top layer. But instead of painting a mask with a black or white brush, you use a black-to-transparent or black-to-white gradient to create a smooth, seamless flow from one image to another.
1. Drag the image that should be in the foreground of the collage to the very top of the list of layers and add a layer mask to it.

2. Press the G key to select the Gradient tool. On the Options Bar, click the selection drop-down arrow. In the drop-down list, select a black-to-transparent gradient, and in the type group, click on the linear gradient button.
3. In my example, I want the Batman logo on the right to be transparent. To do this, I press the mouse button on the border of the logo and hold down the key until I reach approximately the middle of the logo. By releasing the key, I get a smooth transition between images. To improve the quality of the transition, you can also apply a gradient.

When dragging, the Photoshop program draws a line depicting the width of the transition: the shorter the line (the smaller the distance you drag the pointer), the narrower and harder the transition (there will not be a clear border, but you will get something close to it); how longer line, the wider the gradient and the smoother the transition.
If you notice an error in the text, select it and press Ctrl + Enter. Thank you!
The natural color scheme is usually uniform and smooth. But even on perfectly smooth surfaces of the same solid color, natural color transitions are formed. Always an unintentional fall sun rays or artificial lighting, as well as changing the viewing angle produces uneven and unique shades.
Two points of view directed at the same object perceive its color according to the difference in their viewing angles and the relationship with the angles of incidence of other rays on the observed surface.
Psychological effects of color transitions
Color not only evokes physical sensations and depends not only on time and position in space. Images of trees, houses, mountains and other objects in an inverted position evoke the feeling of reflection in or on another surface.

Absolutely black parallel lines on a perfectly white wall surface, each straight line along its entire length increases in thickness proportionally natural decrease the thickness of the line when looking at the wall - all this will give the viewer the feeling that the room has a horizontal ceiling.
One image on which two are applied, and each of them is offset relative to each other by the distance between the eyes, gives a spatial effect of volume if the gaze is defocused.
If the poster is large enough and the boundaries of the transition to reality are made perfectly, then what is depicted on the poster will be perceived so naturally that the right shades colors, the consciousness of the beholder will connect automatically.
The site, and above all, its design, has important and complement the logic of the resource, its dialogue, and produce the appropriate psychological effect on the visitor.

Smooth transitions using CSS
Gradients are created using the linear-gradient() and radial-gradient() functions. In the first case, a smooth color change occurs along a line, in the second case, along an ellipse or circle. CSS gradient can be set in the border-image, list-style-image properties. By layering elements on top of each other and determining their transparency, you can form stunning shades of color and create unique transitions.

It should, however, be taken into account that color transition may not always be smooth. Some color combinations, transparency values, and page background designs can produce undesirable, step-by-step effects.

Rules for writing CSS background gradient
A gradient is a smooth transition from one color to another. In this case, you can use several colors. Specifying a linear gradient (CSS linear gradient) can be varied:

The first parameter is the angle or side of the area, followed by the colors. You don't have to use just two colors, you can paint the whole rainbow. By using the property you can get overlay effects.

Color selection, color generators
The creative part of the work of a designer, website developer last years simplified. Became practical and expedient rectangular shapes containing a minimum of information, a minimum of functions, a maximum of meaning and psychological attitude sell a product, provide a service, especially highlight discounts, quality and/or significant differences from competitors.
However, even in such strict regulations and conditions for the creation of modern web resources, there is room for creativity and a clear desire of some developers to do aggressive, targeted work with color, reflecting the meaning of the text content and the style of the selected dialogue. CSS gradient has become increasingly used.
The color solutions of Google and Skype, in particular, had an effect and followers, however, in the last couple of years, the active component of web design began to look for new forms, new color solutions and try the unobtrusive dynamics of smooth forms.

Many online resources have appeared on the Internet (CSS gradient generator), which greatly simplify the work of choosing the right colors: angrytools, flatonika, generatecass, etc. With their help, you can save time on selecting the right colors, think through the line of transitions and overlays.
Dynamic color scheme
The traditions underlying the creation of web resources have made the rule unshakable: the structure, content and dialogue of the site with the client is the competence of the developer, implementing the will of the owner (customer). The appearance of the site, its design also traditionally refers to something that is not determined by the client.
Meanwhile, the number of different devices is growing, and in the families of each type, various promising specimens appear that have significant differences, not so much in color rendition, but in the resolution and shape of the visible area of the browser.
The variety of browsers and versions used also creates problems in adequately displaying the capabilities of CSS gradient.

Taken together, assessing these circumstances and examples of some promising works, it can be argued that the appearance of the site only in a default state is the competence of the developer and/or owner of the resource. Only when the client visits the resource for the first time can he have the opportunity to evaluate the site design. If the client finds it advisable to remember the site and use it in his Everyday life, then his desire to have tools to control appearance and functionality is quite justified.
This shift in the center of gravity is beneficial to the developer: there is no need to deal with cross-browser implementation or test the site on different devices and different operating systems.
Moreover, the trend will create a common database on the actual implementation of CSS rules capabilities on various devices. This is just the beginning, but its potential is significant.
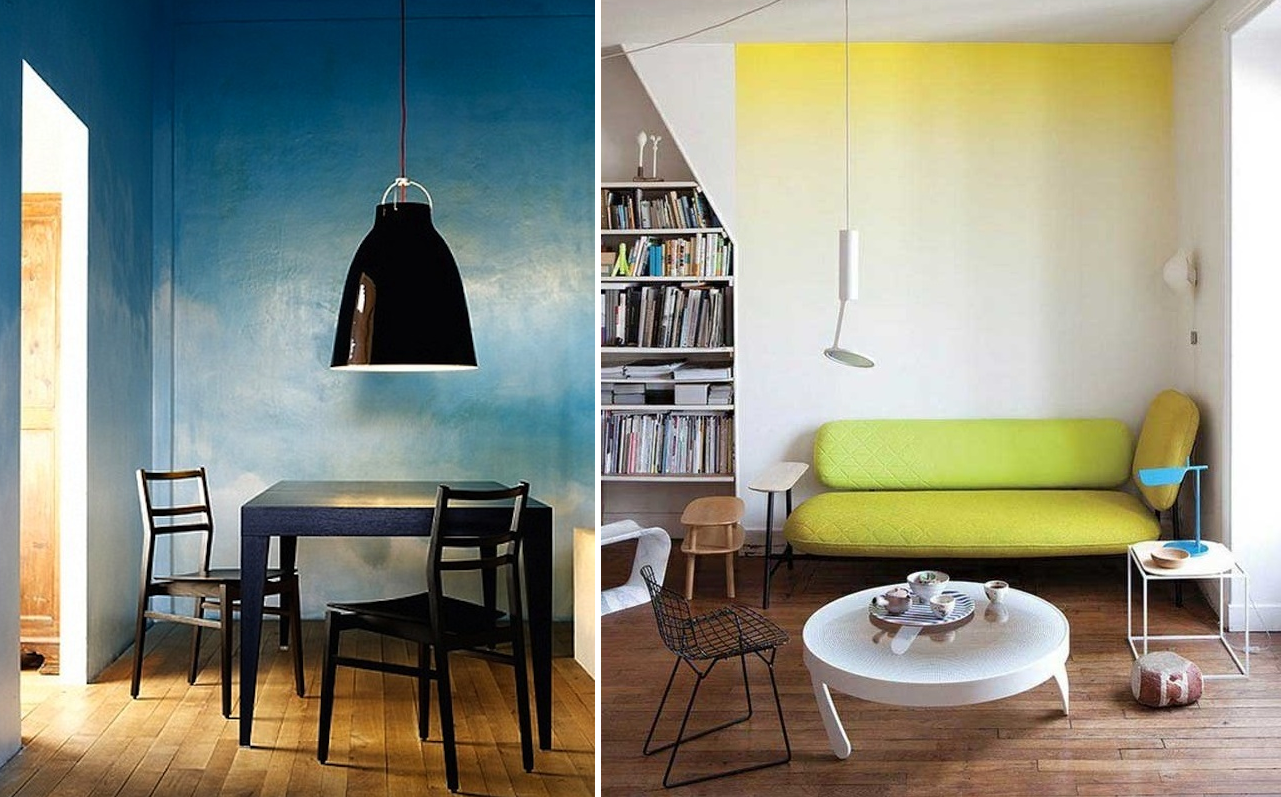
Painting walls in the ombre style is very popular in modern design interiors, while the room acquires a unique character and looks quite impressive. An important factor is that transition painting is possible with your own hands; to do this, you need to follow the recommendations for performing this type of work.
Ombre on walls means a smooth transition from one color to another, without indicating clear boundaries. Transitions can be used not only on walls, but also in furniture decoration, color design curtains and other interior elements. When painting with a transition, it is possible to visually enlarge the space by boldly combining all kinds of shades.
In order to clearly know and understand how to paint with a transition, it is worth considering that application can be done horizontally, vertically, diagonally, and painting can also be divergent or mixed type. The transitions themselves can be made both smooth and quite abrupt.
Combining colors
For the ombre technique, choose 2-3 colors or more, depending on what combination is intended to be recreated on the wall. Regardless of which shade you choose, it is important that all subsequent ones are combined with it. If a barely noticeable transition is being made, it is better to use similar shades or neutral ones. Some people prefer sharp transitions of completely different and contrasting colors, which will enliven and fill any interior with colors.
You can select several shades and paint the walls with them, for example, one plane will be blue, the other gray, etc. White color is often added to the painted surface for greater expressiveness of the overall range.

Possible effects
Depending on the placement of dark and light areas on the surface, the following effects can be achieved:
- Darkening the bottom and brightening the top of the wall– the ability to vertically increase the space, the ceiling seems higher, and the floor - powerful and reliable.

- Darkening the top– visual expansion of the room. The boundaries of the walls and floor are slightly blurred, especially if the flooring is made in light colors.
- Darkening the corners and brightening the wall in the middle– the room is noticeably rounded and visually narrowed. The interior gains contrast and relief lines.

- Lightening corners and areas near windows with darkening the walls in the middle– there is a visual expansion of the room, while the room becomes brighter and more positive.

- With a diagonal or wavy transition– there is a smoothing of straight lines and angles, the room acquires more dynamics.
- Spot with transition in different directions– can be used for repairs small area finishing, as a result, the boundaries of this zone become less noticeable.

Painting walls with a gradient is quite complex equipment implementation, so the services of professionals will be quite expensive. However, you can make an ombre with your own hands, special technique application will help complete the job without additional assistance.
On video: original painting of walls.
Surface preparation
Before painting the wall, you need to clean the surface. Old finishes should be removed using special liquids. Wallpaper can be softened with water and peeled off with a spatula. Afterwards it is important to remove all irregularities from the surface. For this, putties and plasters are used. Before and after puttying, a layer of primer is applied, which increases adhesion and facilitates the process of applying paint of the chosen color.
If you choose striped ombre coloring, you should first apply markings. This is done using a pencil and a long ruler. Then masking tape is glued to the markings, which will ensure evenness of the painting and make a transition in the desired area.

When choosing colors, it is important to consider the functional purpose of the room. For children's it is better to choose soft and bright hues. The playroom will stand out well with the three-color painting technique. If we talk about the bedroom, calm tones are preferable, creating an atmosphere of warmth and tranquility. But for the kitchen excellent option will be a combination bright colors– orange, light green, pink, etc.
How to paint walls (step by step instructions)
Today, the most popular coloring is horizontal ombre, which allows you to achieve a unique and beautiful design premises. You can make a smooth transition from one tone to another using a regular roller or brush. However, in this case it will be necessary to polish the shade transition areas, which takes a lot of time and effort.
You will get a better result if you use a spray gun. The device has the function of adjusting the intensity of the paint supply, which will create a natural, lighter tone in the desired area.

Performing ombre takes place in several steps:
- The main color paint must be diluted with a viscometer to the desired consistency. The paint is thinned in the same way. white, same brand.
- Next you need to mix the color and white paint to make it as light as possible the right tone. The resulting composition is poured into a spray gun, after which the entire area of the wall is painted. This created the base color.
- The spray gun should be washed thoroughly, after which unbleached paint should be poured into it and the composition should be applied to the bottom part walls.
- After flushing, the device is refilled for more than light paint. Before carrying out work, it is better to select the desired tone using ordinary cardboard and adjusting the paint supply or changing the distance of the sprayer relative to the wall. When painting light stripe applied to the darker layer up to half its height.
- The last stripe is applied in the same way. The paint should be slightly darker than the base shade. To smooth out the boundaries, the spray nozzle must be moved away from the surface to a suitable distance.
If you don’t have a spray gun and only have a paint roller at hand, no problem! You can perform gradient coloring according to the scheme below.

If the work is done with a brush, you can make a normal transition on a not completely dry surface with a soft brush, this will allow you to achieve desired effect. If the layer has already hardened, you can use a stiff brush.
By decorating ombre walls with regular paint, you can adjust the height and width of the rooms, while creating the desired atmosphere. Now you are no longer faced with the question of how to paint walls to achieve desired result, you just need to follow a few recommendations for applying paint, because any adult can cope with the task.
Tips for creating an ombre effect on a wall (2 videos)
Coloring options (28 photos)


