How to make a Christmas tree craft. Christmas candy tree. Green Christmas tree made of plastic bottles: a master class with explanations
Good afternoon, today I am unloading the most large selection Christmas trees made from paper. Here you will see the most interesting models - there will be Christmas trees from crepe paper, from napkins, from cardboard, you will learn how to make a Christmas tree from a paper cassette from eggs, from rolls of toilet paper and bags folded from book pages. In this selection of master classes we will only consider paper options the most beautiful do-it-yourself Christmas trees - both flat models and three-dimensional designs. Here ideal options for crafts for the New Year's school competition.
So let's get started.
Idea #1
Beautiful Christmas tree FROM PAPER FANS.
Such voluminous Christmas tree Even children will enjoy doing it. The principle of addition is very simple - you must first make fan circles of different sizes. And then these mugs are strung on the SAME ROD BASE (which we used in the previous Christmas tree). Or you can do it without a rod - just stick the tiers on top of each other (dropping a drop of glue in the middle of each "floor" of the Christmas tree.

Below we see the principle of creating such fans. They are made from a long strip of paper. The strip folds into an accordion. We turn the accordion into a ring (fastened at the edges with glue). After the glue has dried sew one side of the accordion ring with a needle and thread- tighten the thread (very carefully so as not to break through the paper) - and at the same time lay the accordion ring in a flat circle. We press on the middle of the resulting circle with some object - thereby we crush the convex ribs of the accordion so that they wrinkle and become a little flatter.
Different sizes of herringbone tiers are achieved simple principle - the narrower the strip for the accordion we have, the smaller the circumference of the fan resulting from it will be. Seen in the photo below detailed wizard class on creating such a Christmas tree out of paper.

Such a beautiful Christmas tree is obtained from bright paper napkins or from sheets of gift paper.

And if we put a BEAD between each tier of a fan Christmas tree made of paper, then we will get air, the space between the tiers of the Christmas tree (as is done in the photo paper christmas tree below).

Idea #2
Christmas tree-box FROM PAPER.
But this method is the most convenient for beginners. Convenient in that here a simple drawing guarantees a 100% result in the form of a neat volumetric Christmas tree made of paper. Moreover, this Christmas tree can be used as a package for small gifts, if you hide jewelry or a perfume bottle inside.

Since the layout of the drawing above requires a large square piece paper - I give a more economical way to spend paper space (template diagram in the photo below). You can cut the blades of the Christmas tree separately in two pieces. And then fold, glue them cross to cross.

Idea #3
BLADED Christmas tree made of cardboard.
And here is a paddle Christmas tree made of cardboard or thick paper. It's also very easy to make your own. To create such a Christmas tree, you can use ordinary packaging corrugated cardboard (as in the photo below).

How many blades-wings can such a Christmas tree made of cardboard have.
You can make a four-bladed Christmas tree by criss-crossing two flat pieces. To do this, in each silhouette of the Christmas tree, you need to make a cut along the central center line to the center of the Christmas tree. On one part, the incision is made on the TOP HALF of the silhouette - on the second part, the incision is located on the LOWER HALF of the silhouette.
I found such a stencil of a Christmas tree made of paper, but you can take any other shape of a Christmas tree with any lines of legs (smooth, rounded, twisted up, etc.).

If desired, such a Christmas tree cross can be placed on the base in the form of a cardboard roll (a saw cut from a toilet paper roll is suitable). On such a roll, we make 4 cuts (south, west, north, east) - and insert each of the four blades of our Christmas tree into these cuts.

But the blades of the Christmas tree can be more than four - FOR EXAMPLE you can make two silhouettes - 2 with a notch at the bottom and 2 with a notch at the top.
And then combine them into such a Christmas tree with the photo below - it will have as many as 8 blades(as in the photo below). Each blade can be pasted over with a different shade of green colored paper. Can be used as decoration paper gift paper polka dots, diamonds, flowers (as in the photo below)

Using a similar paddle technique, you can make beautiful balls-toys for such a Christmas tree - also from paper.

Idea #4
Christmas tree from paper circles.
And here's another idea volumetric Christmas tree from paper. We make this Christmas tree from ordinary flat paper circles. We fold each circle repeatedly along the DIAMETER LINES. We align each fold edge with alternation - one up, one down, one up, one down, and so on. Detailed master class in the photo below.

You can improve this tree model if, in addition to everything, you bend half of every second such rib upwards - as if forming ladle shape(how it's done in the photo of a Christmas tree made of paper below). And in each such bent ladle-foot he will put a bright bead. And we will get an already decorated Christmas tree made of paper with a beautiful three-dimensional shape.

Idea #5
Flat herringbone IN ORIGAMI TECHNIQUE.
And here is another simple one example of origami technique to create a modular paper Christmas tree.
Here we simply add square napkin paper modules (the napkin folds 2 times along the floors, and then unfolds and folds again 2 times in half but already DIAGONALLY.
Then we lay the napkin back and bend it along the lines formed so that each corner of the diagonal fold is like a separate blade.
From several of these bladed modules-tiers, we fold the Christmas tree - simply by gluing it onto a flat base. Often such an origami paper tree can be seen as an application for a New Year's card.

Idea #6
Christmas tree made of PAPER,
strung ON THE ROD.
If we have a rod that we made to stand exactly vertically and not fall, then by stringing a variety of paper silhouettes on it, we can get New Year's crafts-tree.
The main rule to follow is to make sure that the bottom paper silhouettes are larger than the top ones. That is, so that the size of the parts decreases as you move up to the top of the tree.

The most important thing is to MAKE A ROD. How to quickly and easily make an axis-base from a cocktail tube, so that it turns out to be strong and inflexible.
But what herringbone (pictured below), which is made of STRIPS of felt, but it can also be made from strips of colored paper or cardboard).
Everything is also very simple. MATERIAL: cut stripes the colors we need, we take tube for cocktail(it is better to insert 2 turbos one into one to make it longer), cardboard(for the base circle), hole punch and stapler(either glue or thread with a needle. Now I will tell you in detail how we will make such a Christmas tree at home - with our own hands.

STEP ONE. We are preparing the base-rod for the Christmas tree-crafts.
And cut out 2 identical disc circles from cardboard. Leave one cardboard disc intact. And in the middle of the second disk we make a round hole (we punch it with a nail and expand it so that the tube from the cocktail crawls through). Wrapped in a cardboard disc cut the tube with scissors from the bottom side(vertical cuts of 1 cm each - chik-chik - how we cut straws for inflation soap bubbles). We push these cuts apart like rays of the sun. And we get such a "beam-like spread-leg". We put this spreading leg on the second cardboard disk (the one that remained intact, without a hole).
And now WE GLUE BOTH DISKS - and it turns out that the spreading leg is now with its rays, sandwiched-glued between the cardboard disks - and as a result, our cocktail tube stands EXACTLY VERTICALLY STRAIGHT.
STEP TWO. We string material for the “feathering” of the Christmas tree on the rod.
We cut the tape (fabric or paper or felt) into strips. Please note that the strips are not the same length. Each pair of strips is 1-2 cm smaller than the previous pair. In the center (middle) of the strips, we make holes with a hole punch (or cut with a nail or scissors). We string the strips onto a tube-rod - first long ones, then shorter ones and at the end the shortest ones.
And now we glue the strung strips (or sew them together with threads, or fasten them with a stapler) in pairs with an order such that we get an ACCORDING-ZIGZAG (as seen in the photo). We attach a star to the top of the tube - we also cut out two silhouettes of the star (front and back) - so that the top of the rod is hidden between the two sides of the star.
Idea #7
TIERED Christmas tree
from paper or cardboard.
And here is a nice voluminous Christmas tree made of cardboard. Here we also stocked up with paper circles of different sizes. The edge of the circles was made wavy. Then each circle was cut along the radius - and turned into a cone. And the cones were strung on a rod.

How exactly to string the cones on the rod so that there is air between them (and so that they do not fold like little bags into a friend) I will show using the example of white lacy Christmas trees made of paper, which we see in the photo below.

We will need a rod (wooden skewers will do). Large beads and paper lace napkins.

To make cones out of round napkins, we make a radial incision. We cut along the radius of the circle from the CENTRAL point to the edge.


Beads between the cones will not let them run into each other. And our Christmas tree will turn out to be airy.

You can make cone Christmas trees from spare pieces of wallpaper.

You can use sheets of colored office paper.

Idea #8
Crepe paper tree.
Here is another beautiful children's paper tree. Here we need a BASIS for a Christmas tree in the form of a high paper CONE. We cut out a semicircle from paper - and fold it into a bag of consu.

Crepe paper cut on long wide ribbons. Then along the paper tape we make incisions-fringe. Next, we wrap our paper conse with this fringed paper tape - starting from the bottom and gradually spiraling, turn by turn, moving towards the top. Each notched twist the petal into a curl.


Such a Christmas tree craft is suitable for school or the Skillful Hands circle in kindergarten.
Idea #9
Crepe paper tree.
And here is a convex Christmas tree from a paper cassette from eggs. Cut out the cells of the cassette holder in the fork of the triangle. We paint them in green color gouache. Spray with nail polish (so that the gouache does not stain your hands and the color becomes brighter). And on each bottom of the cassette cell we glue a circle of colored paper. We cut out the silhouettes of a star of different sizes from cardboard and form a puff star.

Such a children's craft is convenient for conducting classes in school mug creativity.
Idea #10
Volumetric Christmas tree from the CONE
(6 ways to decorate)
And here is another Christmas tree made on the basis of a high cardboard cone. We buy whatman paper (a large sheet of paper) - cut out a semicircle - bend it into a cone from a semicircle.

Here the main monotony of labor is in cutting circles of many hundreds. And then there is a gradual pasting with these circles in the form of scales - starting from the lower rows of the cone and gradually moving up to the top of the Christmas tree-cone. Children who often toil around idle in anticipation of the New Year holidays will be happy to be distracted by such a New Year's children's tree craft. And this is to your advantage, no one will wander around the kitchen and prevent you from preparing the New Year's table.

Such a Christmas tree cone can be placed on a long stem. And put the rod on a plasticine pedestal. From plasticine we make a thick round cake. We bury the base of the rod in plasticine. We decorate the plasticine sole with cardboard and pieces of moss or other natural material (bark, peeled cone scales, etc.).

Pasting the Christmas tree-cone can be carried out loops from strips of paper. Or if you are too lazy to cut paper, you can buy a long roll of textile tape, cut it into segments, bend each segment into a loop and glue it on cardboard cone- also in rows from bottom to top.


Can do from fabric (or from paper) triangular folds. Fold the square diagonally in half, and again in half. Layer the angles of the triangle on top of each other - so that the triangle curls up into a ladle. The barrel of the ladle will be glued to the cone-base of the Christmas tree.

As you understand, it is not necessary to use a fabric - you can take plain colored paper, crumpled crepe paper, or even newspaper (and then spray-paint it with paint).
You can also use it to decorate the Christmas tree. paper cups for baking cupcakes. As it is done in the picture below. Such a children's craft will be a real New Year's entertainment for your children. Simple and fast - and very beautiful.

Idea #11
Christmas tree with paper straw decor.
And here is another Christmas tree based on a paper cone. Here, fine paper shavings are used as the material for gluing the cone. You can find these shavings in fragile goods shipping boxes. Or cut such straws with your own office paper scissors - make a voluminous pile of shavings and decorate the Christmas tree with ordinary pva glue.

We also glue cones and Christmas balls on the cone - we put them on hot glue from a glue gun(sold in the construction departments of the store - it costs $ 5, the glue for it is very cheap in the form of rods).

The Christmas tree can be placed on a pedestal made of round log cuts. And crowned with a star. It is also not necessary to buy it - you can make such a star with your own hands from ordinary newsprint. How such a star is made, I told in the article

This is good too option for a simple children's craft on New Year . Because it's simple, easy and fast. Perfect for a 20 minute class in a circle skillful hands". The main thing is to prepare cones, straws and decorative material in advance.
Idea #12
Christmas tree
from paper rolls.
Here is the tree from paper rolls. From ordinary sheets of paper (even from office drafts), we roll rolls, fasten them to a stapler or glue (so that they do not unfold).
In the photo below, we see that an ordinary glass goblet (or a vase for jam) was used as a stand for such a voluminous rolled Christmas tree.

According to this principle, you can make a bright Christmas tree if the rolls are twisted from colored table napkins.
You can put a rolled Christmas tree on a long stick-leg and stick it into a flower pot with earth.

Here below classic way creating such a Christmas tree from paper rolls-bags.

And here is a method where the bags are not glued to the base cone, but simply laid in radially circular rows.

Such paper bags can create a Christmas tree on any plane - on the wall or on the door to the office. A quick and easy way to do beautiful decoration office for the New Year. More more ideas New Year's decor for classrooms and office space I have collected in a special article

Idea #13
Christmas tree in the technique of QVILLING.
(4 ways from flat to voluminous)
And here are paper Christmas trees made using the QVILLING technique. They can be flat as in the photo below.

It's simple.
STEP1 - paper is cut into strips.
STEP 2 - Each strip is twisted around a quilling rod (or a simple toothpick).
STEP 3 - The twist fits into the circle-hole of the stencil - and inside this round frame of the hole we relax the twist (so that it unfolds slightly, but within the specified size).
STEP 4 - Next, we carefully remove the twist from the stencil and glue its tail (so that the twist does not unwind further, but retains the size specified by the stencil. This way we get round twists of the same size.
STEP 5 - Then we take a round twist and with our fingers we set the FORM of the twist - it can be TEAR-SHAPED (as in the photo with the Christmas tree below). And from such twists we glue our Christmas tree out of paper.
Such children's crafts can be offered in the classroom in the circle of school creativity. It can be done together with grandmothers and children for a competition in kindergarten.

The corners of the droplets can be slightly bent up (as in the photo of the Christmas tree below).

You can make Christmas trees using the quilling technique for any fantasy shape.
DOUBLE-LAYER Christmas tree in quilling technique.
But a Christmas tree made of paper in the same technique - where the quilling modules are not glued to a sheet of paper, but to themselves - that is, they stick together side by side. And such gluing of paper strands is stacked in two layers

Paper quilling tree - ON THE ROD.
Quilling twists can be placed on the rod. From cardboard we make a rod on the edges of which we will glue the twists. Here we see a striped Christmas tree, where the twist modules are attached to a central cardboard rod.

But the Christmas tree where the central rod made of cardboard has a hexagonal section - that is, this rod has 6 sides and 6 edges. On these flat sides we attach the base of the paper droplets. Please note that here the droplets are of different sizes - at the bottom there are large twists (made according to a large stencil-hole), and at the top there are smaller ones. We attach a rhinestone to the tip of each droplet.


You can glue the twist droplets with the sides down, as is done on the Christmas tree from the picture below.

A quilling twist can be placed around a round rod - and put the modules in a horizontal plane (as in the photo of the quilling paper Christmas tree below).

Fastening modules to a round rod will serve another flat piece of paper the same color. First wrap the paper around the rod on glue- we leave the tails sticking out on both sides of the rod - and strips between these ponytails we put our finished twist, and hug it, wrap it around with tails - gluing them to the twist. In order for such fasteners to hold better – we repeat it with another strip of paper (and, if necessary, with another strip) - so our twist will ideally keep its horizontal plane.
You can make a simple quilling herringbone from weak looped and curlicue twists from cardboard or thick non-quilling paper (as is done in the photo below).

Paper quilling tree - ON THE BASIS OF A CONE.
You can glue the twist modules not on the rod, but on the classic cone base.

The cone can be round(as in the photo above). Or the cone may have rectangular section- that is, to have ribs and flat sides (as in the photo below). On such planes cone-pyramid It is convenient to apply any quilling patterns. And we will get a patterned 3d Christmas tree.

You can connect children to such a craft. They will happily wind up the modules. And then they will help you glue the pyramid-tree with them. A good children's Christmas craft.
Idea #14
Christmas tree craft from bushings
from toilet paper
And here is another idea for a Christmas tree made of paper. Here, rolls of cardboard and paper of different diameters are taken as material. You can use rolls of scotch tape and masking tape, supplement them with toilet paper cardboard sleeves (shortening them to the height of scotch rolls), you can use narrow tubes from office fax paper (also cut into pieces short length). Screw homemade rolls of cardboard.
And from such a prefabricated material, fold-glue a Christmas tree. Rolls can be glued to each other with a glue gun, or with double-sided tape. A simple craft that kids will love to do.

Only toilet paper rolls of the same size can be used. And fold them into a Christmas tree in the form of a pyramid. Pre-paint the rolls green, dry, glue. So that the gouache paint does not stick to your hands and does not dye clothes, the dyed and dried rolls need to be sprayed with hairspray - the paint will fix and the color will become brighter.
Inside each roll we put a Christmas ball (you can just put it or you can hang it by a hole in the roll) - instead of a ball put a large candy in a shiny wrapper. You can decorate the side of such a Christmas tree made of paper rudons with New Year's glass beads.

If you start collecting rolls in advance and involve all the staff of your company, then you can make a very tall large Christmas tree to decorate the office.

And here is another way to design a Christmas tree from paper rolls. There is a more economical consumption of material, since the herringbone empty inside. Just made from rolls rings– (rolls just stick together in a round dance with their sides. And then such round dance rings from rolls are placed on top of each other and Christmas tree balls are put into their sockets. Pre-paint the rolls in the desired color.

These are the ideas for a do-it-yourself paper Christmas tree I have collected today in this article. Now you can choose an easy and beautiful way to make a Christmas tree for yourself. Good luck with your New Year's creativity and beautiful Christmas trees. May everything work out now and in your New Year.
Olga Klishevskaya, especially for the site ""
If you like our site, you can support the enthusiasm of those who work for you.
Happy New Year to the author of this article, Olga Klishevskaya.
In autumn, you often begin to think about the coming of the New Year with its festive mood, meetings with friends and family, and, of course, gifts. In addition, the New Year has been associated with the Christmas tree for all of us since childhood! Let's talk about her.)
Fortunately, people are increasingly thinking about what not to cut live Christmas tree for a few holidays. "Cross" and I fully support this decision and believe that a do-it-yourself Christmas tree is much more interesting and humane! In addition, this great options for those who have nowhere to put a big Christmas tree (for example, there is no free space, or an active small child is in this free space).
We bring to your attention a large selection of master classes on creating a decorative Christmas tree with your own hands, which will serve as a wonderful decoration for your home and an original gift for a wonderful holiday!
Christmas tree made of cones
Very original Christmas tree can be made by hand pine cones. But we will not use the whole cones, but only their scales, so that the Christmas tree is not too bulky.

So, to begin with, we will separate its scales from the cone. This can be done with a sharp knife, wire cutters or secateurs.

Be careful, take care of your hands!

The next step is to make a cone from thick paper or cardboard, which will be the base of our Christmas tree. We turn the paper into a cone, glue it on the side and cut off the excess at the base.


Then we just take the scales in our hands and glue them in a circle, starting from the base of the cone.

You can glue each new row in a checkerboard pattern, you can, as here, one above the other.

You can glue a clove on the top of the Christmas tree (such a spice))

After the glue dries, you can start painting our beauty. To do this, you can take spray paint or regular acrylic paint.
If you choose acrylic paint with a metallic effect, then your Christmas tree will look much more spectacular.

Then we cover the ends of the "twigs" with PVA glue and sprinkle sparkles on them.


This beauty is obtained as a result of these uncomplicated actions:

Exactly according to the same principle, you can decorate the cone with chains and beads, decorative cords, ribbons, braid, etc.

Another very popular way of making artificial Christmas trees with their own hands is their weaving from beads. This is perhaps the most painstaking way, but for lovers of beading, nothing is impossible!
The detailed process of weaving Christmas trees from beads cannot fit in one article, so we share with you links to master classes previously published on "Cross".


Christmas tree made of paper and cardboard
If you have nothing to do in the workplace) or just want to add a little holiday to the office, make a Christmas tree out of paper. What's easier?)

And this Christmas tree is very similar to the design one, don't you think? It's all about color designer cardboard, which is so beautiful and bright that you don’t need to decorate the Christmas tree with anything else) which simplifies the process of making a Christmas tree with your own hands.


Secondly, for the manufacture of a designer Christmas tree, you can use threads that are wound on a paper cone using the technology for making openwork balls.

Third, flower mesh and mesh for bouquets.

The manufacturing technology of these three Christmas trees is very similar, so the process of their creation is shown in one master class.
Feather Christmas Tree
Yes, they do too! You can buy feathers in hardware stores, or maybe you have stocks of bird feathers? They can be dyed for brilliance. food coloring. It looks original, beautiful and so airy!
Immediately after the autumn holidays in kindergarten and school, we begin to actively prepare for the main holiday of the year. Create original Christmas crafts for kindergarten with your own hands you can even with the smallest children from improvised material. It's simple, fast and cheap. An active mother offers a selection of ideas for joint creativity with preschoolers on the eve of the New Year.
| The content of the article: 1. 2. 3. 4. |
Christmas trees made of paper
Unaltered main symbol The New Year will certainly take a special place among the many crafts that you will create with your baby.
You can make a simple but spectacular Christmas tree by cutting paper circles different shades green and sticking them on a foam cone blank. Even a three-year-old kid can cope with such a task.


To create the next paper Christmas tree, you will need the same foam cone and cut strips of colored scrapbook paper of the same length and width. Having folded the strips in half, they can be glued to the Christmas tree in rows, but it is easier to attach each strip with a decorative pin. Decorate the Christmas tree with small plastic snowflakes. Bright, positive, made by the hands of a child, such Christmas tree made of paper will become a real decoration of the playroom in kindergarten.


Alternatively, a similar Christmas tree can be made from ribbons:

The next Christmas tree is quite simple to perform. To make it, you will need a cardboard blank in the shape of the same cone and small round napkins with a lace pattern around the edges. Paste the cone with napkins in rows, starting from the bottom. Stylish, delicate, dazzling snow-white Christmas tree is ready.

Another very simple manufacturing option paper christmas tree with your own hands. Cut out a triangle from colored scrapbook paper, fold it with an accordion and “plant” the Christmas tree on the trunk - a wooden skewer. Set on the base, decorate with a foil star. Simple and tasteful!

Christmas crafts for kindergarten on the Christmas tree
Christmas decorations are the first thing that comes to mind when we are talking about crafts for the New Year.
Easy to perform and funny New Year's. To turn an ordinary light bulb into a snowman, Santa Claus, a penguin or a gnome, you need to prime it (with a special primer or PVA glue), apply a layer of base paint and a pattern (use acrylic paint or gouache - the latter will have to be varnished). For decor, use felt, lace, eyes for toys, decorative flowers, etc.

From improvised materials: the remnants of yarn and felt, wire, beads - you can make such a funny snowman for the Christmas tree. The whole process is shown in detail in the illustrations:


On spruce branches you can hang bright white and red Christmas "candy". Making them is not difficult at all: you need to alternately string white and red beads onto chenille and bend it.

Styrofoam balls are very popular as blanks for New Year's crafts in a kindergarten with their own hands. Buy such a ball - and the basis for the future Christmas tree toy is ready. With pins, you can attach beads, sequins, buttons, flowers to such a ball.


If you cut a triangle out of cardboard and wrap it with acrylic threads, you get bright Christmas tree that can be hung on a Christmas tree. In the same way, you can make stars and balls.

It is quite easy to make a Christmas tree toy in the shape of a Christmas tree from popsicle sticks. Glue the sticks into a triangle, decorate it, glue the stem-leg, decorate with bright decor and attach the pendant. What could be easier?

A Christmas tree for decorating a Christmas tree can be cut out of thick felt and decorated with buttons.

It is quite easy to make a Christmas tree from a colored lace (or ribbon) and large beads:

Balls and figures based on them from threads treated with PVA glue are invariably popular. Woolen threads need to be rolled in glue, wrapped around the inflated balloon, and after the glue hardens and the threads harden, lower the ball. The resulting ball can be decorated with sparkles, sequins, beads and hung on a Christmas tree.


And you can make such a funny snowman for room decor.

New Year's crafts for kindergarten from cones
Cones are a popular natural material for making crafts, including for the New Year.
It is enough to paint the cone and place it on a stand - and now a small Christmas tree is ready to decorate a table or shelf.


The cone can be decorated with small pompoms and hung on a Christmas tree - it will turn out a wonderful alternative to traditional balls.

And, of course, all kinds of figurines of animals and fairy-tale creatures can be made from cones. For example, gnomes:


New Year's wreaths
A wreath on a door or on a wall is a traditional decoration for many holidays. New Year's door wreaths made of natural spruce branches, decorated with gold cones, look gorgeous. And with preschoolers, you can make New Year's crafts for kindergarten easier.
For example, take a sheet of double-sided colored paper, fold it in half and make cuts, not reaching the end of about 2 cm. Roll the sheet first with a tube and then with a ring, securing the ends with a stapler. Decorate with a paper bow.

A bright and simple wreath can be made from disposable plastic plate and pompoms. Cut out the bottom of the plate, paint the plate with acrylic or gouache paint, decorate with pompoms and bows.

About Active Mom already wrote, in the same way you can make a wreath on the door.

An original, stylish and simple wreath can be made from clothespins. You can buy plastic green clothespins or paint wooden clothespins green. Alternately string clothespins and large red beads onto the wire, form a circle from the wire, decorate with a ribbon bow.

Do-it-yourself clocks from disposable plates. Numbers and arrows can be cut out of cardboard, paper or felt, molded from hardening plasticine. Decorate the clock with ribbons, chenille, a star indicating the coming year.


Marina Suzdaleva
The pre-New Year's time of miracles is coming, when you want to believe a fairy tale and give a little magic to yourself, children and the whole family. Traditionally, at this time, parents and children make crafts, prepare gifts and postcards for relatives, spend, and the Club of Passionate Moms holds.
On the eve of the New Year 2016, we announced a competition crafts "Yolka" with children. And today we are glad to present to your attention the forest beauties, made in different techniques children and their parents.
1. Herringbone in the style of kanzashi
My name is Natalia, and my daughter Stephanie, she is 6 years 1 month old. We are from Alma-Ata (Kazakhstan).
For the competition, we made a Christmas tree from satin ribbons in the style of kanzashi (tsumami). We work with our daughter 50/50 together. The first half - folding the petals was done by me, because. there is work with fire.

Stefania cut out a shape for the Christmas tree from felt, glued the finished petals (except for the first top row) and decorated the Christmas tree with beads (I only dripped hot glue).
2. Herringbone of pasta, pumpkin seeds and green tea
Irina Ryabtseva and Pasha (2 years 11 months), from Vladivostok, made a Christmas tree from unusual materials for creativity.
To make the base - the cone, we need:
- green cardboard (A4);
- green tea (dry);
- PVA glue.
Christmas tree decorations:
- pasta - "bows";
- acrylic paints;
- pumpkin seeds;
- glitter gel pencil;
- sequins;
- textile bow at the crown;
- cotton wool;
- hot glue.

Manufacturing process:
- We make a cone out of cardboard, grease it with glue, glue the tea leaves (we had flavored green tea, so the Christmas tree turned out to be “fragrant”);
- We paint pasta acrylic paint;
- We cover the seeds with sparkles and glue sequins on them;
- Using hot glue, glue the decorations on the Christmas tree;
- We glue the Christmas tree on a cardboard circle, decorate the bottom of the Christmas tree with “snow” from cotton wool. Add small cotton "fluffs" to the Christmas tree;
- We fix a textile bow on the top of the Christmas tree.
3. Plasticine Christmas tree
My name is Ekaterina Golova, and my daughter is Varvara. We are from Moscow.
The craft was made by my daughter, who is now 3 years and 1 month old. To make a Christmas tree, we need green plasticine, if it is not enough, you can mix blue and yellow.

Manufacturing process:
- We roll out the plasticine in the shape of a cone and divide it into parts;
- Roll out each piece into balls of different sizes. We form cakes from the balls, starting with the largest and ending with the smallest. We fashion “hats” from the cakes, like a mushroom. Using a children's fork or knife, we imitate needles and assemble a Christmas tree;
- We make a small stand from brown plasticine and put the Christmas tree on the stand;
- We decorate the Christmas tree: we sculpt multi-colored balls and snow from white plasticine in the form of a small ribbon and fix everything on the Christmas tree.
4. Volumetric Christmas tree made of paper
The second craft for the competition was made by my son Egor, who is 5 years old (mother Ekaterina Golova).
Manufacturing process:
- cut out the contours of the same four Christmas trees;
- fold them in half;
- one side is smeared with glue and glued to the half of the other Christmas tree;
- in the same way we connect all four parts.

It turns out a voluminous Christmas tree, which we decorate with circles of colored paper, sticking them on the craft.
5. Do-it-yourself snow-covered Christmas tree
My name is Irina Bredis, Roma's son (6 years and 5 months). We are from the Moscow region, Shchelkovo.
The Christmas tree was made for a craft contest in the kindergarten, the idea came in 1 evening and was met with a bang by my son! He enthusiastically got involved in the work and completed almost all of it in its entirety. Usually I try to choose such crafts that the child can do himself.

The piece was made as follows:
- bought foam base in the form of a cone;
- many snowflakes were cut out of colored foil paper with a figured hole punch;
- first glued green snowflakes on a glue stick;
- secured colored snowflakes with multi-colored safety pins;
- A star-shaped button was fastened to the top of the head.
That's all, the snow-covered Christmas tree is ready!
6. Craft "Christmas Tree" from a cone
I am Dasha Martynova, my daughter's name is Tasya, she is almost 3 years old. This year we decided to do every day the tasks of Santa Claus that the snowman brings us. One of the tasks was to make a Christmas tree from a cone.

Manufacturing process:
- We make the base of the lid and plasticine;
- We paint a big cone, pour it with PVA glue and sprinkle confetti in the form of stars and artificial snow on top;
- Instead of a tip - a snowflake from Christmas tree beads.
Tasia did everything herself with my tips.
7. Craft "Christmas Tree" from cardboard and crepe paper
Hello! My name is Tatyana Globa and I work as an educator with children of 3-4 years old, I do arts and crafts with them. We made crafts for your Christmas tree contest.
For manufacturing we need:
- cardboard;
- crepe paper;
- glue.

Manufacturing process:
- cut out a circle from cardboard and divide it in half;
- from one half we turn the cone - this is the base of the Christmas tree;
- from crepe paper we make a lot of lumps and glue them in a circle.
And we also made a Christmas tree from cones and decorated it with lumps of plasticine (but this is an addition, without a master class).
Author of the work: Grishutin Sergey, 4 years old. Krasnodar Territory, Korenovsk.
My name is Tatyana Stepankina, Moscow, and my daughter Varvara (4 years old) and I decided to participate in the competition.

We knead pancakes from green plasticine and string them on a toothpick, each time we take less and less plasticine. When all the tiers are ready, we decorate with beads, insert a bead in the form of a cone from above.
9. Elegant satin Christmas tree
When I received a letter with a task, I invited the family to participate. My son enthusiastically supported the idea, and, to my surprise, my husband also expressed a desire to take part in the process! Therefore, we did not put it off indefinitely and immediately set to work.
For the base, they found thick cardboard, wrapped it in a cone and glued it with a glue gun. Needless to say, the men did not trust me with this unit? A weapon is a truly masculine trophy, even if it is a glue one.
Then I found a large satin patch (about a meter), from which 5 × 5 squares were cut. While measuring, we fixed the knowledge of numbers up to 5 on the ruler. Next, we folded each square diagonally - we got a triangle. And twice more in half.

Attention, the most dangerous stage! With a lighter, lightly burn the edges so that they do not crumble.
Now the most interesting stage - we take a gun, apply a glue circle along the bottom of the cone and put our prepared needles on the glue, with beautiful spouts outward. At first, we tried to glue and stick each needle individually, but it was experimentally proven that it would be much easier to make 1 glue circle, and then sculpt on it.
When the landscaping of the tree was completed, it was time to collect stones - to find all the ownerless decorations that until now did not know about their purpose. Grandmother's torn beads, beautiful buttons, a piece of New Year's beads (cut individually), sequins from an old sweater were used.

Combining the colors, mom chose the right ones, and dad and Savushka determined their place for each “toy” (also with the help of a gun). We also put red “garland threads” on our Christmas tree (FixPrice, 47 rubles). The top was decorated with a red ribbon folded like a flower and grabbed in the center with a thread, which was covered with a bead.
Like this wonderful Christmas tree we live now! The son offered to bake cookies and hang a Christmas tree on "them and dad" ... But that's a completely different story.
- son Savva (2 years 7 months), the most fearless and decisive of all;
- Lesha's dad, always ready to support his son in any Skoda and any undertaking;
- Sveta's mother, a loyal fan of the Club of Passionate Moms.
We are from Rostov-on-Don.
10. Advent calendar for dad and older sister
My name is Lyubov Vasilyeva and my youngest daughter Katyusha and I made it in the form of a Christmas tree for dad and older sister.
Katya is not yet quite ready to complete the tasks, but it’s easy to prepare. The Christmas tree is decorated with plasticine balls and rhinestones, as well as task cards that Katyushka stringed on a thread.

Tasks for dad:
- Buy a bottle of champagne and several types of cheese;
- Go to the cinema with your wife for a New Year's comedy;
- Write a plan for the next NG and preserve it in the bank;
- Give each other a massage;
- Tell the children about the 10 best qualities of dad / mom (mom talks about dad, and dad talks about mom);
- Take the whole family to the ski base or go tubing;
- Today is the day of choice new year gift for the wife.
Tasks for the sister:
- To make a snowman;
- Show younger sister master class (paint cones or make a New Year's toy for the Christmas tree);
- Make decorations for the Christmas tree in the forest;
- Bake cookies (money for groceries and recipe already prepared);
- Decorate the windows in the room (stickers, acrylic paints);
- Sew a felt New Year's toy (felt, scheme);
- Make postcards to all loved ones;
- Make a symbol of the New Year (a monkey to be assembled from beads).
11. Soft Christmas tree
My name is Elena Burenina and I am the mother of Kirill 2.8, Nizhny Novgorod region, Sarov. We made the Christmas tree from soft packaging for shoes and fragile things.

For convenience, I lined the packaging and Kirill cut it into strips. On a stand for flower pots we fixed a stick for sushi with plasticine and pricked soft strips. The top was also fixed with plasticine. Plasticine at the bottom was covered with synthetic winterizer - snow. My help to my son is minimal, I did almost everything myself.
12. Aroma - Christmas tree
My family and I created Aroma Christmas tree.
Artists:
- daughter Anya - 1 year 8 months;
- mother Lena - 30 years old;
- dad Dima - 30 years old.
Components-ingredients:
- jar lid with sauerkraut;
- wooden skewers for barbecue;
- two blocks of plasticine;
- multi-colored tinsel on a wire (30 cm long);
- cones;
- star anise;
- cinnamon sticks;
- dough (firm "Razvivashki") and molds for modeling;
- gouache paints (acrylic with sparkles);
- hooks for Christmas decorations.
Stages of work:
We make Christmas decorations from modeling dough. Daughter tears off colorful pieces. I collect and roll out with a rolling pin. My daughter makes stamps with molds. Together we pierce with a crochet for Christmas toys. We bring to dry. I draw eyes. We paint cones together.

We collect the tree. I give a ball of 1 block of plasticine. Daughter sticks skewers in it. Together we roll sausages from the 2nd block of plasticine and put them under the rim of the lid. I install the Christmas tree frame into the lid. Daughter paints skewers green. I insert green tinsel between the skewers, and also attach it to the plasticine from above and below. Dad puts baby puree lids on colorful tinsel. I fasten these "lid garlands" around the Christmas tree, since the wire inside makes it easy to do.

We decorate and flavor the Christmas tree. I put on - with the help of the same wire tinsel - cones on the Christmas tree. Daughter puts on toys made of dough. Together we stick cinnamon and star anise. I make a star out of 3 sticks of tinsel. Christmas tree-beauty is ready!
My name is Victoria Barmatova and I am the mother of this beautiful girl, whose name is Ekaterina, she is 5 years old. We decided to make a Christmas tree out of salt dough.

With a thermal gun, I glued beads, a star (also from dough), rain and decoration in the form of flowers on the spruce itself. Salt dough Christmas tree is ready!
14. Christmas tree - motanka
My name is Tatyana Vilyavina. We made the Christmas tree with our daughter Masha (4.5g). We are from Moscow and decided to make a Christmas tree out of fabric, inspired by Russians folk dolls.
To make such a Christmas tree you will need:
- Any fabric for twisting-bases;
- Two types of green fabric;
- Multi-colored shreds;
- Threads.

Manufacturing process:
- From any fabric we make a cone-shaped twist-base. For rigidity, you can put a paper cone inside. We wind everything with threads;
- We cut out 4 squares from green fabric, the next one is several centimeters smaller than the other. In the middle of the green squares (except for the smallest one), we cut small holes;
- We put green squares on the cone, starting with the largest one, we wrap it with threads like a skirt;
- We cut multi-colored squares (for toys and the crown). We place a rag or cotton wool in their center, collect it in a “bundle” and wrap it with threads. We place one (red knot) on the top of the Christmas tree, straighten its tips and wrap it with threads. We wind the rest of the "toys" to the corners of the branches;
- We fix our tree. All is ready. You can play!
My name is Valentina Akimova, I'm from Moscow, I'm 28 years old, my daughter is 3 years old. 10 months We made this craft 2 years ago on assignment in the kindergarten.
I decided to make the Christmas tree mobile, for this, I wrapped tape and napkins on the base of a thin dry-cleaner's hanger to give stability, volume and stability to the Christmas tree. And the Christmas tree itself was sewn from my husband's old jeans. The sewing process was still too early for my daughter, but I attracted her to the decoration.

The Christmas tree was supposed to be summer. Therefore, I cut out two colors of butterflies from felt in advance, decorated them with beads, and my daughter glued them on double-sided tape. She was not enough for a long time, but it was important for me that the crafts in the garden were her handiwork. Minimum participation, of course, but the age at that time was quite small.
My name is Anastasia Zotova, I'm from Vladivostok. We made a Christmas tree with my son Grisha (3.5 years old).

Material - packaging from flowers (like interlining) green. Grisha loves to cut and glue, so we chose the option where scissors and glue are the main tools for creating a Christmas tree. The decorated Christmas tree was sprinkled with a "snowball" of crushed polystyrene.
17. Wall tree
My name is Galina Krivova and my daughter Katya, 5 years old, and I decided to take part in the competition of forest beauties. We are from Ukraine, Dnepropetrovsk.
We have a Christmas tree made of wallpaper, decorated with my beads, Katya's hairpins, stickers, homemade flags.

Only the base was made by an adult. Katya did everything else, hung, hooked, glued herself. The Christmas tree was made in several stages and approaches, but each time it was interesting to watch how the daughter worked hard, invented and invented new decorations.
18. Three-sided Christmas tree
My name is Diana Gnilokozova and my son Egor, who is now 1.2 years old, and I want to participate in the competition. We live in Belarus, Borovka village, Lepel district, Vitebsk region.
We decided to make together Christmas tree. Since the child is small, and his participation is necessary, we have prepared a simple version of crafts where both mother and child can participate.
For our Christmas tree you will need:
- cardboard;
- 3 templates of any Christmas tree (you can find it on the Internet and choose the option that you like);
- PVA glue;
- scissors;
- double sided tape;
- gouache;
- plasticine;
- ribbons for decoration;
- glitter nail polish.
The template is printed in triplicate. Glue the Christmas trees on cardboard and leave to dry. Cut out the templates neatly along the contour. On one side, paint with green gouache and leave to dry. On the other side of the templates, we glue double-sided tape, fold the templates in half and glue them together. It turns out a Christmas tree.

It may happen that the patterns do not match a little and some pieces of cardboard are larger - they just need to be cut with scissors. Next, we proceed to the decoration: we sculpt small balls of different colors from plasticine and glue them to the Christmas tree - we get christmas balls. We cover them with nail polish - so they will shine. Instead of tinsel, we added a beautiful ribbon to the Christmas tree, and instead of a star, we added a red bow. Our tree is ready!
19. Christmas trees made of chenille wire
My name is Vera Kogevina and my sons and I: Starukhin Artem, 6 years old and Starukhin Anton, 4 years old
Decided to participate in the Christmas tree contest. For several days in a row, children have been playing with great pleasure with chenille wire, twist, master something. I offered to make a Christmas tree and the boys accepted the offer with enthusiasm.

With the eldest son, we decided to make a “curly” Christmas tree. For the base, Artem twisted 3 wires together, then added a few more wires. I helped connect the base into a circle. Then he screwed more wires, leaving free ends. The result is a cone with pieces of wire sticking out. Artyom twisted these ends into a spiral. I helped distribute the curls evenly to make it look like a Christmas tree. The work took 2 days.

It was easier with Antoshka. Twisted the trunk of two wires. And they wound pieces of wire on it, different in size. Then Artem suggested decorating the Christmas tree with beads.
20. Craft "Yolka" from postcards
I, Olga Nefyodova, am the mother of three-year-old Jaromir and we are from the city of Kirov. We decided to take part in the competition. Based on the old New Year cards, it's a pity to throw it away, but they have been lying for a long time.
Yar cut out mugs, helped to twist them into cones, put plasticine and “spruce paws” on a stick. So that the Christmas tree would not fall, they stuck it in the deodorant cap, which Yar carefully covered with plasticine. Then Jaromir smeared the cones thickly with glitter glue, and decorated the stand with old wet wipes and the remnants of shiny gum.

And don't forget about the top. In Jaromirkin's warehouse of the necessary unnecessary items, just such a one was found! They didn’t do it all at once, but the child showed a clear interest in the process. Had a great time with my son! In the photo: our Christmas tree, a hare, beloved by my son, and Jaromir the monkey, carved along the way from a postcard.
21. Kiwi tree
For a Christmas tree, it is better to take 2 kiwis of different sizes. Peel the kiwi and cut into slices. We put kiwi on a toothpick (we took 3 for strength). We decorate the Christmas tree with toys - pomegranate seeds.
Tired of the mess in the nursery? Tired of endlessly collecting toys for the child?

In addition, one Christmas tree was sprinkled with snow - sugar. But it’s better not to do this, it melts and the taste of kiwi with sugar is a big fan.
The work was done by Fedya Demidov (2 years and 10 months old) and mother Oksana (slightly older).
22. Christmas tree made of pencil shavings
My name is Khuzzyatova Olga, and we youngest daughter Svetlana (3.5 years old) decided to take part in the Christmas tree competition, although they had not participated anywhere before. We are from Irkutsk. Once we were sitting, solving Ovechkin's problems and we needed colored pencils, but somehow they all got used up and blunt, we decided to sharpen them and ... here the idea of our Christmas tree was "born".

They made a cone out of cardboard and the fantasy was played out. At first I glued it myself, then my daughter joined and finished the Christmas tree. She liked the gluing process very much, she was so happy!
After the Christmas tree was ready, decorations were glued: snowflakes, balls, stars and, of course, a star was “dressed” on top! All day long, animals and toys danced around this Christmas tree.
23. Christmas tree - candle
The second work for the competition from Khuzzyatova Olga and daughter Svetlana is a Christmas tree from beeswax.
On the eve of the New Year holiday, for the second year we have been making live candles as a gift to all our friends and acquaintances. When you touch wax with your hands, it is such grace. And when you look at the fire from a candle - it's just magic! At first, the kids and I just inhaled this divine aroma of autumn and honey. We like it so much… And then we began to create and create.

This time they made a Christmas tree-candle.
They took wax, cut it in half, then into triangles. They put in a wick and my daughter began to twist. All is ready! Simple, beautiful, practical, with love and warmth of our hands!
24. Winter composition
We are the Kushev family (father Petya, mother Nastya, son Fedya) from St. Petersburg. My son and I love to make crafts and decorate our house in every possible way! Dad helps us sometimes.

We send our craft for the kindergarten to the competition. On it is not only a Christmas tree, but also a snowman - a mischievous one, as well as firewood and a snowman's headdress. The idea of a snowman standing on his head was spied on somewhere, but there was a real snowman, and we also wanted to play pranks, like Carlson, and we made our own out of ... deodorant balls.

And the Christmas tree was built from sisal, well, and snow is simply made from salt and PVA glue.
25. Edible Christmas tree of vegetables and cheese
My name is Olga, my son is 4.8. We are from Ussuriysk. Timur loves to cook, he even runs a culinary blog http://www.psyholog-ussur.ru/index.php/blog/kylinarniy with his dad. Hence the theme of the craft.


Used broccoli, tomatoes, carrots, tofu, corn. Snow is baby formula.
26. Christmas tree made of tinsel
My name is Tatyana Dominova and my daughter Alisa (2.5 years old) and I are from St. Petersburg. We decided to make a simple craft "Christmas tree of their tinsel."
For crafts we need:
- green cardboard;
- green tinsel;
- stapler;
- pompoms;
- glue type "Moment" (or hot glue);
- yellow self-adhesive paper;
- toothpick.

Manufacturing process:
- They rolled up a green cardboard cone and fixed it with a stapler;
- They took green tinsel and wrapped it around the cone, securing it with a stapler;
- Glued pom-poms on glue Moment. When we glued the pompoms, we parted the tinsel and glued them onto a cardboard cone;
- They cut out two stars from yellow self-adhesive paper, glued them together, inserted a toothpick into the middle of the star. Then they put a star on the top of the Christmas tree.

So we got a craft, for the manufacture of which we spent 15 minutes. What I love the most is that my daughter was able to make this craft almost on her own. I just helped her make a cone and cut out a star. Our Christmas tree turned out so cute that dad decided to take it to work.
27. Christmas tree for the lazy
My name is Gazizova Gulnara, and my daughter Leysan is 2.1 months old. We are from Chelyabinsk. My daughter helped to circle the rings, paint, collect crafts.
I hope you don't think our tree craft is too simple. I came up with the idea myself, especially for this competition.
We will need:
- pyramid;
- green cardboard or plain cardboard (then you need green paints);
- scissors;
- optional: hole punch, decorations for the Christmas tree.

Manufacturing process:
- Cut out blanks from cardboard - branches. The quantity depends on the number of rings. (At the bottom of the pyramid there will be the largest blank - a branch, at the top - the smallest);
- If blanks were cut out of white cardboard, then they must be painted with green or blue paint, and when it dries, walk with a semi-dry brush with yellow paint;
- If desired, trim the edges of the branches, imitating needles;
- If you plan to hang bows, ribbons, beads on branches, then you need to make holes on the branches with a hole punch (we did not);
- Blanks - put branches on a pyramid alternating with rings;
- The Christmas tree can be decorated as desired.
28. Winter application "Forest clearing"
My name is Marina Furzikova, and my son Daniel, he is 2 years old. We live in small town called Yoshkar-Ola. Since my son is still small, our craft turned out to be very simple.
We needed:
- cardboard;
- lace;
- cotton pads and sticks;
- stickers;
- purchased eyes.

It is very easy to make such an application:
- My son, in descending order, glued the details of the Christmas tree prepared by me;
- From halves cotton pads he made snowdrifts;
- I made a snowman from whole cotton pads (with already prepared eyes, nose and buttons), glued a cardboard bucket and added cotton bud handles;
- The background is decorated with stickers.
29. Christmas tree with a cone
My name is Julia Alkhovik and Alisa and I made a Christmas tree for the competition. Alice did almost all of this craft herself. I just cut out a piece of cardboard and glued the bump to the eyelet.

First, Alice decorated the workpiece with finger gouache. While everything was drying up, my daughter decorated the bump. After drying, pasta stars were glued onto plasticine balls. A hole was made with a hole punch and a ribbon was inserted.

I helped glue the bump. Then they decorated the stars and glued snow from cotton wool. It turned out very pretty!
30. Christmas tree - postcard
My name is Nadezhda Kudryashova, and my daughter is Anya, she is 4 years old. We are from Saint Petersburg. I love to embroider and my daughter, looking at me, began to ask me to teach her. So I came up with such a Christmas tree card to get acquainted with a needle and thread.

It's simple: they glued the silhouette of the Christmas tree (the daughter just wanted a triangle) and began to thread the threads (they used floss), stringing beads on them. Got garlands. At the end, drops of glue were dripped and sprinkled with sparkles.
31. Christmas tree - a cone of threads
My name is Lena, and my son Valera is 2.6 years old. We are from Novokuznetsk, Kemerovo region.
The paper cone was wrapped in an ordinary plastic bag, smeared with glue and wrapped with threads. The glue was allowed to dry, then the cone was carefully removed first, and then the package.
The fun has begun! The son was given a huge selection of jewelry, he chose flowers, ribbons, beads and large beads. Perhaps the photos do not reflect the entire decoration process, but since the work was with glue, she could not leave her son without her help for a long time.

I already had a base with cones for 2 years, so we put a Christmas tree on it.
Natalya Kardashina and her sons could not pass by our competition. Each of them decided to make their own Christmas tree.
32. Orange quilling Christmas tree
I reacted to this idea with doubt: “Alyosha, you won’t be able to twist so much.” But it turned out to be wrong, Alexey himself almost completely twisted all the elements. I only helped glue everything.

The main elements used are a drop, a rhombus and an eye.
The Christmas tree turned out to be creative - orange. We decided that it would be more fun, and the green stripes we had were only very pale, sad.
33. Purple tree
Of course, three-dimensional modeling is difficult at the age of 3, so I had to help a lot in creating the form. The base is a cone from a gift bag, a shuttlecock is corrugated paper slightly stretched along the edge and pressed along the fold.

34. 3-D applique for kids
Of course, kids like my youngest son are not yet given the opportunity to do crafts, they don’t even understand what exactly is needed from them, but the process of smearing with paint is fascinating!

They painted with finger paints, although I later regretted it, since there was not enough brightness. Stage 1 - drawing the background. Stage 2 - cutting layers. Stage 3 - gluing the application on a thick double-sided tape.
Our Christmas trees became the backdrop for the composition with a purple Christmas tree.
35. Christmas tree - support
My name is Vlada Maksimishina, we are from Yalta. The Christmas tree was made together with my daughter (4 years old). The idea was "born" by accident. I planned to make some kind of "classic" Christmas tree, but, looking at pictures on the Internet, I realized that any object can be called a "Christmas tree" triangular shape. And then the word “support” caught my eye on the screen, and although it was used in a different meaning, the decision was made. The theme of light, or rather its absence, is relevant in Crimea now, and making a Christmas tree in the form of a support seemed an interesting idea.

For a long time I thought about what to make this support. The idea to use hangers also came by chance (I saw my daughter playing with a hanger before hanging up her jacket). It took only 5 hangers, some tape, tinsel, foil, cocktail tubes and thread. Well, a few finished toys for decoration (did not have enough time to do it yourself).
36. Christmas tree made of plastic spoons
Somewhere on a Saturday afternoon
We made a Christmas tree with our family.
We are from Angarsk, we will tell you honestly
Making a "beauty" was a dream.
For a Christmas tree 20 cm high you will need:
- 44 - 45 disposable spoons (we cut off their handles);
- 1 cone (thick cardboard or foam) 20 cm high;
- glue (we took a pistol, you can "Moment", but it is toxic for a child);
- green paint and soap;
- decorations for the Christmas tree (we made from corrugated paper).
Glue the spoons on the workpiece, starting from the bottom. After all the spoons are glued, we take the paint and start painting by dipping the brush in soap beforehand (this way the paint is better to lie down and not slip). And now the beautiful Christmas tree is ready.

While the tree is drying, we make decorations. We did Christmas balls from corrugated paper. They cut out squares, then they were crushed and glued to the Christmas tree. Decorate the Christmas tree the way you want. On the top of the head, the son wanted to stick a painted bump (left over from the New Year's door wreath, painted with paint from a balloon), you can make a star out of paper.
The work was done by Bichevin Yaroslav, 4 years old and mother Svetlana Bichevina, Angarsk.
37. Christmas tree - snowflake
My name is Olga Lunde and my daughter Anechka (3.8) from Krasnoyarsk and I decided to participate in the Christmas tree contest. We worked on our winter beauty for several days.
For work we needed:
- cone (made from thick cardboard);
- cotton pads;
- PVA glue;
- gouache;
- various decorations: beads, balls, etc.;
- for the garland we used thin fishing line and beads.

First of all, Anyuta glued discs onto a cone. This work stretched out for us all day - you need to stick a lot and carefully. After we glued all the “Christmas legs”, we straightened the Christmas tree to dry.
The second step was to color the Christmas tree green. Anya used green gouache and a small sponge. And again, the Christmas tree was left to dry.
And finally, the most interesting thing - we start dressing up our beauty. To do this, we used colored balls for crafts. Anyuta was very interested in this activity. The balls were of various sizes. We tried on and consulted how best to arrange them. A red ball was placed on top - this is how we got a star.

Of course, we couldn't leave the snowflake Christmas tree without a garland. On a thin fishing line, Anyuta strung various beads from a set for making beads and bracelets.
At the end of our work, we admired the Christmas tree and decided to have a holiday in a fabulous, magical forest. We invited our toy animals: a bear and a bear cub, a squirrel, a hedgehog, a fox and bunnies. Christmas story turned out!
38. Christmas tree made from natural materials

39. Candy tree
The following 2 works are presented out of competition from Yulia Maznina, a member of the team of the Keen Moms Club.
My name is Julia Maznina. I have two boys: Andrey (10 years old) and Maxim (2 years 10 months). We live in the city of Magnitogorsk, Chelyabinsk region.
For several years in a row, for the New Year, we have been making a candy tree. Children remember it and every year they themselves remind us to do it again.
Usually we give a candy tree to someone. This fall, Maxim went to kindergarten, so this year we made a candy tree to arrange before the new year in kindergarten Christmas tree holiday when the Christmas tree brings gifts to the kids - sweets.

For crafts "Candy Christmas tree" we needed:
- a glass bottle from mineral or carbonated water (you can use a plastic bottle with a volume of 0.5 liters, but for stability it must be filled with water);
- sweets in a green wrapper (we had Pine Nut bars with painted cones on the wrapper, on glass bottle 0.5 l, it took us 50 sweets - 2 for each child in the kindergarten group + educators);
- 2 sweets for the youngest participant, since it is difficult to make a Christmas tree out of sweets and not eat any of them;
- tape and scissors.
Starting from the bottom, we glued sweets in several tiers at one end of the wrapper to the bottle. The top of the bottle was decorated with tinsel, and a red cap was put on the neck. Together with the Christmas tree, we made a monkey that will bring a candy Christmas tree to kindergarten. When the Christmas tree distributes treats, you do not need to pluck the candies, you just need to pull the candy out of the wrapper. The more candies that are eaten, the fluffier the Christmas tree will become.
40. Christmas tree made of rubber bands
The youngest son loves to decorate Christmas trees. Since the beginning of December, we have been doing this almost every day. The Christmas trees are different, but I try to come up with such options so that he himself can then repeat the process.

For a Christmas tree made of rubber bands, we needed:
- a plastic bottle with a volume of 0.5 liters (you can take a red bottle cap - a star on the top);
- elastic bands for hair of different diameters (it is better to use thick ones, they hold better).
We put elastic bands on the bottle from the bottom up, combine or alternate colors. For more stability, you can pour a little water into the bottle.
Wow! A whole spruce forest of crafts turned out!
We thought and thought and decided to encourage each participant of the competition with a pleasant New Year's surprise. Well, our team decided to distribute the main prizes as follows:
- Nomination "Christmas Tree for a Baby" - a pyramid tree for the lazy from Gulnara Gazizova from Chelyabinsk (No. 27)
- Nomination "Appetizing Christmas tree" - a Christmas tree of vegetables and cheese from Olga from Ussuriysk (No. 25)
- Nomination "Eco-Christmas Tree" - Christmas tree-candle made of beeswax from Olga Khuzzyatova (No. 23)
- But that is not all! Our entire team simply could not ignore the Christmas tree from Yalta from Vlada Maksimishina. This prop tree gets a Creative Christmas Tree nomination.
Congratulations to the winners and thanks again to everyone for participating! You are incredible!
Good day, friends!
Soon, soon the New Year!
He's in a hurry, he's coming!
Knock on our doors:
"Children, hello, I'm with you!"
We celebrate the holiday
We decorate the Christmas tree
We hang toys
Balls, crackers…
So unusually, I decided to start today's note. Which will be dedicated to making at home. After all, we all traditionally love to give them on New Year's Eve. Namely, I propose to make a Christmas tree from what you have at hand. It can be anything, for example, paper, cotton pads, dry twigs, etc. After all, we all dream of surprising our loved ones with something special and unique. Therefore, if you are still thinking about what to give mom, dad, etc. then you have a ready solution).
Of course, in every house on New Year's days there is a brightly decorated live "forest beauty" that flickers and flashes with multi-colored lights. I propose to make a “little girlfriend” so that she is not bored. And after one, your decor in the rooms will be transformed, or perhaps you will place it on the festive table.
Besides, this creative work will deliver mass positive emotions and the kids will be delighted. Moreover, the winter evenings are long, and you can afford to create something beautiful and green).
Although it doesn’t have to be that color, white is also in fashion. There will be a tree as if in a snowball or hoarfrost.
Perhaps I will start with the most grandiose and magical tree in my opinion. I propose to look and study this instruction in order to create such a funny and cheerful beauty for yourself or someone as a souvenir. The work is made of sisal, who does not know this coarse fiber of a tropical plant.
On a note. A feature of this craft is the presence of funny legs instead of a stand. And if you remove them, you get a topiary, which can be made from any material, for example, coffee beans or threads.
Well, get started by looking at these pictures and a detailed description.

We will need:
- sisal green - 25 g
- cases from kinder surprise
- thermal gun
- Styrofoam
- wire
- green pencil - 2 pcs.
- colored paper
- green threads
- decorative braid
- any decorations for example balls, beads, etc.
- cardboard
Stages:
1. Take the case from the kinder and cut off the lid. For a small part, cut off a half-oval segment on one side, so that you can glue it later.

2. Using a glue gun, glue the two parts together. This is how the boot will come out, top-top.

3. You should get two identical shoes. Make a hole in the largest bottle opener. Guess what it is for?

4. Now let's decorate the shoes. To do this, take a red sheet and cut out two strips 19 cm long and 2 cm wide.

5. Glue the most long strip, wrapping it completely around the shoe and giving it the desired shape.

6. Then glue the decorative tape around the entire diameter of the sole for a beautiful appearance.

7. Then take the pencils.
8. Poke them into the prepared holes, and put a little glue on them to hold them tight. The legs are almost ready.


9. It remains to decorate them with tinsel, do as shown in this photo below.


11. This is what should come out. What does it already remind you of?

12. Now take the wire and insert it into the tip of the cone. Wrap it with sisal too and tie it with a thread.

13. The next step, we will make a skirt for the tramp. To do this, you need to make pounds. From the fabric, make rectangles measuring 10 cm x 9 cm, their number should be from 60-80 pieces. depending on the fluffiness of the skirt.

14. After that, start gluing with a thermal gun. In that order. Bend the rectangle in half, as it were, but along an oblique line. Fix with glue.


16. Then lift the right edge and glue.

17. Funtik is ready. True funny name, even slightly funny.

18. Then start assembling the Christmas tree. Glue the blanks in a circle.

19. To get a skirt later.

20. Insert the legs into the base.

21. Then connect your imagination and create, stick various kinds of decorations.

22. Glue a bow with beads on the top of the spruce, wrap the craft around.

23. Here there will be more snowflakes and rhinestones. Put the resulting masterpiece on a stand. Good luck.

How to make a paper Christmas tree at home
I think a lot of people have thought about this at some point. After all, often in schools and kindergartens they give assignments on this topic. I propose to make, for example, a silhouette Christmas tree. To do this, take this sample and print it on office color sheets.

Then cut with a clerical knife and glue the blanks together. Use special clamps for this.

You can make a whole forest of such multi-colored coniferous beauties.

The next job will be done in 5 minutes. Don't believe? It couldn't be easier, you need circles of colored double-sided paper and a pencil on a stand. The diameter of the workpieces, you can see below:

1. Fold the circle in half with your hands, like this, to make a semicircle.
Do exactly that! Carefully iron the fold with your hands.

2. Now fold the semicircle in half again.


4. And in the same way twice.

6. And here's what happens. Trim the ends of each piece carefully with scissors.

7. Start assembling the product. Put all the blanks on a stick. From the largest circle to the smallest.


8. The only thing missing is a star or Santa Claus.

For you, I specially found such a video so that if you need, you can also roll up your grandfather out of paper. A new note will be released soon, in which you will find many works with this hero, but for now, watch the plot.
For those to whom the first option seemed quite easy and simple, you can take and fold an origami-style Christmas tree, see the instructions and description below in this film.
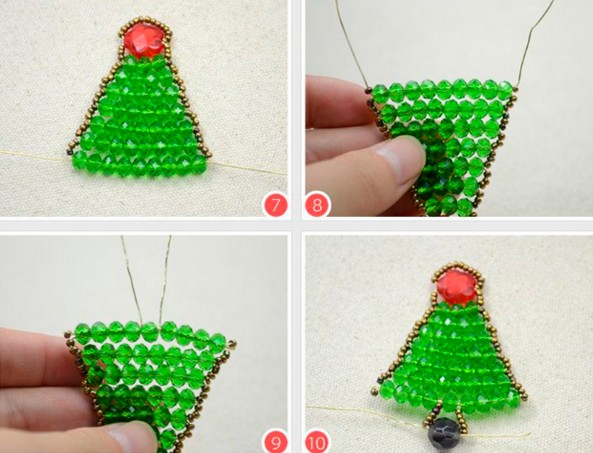
Christmas beaded tree for beginners (diagram inside)
The next creation of nature, wow and classy and at the same time immediately elegant. And such a souvenir will stand for a dozen years. This is a beaded tree. I thought that such a tree could not be made by myself. And as it turned out, I was wrong. I'm sure you can handle this job with a bang.

We will need:
- green beads - 7 shades
- white beads or transparent
- plate from under the pot
- acrylic paint: white and brown
- wire 0.4 mm
- PVA glue
- ruler
- rod 4 mm and 2 cm long
- teip tape
- alabaster

1. Place the beads in a cup, mix all the colors. Put the balls on the wire in different sequences in color and measure with a ruler 2.5 cm. At the same time, leave the edge in the region of 5-7 cm without beads.

2. Make a loop for four circular turns.

3. Step back from the loop 2 cm of wire free and without beads of wire and again count 2.5 cm and make a loop.

4. For the smallest branch, wind 7 loops in this way. Then find the middle and fold in half and twist the elements together.


5. Thus, you should get this number of branches.


7. Now take the rod and wind the teip tape, and then 4 branches to it, which have 7 loops. The first one is in the center, and the rest are laid out below in a circle, twist the stick and wrap it with tape.

6. Next, take 6 branches of 9 loops. Wind them in a circle in two tiers of three branches, wind them in a circle. Then step back about 7 mm and take 5 branches of 11 loops and wind them in one tier.

7. Step back 7 mm again and wind 6 branches of 11 loops each and again divide them into two tiers. And so on. The final stage is 5 branches of 7 loops.
Rewind the remaining barrel with brown tape. Straighten the branches to make the tree lush.

8. Bend the table at 90 degrees and place in a cup from under the planter. Pour the alabaster solution into it and let it dry.

9. Wait until the tree grabs, you can also plant any symbol of the New Year. Like a pig or a rat.
From PVA glue and alabaster, direct a thick solution, dip a kitchen napkin and glue it to the trunk. To get a natural look.

10. After complete solidification, proceed to painting, but first remove the product from the cup. Color the trunk brown paint and the pad is white.

11. Decorate with large toy beads or something else.

Now a few more instructions that I found on the Internet.


But this model is somewhat similar to the first one, suddenly someone will like this one more.


And look, what a beauty.

Well, in conclusion, I would like to show one more example of a flat spruce, which you can use as a pendant or keychain.


Herringbone in kanzashi style from satin ribbon
Well, friends now got to one more elegant option, which looks quite bright and elegant. The green beauty is beautiful and lush. But, first you must master the kanzashi technique, for this you need to learn how to make special blanks in the form of triangles. Take a look at the diagram, if it is not clear, then you will find a more detailed master class on making such things.
You have to take a green satin ribbon, cut it into pieces measuring 5 cm x 5 cm and repeat all these steps.

Or take a look at this tip.

Thus you will need:
- thick paper or cardboard cone
- satin tape
- star
- scissors
- wire
- candle
- thermal gun

Stages:
1. Prepare everything you need for work. Put the gun on fire.

2. Gently and slowly glue the fabric blanks in a circle and in a spiral to the surface of the green cone.

3. Try to place all the triangles fairly close to each other. After the product is ready, take a star or any bow and glue it to the wire.

4. Insert the decoration on the top of the spruce. Decorate a souvenir with beads, they will act as a garland.

I met a more simplified version of the craft in this film, maybe you will like it too and you and your children will master this technique. Good luck!
Spruce from cotton pads: crafts for kindergarten children
Now let's get acquainted with a fairly simple craft that you can easily do with your child at home or in kindergarten in class. This option is so lightweight that it is suitable for any junior group or older.
For creativity, you will need to decorate cotton pads with green gouache. Let them dry completely. After fold into such a petal, fix with glue.

Since the Christmas tree is usually made for the New Year, let's stick snowdrifts on a blue background sheet first of all from disks. And then arrange and glue the green blanks in descending order in the desired sequence.
You can also dream up and build a snowman or other character. Unleash your imagination and a souvenir or postcard will be ready.


It is with such triangular blanks that you can build other options.


The next option, which will require the materials that you see in this picture. Make a bag out of cardboard, glue the parts with double-sided tape, and make the bottom even.

And then dilute the blue gouache in some water and dip a cotton swab in it. Draw dots along the outline of the disks.

Then glue the rounds on the cone, overlapping one on top of the other.

Then decorate the craft to your taste. Winter beauty is ready. How do you like the idea? The truth is super-duper and fast and cool!

You can go the other way, fold each disc three times in half, and staple it together. Then glue these triangles on the white cone. And then decorate the Christmas tree with beads and a star.

Or you can go the other way, voluminous crafts, cutting cotton pad into four equal parts. See it all for yourself below:

The youngest helpers may be asked to do this work.

Forest beauty from spruce and pine cones
Of course none New Year's celebration can not do without tangerines and, of course, cones. So why not use that too. After all, it is easy to collect such natural material in a forest or park, and then sit down and make it.
We will need:
- gun
- scissors
- cardboard
- cones
- lacquer in a bottle

Stages:
1. From a sheet of A4 paper, make a cone, glue the ends. I remind you how to do it. Draw a circle, and then cut it in half, grease the walls with glue and let dry.


2. After that, start assembling the product, glue the cones to the workpiece in a spiral. So until the product is finished.


3. Cover shiny varnish for durability.

4. From a shiny cap or any other material, cut out an asterisk.

5. Decorate the top with it.

You can go another way and make such a forest charm from the husk. Also glue a cone out of paper.

And it is on it with the help of a glue gun that you glue the particles in a spiral one after another.

For completeness, decorate with beads or other decorations that are inherent in this holiday. For example, tinsel and stars.

Candy Christmas tree (step by step instructions)
Love sweets? Oh, and I just love them. I propose to lay out the symbol of the New Year from them, and take a bottle of champagne as a base.
1. Glue fluffy green tinsel onto champagne in a spiral using a glue gun.

2. As soon as the first row of tinsel is glued, glue candy wrappers (tips) at the same distance.

3. And then add something else, like a bow.

4. Well, how do you like such a wonderful idea? Cool, bravo to the author! With such a souvenir, it’s not a shame to visit).

DIY sisal tree
Preparations for the New Year are in full swing, so let's do something interesting from such material as coarse fiber. Now they often began to use it due to the fact that it is not very expensive, and everyone wants to create from it.
We will need:
- sisal fiber green and white
- filler
- bamboo stick
- plastic cup
- cardboard
- satin tape
- scissors
- decor elements: bows
1. From a sheet of cardboard, fold a cone and glue it. Put the filler in it and insert the stick. The stick will need to be decorated satin ribbon. Secure the ends of the tape with glue.

2. Also add filler to the cup, put something heavy on the bottom, such as coins. Using corrugated paper or other material, decorate the glass, it will act as a stand. You can also put a piece of foam rubber on top, for strength, and make a hole in it for the stick.
Insert the prepared cone on a stick into the stand.

3. Roll the sisal into balls by hand.

4. Glue them to the workpiece in different combinations I mean color. Alternate at your discretion.

5. Now dress up the beauty and sprinkle a little shiny varnish. It remains to admire or give this masterpiece to someone.

Video on how to make a decorative Christmas tree from threads and PVA glue
And one more little beauty that will fit into any interior very cool or will be a great gift, which is a miracle of threads. Watch this story and follow all the steps for the author.
The next option, I decided to prescribe for you, please read.
We will need:
- PVA glue
- threads
- foil tape
- disposable cup
- cardboard or old box
- plastic bag
- battery operated candle
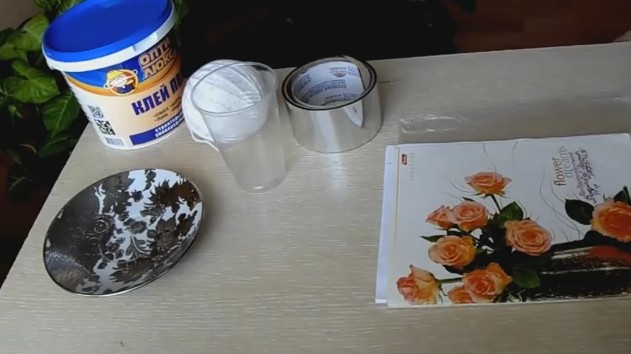
Stages:
1. Form a cone from cardboard, glue with foil tape. Dry. Then put a bag on the geometric figure, fix it even inside, otherwise it will fidget around the workpiece.

2. Place the threads in PVA glue diluted with water (50 to 50). But before that, make a hole in the cup right on the base and thread a thread into it.
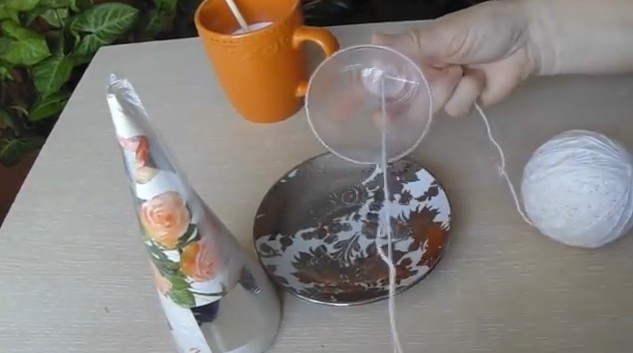
3. Fill the glass with glue solution so that the entire thread is in the glue.

4. Now start winding the thread around the cone in a spiral.
Important! The thread should not be too tight, it should lie easily on the surface of the cone.

3. So in the end you will get new souvenir, cut the thread. Leave to dry.

4. After drying, remove the Christmas tree from the workpiece, the PVA will dry and become transparent.

5. Decorate the gift with sequins and then turn on the battery-powered candle and lay it at the very base.

6. The Christmas tree will flicker and will act as a mini lamp or garland.

Craft for the competition to the school "Christmas tree from tinsel for the New Year 2019"
Now we move on and carry out the symbol of the next year with the help of ordinary tinsel. All the same, such material is also an indispensable attribute. Do you agree? In addition, it turns out really beautiful and charming. Take a look yourself.
We will need:
- tinsel of different colors
- cardboard - 2 pcs.
- glass or pot
- foil sleeve
- glue gun and pva glue
- scissors
- thread with a needle
- wire
- any decorations, lace fabric, bell, balls, etc.

1. Make a cone from cardboard, take it in green.

2. Then cut a circle from another sheet, 1.5-2 cm larger than the diameter of the geometric figure.

3. Then make such cuts on it.

4. On a round workpiece, circle the sleeve in the middle so that a suitable hole can be cut.

5. Glue the circle to the cone. Here's what happens in the end.

6. Wrap the bushing with decorative tape and insert it into the plaster cup.

7. Make a skirt out of lace, assemble with a needle and thread to make it airy and fluffy.

8. Glue in two tiers to the green blank. Cut off the tip of the cone and insert the wire with the bell into it.

9. Now take the glue gun and use it to fix the tinsel in a spiral.

10. Then glue the balls and other decorations, such as beads. Your magical miracle is ready. Create for health!

Video master class on making a New Year's tree from foamiran
If you want something unusual, then I am glad to present you another green joy. It will be needle-shaped, and foamiran will be used. It is quite unpretentious, it is easy to work with it and the most important advantage is that it does not crumble. So keep it up.
Do not forget to use artificial snow for decoration, which will give the spruce well an unprecedented beauty and brightness.
Corrugated paper vintage Christmas tree
Now another craft, which you can also take and carry out to the exhibition in kindergarten or school. The execution technique will be facing. Are you familiar with this method? Hope very well. And if not, you'll find out now. To work, you will need corrugated paper, PVA glue, scissors, and a cardboard cone. And, of course, a good mood.
1. So, take a cone to work. That is what we are going to process now.

2. But, before doing this, cut squares from the corrugations: 1 cm x 1 cm, 2.5 cm x 2.5 cm, 3 cm x 3 cm, 4 cm x 4 cm, 5 cm x 5 cm, 6 cm x 6 cm.
Corrugated paper can be replaced with ordinary paper napkins.

3. Take a small square and wrap it around the stick, then dip it in glue and stick it on the cone.

4. In this way, fill in the entire geometric figure, move in a circle.

5. Take the smallest squares first, then larger and larger in size.

6. You can also make a star on top of paper from paper. Or take it already ready-made version from the shop.


Here is such a wonderful green souvenir you should eventually get. Don't forget to decorate with any beads or rhinestones.

Creative Christmas tree made from plastic bottles
I think that in any house there is a plastic bottle. Take it light green in color. The steps are quite simple, do it with your children to take your family leisure time.
Stages:
1. Cut out the middle from the bottles, and then cut it into pieces.

2. You should get such rectangles. From which branches for the Christmas tree will be made. Their sizes are:
- 8.5 cm x 6 cm - 6 pcs.
- 7 cm x 6 cm — 6 pcs.
- 6.5 cm x 6 cm - 5 pcs.
- 6 cm x 6 cm - 5 pcs.
- 5.5 cm x 6 cm - 4 pcs.
- 5 cm x 6 cm - 4 pcs.
- 4.5 cm x 5 cm - 3 pcs.
- 4 cm x 5 cm - 3 pcs.
- 3 cm x 3 cm - 3 pcs.

3. Round each rectangle, bend the tip, and cut after the edge, as shown below.

4. For curliness, singe the fringe with a candle.

5. And then paint the fringes with acrylic paint or nail polish. Spray with glitter.

6. Thus, you must make this number of branches, and make a hole on each branch.

7. Then take a stick and stick it in lower part bottles. This will be a souvenir stand. Make a hole using a drill.

8. Well, now it remains to collect the Christmas tree, thread the branches onto the stick.

9. Looks chic and attractive.

10. Embellish with a bow and beads. Gift this masterpiece to your friends or keep it for yourself. New Year's table. Product height 20-25 cm. Class!

Christmas tree for the New Year 2019 from improvised materials (100 ideas)
The time for miracles has come, and so let's get our apartment today. Which each of you can create yourself. For example, you can use this idea and decorate the walls in any room. Such a nice craft will cheer everyone up. You can make such a drawing in the classroom and even in the kindergarten hall. In principle, anywhere, even in the office.


Such hanging Christmas trees look elegant, and they can be made from anything, as in these pictures. It can be sticks or even dishes, take a look:

Or decorate the figure with any lamps or New Year's garlands.

The souvenir on which your photos and are placed looks cool.

And also perform illumination. Wow, it is breathtaking especially in the dark, when it is already evening or night.

You can add spruce twigs or one of them to do the job.


Even from ordinary magazine sheets, you can also create an elegant composition.

From ordinary notes for notes, you can also make crafts in the form of a Christmas tree, both voluminous and on the door.

It has become fashionable now to make compositions on doors or walls. Here's an example from an old booklet:

But even in stores they make such wonderful decorations from the books themselves.

Again, depending on where you work, if a clothing and footwear store, then you can disguise the mannequin like this.

In addition, you can also take from waste materials ordinary wine corks and voila, a new masterpiece.


Or use the simplest idea - draw a Christmas tree.

Or make the desired shape according to the template.


Well, if you are a completely creative person, you can even do the work from machine tires or plywood.

If you work in a hospital or specialty related to medicine. Then you can lay it out like this:

And from ordinary wooden dies it is also possible to create something beautiful, as shown in this picture.

You can also turn an ordinary stepladder into something very cool, look what it looks like?


They even make imagine Christmas trees from plastic or paper pipes.


And here is another souvenir from disposable plates.

Or lay out with fabric and modern glass beads.


Or use bows.

For those who are fond of needlework (for example, you can take foamiran or felt) or knitting:


From New Year's toys they also lay out in a suspended state such cool little things that resemble a forest beauty.


This is where the wire comes into play.

And here they made a cardboard frame.


Crafts are also made from ordinary napkins and newspapers.


Or use scrapbooking paper.

Once I even saw a chic creation from egg molds.

You can also make a masterpiece from pillows.


by the most original crafts you can designate these, from bottles.


And here is another idea from jars of jelly or take any containers.

With the kids, you can easily make a Christmas tree out of plasticine.

By the way, you can create sweet masterpieces that are also edible. You will need waffle cones and cream.


And here is another beauty that is made of sweets or cookies.


From fruits and berries you can create unusual souvenirs. I think that the kids will not resist such beauty and will immediately want to try it on the tongue.


Here's another pasta idea.

And you won’t even believe that products are made from disposable spoons and forks.

And here is another work of woolen balls and buttons in the form of a cone.


And here, look, shells were used.

This masterpiece looks rather unusual; it is made of feathers.

Or from a material such as floral mesh or sisal.

Here are a couple more ideas.


That's it friends, that's all for me. The post is quite long, but I hope you found what you were looking for. Create on your own or together with your children such wonderful decorative Christmas trees and be happy. After all, such a souvenir is always there and will be the main attribute of the New Year.
I wish that all your dreams and expectations come true in the near future. Good luck everyone and have a great day! Bye.


