Crochet booties for newborns white pink. Crochet booties for beginners with a step-by-step description
Knitting has long been in fashion. Some women knit booties even before the baby is born, although according to popular belief this Bad sign. Majority modern mothers are not superstitious and want to knit soft booties for their child with their own hands. Learning this skill is not as difficult as it seems.
First you need to purchase the following items from the store:
Lacing can be made from threads or satin ribbon and attach funny bells to them. Don't buy appliques or stickers. To attach them to the product, manufacturers use adhesives, which can cause irritation to the child’s skin. IN as a last resort You can use beads or small beads for decoration.

The main function of booties is to give warmth to the newborn’s feet and protect skin covering, so they are divided into groups:
- By type of yarn: cotton, knitted or felted.
- By gender.
- By season: warm for winter or light for summer.
- For everyday wear or for a festive outfit.
- According to the form. They can be in the form of a sock, a cake, sneakers, shoes, with sharp or blunt toes.
The main thing for a baby is convenience, so there is no point in making modernized booties. Knit traditional variations and focus on simplicity of design. Not only should it be comfortable for a woman to put them on and take them off her child, but she also needs to make sure that they do not fly off, but stay firmly on her feet.
Basic rules for crocheting booties
To ensure that your booties are not only beautiful and comfortable, but also safe, first of all choose high-quality threads without synthetic additives.

To determine the size of future booties, just apply a ruler to the child’s foot and measure the length. The distance from thumb to the heel. Experts advise purchasing acrylic threads without adding wool. This will reduce the risk of allergic reactions.
How to knit soles for booties
After the leg has been measured, you need to draw a diagram according to which the knitting will be carried out. To do this, you should take a regular notebook sheet in a cage. Draw a line based on your foot size. Then, in the middle of this line, draw another one that will correspond to the width of the foot. Connect this cross with an oval. This scheme will clear instructions for knitting soles.
Place a diagram with a picture in front of your eyes, pick up a thread and a hook and get down to business:
- Tie a braid strictly of the size that is equal to the main line of the drawing in the middle. To avoid making a mistake in size, count the number of cells per notebook sheet. 1 cell is equal to the 1st loop. To create a loop you need to take your index finger and thumb end of the thread, hook the other edge and pull it through the resulting ring. After the first loop is ready, we knit a chain using the same method.
- Then we move on to the second row. In order to make the first column, you need to thread the hook into the first loop, hook the thread and pull it out of the loop. You will get two loops on the hook, which are connected by another yarn over. We knit 5-6 rows using this method to make a small rectangle.
- Then you need to transform the shape of the product into an oval. To do this, at each corner of the rectangle you need to remove 1 loop. Simply skip one stitch when knitting a new post and also skip one stitch at the end. This will create an oval shape with a convex bottom.
Sometimes touch the product to the drawing to make sure that the process is going correctly. If the narrowing was started earlier, it will immediately become noticeable. After the oval is ready, it is not necessary to fasten the thread and tear it off. Let's start knitting the walls in a circle so that there are no seams.
The simplest crochet booties for a newborn

When the sole is ready, it will look like a shallow boat. This shape is created by skipping stitches to create an oval. Now you need to move on to knitting the walls of the product, but before that you need to decide on the shape of the booties. It is better for the first experiment to tie them in the form of a shoe, which will be secured to the leg with the help of braid.
Knitting process:
- Due to the fact that the product has acquired the appearance of a boat, subsequent columns of knitting will go up. You need to knit several rows to create the border of the bootie. There should be about 4-5 of them. Focus on the thickness of your child's fingers.
- The “boat” has become deeper, which allows you to place a baby’s foot there. You can try it on and immediately determine where the heel will be.
- Then we begin to knit the sock using transverse lines, picking up one loop on each side. We knit in the shape of a crescent, from one edge of the bootie nose to the other.
- We tie it to the middle and leave enough space for the child’s leg to fit there.
- The final stage is the design of the “throat” of the bootie. The heel part of the product is already involved in this process. You need to knit several columns up. It is into this border that the thread or ribbon will be threaded.
Having knitted a pair, the booties began to look like cute shoes. It is better to knit these products without crochet if they are intended for winter period, and with a double crochet - if it is summer option. Finally, we thread a thread or ribbon and attach bells to it.
How to crochet openwork booties for a baby

Openwork booties are not much more difficult to knit. The thread should be soft so that the patterns do not rub the skin. It is better to make the pattern on the walls of the product.
Let's consider the knitting algorithm:
- We knit the sole according to the standard pattern.
- When we start to remove the board, you can make a drawing around the product. Voluminous openwork knitting is very fashionable now.
- To do this, you need to knit one row with a double crochet. Starting the second, you need to grab one loop on outside column, and the second - on inside. So alternate in a circle.
You will get a voluminous openwork pattern. There is no need to tie the booties to the end using this method. Make an accent from several rows, and then return to standard knitting.
- Don't buy threads that are too thick. It is better to make a double sole to make the booties warmer.
- Constantly apply the product to the drawing and do not rush. Otherwise, you will have to unravel the thread and start all over again.
- Do not sew for decoration small parts. Better decorate your booties multi-colored threads when knitting.
- Booties should be spacious. Fastening in the form of ribbons or ribbons can hold them on the leg. A newborn baby does not walk yet, so the sole should not hug the leg.
- The sole is always knitted without a crochet. This will make the item more reliable, otherwise the booties will quickly lose their shape.
You can link one simple booties for sleeping, and others for walking. In the second option, you can add decorations. Remember, the main thing for a child is simplicity and convenience.
Any type of needlework, not just knitting, requires perseverance and patience. If we're talking about For beginner needlewomen, it is better for them to start knitting small, simple items. Absolutely anyone can crochet booties. Simple circuits will help you quickly learn this skill.
Absolutely anyone can crochet booties
Thanks to step by step instructions You can knit booties yourself for a baby about a month old. If the thread is folded in half, the size of the product will be larger, and therefore it will be suitable for six-month-old children.
Tools and materials:
- hook No. 2;
- button;
- 100 g yarn.
We knit according to this pattern:
- A chain of sixteen chain stitches is cast on.
- Make one yarn over in the first row, increasing the number of stitches along the edges.
- In this and all subsequent rows, the connecting column is the final one.
- The next row is a double stitch, which consists of two single crochet stitches connected to a base stitch.
- The third row is knitted using the same principle.
- After this, knit two rows of single crochets.
- Then just make a row with one crochet.
- The next stage follows the same principle, but with a decrease in the toe area (six inverted ticks).
- Now the decrease occurs by knitting three loops with one yarn over, connecting at the top with inverted ticks.
- At this stage there should already be four such loops.
- Make the clasp by knitting 21 air loops.
- Doing reverse side you need to add three more chain stitches and two double crochets.
- There must be an additional air loop in the water.
- Then knit another row with one yarn over and secure the strip to the main part.
- All that remains is to knit a row with a double crochet and sew a button on the side.
Crochet booties for beginners (video)
Crochet booties for boys and girls
These cool slippers are suitable for both girls and boys. Beautiful booties Will definitely warm little children's feet.
Knitting pattern:
- Cast on a total of 40 loops and connect the chain into a ring.
- Using a raised stitch, continue knitting in a circle, alternating gray and white threads. The result should be 2 rows gray and 3 white.
- After that white thread do not tear, but knit with grey. Divide the loops into 4 parts. Knit 10 stitches in 12 single crochet rows.
- Close the loops and break the gray thread.
- Then continue knitting from the place where the white thread was left. Ten loops need to be raised to the point where the gray part was completed. After this, knit three single crochets.
- Knit six central loops with a single crochet, then again with three single crochets.
- Raise 10 loops again.
- After this, make a total of 28 loops with a relief column.
- Next comes a pair of fully knitted rows with a relief stitch.
- Close the loop and break the white thread.
- Take 8 loops from the toe and knit another stitch, while grabbing the side parts.
- In this way, a sole equal to only 15 rows is produced.

Beautiful booties will definitely warm little children's feet
Sew the remaining 8 stitches.
Booties with beautiful soles: diagram
The sole of the booties should not only be durable, but also beautiful, regardless of whether this product is intended for little girls or boys.

The sole of the booties should not only be durable, but also beautiful.
A simple circuit allows you to connect original socks literally in the evening:
- Cast on 10 loops and from the resulting chain knit an oval, the width of which should be 6 cm and the length 9 cm.
- Tie the entire sole without any increments with half-columns.
- At the next stage, make half-columns turned in relation to the previous row so that they are visible from the outside.
- The next six rows are made with regular single crochets and increases.
- After this, you need to knit the toe with tongue, heel and sides separately. To make the sock voluminous, it is better to initially tie it with a couple of rows of half-columns, which are turned 90 degrees relative to each other.
- The first row of the sock is only 4 in the center. At the same time, connect the fourth to the harness with a half-column.
- At the next stage, make seven columns and also attach them to the harness.
- Then you need to knit ten stitches, but with a double crochet and attach them to the harness in the same way as the previous ones.
- After this, knit thirteen stitches and an additional six rows without increments.
- Without attaching to the harness, it is necessary to knit six more rows, while reducing the columns to eleven. Tie the resulting tongue from the very base.
- Continue tying along the top of this tongue.
- Knit twelve rows of the sidewall and heel, decreasing on the 4th, 8th and 12th rows by one stitch on each side.
- Pull back a couple of posts from the edge and make a small hole for the lace. To do this, instead of columns, make a pair of air loops.
- Trim the sidewalls on all sides.
- After this, tie the laces (50 air loops) and thread them into the finished booties.
Choosing yarn for booties
One of the most important points When knitting booties, the choice of yarn counts. Due to the fact that the product is intended for small children, this issue must be approached responsibly. It is best to use cotton, wool or acrylic for this purpose. If booties are intended for winter, then acrylic and wool will be the ideal materials for them. Summer models knitted from cotton.
When choosing wool yarn, you must pay attention to its quality. It should be soft enough, not prickly. The child will not be happy with booties that cause discomfort. Perfect option– merino wool. It is worth noting that hair that is too fleecy, such as angora, is not suitable for booties. Too long a pile may later stick to children's palms and, accordingly, end up in the mouth.
If a child suffers from an allergy to wool, it is better to use acrylic yarn or a mixture of cotton and acrylic.

Please pay attention to the following:
- slippers must completely match the shape of the foot;
- the toes in the socks should not be squeezed;
- It is better to choose patterns without seams. As a last resort, make them outdoors;
- choose soft yarn that is resistant to numerous washes.
You shouldn't choose right away either. complex circuits no matter how beautiful the product may seem. To begin with, it is recommended to tie them with a stocking. Even a beginner can make such a model.
Ideas for creativity
In addition to simple, classic booties, you can also make more original models. Skilled needlewomen knit unique original masterpieces. To make them, you don’t need any special skills, the main thing is to give free rein to your imagination:
- knit them in the form of sneakers;
- summer option - sandals;
- Knitted boots are suitable for winter;
- little beauties can knit ballet shoes;
- make booties in the shape of birds or animals;
- add new Year decoration, if relevant;
- decorate with flowers or cars.
Crochet booties: master class for beginners (video)
Booties are a real work of art, despite the simplicity of their weaving. They can be unusual, colorful, and attract attention. The main condition for the baby to like them is the choice of high-quality yarn. Soft, made in pastel or bright colors slippers will become the favorite of any child.
Now you can buy whatever your heart desires for a newborn. But not a single purchased item will convey your warmth and love to your baby like something you made with your own hands. Clothes such as booties will be suitable for any baby, especially since knitting them does not take much time and will not be difficult even for beginner knitters. As a result, you will receive an elegant, exclusive item.
Popular patterns for crocheting and knitting booties for newborns
If you look on the Internet, you will find many different models booties. And not every pair can be mastered beginner knitter. I chose the simplest descriptions, but at the same time interesting and beautiful , in my opinion, knitted and crocheted booties that even a beginner can handle.
- The simplest “marshmallow” knitting for beginners

You will need 50g medium weight yarn in two colors . Cast on 28 stitches using the first color on straight needles. Knit garter stitches 52 rows (by the way, you can adjust the shoe size by the number of rows knitted). Then close with right side 8 pieces at a time . The number of remaining loops became 20. Next, we will continue knitting in a different color: first perform 4 rows in knitting, then 4 in purl. Repeat this 7 times and finish with knit stitches. . Close everything at once.
After this, connect, more precisely, sew the part with the edges facing each other to make it work vicious circle. Then sew the main part of the workpiece, and along the rest of the part (knitted with strips) lay a basting stitch and pull it towards the center.
Decorate the top of your baby's shoes knitted applique , beads or any other decorations according to your taste and imagination. Turn away the protruding edges.
- Another simplest version of one-color booties with knitting needles. Thread thickness is medium or higher

The size of the product can be increased or decreased due to the length of the knitted toe.
Cast on 37 stitches and spread them across 4 knitting needles - 9 pieces each . Join the knitting into a circle by knitting the last two stitches together. Then knit 12 rows in a circle with a 1 by 1 elastic pattern. Don’t forget to make a row of holes where you will insert the braid or lacing. It works like this : Knit 2 with one, 1 yarn over, 1 knit (alternate until the end of the row). Then knit two rows facial loops, after which they need to be distributed as follows: 11 loops - on the first knitting needle (try to ensure that the place where the knitting is connected into a circle is in the middle), 7 loops on the other, 11 loops on the third and seven on the fourth.
Now let's move on to knitting a toe . We knit it on 11 loops of the third knitting needle in a garter pattern, in reverse rows. We do not touch the remaining loops for now. We knit 18 rows of toe . Next we knit the sides. To do this, we cast on one loop from each edge loop on the sides and add all the postponed loops to the work. The sides are also knitted with garter stitches - 10 rows.
Well, then we will continue the sole from the top of the toe with facial loops, evenly grabbing and knitting together sole loops with side loops. Continue knitting until the side knitting needles run out of stitches. When all the eyelets are locked, the seam created on the heel is sewn together.
- Crochet "shoes"

We cast on 13 loops, knit a single crochet into the second loop from the hook and knit according to the pattern.

After knitting seven rows, we will get the finished sole of the shoe. We knit further from 8 to 11 row just single crochet - no additions or decreases.
Having knitted everything to the end according to the pattern, we get an almost finished slipper. Then by top edge we knit three rows in single crochets and, fasten and break the thread.
To make the fastener, cast on a chain of 21 loops and knit a single crochet into the second loop from the hook, then knit according to the pattern.
Sew on the buckle and secure it with a pretty button.
Master class on knitting booties with your own hands
I suggest you try your hand at knitting a charming pair of shoes, your choice of knitting or crocheting, with an accessible description and detailed photos will help you with this.
- Crochet booties

For these booties, I took the remains of the Turkish yarn “Lanoso” Egyptian cotton for children with a thickness of 50g/105m.

Materials
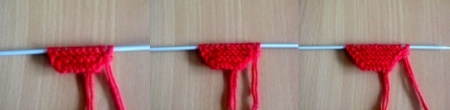
Let's start knitting from the sole - cast on 11 chain stitches. Add two for lifting.

Step 1. Cast on 11 chain stitches
And we knit according to the pattern.
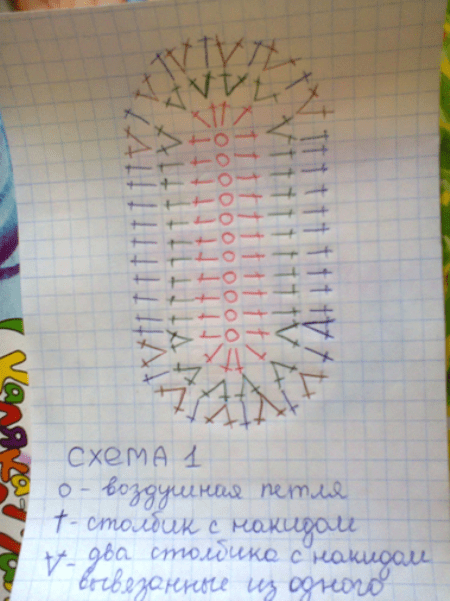
Schematic drawing
In the outer loops of the chain in the first row we knit 6 double crochets (dc), in the second in each of these six there are two dcs - it turns out 12.
In the third row we alternate 2 dc – 1 dc.

Step 2. In the third row, alternate 2 dc – 1 dc
The sole is ready.
We tie it with single crochets (SC). We knit three rows in total. The resulting part is folded and a kind of “boat” is obtained.

Step 3. We roll up the base and get a “boat”
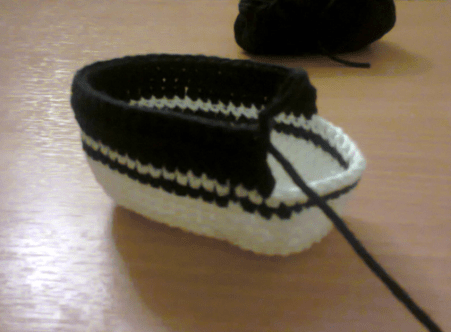
We take black yarn and knit one row with single crochets. After the black row, we knit another row of sc with white threads.

Step 4. One row of black yarn without crochet and another row of SC with white threads
Fasten the thread and cut it. We knit a second similar piece.

Step 5. Knit the second sneaker
In the resulting workpieces, remove all protruding ends of the threads so that they do not interfere with your work in the future.
We begin to knit the side parts of the “sneakers”. On the toe we count 12 loops - we leave them for the tongue, and with black thread we knit a row of dc above all the other stitches.

Step 6. Using black thread we knit a row of dcs
Then we unfold the workpiece and knit another row in the opposite direction.
Step 7. We knit another row in the opposite direction.
From the third row we begin to knit eyelets for the laces. To do this, at the beginning of the row we knit 3 chain stitches, count two stitches from the edge and knit a DC in the third. We continue to make dc until there are two columns left to the end. We collect three air loops and attach them to the edge of the row.
Unfold the knitting. Along a chain of three loops we knit three half double crochets. Let's move on to the fourth row. We also knit three chain stitches, skip two stitches and again knit a double crochet into the third.
We continue knitting similarly to the third row. There should be three rows with holes in total.

Step 8. Make 3 air loops, count two stitches from the edge and knit a dc in the third
We simply knit the sixth row with a DC, cut the thread and fasten it.
The main part of the “sneakers” is ready.

Step 9. We knit the sixth row simply with dc
We begin to make the tongue according to the diagram.

Scheme of the tongue for the sneaker
Along the edge of the twelve remaining loops we knit six double dcs with one vertex. We unfold the knitting and knit the resulting six double crochets together. We cut the thread and fasten it.

Step 10. We knit six double crochets and six double crochets in the other direction.
From the edge of the tongue we start knitting with white thread - 10 sc, unroll the knitting and knit another row. Change the thread to black and perform 6 rows of dc. We fasten the thread and cut it.

Step 11. Start knitting from the edge of the tongue with a white thread, and then change to black
We do the second one in the same way.
For the laces, we knit two chains of air loops with a length of 40 cm with white yarn.

Step 12. We knit the tongue on the second sneaker and knit chain laces
We tuck the laces into the finished “sneakers”. To prevent them from losing their shape, I advise you to put padding polyester or cotton wool inside.

Step 13. Cord and it’s time to try it on
Your crocheted sneakers are ready. This description is intended for babies from 0 to 6 months. The sole size is 8-9 cm. Knit the shoe bigger size It’s easy if you cast on more stitches at the beginning, instead of eleven.
- Knitted booties

For this model, I took Baby Wool Alize yarn 50g/175m in two threads. According to my description, the size of the sole turned out to be 8-9 cm, that is, also for a baby aged 0-6 months.

Materials
We start knitting from the sole. We put 8 loops on the knitting needles.

Step 2. Garter stitch
In total we get 14 loops. We continue knitting 34 rows in garter stitch.

Step 3. Knit 34 rows in garter stitch
In the 35th row we decrease one loop from each edge.
We repeat decreases in the 37th and 39th rows. There are 8 stitches left on the needles.

Step 4. From rows 35, 37 and 39, decrease one stitch from each edge
Close all the loops until only one remains. And along the edge of the sole we begin a set of stitches on four knitting needles.

Step 5. Close all the loops until one remains and cast on the loops on four knitting needles
We should have 60 loops.
We knit 6 rows with a scarf pattern.
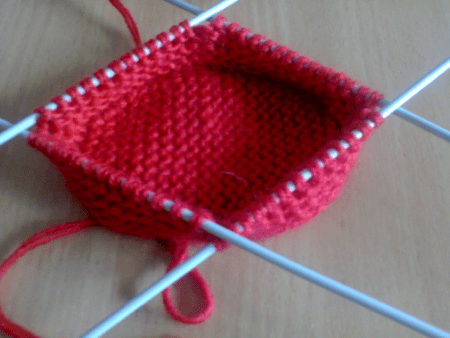
Step 6. We knit 6 rows with a scarf pattern
We divide the work into two parts - heel and toe. We perform the toe with an elastic band 1 by 1, and the heel stockinette stitch. In the first row on the sock exactly in the middle (between 15 and 16 loops) add one loop. We knit four more rows according to the pattern.

Step 7. We perform the toe with a 1 by 1 elastic band, and the heel with the stockinette stitch
Then on half of the sock in each row in the middle we knit three loops together.
We continue this way until there are seven loops left on the sock, while knitting the heel with a knit pattern.

Step 8. Continue this way until there are seven loops left on the sock
We close these seven loops, and add 16 more loops to the number of loops on the remaining knitting needles.

Step 9. Cast off seven loops and cast on 16 more loops for the remaining ones.
We knit 6 rows with a scarf pattern. Don’t forget to make a hole for a button in the third row (knit two together, yarn over one).

Step 10. Knit 6 rows with a scarf pattern and make a hole
We close all the loops, cut the thread, and fasten. We remove the protruding ends.
We knit the second one in the same way.

Step 11. Knit the second bootie
Sew on the buttons. The shoes are ready.

Step 12. Booties for the little princess are ready
- When choosing yarn for knitting children's products, it is better to give preference threads marked “baby” . This yarn is soft and hypoallergenic , so the baby will wear products made from it with pleasure, and it will not cause him any inconvenience or harm. For one pair of booties, one skein weighing 100g is enough. Everything else necessary information can be read on the label.
- When choosing a model, it is better to focus on options that have
Each future mom, preparing for the arrival of the baby, wants her baby to have all the best and most beautiful things. When a woman goes to maternity leave, she has more free time, but to study active species activity is no longer possible. Many people are fond of knitting. If you are new to this and want to learn how to crochet booties for beginners, read on. The article discusses simple options. They can be easily dealt with.
What thing to do?
Many expectant mothers begin to prepare for the meeting with the baby in advance, buying caps, diapers, rompers, vests, bed sheets. Women often ask about what and how much they should have. It all depends on the time of year in which the baby is born. If you like to do handicrafts, you can knit a hat, scarf, baby sling beads, educational toys and crib decorations for your child. If the apartment is cool, you will need booties for newborns. You can crochet them yourself. They will keep you warm mother's hands and warm the baby's feet.
Which knitting method should you choose?
The easiest way to make booties is to crochet. The patterns for beginners are very simple and do not require much experience to complete. In addition, it is easier to get different decorative elements- flowers, circles, balls, holes.

Knitting may seem more difficult, especially for small objects. In addition, it is easier to crochet a complex three-dimensional shape without seams. To create beautiful thing, it is enough to be able to make ordinary single crochet stitches. More complex elements will be required for openwork knitting and decorative surface patterns. If you decide to learn crochet for beginners, booties are a very good first try.
Design and style

The variety of models and decorations of booties is amazing. You can use any ideas that you like. Most often chosen for girls openwork knitting with abundant additional decor in the form of ribbons, bows, flowers, beads. You can make crochet booties for a boy of blue color. The most original version will be in the shape of a stylized car. Thematic models with animals are interesting. Butterflies, berries, daisies - more feminine styles execution.
The shapes may also vary slightly. They make booties with ties. They are the most versatile because they stay firmly on the leg, even if the baby actively moves them. A sandal or boot will also not slip off, but booties, shaped like a bast shoe or an ordinary slipper, must stay firmly on the foot, otherwise the child will definitely throw them off or lose them. So, when choosing a sample or coming up with a design yourself, proceed from considerations not only of beauty, but also, above all, of convenience and functionality.

What will you need?
If you have not yet decided which specific options you will make, or want to try several, buy any hook No. from 1.5 to 2.5. It is chosen, as a rule, in accordance with the threads. Thin is a must have. It is always useful for creating small parts of decor.

It is better to use special children's yarn. It usually costs more, but is considered hypoallergenic. This is especially important for those things that will come into direct contact with the skin. You can, of course, buy any threads in the shade you like, but if they make your baby red, you will have to use your booties for the doll or as decoration.
Select decorative elements in advance. For girls, beads, ribbons, and flowers are used. If you are going to make car booties, use buttons as headlights.

For the animal's face, it is worth buying ready-made eyes, although it is not difficult to knit them yourself.
If you are afraid that all this beauty may accidentally fall off during use and harm your child, add originality to the item by selecting colors.
A charming effect can be achieved through openwork patterns and frills. However, such models require special care, as they require constant counting of loops and following the pattern of the pattern. For beginners, it is better to practice with simple options.
How to crochet booties for beginners?

As a first experiment, choose a standard form without openwork elements. Try to see what your knitting density is. Estimate the size of the foot that is obtained from the purchased threads (using the sample you like). If there are no recommendations for the hook number and the name of the yarn, it may turn out that according to the proposed pattern you will knit slippers on two year old child. This will depend on the thickness of the threads. If there are specific instructions, try to adhere to them.
Execution Sequence
To obtain simple form shoes, like sandals, the crocheting pattern for booties will be as follows:
1. Do required amount air loops for the sole. You do it according to

pattern, where crossed sticks indicate a double crochet, a black oval - an air one, and a purple one - connecting loop.
2. The upper part, where the toe decrease is performed, is knitted in the following sequence in rows:
- go around the circle with single crochets, knitting them behind back wall;
- The next two rows are also made with single crochets;
- in the first loop, in which you make an air at the beginning, knit a single crochet, nine single crochets, decrease with single crochets, that is, do two together, decrease with double crochets, double crochet, three double crochets together, double crochet double crochet, decrease with double crochets, decrease with single crochets, single crochet to the end of the row;
- In the first loop in which you make an air stitch at the beginning, knit a single crochet, seven single crochets, a single crochet, a single crochet, three double crochets together, a single crochet, a single crochet, single crochets to the end of the row. ;
- In the first loop in which you make an air stitch at the beginning, knit a single crochet, five single crochets, a single crochet, a single crochet, three double crochets together, a single crochet, a single crochet, and the remaining single crochets.
Do not forget to make a connecting loop at the end of each row, and start with one air loop.

3. The cuffs can be made as one piece with a strap, or the clasp can be knitted separately and sewn on later. If done together, then for the right bootie the thread is attached to the seventh column, for the left one - to the eleventh. Knit 12 air loops. Then you work in the following rows:
- half double crochet in the third stitch from the hook, 2 chain loops, half double crochet in the next 9 stitches, half double crochet in the first stitch (the one you joined the thread to), 19 half double crochets (there will be 3 left loops left), skip 2 loops, single crochet in the last loop.
- 2 chain stitches, turn the work, half double crochet in the first and next 28 stitches, 1 chain stitch, skip one half double crochet, half double crochet in the last 2 stitches.
- 2 chain stitches, turn, half double crochet, half double crochet into the hole, half double crochet to the end of the row.
4. If you are making a version for a boy, perform a turn, 2 chain stitches, the entire row with single crochets, fasten the thread and cut it. For a girl, you can make ruffles, then after turning, knit 5 double crochets in the second column, and this sequence: skip 1 half double crochet, 1 single crochet, skip 1 half double crochet, 5 double crochets in the next one, repeat in a circle 8 times , fasten the thread and cut. All that remains is to sew on the button.

Boot with ribbons
For the cold season, it is worth making booties in the form of a boot from warm yarn. They can be worn under overalls, for example. Although this option looks good in openwork lung performance. Perfect for little princesses. This item is also knitted from the trail, then a vertical headband several rows high is made. The toe and heel are made separately.
Step by step
If you find a beautiful pattern, but don’t know how to crochet booties, for beginners we can advise you to figure it out general sequence work. The proposed actions are:
1. First, the sole is made in the form of an oval, expanding towards the future toe. In this part you will have to make more columns. The increase, as a rule, occurs evenly in each row.

2. When the mark is ready, a vertical rim is formed. It is obtained by knitting single crochets behind the back wall of the loops of the outermost row of the sole. This part can be one or more rows high.
3. The next step is the toe, where the decrease occurs.

4. Then the heel part is performed. If the model is one-piece, the third and fourth steps are combined, since knitting occurs in the round.
5. Separately, decorative elements, fastener straps, and laces are created, and then attached to the finished base.

So, you have learned how to crochet booties. For beginners, this task is not too difficult. Having done it once according to the scheme, you will be able to fantasize in the future, inventing different variants design on one basis.
This article will describe in detail the lessons on knitting tiny warm booties for a baby, which are easy to crochet even for beginners, and even more so quickly and easily connected with diagrams and descriptions, for both boys and girls. Of course, today it is quite possible to buy such things, but it is much more pleasant to create such masterpieces yourself. And not everyone will afford a purchase due to their well-being. Our article presents photos of wonderful, crocheted booties. First of all, it would be better for beginning needlewomen to choose more simple models booties, without complex finishing and non-standard patterns.


When starting work, you need to take any yarn (about forty grams). The most important thing is that subsequently the baby’s feet do not freeze and that the booties create comfort and coziness. When choosing acrylic yarn It is worth considering that it will not warm you up. And if booties are knitted for a baby for the summer, then cotton yarn can be perfect. In any case, it is recommended to wear booties over tights or socks. A hook with a diameter of two and a half centimeters or even thinner is needed in order for the knitting to be tight.
Crochet pattern for bootie soles for beginners
Below is a pattern for knitting bootie soles:

The booties are crocheted from the sole according to the pattern indicated above, to the required size, using the main thread. The color of the thread is chosen depending on whether the booties are being knitted for a boy or a girl. The outline is tied with white yarn in two rows with single crochets.
Switching to the main color yarn, knit, as before, two rows of single crochets. And again they change the color to white and knit two rows, only this time last time, then completely switch to the main color. The knitting should be made tight.


Let's move on to working on knitting the toe of the product
Next, you need to knit two, one air loop and a turn fifteen times in the third front row. Then there are three rows without decreases of fifteen single crochets. The front row is knitted according to the pattern: five times three loops, one air loop and a turn. The row is knitted on the wrong side: five single crochets. The last row knit five together, then cut the thread and fasten.
Next, the thread is attached to the heel and knitted in a spiral, without joining or lifting loops. You need to knit two loops together where the sole and toe meet. And along the edge of the sock there are fourteen loops. In the first row you should have forty-six loops around the sole, then two together, fourteen loops and two together along the toe.
The next stage is knitting two stitches together for the rise, and five rows over the toe of the booties. The pattern for knitting a sock is located just below:

We knit lapels with a step-by-step description of working on tapuls
Here you can both fantasize and knit according to the pattern. For girls, you can add ruffles, fringe and various ribbons. As a result, when turned up, the knitting will look like lace.
The next four rows are knitted without decreases, in an even fabric. Approximately by eye, knit the lapel, which is located where the foot and toe connect. This is knitted in one chain stitch, then turn and knit eight rows in a single crochet stitch. You can cut the thread of the main color and fasten it. Most top part The booties need to be steamed so that the lapel does not curl. Do not touch the iron. For decoration, the edge of the lapel is tied with white thread: one row of single crochets and one row of “ crayfish step" Using the same pattern, you can knit a second pair of booties. When finished, you can decorate with beads, rhinestones or stones. There are also many other ways to decorate booties. Using these diagrams and descriptions, you can connect more short model booties, which can suit slightly older children, and in their own way appearance will remind summer slippers. Below are step by step photos perform the knitting described earlier.


Video selection for beginners and more
Here you will find video tutorials created specifically so that you can see how to crochet booties for babies:


