House for barbie with their own hands from different materials. We make a house for barbie with our own hands
There are several ways to make clothes for Barbie. For example, you can sew it or use the options where sewing machine will not need. In this article you will find various instructions and ideas for homemade outfits. Skirts, dresses, shoes and other accessories are here to dress up your dolls.
Ballet costume for Barbie doll master class
simple and fast way make a ball leotard using a balloon.

In addition to a bathing suit, you also need shoes. In order to make shoes for Barbie, you will need a hot glue gun. We will use Barbie legs as a model. They need to be wrapped with plastic wrap, then hot glue is applied. When the glue hardens, remove the finished shoes. With the help of scissors, we remove everything unnecessary.

With the help of nail polish we decorate shoes in any color. By following the instructions below, you can make simple skirt for your Barbie.

Top and skirt for Barbie from socks without sewing

Another option for clothes for a doll using a sock. Can be used to decorate tops and skirts lace ribbons, beads or rhinestones.
Miniature shoes for a doll photo lesson

On thin cardboard we trace the legs of the doll. We make shoe soles, so the measurement exact size very important.

The boots have a slightly pointed part, so we draw the shape a little more legs dolls.

Now cut out the sole and bend in two places as shown in the figure. For the heels, you will need two glued pieces of cardboard.

Cut out heels and polish with sandpaper until the layers of cardboard are visible.

Measure the front of the doll's leg (length and width). Draw your measurements on paper. You need to add extra space to the resulting drawing. This extra fabric will be folded and glued to the sole.

In this extra space, you need to cut out small triangles. This will give the shoe a smooth outline.

Add some glue on the front and back of the foot. Glue carefully.

We measure the back of the foot. We draw the drawing in the same way as we drew the front part. Cut out small triangles.

Glue the back as shown in the picture.

The sole needs to be painted. After the paint has dried, it must be glued to the bottom of the foot.

In order to give the shoes a finished look, you need to glue a golden braid to the shoes. Other suitable material may be used.

For a more interesting design, you can add small straps around the ankles.

You can decorate shoes with lace and small rhinestones.

Instructions for making Motanka, Tilda, Barbie dolls with your own hands.
The doll is a favorite toy of all girls. But in many religions and cultures, dolls are amulets, amulets. In black magic, dolls are used to harm the enemy.
How to make a clay doll with your own hands?
Previously, such toys were made from red clay, but now there are modern materials, allowing you to make a doll very similar to a living girl. The most popular material is polymer clay.
Instructions for creating a polymer clay doll:
- Initially, draw the details of the doll on paper and indicate its dimensions.
- Cut out every detail
- Take a piece of thermoplastic and hold it in your hands to soften it.
- Blind the head, torso, arms and legs of the toy. Focus on the dimensions in the drawings
- Grooves, indentations can be made with sharp objects or special tools. They can be purchased at any art store.
- Put the parts on a plate and put in the oven for 10 minutes at a low temperature. Do not use strong heat as you risk discoloring the parts
- Pull out the pieces and glue them together
- Color the toy using acrylic or stained glass paints.
- Hair can be made from fur, or the hair of a domestic cat
- Sew an outfit for the doll
How to make a simple paper doll with your own hands?
There are a lot of options for paper dolls. Girls aged 3-9 years use these products for fun, as there are many options for dressing them up that you can make yourself.
There are also a lot of paper dolls on sale, however, now they bear little resemblance to old version when outfits were fastened with vertical stripes, curving on the shoulders of the toy.
Instructions for making a paper doll:
- Select suitable model on the Internet or draw a doll yourself
- She's best portrayed in lingerie
- Cut out the doll and don't forget to draw some holiday and everyday outfits for her.
- It's very exciting and interesting game helping to develop artistic and figurative thinking


How to make a doll with your own hands from threads?
- For most of us, such dolls are associated with childhood memories.
- Now many of these products are made as a talisman or a souvenir.
- It is not difficult to make, just choose the right materials
- An activity can become a favorite for a child, in addition, it develops fine motor skills hands
Instructions for making a doll from threads:
- Take the base, it can be a piece of cardboard equal in length to the height of the chrysalis
- Wrap a tight thread
- Pass the thread from above and tie, stepping back a little from the tying point, drag the fiber bundle again
- Now make hands from a small hank, bandage them around the edges, these will be palms
- Then bandage under your arms
- Shape the legs if necessary
- You can sew an outfit for the doll and make hair

How to make a doll with your own hands from tights?
Now such dolls can be purchased in any souvenir shop but you can make it yourself if you want. Enough to have on hand nylon tights and a little imagination.
Instructions for making a doll from tights:
- Take plastic bottle and cut off the bottom
- IN upper part bottles, add a synthetic winterizer and pull the stocking by tying it at the top of the bottle
- In place of the synthetic winterizer, use threads and a needle to form a nose
- If you want to make cheeks and chin, put some more synthetic winterizer
- Glue eyes, add thin layer synthetic winterizer over the entire area of the doll's body
- Sew on the hair and glue on the eyes
- Make hands from wire, nylon and synthetic winterizer
- Make an outfit for the toy


How to make a motanka doll with your own hands?
This is not just a doll - it is a symbol of longevity. Having made a similar toy, you can also acquire a talisman.
Instructions for making a motanka doll:
- Take a white piece of fabric and put a piece of synthetic winterizer in the middle. Tie with thread to make a head
- Wrap with threads 2-4 cm, this will be the distance from the head to the waist
- Tie a colored patch, this will be a skirt
- To make hands, simply wrap a piece of fabric with thread, forming a "sausage"
- Tie your hands to the base and sew on the hair from the threads


How to make a tilde doll with your own hands?
The Tilda doll comes from Norway, where her creator lives. She designed the toy and made it very popular. To make a doll, you will need a pattern.
Instructions for making Tilda:
- Print the details for the doll on paper, transfer them to the fabric
- Sew the details and fill with padding polyester
- Connect all parts of the doll's body
- Sew your hair and pin it to your head
- Make an outfit
- You can make beads and jewelry for the doll


How to make a doll box with your own hands?
This great gift for a friend and a container for storing jewelry. For the manufacture of the box, an old doll (more precisely, half of it) and a bucket of mayonnaise are used.
Video: master class on making a box doll
How to make a barbie doll with your own hands?
In 1959, a toy factory worker designed an unusual doll for her daughter and named her after the child.
Instructions for making a Barbie doll from polymer clay:
- Make a drawing and mark the dimensions of the pupa
- Blind the head, body and hands of the doll. Make long legs
- Dry the clay in the oven, connect the parts and paint them with acrylic paints
- Sew a modern outfit for Barbie, make hair

How to make a folk doll with your own hands?
This doll is slightly different from the motanka, although the materials used are exactly the same. Folk dolls were made without a face, it was believed that an evil spirit could not inhabit them.
Made toys from natural materials, and each village had its own technique for creating a product.
Such symbols were made for a wedding, as a talisman and as a usual fun for children.
VIDEO: Do-it-yourself folk doll
How to make a doll for the theater with your own hands?
The head of such a doll is made using the papier-mâché technique, and the glove on the hand is sewn from ordinary fabric. This is great fun for kids, which will help develop in them creative personalities With figurative thinking. It is believed that role-playing needles make babies social.
Instructions for making dolls for the theater:
- Make a model of the head from plasticine, tear the newspaper into pieces and glue it to the base in several layers using starch glue
Do you want to please your daughter and give her Dollhouse? Read how to make a house for Barbie, Monster High with your own hands from cardboard, plywood and MDF.
What girl does not love dolls and does not dream that they have a real house with spacious rooms and furniture? Such a toy will not only entertain the baby, but also make her director's game more complex and varied. As you know, while playing, children learn and develop, and parents should make efforts to organize the conditions for this development.
Do-it-yourself dollhouse for barbie: diagram, photo
Certainly there are more simple options make a doll house for your daughter:
- Buy ready. But they cost sky-high money. At the same time, the plastic parts are fragile, they are poorly attached to each other, the house is constantly falling apart.
- Organize your home in a closet, nightstand or bookcase. Probably, parents in their distant childhood did this themselves. The option is good because, firstly, you do not need to spend extra money, and secondly, the child will learn to use objects in the game - substitutes. The downside is that sooner or later the daughter will say that the house is not real, she will want to have something more believable, with wallpaper, windows, etc.
Then mom and dad will have to decide how to make this toy themselves. First of all, decide on the size. If the house is intended for a doll like Barbie or Monster High, it will turn out to be dimensional. The height of each room will be at least 30 cm, width, so that you can put a doll bed in the house, 40 cm or more. For baby dolls and toys - figures, you can make a more compact "housing".
House for Barbie made of plywood, made by hand.
IMPORTANT: In practice, the doll house takes its place as a full-fledged piece of furniture. Having decided to make one, you need to think about where it will stand in the room.
The next step is the choice of materials. As a rule, dollhouses are made from:
- Cardboard boxes and cardboard. Budget option, you do not need to spend a lot on the purchase of materials. Also, you do not need to think about what fasteners to assemble the house with, you will only need any glue and adhesive tape. The big minus of the house is that it is fragile, hygroscopic, easily dirty. You can't put heavy furniture on thin shelves. cardboard house For a doll, do not fit small children who do not know how to calculate strength while playing.
- Plywood. A more practical and also cheaper option. A sheet of plywood is covered with do-it-yourself parts for a toy house using an ordinary jigsaw. The toy is getting better. But porous plywood must be painted or glued so that it does not absorb dust and moisture, does not swell, and fungus does not start in it. Another drawback of this material is that thin sheets of plywood are not easy to connect with each other so that they hold tight, the house does not fall apart.
- Wood, MDF. The most practical and costly option. The house will turn out to be very high quality and durable, stable and safe. It will not fall apart even if the child hangs on it with all its weight. MDF is easy to process, structural elements are firmly connected to each other with self-tapping screws, and their caps can be drowned in the thickness of the material. MDF gives absolute freedom home decor ideas.


IMPORTANT: It must be remembered that a child will play with the house, and, most likely, this dimensional toy will stand in the children's room. Materials for it must be hygienic, environmentally friendly, hypoallergenic, non-toxic. If after priming or painting the house exudes a smell, you need to let it weather.


Although the house is intended for children from 3 years old, that is, the age at which the director's game has already been formed, you need to pay attention to the presence in it small parts that you can choke on.
Before proceeding with the purchase of materials for the dollhouse and proceeding directly to its assembly, it is necessary to make a plan or diagram. It will help you calculate how much material you need to buy. The details will match each other, they will turn out to be firmly connected. sustainable and beautiful house for toys will please the child and will not spoil the interior of the apartment.

 Diagram of a doll house with dimensions.
 How to make a dollhouse out of a box?
The girl really asks for a dollhouse, a decision was made urgently and cheaply to make it out of cardboard boxes? Well, then you need:
- the boxes themselves (according to the number of rooms, from 2 to 6 pcs)
- thick cardboard
- scissors
- stationery knife
- ruler
- PVA glue or any other for paper
- paints, colored paper, self-adhesive wallpaper, kitchen oilcloth, corrugated paper, ribbons, braid, bows, other improvised material for decorating a house
IMPORTANT: Boxes will fit any, if they right size and quite dense. For dolls the size of Barbie (29cm or 31cm, scale 1:6) or Monster High (26-28cm), it is best to take drawers from under household appliances.

- Boxes are stacked in two floors of two rooms. On the second floor, you can also equip one room and a veranda.
- The boxes are fixed with glue and adhesive tape. In order for the parts to stick well, they organize a press from ordinary clothespins.
- The roof of the house can be made from a box by cutting it in half diagonally, or cut out from sheets of cardboard.
- In the side walls, they measure out, draw and cut out windows with a clerical knife.
- The interior decoration of the house is in progress. Ceilings, floors and walls are glued with colored paper, wallpaper residues, self-adhesive or oilcloth. From improvised means, you can also make cornices, window sills, baseboards, and other surroundings.

 House for a doll from boxes: tools and materials.
  House for a doll from boxes: manufacturing steps.
 How to make a do-it-yourself doll house out of cardboard?
Dollhouse parts can be cut from thick cardboard, perhaps, all from the same boxes of household appliances.
Here a drawing is definitely needed, for example, this one:

 The scheme of the house for Barbie from cardboard.

You will need:
- cardboard
- scheme
- pencil and ruler
- glue, tape, tape
- stationery knife
- paints, felt-tip pens, old wallpapers, oilcloth, corrugated paper for decorating the interior and exterior of the house

- The drawing is drawn or found on the Internet and printed. The details of the house are cut out.
- Make markings on cardboard. It is better to cut cardboard parts not with scissors, but with a knife, then their edges will be even.
- Sections that will not join can be trimmed with tape or electrical tape.
- The cut parts of the house are assembled into grooves or glued together.
- Create the interior of the house. If mom and dad are creative, they can paint the house by hand.

 A simple cardboard house.
 House made of cardboard for toys.
 Cardboard house.
  Cardboard house, assembled into grooves.
 Cardboard house for small toys with a drawing.
 VIDEO: How to make a house for dolls?
Drawing of a plywood dollhouse with dimensions
Making houses out of plywood is no longer so easy. Most likely, mom alone can not cope. You need to attract dad, the little princess will definitely thank him for the unique toy with her incomparable happy smile.
To make a house for Barbie prepare:
- plywood
- jigsaw
- hammer
- sandpaper
- wood glue or PVA
- masking tape
- nails
- wood primer, paint
- scissors, pencil, ruler
- house interior decoration materials

 Plywood dollhouse drawing.
 Scheme of assembling a plywood dollhouse.
- From plywood, the details of the house are very carefully cut out. They must exactly match the drawing. Also cut out window and door openings, if any. Windows can be made rectangular, round or triangular.
- All plywood parts are carefully sanded with sandpaper so that the child does not drive a splinter during the game.
- Connect the details of the house with construction glue, PVA glue or hammer together with nails. It is necessary to make a reservation, the glue gun with silicone will not hold plywood.
- Primed and painted plywood.
- Think over and create the interior of the dollhouse. The walls in the rooms can be painted by hand with paint, painted in one color, decorated with the remnants of wallpaper, wrapping paper.
- The floor is also painted, shreds of carpet are laid on it, and so on.
It is recommended to make a staircase to a two-story housing for dolls from wooden rulers sawn to size. - Furniture in the plywood house will be any - bought specifically for dolls in toy stores, made with your own hands from cardboard, the same plywood or improvised means.
 Making a house for Barbie from plywood: stage 1.
 Making a house for Barbie from plywood: stage 2.
 Making a house for Barbie from plywood: stage 3.
  Making a house for Barbie from plywood: the back side.
 Making a house for Barbie from plywood: rooms.
 VIDEO: HOUSE for DOLLS WITH YOUR HANDS
Do-it-yourself wooden doll house: drawings and dimensions
The doll house will be played by a girl from 3 to 10-12 years old. This toy, if it is beautiful and of high quality, will stand in the house long years, permanently please the baby and surprise the guests. It is definitely worth the effort and investment. That's why, the best option will make it from MDF.
- At the first stage of work, they think over the design of the house. You need to decide on the size, number of rooms, their shape, roof configuration. A universal solution is a two-story house with 4 rooms with a shed roof and an attic.
- For such a house, the main details are needed: a rear wall, two side walls, two strips for the ceilings of the first and second floors, two vertical lintels between rooms, a strip for the roof slope. It is better to order the cutting of these parts in a furniture or carpentry workshop. Under them all take MDF of the same thickness. Or is it possible back wall and the sides, that is, the bearing parts of the structure, should be made thicker, and the rest, auxiliary, thinner.
- In the side walls, and, if desired, in the back, window openings are cut.
- window frames it is better to order in laser cutting, then they will turn out perfectly even and already chamfered.
MDF is a heavy material, glue or ordinary screws will not take it. Connect the parts of the house with self-tapping screws. Hats are drowned in the material and then masked with shavings with glue or polymer clay. - On the roof, the attic with a round window looks beautiful. It is also better to order it in laser cutting. A plywood attic is attached to the roof of the house with glue.
- To imitate tiles and decorate the roof beautifully, they buy thin bamboo roller blinds, cut them to the size of the slope and glue them on it. The attic is decorated in the same way. If the roller blinds are on one thread, they can crumble when cut. Then they must first be glued with ordinary PVA.
- The roof of the house is conveniently mounted on hinges so that it can open. In the "attic" then it will be possible to store the pupae and their dowry.
- Window frames are planted in openings.
- Next, move on to the design of the walls. The simplest thing is to prime them and paint them the same color. You can also make an imitation of brickwork. The bricks are first marked with a pencil, then cut out with a wood router. Primed MDF and painted desired color. After the soil has dried, the recesses between the bricks are isolated with the help of simple pencil or marker. To make the masonry look natural, color heterogeneity is betrayed with the help of crayons.
- "Bricks" are cut out of porous egg trays different size and glue them around the windows.
- They complete the exterior decor of the house with artificial small flowers. They are glued at the base of the side walls, on the roof and attic.
- The ceilings and floors of the house are painted in the right colors.
- Barbie doll is a conditional model of a person 1 to 6, respectively, and her house. Trimmings of old wallpaper or gift paper it will look rough. Good decision- for each, find a wallpaper on the Internet with a pattern that you like, proportionally reduce them in a photo editor and print them out at a printing house. Important to choose good paper. A conventional copier will soon wipe off, glue may appear on it, or it will wrinkle during pasting. Photo paper may not adhere well. Glue wallpaper on PVA.

 Blanks for a dollhouse made of MDF.
 Window layout.
 Assembled house frame.
 Window frames laser cut.
 Round attic window.
 Roof top attic.
 Decoration of window openings and imitation of bricks.
 Wallpaper 1:6 in the children's doll room.
 House interior decoration.
 Finished roof with imitation tiles and flowers.
  The girl will play in such a house for hours.
 IMPORTANT: The girl will play in the barbie house for a long time. To make it more convenient for her, it is better to make it on a leg. The raised design also makes it easier to clean the toy.
VIDEO: K do-it-yourself prickly house made of drywall
How to make a do-it-yourself doll house for monster high?
Relationships of moms and dads to dolls monster high ambiguous. Some cannot stand them, they consider them crippling the psyche of the child. Others tend to think that stylish monsters encourage cognitive interest child and myths and legends, and also raise his self-esteem. Be that as it may, girls love monster dolls. And at some point, the daughter may ask her parents to make her a house for them.

 House for Monster High from whatnot.
 IMPORTANT: The dimensions and construction of the Monster High house are different from those intended for Barbie. But with the finish will have to tinker.
- Before you design a house for monsters, you should learn more about the Gothic style.
- Monster High likes an interesting color palette: they combine gloomy black with rich pink, fuchsia, neon yellow and green. The same combination of colors should be used in the interior of the doll house.
- You need to think about how to beat the glitter and black lace. Monster rooms should have gold and silver.
- Elements with imitation of artistic forging also complement the interior of the Monster High doll house: chandeliers, candelabra, fireplace grates, stair railings.
- The interior and exterior of the house use Monster High symbols.
 House with symbols of Monster High. Dollhouse lighting.
Learn how to sew clothes for Barbie and Monster High. The article contains ideas, patterns, tips, master classes.
Dressing up a doll is one of the components of the role-playing and directing children's games. Favorite girls Barbie and Monster High, which comes with a change of clothes, are very expensive. And dresses for fake dolls are of the same type and of poor quality. If you have a daughter, sooner or later you would hear from her a request to sew backgammon for her doll. Master classes from this article will help you cope with the task and please your baby.
How to sew a dress for a Barbie and Monster High doll with your own hands for beginners: a master class
If you do not have skills in cutting and sewing, it will be difficult for you to sew a dress for Barbie or Monster High according to a pattern. Do not count on the fact that it will turn out to be really elegant, stylish and unusual. To get started, try something simple, get your hands on it. Later on, move on to sewing more complex outfits.
Handmade outfits for Barbie.
IMPORTANT: If you want to sheathe a Barbie doll, you should know her parameters. And they are as follows: height (excluding hairstyles) - 290 cm; chest girth - 13 cm; chest width - 7.5 cm; back width - 5.5 cm; waist circumference - 8 cm; hip circumference - 13.0 cm; neck girth - 6 cm. If you do not have the original, do not be too lazy to try it on measuring tape parameters may vary slightly.

 Monster High dolls in homemade dresses.
 Dress for Barbie and Monster High from a sock
For example, different beautiful outfits for dolls can be sewn from ordinary baby sock! You will only need:
- baby socks
- scissors
- thread
- needle
- marker
- string or ribbon

 simple dresses from socks for dolls.
 If you decide to make an outfit and a sock for the doll, the sock itself should be new and beautiful. The good news is that the socks come from different fabrics: you can make a cozy winter sweater from terry Barbie, from thin cotton - light summer dress.

 Outfit for Barbie from a sock: a manufacturing scheme.
 - Lay the sock on the table, take the marker. Look at the picture how you will need to mark it.
- If you decide to make a set of a T-shirt and a skirt for the doll, you will need to cut off the elastic band (the one on the lapel) and the toe from the sock.
- If the sock does not fray, you will only need to make sure that the skirt is kept on the doll's thin waist. Make a few slits in the elastic and pull a string or ribbon through them to make a belt.
- If the sock is fraying, you will need to seam the bottom edge of the skirt.
- Cut the shirt according to the scheme from the toe of the sock. If necessary, suture all cuts.

 Scheme for making an outfit for Barbie from a sock.
 And according to this scheme, from a sock you can make a swimsuit or a set of underwear for a doll.


IMPORTANT: If your daughter is still small, but really wants to make clothes for Barbie or a monster girl herself, offer her an easy option - a seamless sock dress. Just make a couple of cuts in right places, use a hair elastic as a belt. The dress will turn out to be quite pretty, the girl will surely remain satisfied with her first creation.
Vintage dress for Barbie
You can sew a simple dress for Barbie according to the pattern in the figure below. Pay attention to the scale! You take the square circled in red for 1 cm, in accordance with this, increase the entire pattern.
Prepare:
- paper
- pencil
- scissors
- soap
- tailor's pins
- tissue flap
- lace
- braid
- threads
- needle
- Velcro

 Dress pattern for Barbie.
 - Cut out the pattern, attach it to wrong side a piece of fabric. Circle the details.
- Leave seam allowances.
- Cut out fabric pieces.
- Take care of the skirt: tuck the bottom cut and process with a seam. Sew on lace if desired.
- Finish both side cuts. Finish the top edge with a criss-cross stitch.
- Proceed to processing the shelf. Sew the neckline with double thread. Make notches.
- Fold the fabric as shown in the picture, pin it with pins. The width of the shelf between the grooves should be 3.5 cm, from the bottom - 1 cm. Sew the grooves. Remove the pins, process the undercuts with a zigzag.
- Process two parts of the back. Sew the neckline with double thread.
- Make straps: cut off the lace (details 2 by 8 cm). Sew them along the armhole of the front sleeve and the corresponding part of the back. If you do not want lace, make straps from braid or a thin satin ribbon.
- Sew the front and back pieces along the side cuts.
- Stitch the bodice and skirt of the dress.
- Attach the Velcro strip to the back of one side of the dress and to the front of the other side.
- Make the Velcro long enough to hide the doll's buttocks. As an alternative to Velcro, you can use hooks or buttons.
- This is such a cute vintage dress your doll should have.

 Simple dress for Barbie: steps 1-2.
 Simple dress for Barbie: steps 3-5.
  Simple dress for Barbie: steps 6-8.
 Simple dress for Barbie: steps 9-10.
 Simple dress for Barbie.
 Simple dress for Monster High doll
IMPORTANT: Monster High dolls are fundamentally different from Barbie-type dolls. Most of them have a standard teloid with the following parameters: height - 21.5 cm; girth m chest - 7.5 cm; girth under the bust - 5.5 cm; waist circumference - 5-6 cm; hip circumference - about 10 cm. Monster dolls have an unnaturally large head, narrow shoulders, Long hands and legs. Their waistline is not clearly marked, the back has a complex curve. Therefore, it is very difficult to sew something “according to the figure” for them.
Also, don't forget the monster glam doll style. Choose flowy fabrics for them rich colors such as satin or jacquard.
Prepare:
- tissue flap
- threads in color
- contrasting color satin ribbons
- scissors
- paper
- pencil
 Basic patterns dresses for monster high dolls.
 Dress pattern for Monster High.
 - You cannot sew a dress for a student of the School of Monsters without a pattern and fittings. Therefore, choose the pattern that you like the most, which you "pull".
- Cut out the details of the pattern, transfer it to the fabric, not forgetting about the seam allowances.
- Sew the details of the back to the shelf. Finish the top and bottom cuts.
- Also process the cuts on both parts of the back.
- Consider a clasp. Use Velcro, hooks or buttons as it. It will turn out very nice if you make the bodice of the dress look like a corset. Then sew from above to the right and left parts of the back satin ribbons. Make holes in the details, pass the ribbons through them so that the corset can be laced up.
- Sew the bottom of the bodice on the back by 1 cm.
- To make a multilayer fluffy skirt, cut out several petals from the same fabric. Fold each of them in half in length and attach with a thread.
- Sew the petals randomly onto the bodice to make the dress look like a rose.
- Put the dress on the doll, lace up the corset and put ribbons around the doll's waist. It will turn out very nice.
 Dress for Monster High: pattern.
 Dress for Monster High: step 1.
 Dress for Monster High: step 2.
  Dress for Monster High: step 3.
 Dress for Monster High: step 4.
  Dress for Monster High: step 5.
 Dress for Monster High: step 6.
  Dress for Monster High: step 7.
 Dress for Monster High: step 8.
 Dresses for Monster High.
 VIDEO: How to sew clothes for a monster high doll from a sock?
How to sew a ball gown for Barbie and Monster High dolls
According to legend, Barbie is a girl who cannot sit at home. She is always involved in some events, including evening ones. For such, she will definitely need an appropriate outfit - luxury dress from noble fabrics. Use an atlas!
 Pattern of an evening dress for Barbie.
 Prepare:
- tissue flap
- Velcro
- a bead or a beautiful button
- threads
- needle
- simple pencil
- ruler
- scissors

 Evening Dress for Barbie, which is sewn without a pattern.
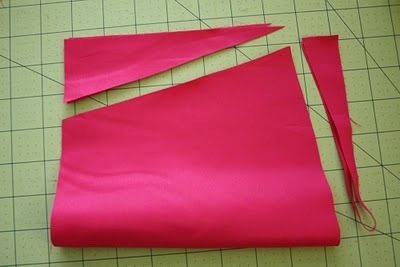
 You will make the pattern yourself. All you need is to draw on paper or already directly on the fabric three rectangular parts with dimensions of 19 by 30.5 cm, 6 by 21 cm, 6.5 by 16 cm.
 Evening dress for Barbie: step 1.
 Start by making a skirt. Fold up large rectangle in half and cut as shown in the photo.
 Evening dress for Barbie: step 2.
 Manually or on a typewriter, zigzag the sections of the skirt part and the middle rectangle.

 Evening dress for Barbie: step 3.
  Evening dress for Barbie: step 4.
 Through upper edge skirts, stretch the thread, pull it off to get a frill.

 Evening dress for Barbie: step 5.
 Attach the middle rectangle to the doll's chest. Pull its edges on the back of the doll with pins. Directly on the doll with pins, mark the places where the grooves will be. Sew the undercuts from the inside out.

 Evening dress for Barbie: step 6.
 Sew or stitch the bodice to the skirt.

 Evening dress for Barbie: step 7.
 Sew or stitch side cuts skirts.

 Evening dress for Barbie: step 8.
 Sew Velcro on the back.

 Evening dress for Barbie: step 9.
 From a small and long rectangle, make a decorative detail for the neckline, as shown in the picture.

 Evening dress for Barbie: step 10.
 Decorate the dress as you wish.

 Evening dress for Barbie: step 11.
 VIDEO: HOW TO SEW A DRESS AND MAKE A PENDANT FOR MONSTER HIGH?
How to sew a wedding dress for Barbie and Monster High dolls
One day wear white Wedding Dress is the dream of many girls. Little, they often play Barbie and Ken's wedding, their dolls need formal outfits.

 Handmade wedding dress for Barbie.
 You can sew a doll wedding dress according to the pattern presented above. You can also use this one.
 Wedding dress for Barbie.
 This beauty is sewn for Barbie.
 Pattern of a wedding dress for Barbie from a magazine.
 Wedding dress for Barbie on a pattern.
 The heroines of Monster High are still students of the school. But why not dream up and “marry them” in such beautiful dresses?

 Monster High in a wedding dress.
 Elegant wedding dress for Monster High doll.
 VIDEO: HOW TO SEW A WEDDING DRESS FOR MONSTER HIGH?
How to sew a dress with sleeves for Barbie and Monster High dolls
Again, from the sock, its upper part, you can do unusual dress With long sleeves for Barbie or Monster High.
 Dress with long sleeves for a doll: steps 1-2.
 Dress with long sleeves for a doll: steps 3-4.
 - Cut off the part you need. Its length will depend on the length of the doll's dress you want.
- Outline the lines of the sleeves. Try not to miscalculate with their length. But if the sleeve turns out to be short, do not be discouraged, cut it under three quarters. It will also turn out very nice.
- Cut the part of the sock along the lines you marked. Turn out the sock.
- Sew the sleeves and the dress itself buttonhole stitch. Finish the bottom slit of the dress.
- Turn the neck of the dress to the front side, hem with straight stitches.
 Pattern of a dress with long sleeves for Barbie.
 How to sew a skirt for Barbie and Monster High dolls?
Barbie doll is a slender beauty, a skirt of any style and any length will fit perfectly on her. You can use the patterns below to sew a new dress for her.

 Skirt pattern for Barbie with blind vent.
 Skirt pattern for Barbie.
 Skirt pattern for Barbie with a slit.
 If a doll skirt is your first sewing experience, don't bother cutting it.
Prepare:
- 2 pieces of fabric (19 by 10 cm, 19 by 1 cm)
- elastic band
- threads in color
- scissors
- pencil
- lace or ribbon as desired
Fold the pieces of fabric facing each other, sew, process the seam with a zigzag.

 Skirt for Barbie: step 1.
 Tuck and finish the bottom edge of the skirt.
 Skirt for Barbie: step 2.
 Sew or stitch the elastic to the waistband of the skirt, stepping back 1.5 cm from top cut. Make sure that the fabric is slightly gathered.

 Skirt for Barbie: step 3.
 Turn the top edge of the skirt over so that it covers the elastic. Sew it up.
 Skirt for Barbie: step 4.
 Fold the skirt in half, step back from the unsewn edge 1 cm, sew it. Process the resulting seam.

 Skirt for Barbie: step 5.
 Skirt for Barbie.
  Skirts for Barbie.
 For a monster doll, you can sew a similar skirt, only multi-layered. Let the top layer be from thick fabric, and the lower one is guipure, lace or mesh.

 Sewing a skirt for Monster High.
 The wrong side of the skirt for Monster High.
 layered skirt for Monster High.
 VIDEO: HOW TO SEW A LEATHER SKIRT FOR A MONSTER HIGH DOLL?
How to sew a T-shirt for Barbie and Monster High dolls? How to sew a jacket for Barbie and Monster High dolls?
Sewing T-shirts and blouses for Barbie dolls and monster dolls is the most difficult. First, these garments are not easy to cut. Secondly, the parameters of toy fashionistas are such that it’s hard to sew the top so that it sits “on the figure”, somewhere it doesn’t turn out to be small, but somewhere it doesn’t bristle. But why don't you try your hand?
 T-shirt pattern for Barbie.
 Prepare:
- 2 pieces of fabric
- scissors
- threads
- pencil
- pins
If you use a pattern, transfer it to the fabric, give allowances for the seams, cut out the details.
If you can't find a pattern or don't know how to customize it, just attach the doll to your patches and circle it.


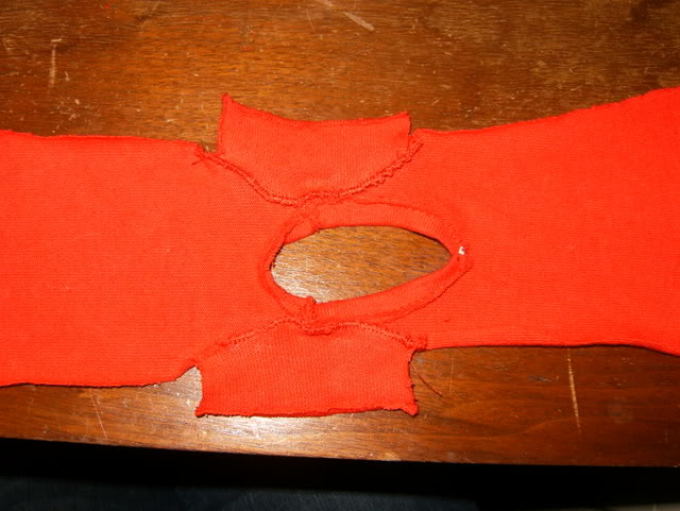
Carefully cut out the neckline and armholes. Do not damage the pieces of fabric left after cutting the armholes, they will still be needed.


Turn and sew the bottom of the T-shirt. Finish the neck. Sew a T-shirt over the shoulders.
 T-shirt for the doll: step 4.
 T-shirt for the doll: step 5.
 Process the remaining semicircular flaps according to bottom edges, and top stitch to the armholes.
Sew the sides of the shirt, sew the sleeves.

 T-shirt for the doll: step 6.
 T-shirt for a doll.
  Pattern of a shirt for a doll.
 How to sew velvet pants for Barbie and Monster High dolls?
Take advantage ready-made pattern to sew Barbie or Monster High velvet pants, leggings or jeans.
 Plain jeans for dolls: pattern.
 IMPORTANT: If you want the pants to look realistic, you have to work hard. You will need a machine to make the product look neat. But in hard-to-reach places, you will have to work manually.


Open the details of the front and back halves, yoke, pockets, belt, belt loops.


Sew the yokes to the back halves of the trousers. Treat cuts immediately.


Optionally, make decorative stitching on the pockets. If you are not lazy, it will be very beautiful. Turn the top edges over and sew.

Turn the bottom and side allowances on the pockets and iron them. Then sew the pockets to the back halves of the trousers.
 Pants for the doll: step 4.
 Pants for the doll: step 5.
 Fold down the back of your pants front side to each other, sew the seam of the seat and process its cut.

 Pants for the doll: step 6.
  Pants for the doll: step 7.
  Pants for the doll: step 8.
 Working with the front halves, first sew in pockets from burlap. Topstitch the seam on the front side. Sew to the burlap of the barrel.
 Pants for the doll: step 9.

Topstitch the front seam to where it meets the closure. Pants for the doll: step 13. Pants for the doll: belt. 
 Trousers for a doll.
VIDEO: JEANS WITH TURNS for dolls without a pattern!
How to sew a fur coat for Barbie and Monster High dolls? How to sew a winter jacket for Barbie and Monster High dolls?
Sew for a doll outerwear not easy. But if you have a piece of fur, a piece of denim or raincoat fabric, everything will definitely work out.


To sew a short white fur coat you will need:
Fur coat for Monster High: step 3. Do the same on the lining fabric.
Lay the pieces of fur and lining also face to face, sew the corresponding pieces of the hood to them in the neck area.
The same pattern can be modified to make a warm jacket for Barbie or Monster High. The lining is only needed for the hood. You will also need to cut and sew pocket details, sew a snake into the product.
Closed swimsuit for a doll: pattern. 
 Separate swimsuit for a doll: pattern.
- Cut out the details of the swimsuit from paper. Transfer them to the fabric, leaving allowances for the seams.
- Sew the details of the bra.
- Sew the details of the bottoms along the side seam.
- Optionally, sew straps to the swimsuit or decorate it.
VIDEO: How to make an open swimsuit for a doll?
Surely, many mothers are familiar with such a situation when their daughter asks to buy outfits for her doll. And since any girl has a Barbie at home, in most cases she needs clothes. Then a bunch of questions arise, namely: how many things do you need? How can I choose outfits so that my daughter likes it? How to guess the size? How much will Barbie clothes cost? These questions will not arise if the doll's things are done at home. What is required for this and how the work is done can be found in this article.
To sew clothes for this doll, you will have to get to know her in detail. Barbie is a girl with unbending and bending arms and legs.
Her height is about 25-30 cm, and her hair is mostly white, about 5-6 centimeters long. Neck girth - 2 cm; chest girth - 11 cm; waist circumference - 7.5 cm; hip circumference - 12 cm.
Back length - 5 cm; arm length - 12 cm; brush girth - 3.5 cm; leg length - 16 cm; wrist circumference - 2 cm, foot length - 2 cm.
DIY clothes for Barbie
It is known that clothes can be both sewn and knitted, so models and fabrics must be different. The easiest thing to sew is a simple dress or blouse, and the most difficult is a wedding dress or overalls.
Gallery: clothes for Barbie and Ken (25 photos)


Classic embroidered dress
If you decide to sew something for a doll, then it must be a dress. Firstly, the doll's dress is the basis of her wardrobe, and secondly, it is sewn very quickly. The dress should not be made chic if you are not going to take the “girl” to the podium or hold a photo shoot for her. It will be enough to sew an ordinary classic dress V life size. What will be needed?

If you decide to sew something for a doll, then it must be a dress.

- Fabric (chiffon, silk or gabardine is usually welcome) - 0.5 × 0.5 m;
- Scheme;
- Zipper (10 cm) or buttons or Velcro;
- Threads;
- Scissors;
- Needle.
To make such a dress, you will need an A4 pattern (you should print it or copy it), according to which you will cut out the details from the fabric. Next, sew the pieces, process the ends and insert a zipper or sew on buttons. If you don’t get smart with the design of the dress or additional details, then it can be sewn quite quickly - about 30 minutes.
If the dress is one of the easiest outfits to make, then the coat is much more difficult to sew. It is also worth considering that the coat can be both sewn and knitted. Let's consider both options.
How to sew a coat for Barbie
To sew a coat, you should purchase:
- Fabric (wool, crepe, diagonal, boucle) - 0.5 × 0.5 m;
- Scheme;
- Threads;
- Needle;
- Scissors;
- Faux fur (collar);
- Belt (as an accessory) and buttons.

The coat can be sewn or knitted

Work like this: print out the diagram, mark everything on the fabric, cut out, connect, sew everything together. And it's done!
How to knit a coat
It is worth working with a knitting coat, because it is a very painstaking work. But if you approach it with responsibility and a special desire, then everything will work out quickly.
To knit a coat, you should purchase:
- Woolen or acrylic thread (not thick, different color) - 30g;
- Hook number 2;
- Buttons.
Knitting goes from top to bottom.

It is worth working with a knitting coat, because it is a very painstaking work.

We tie the edges of the sleeves and the collar with threads of a different color. Sew the sleeves, sew on the buttons and you're done!
What else should a doll have in her little wardrobe? Of course, skirts, blouses, pants, a lot of shoes and certainly a fur coat! But how to make a “girl” a fur coat, and what kind of fabric is needed for this
Beautiful fur coat for Barbie
It will require:
- A piece of fabric (needed for lining);
- Ribbon;
- Velcro;
- felt-tip pen;
- Scissors;
- Threads;
- Needle.


Everything works in the same way as in the previous versions: it is cut out and sewn together.
Buttons can be attached as desired.
Boots for Barbie with foam soles
- Fabric (some kind of elastic);
- Scissors;
- Coffee can (to make insoles);
- Threads;
- Needle;
- Styrofoam (for the sole).
Progress:
- First you need to cut out something similar to stockings from the fabric (the main thing is that they are 1.5-2 times larger than the doll's leg itself). Next, cut out the insoles from the jar and sew them to the stockings from the side of the foot.
- Further actions depend only on you and your imagination, since it is at this stage in the manufacture of shoes that you will have to cut out the foam sole. What will be the sole of the doll, you decide!
- Then glue the made soles into the "stockings", and the boots are ready!
The main thing is to treat this matter very carefully and patiently.
Light knitted slippers
How can a woman do without cute slippers? Of course not! That is why here is the knitting option for this wonderful shoe. If you follow the scheme correctly and do not be distracted by anything, then you can perform this work in a few hours.
- Threads (wool or acrylic) - 30 g.
- Scissors;
- Ribbon - 1 m.

If you follow the scheme correctly and do not be distracted by anything, then you can complete this work in a few hours.
The color of the threads and ribbon is chosen independently. Then it remains only to follow the scheme. It is worth paying attention to the picture in the middle. This very figure shows the foot with which you need to start knitting. Next, the sides are knitted in a circle.
Pumps with high heels
And finally, the shoes! Their manufacture is considered one of the painstaking work in the field of footwear. How are doll shoes made? It is worth considering a simpler version.
- Fabric (any will do) - 10 × 10 cm;
- Cardboard;
- 2 pieces of wood for heels;
- Glue;
- Scissors;
- 2 beads;
- Thin elastic band;
- Sealant for processing (if you took a loose fabric).


First you should use the scheme, then cut the fabric along it. Glue the “insole” of the fabric onto the cardboard (which is also cut out along the foot). It is necessary to glue the back of the shoes, then the toe, then the heels. Next, attach a bead for beauty to the clasp (beads or sequins would work well). Everything, shoes for our beauty are ready!
Ken doll
Ken is Barbie's boyfriend.
In terms of height, he is the same as the “girl”, but a little more in physique (after all, a man), so the clothes for him should be larger than for Barbie.
The girth of his hips is 15 cm; chest girth - 13 cm; arm length - 12 cm; leg length - 14 cm; foot length - 3.5 cm; shoulder width - 8 cm.
Come to think of it, what can Kena sew? You can wear a T-shirt with shorts or pants, a T-shirt, shirt or pajamas. A set of T-shirts and pants is sewn in almost the same way as pajamas, only from a different fabric. For ordinary clothes, gabardine works well, but for pajamas, as for clothes in which to sleep, cotton is great. As you can see, a pajama set does not always include a t-shirt. Most likely, there is something like a jacket. You can verify this by sewing such pajamas.
DIY pajamas for Ken
To make such clothes, you need:
- Fabric (cotton, bamboo, silk) - 1x1m;
- Scheme;
- Button or Velcro or elastic band (inserted into the belt);
- Needle;
- Scissors;
- Threads.
In order to get such beauty, you need to make a pattern, sew, then insert an elastic band or fasten it with Velcro or sew on a button. Everything is made quite simply, so with a lot of patience, pajamas will be ready in just a couple of hours.

To sew the top, take the rest of the fabric, cut out the pattern again, mark everything on cotton or bamboo and sew. You can make a jacket without sleeves (as shown in the diagram), or you can sew on sleeves. Each sleeve should be 8-10 cm.

Other things are sewn on the same principle. Only for each thing there is its own fabric, so you should choose it correctly. If you are in doubt about which fabric is suitable, then you should find out what material clothes are made of for people, then everything will become clear.
Very simple dress for Barbie doll (video)
How to sew a shirt for a Ken doll (video)
The main thing is diligence and patience, because sewing (or knitting) clothes for dolls is quite difficult, despite the fact that they have the same physique as humans. You need to cut out the smallest pieces of fabric, sew them or glue them, and this takes a lot of time and effort. But if you still decide to continue doing such a thing, then you can only envy!


