Unusual crafts made from natural materials. Summer crafts from fruits, leaves and flowers. Children's crafts made from natural materials on the go
Spruce and Pine cones- excellent material for voluminous toys and entertaining crafts. All sizes of cones should be collected - from small to large.
Place the sorted cones, size and volume (elongated, round, open and closed, old and young, pine and spruce) into separate boxes.
In the spring, when you collect old, dried cones with fallen seeds, you don’t have to worry about them becoming deformed over time. To avoid deformation, glue the autumn cone: dip it in a liquid solution of wood glue. Once the cones have dried, the glued scales will not open up and diverge into different sides, and the shape of the product will be preserved.
From pine and fir cones you can make various animals, birds, all kinds of figures, using plasticine, clay, sticks, fabric, feathers and other finishing materials to help. Each toy consists of several parts that are assembled into a base - a pine cone. Such a toy is either attached to a board under a stand, or suspended as Christmas tree decoration, on a loop. The most difficult thing is to sculpt the head of the toy. To do it right, you should stock up good pictures with the image of a particular animal or bird.
When starting work, you should first of all take care of a strong fastening of the toy, that is, a stand, if the toy is not intended to be hanging (Christmas tree). The stand can be plywood or thick cardboard, cut into any rectangular or round shape. The stand should not be bulky, but it is necessary that the toy fits freely on it, taking into account additional finishing: moss, cotton wool or other finishing materials.
It is best to secure the pine cone on the stand with a nail driven into its middle with the point up. A hole is pierced in the cone with an awl, and it is put on a nail. For a more durable fastening at the base of the nail, you need to smear the stand with wood glue or place a lump of soft plasticine.
Toys made from cones can be given to a sponsored person kindergarten, they can be issued fabulous performances tabletop theater, layouts, illustrate fables and poems in Russian language lessons. Such toys are hung from the branches of the tree by loops or they are placed around the tree, at its foot. Make pine cone toys for hanging lighter so that the branches do not bend from their weight. Therefore, the head and all additional parts for them should be made of cotton wool, cardboard and paper, and not of clay or plasticine.
Duck, chicken, goose, rooster- all poultry is made from cones of the same type. For the head and neck, a piece of soft wire of the required length is bent, which is secured to the handle of the cone by wrapping it between the rows of scales. Make the ratios of the sizes of the head, neck and legs by checking with drawings or with live birds. Attach the ducks and swan to the stand with wood glue. The stand can be designed in the shape of a river or pond by placing blue-painted cellophane or glass on the base. Cover the banks with moss and dry herbs. To attach roosters, hens, and birds to a stand, use small pieces of plywood and cover them with moss; Use twisted copper wire to make legs for the birds.
Make the heads and beaks of all birds from birch bark, cardboard, cloth or celluloid. Make the tails and wings of the rooster from feathers, the wings of the geese and swan from pieces of white birch bark.
When sculpting a neck and head from plasticine or clay, you need to carefully finish and smooth out all the roughness of the form. There are no irregularities on the neck of birds, and plasticine or clay applied with strokes will give the toy an ugly, sloppy appearance.
Fox, squirrel, bunny. They are made from cones of different sizes, the assembly principle and fastening are the same.
Tails, except for the bunny's tail, are made from an additional cone, strengthening it on a wire.
Muzzles, sculpted from clay or plasticine, are attached to the stem part of the cone.
Attaching to the stand is carried out by placing the cone on a nail. Animals standing on their paws are attached to a stand with nails.
The scales of the cone, facing from the muzzle to the tail of the animals, will be like fur. The tail is attached with the scales facing upward.
For foxes and squirrels, the tail bump should be long and fluffy. The bunny's tail is cut out from part of the cone-body.
The eyes of the animals are glued together using beads on plasticine. The beads can be replaced with shards of black graphite from a pencil.
The paws are made from matches, wire, pasted over with scales or covered with plasticine. It’s good to stick one scale at a time on top of the plasticine. Thanks to the wire base, the legs can be bent as you like, giving the figure a tilt.
Having sculpted several animals, you can create entire pictures, illustrating fables, fairy tales, puppet shows.
Telescope fish. Made from a short, thick pine cone. The telescope's eyes are two convex balls. Glue them with beads or simply stick them with plasticine. The tail is glued from curved feathers different lengths. If a fish is made for a Christmas tree, it is painted with silver or gold paint.
Chick. The body cone is selected according to the shape of the selected pattern. The design of the remaining parts of the bird depends on the available material and taste. The head and neck of the bird are made on a wire frame.
You can make several of these birds and paint them with colored tsapon varnishes. Feather trim and varnish.
Mother hen. The pine cone is strengthened obliquely on two twisted wire legs. The neck and the spherical frame of the head with a beak are strengthened from twisted wire under the scales of the cone. A round head is sculpted from plasticine on a wire frame, and it is good to glue red cloth or celluloid onto the beak on top of the wire. The tail can be made from feathers or cut out a figurative image of feathers from cardboard and paint them brighter. Excellent eyes will be made from black beads on white circle bases.
Crane. Between the scales of the pine cone, a wire frame is firmly strengthened for the long legs of the crane. The neck is made no less long. The figure shows how to bend the wire to give it the shape of the head, beak and neck. All other design of the bird is as usual.
Special attention Pay attention to the strength of fastening the pine cone to the frame and to the stand. Carelessly made frames of paws, necks and heads fall off easily.
You can also cover the roof of a small house on the model with scales. It will look like tiles. The scales can be painted with colored varnishes or oil paint. The single-color scaly roof is varnished.
Children's carnival costumes You can also decorate with cone scales. They can be sewn, strung, glued to fabric and paper, and made into various appliqués.

Little bear. For this toy you will need six old, open fir cones: one large and wide for the body, four smaller ones for the paws, and one small, possibly spherical, for the head. To attach the paw to the body, thin soft wire wrap the cone at its very base, passing the wire between the scales, and twist its ends one with the other. Then, pulling the cone-paw to the body, wrap the wire around the cone-body twice, passing the wire between the scales, but so that it is not visible anywhere, twist the ends, bite them off with wire cutters and hide under the scales of the cone. Having thus attached all four paw cones to the body, attach the head cone in the same way.
From pieces of the old unnecessary skin, suede or leatherette, cut out the claws for the paws, two circles for the eyes, two ears and the nose of the bear cub using scissors according to the included patterns. Sew two shiny black beads or small buttons in the center of the eye circles. Separate four scales from the cone and glue them on both sides to the ears with wood glue.

Sew the eyes, nose and ears to the bump-head, as discreetly as possible, with thick black threads. You can also glue the ears by spreading glue on the base of the ears and pushing them tightly into the depths of the cone-head. Also sew on the bear’s claws and bend them with finger pressure. Cover the bear's nose and claws with black varnish or paint them with black paint, and then cover them with colorless varnish.

Squirrel. It is made according to the same principle as the bear cub. Take three fir cones: medium-sized for the body, small for the head, large, fluffy for the tail. Connect them together. From scraps of old leather or suede, cut out the squirrel's paws and ears according to the included patterns. To make the paws hold better, make them on a wire frame, then cover the frame wire with a strip of brown material or wrap it with brown darning threads. Attach the legs to the wire so that the wire is not visible. Place a nut, an acorn or a small cone into the squirrel's front paws, attaching one or the other to the paws with black thread or thin wire. Make the squirrel's eyes from black beads. For the ears, just like for the teddy bear, glue cones between the scales or sew them on. When the squirrel is ready, attach it with wire to a round or rectangular shape. Cover the wire or nails with small tufts of green moss.
Fairytale bird. Prepare a large pine cone with very open scales, twigs for legs and feathers of different sizes. It is better to choose goose feathers, as they are better colored than others. Before dyeing feathers, dip them first in soapy water. soda solution, and when they are dry, paint them with aniline dyes bright colors: yellow, blue, red, green, orange. Long feathers are needed for the bird's tail, small feathers with down are needed for the neck. Attach the feathers to the cone like this: pierce the cone with a triangular awl, coat the end of the feather with wood glue and insert the feather into the hole. Attach the stems-twigs to the cone-body in the same way as feathers.

Make the bird's head from cardboard, leather or cloth. Between two patterns made of leather and cloth, be sure to glue a piece of cardboard or wire to hold the head.
Now take care of the tuft: pick up some bright, beautiful, shiny beads or beads, string each bead onto a piece of thin wire. Twist the wire into a knot and place it in the middle of the bead so that it is not visible. Place the ends of the wire on the first head pattern and cover them with pieces of paper. Then apply glue to the second pattern, fold them together and place them under the press. When the head is dry, glue it to the body of the bump.
Now all that remains is to paint the head, glue glitter eyes to it and secure the bird either on a wooden stand or on a tree knot. The bird is ready.

Cockerel. Draw the outline of the cockerel (without the tail and crest) on cardboard and cut out two copies of the cockerel body with the head. Then select the feathers for the tail and color them required colors. From a small piece of red velvet or cloth, cut out a comb and a beard, also in two copies, and glue them together.
Apply wood glue to the first and second patterns of the cockerel's body, place the comb and beard on one of the patterns, and cover the first with the second pattern and place it under the press. To make the cockerel more voluminous, place wire inside the patterns. The ends of the wire can serve as the cockerel's legs and be attached to the stand. When the patterns are dry, sew the tail feathers onto them with thread.

Take a straw, cut it lengthwise and cover the cockerel’s legs with these strips; they will look very similar to the legs of a live rooster. You can wrap the cockerel's legs with darning threads suitable color, or you can just color it.
Paint the beak and the upper part of the cockerel's head with paints and cover the neck and entire body of the cockerel with fir cone scales, arranging the scales so that the upper one covers a little of the lower one.
Glue a few feathers in the place where the cockerel should have wings.
You can attach undyed, natural chicken feathers of brown or yellow color. Make the cockerel's eyes from beads. You will get a very interesting, bright cockerel. The cockerel can be made more voluminous.
Flying bird. Dip the pine cone into the glue solution. Then remove the bird's head. Make the head like the head of a bird of paradise, only without the crest. Then cut out the bases for the wings from thin cardboard and sew feathers to these pieces of cardboard. Glue fluffy feathers on top to cover the bases of the large feathers. Make the tail in the same way.
When the wings and tail are ready, use a triangular awl to drill holes in the cone and, having smeared the bases of the wings and tail with wood glue, insert them tightly into the holes made in the cone.
Glue the bird's head and small branches-legs.
Feathers for such a bird can be dyed, or you can use natural ones - white, yellow, variegated feathers.
So that the bird can be hung on the tree, make a long loop on the back.
Hedgehog. Take a large unopened one fir cone and dip it in liquid wood glue so that when it dries, its scales do not open. Cut two strips of brown fabric, half a centimeter wide and slightly shorter than the length of the cone. Place one strip on a piece of paper and glue fir needles onto it, one next to the other. Glue the strip with needles onto the bump. When the glue has dried, lubricate the row of needles you glued at the base with wood glue and at the same time thickly spread the glue onto the strip on the pine cone itself. Glue the second strip of fabric so that it sticks to the first row of needles and at the same time to the pine cone. Continue gluing rows of needles, alternating them with strips of fabric until you get a round hedgehog. Do not glue needles to the hedgehog's tummy. Leave the hedgehog's face uncovered with the strips of needles. Then attach the legs of the hedgehog from wood knots, and make a nose and eyes from black beads.
You will get a wonderful prickly hedgehog, very similar to the real one. A hedgehog from needles can be made in another way. Look carefully at the picture, and the second method will be clear to you. Piece old fabric pull it, hammering it with nails, between two bars or boards. Then, dipping the needle in wood glue, stick it into the stretched fabric so that only a small tip remains at the top. And so stick the needles into the fabric one after another, placing them as far as possible closer friend to friend. Then remove the fabric, cut it according to the shape shown in the figure, and stick it on the cone, thickly smearing both the cone and the material with glue.

In order to create a cozy atmosphere in your home, every detail intended to decorate the interior must clearly fit into its overall style. Decorative sound will help to emphasize the dignity of the interior, highlighting the advantages and hiding the disadvantages. various accessories. One of these creations of home art are crafts made from natural materials made by hand. From our article you will learn how, with the help of simple things that surround us, you can create exquisite jewelry and original decorative items. The master classes below with photos and step by step guide, and different ideas for home, cottage, school and kindergarten, will help you cope with this task with ease.
Beautiful crafts: do it quickly and easily (photo)
Kanzashi, topiary, decoupage, flower pots, origami - the world of handmade art tirelessly excites the imagination of needlewomen.
A variety of crafts made from wood, glass, shells, cereals, coffee beans, pasta, paper, stones, pebbles and other natural materials will help create unique comfort and light romantic mood in any interior.
Advice! You can create a variety of supplies for making crafts from natural materials from absolutely anything, just look around, you probably have a lot of things suitable for this at home.


Hazelnuts and pine nuts, beans, buckwheat, peas, coriander, pepper are excellent materials for creativity.

Advice! So that handicraft creativity brings you exceptional positive emotions, and the process of material procurement has turned into a real holiday, you can combine business with pleasure.
- When you're at sea in the summer, stock up beautiful shells and small pebbles. They make excellent wall decoration for home.
- While walking through the autumn park, give your child the task of collecting acorns, chestnuts, and colorful fallen leaves. Products made from natural materials made by children's hands are endowed with special warmth and love.
- When caring for your own garden, do not be lazy to sow dried flower seeds. They store well in winter and are an ideal tool for creative work.

Crafts made from natural wood
Tree- a beautiful and pliable material that has gained popularity among designers, architects and ordinary amateurs. Natural solid wood can be easily combined with metal, glass, plastic and stone decor.
Wooden crafts will harmoniously fit into a cozy country-style room, set the tone for the brutal loft style, and will favorably change the classic, Scandinavian, minimalist decor.


We invite you to view a universal selection of interesting wood products that can transform the design of any interior, becoming its beautiful and bright accent:
Tree branches
– a sophisticated natural material that allows you to create many original things for your home with your own hands: chandeliers, wall lamps, candlesticks, photo frames, hangers, headboards and much more.
- Painted dry branches with many branches will add special charm to the living room, kitchen, and bathroom.
- Tables, lamps, shelves, vases finished with sawn wood look nice.
- Will set a romantic mood decorative panels in the shape of a heart, a bird, a star.
- Gold, silver, white, and black rods placed in a transparent vase with stones attract attention.


Wood cuts
Tree cuts help create larger crafts: vases, clocks, frames, stylized wreaths. Wooden flower pots, shelves, and hot stands will fit harmoniously into the interior.
With a little imagination, it will not be difficult for craftsmen to build an unusual tabletop from these round pieces by fixing the wood cuts on a plywood sheet, filling the voids with shavings and opening them with varnish.


Bark of tree
Bark is a natural and affordable material. Modern craftsmen use birch bark to create unique paintings and appliques. Mugs, baskets, tues and boxes made of birch bark will last for decades.
Crafts made from natural materials will help not only reveal your creative potential, but also to bring your interior ideas into reality.


Decorative stone and pebbles
- Decorative rock— the unbridled power of the elements, which has a strong charge, which affects the overall design concept of personal plots, interior decoration premises.
Chests, caskets, vases filled with pebbles will dilute the routine furnishings of city apartments and office premises. Small stones will decorate walls, mirrors, door handles, stands for installations, as well as bottles. Look at the examples in the photo.

An interesting solution would be candlestick from glass bottle filled with shells and colorful pebbles. Beautiful ones will look no less beautiful pebbles glued to the wall.
A decorative rug covered with flat pebbles, mounted on silicone or special glue. It will make your porch look stylish and beautiful.
Create original compositions Even children can make stones. Just before that, you need to conduct a step-by-step master class for them.


Mosaic, painting, stone cutting — great way entertain children by creating magnets, flower arrangements, trees, cacti in decorated pots.
Advice! Color sea pebbles in one tone it is best to use special spray cans, but you need to apply drawings and fine lines on them using liner brushes.


- From colorful stones they make decorative panels and figurines. Pebble cladding of walls, floors, fireplaces and window sills - the basis of kitchens and toilets.

A picture made of stones is a unique interior item

Summer crafts from fruits, leaves and flowers
Formation of a caring and caring attitude towards environment form activities with natural materials. An important stage The work becomes collecting, processing and preparing for use of summer gifts.
Making beautiful and beautiful things with children's hands original accessories for home you can from:
- leaves;
- poplar fluff;
- colors;
- seeds
Dry grass, fruits, flowers, tree fruits and plant seeds allow you to create complex volumetric applications, unique and colorful compositions and other original art objects on autumn and summer themes.


Advice! If wood (cuts, logs, bark, twigs) is used to create crafts from natural materials, it should be thoroughly dried before starting work. Using damp wood will significantly shorten the life of your homemade masterpieces.
Ideas for creating autumn crafts
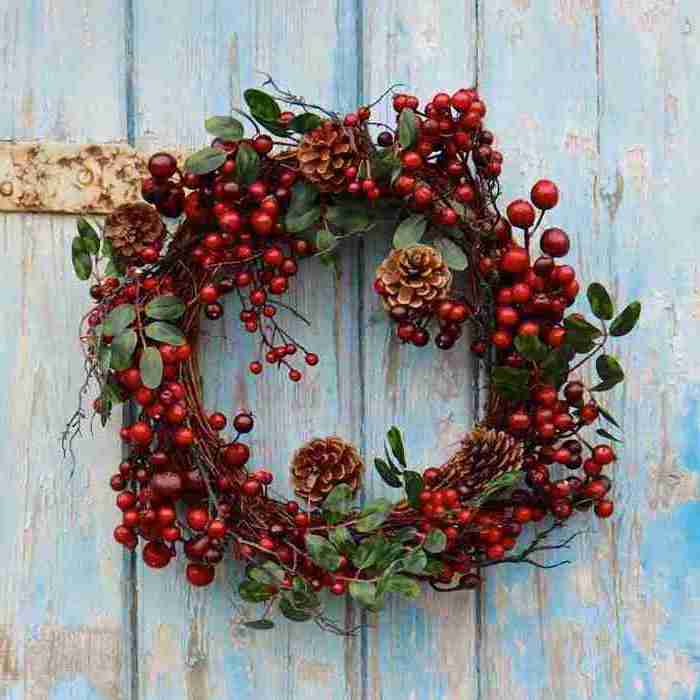
Autumn - best time for collecting fruits, seeds, vegetables, as well as acorns, cones and chestnuts. Fallen leaves, dried flowers, grass will serve to create extraordinary bouquets, wreaths, and appliqués.


Natural compositions look good in ordinary vases, watermelon peel, coconut shell, pumpkin shell. Original master class You can teach children how to create crafts from natural materials with their own hands.
- The pine cones will make a cozy basket or wreath that can be hung on the front door.
- Zucchini decorated with berries and flowers will become the main character of the garden plot.
- A kaleidoscope of bright colors of pumpkins, potatoes, and eggplants will decorate your yard landscape if you come up with a worthy use for them.


Advice! When looking for ideas for creating crafts for kindergarten, pay attention to the wonderful houses made from bark and tree branches.


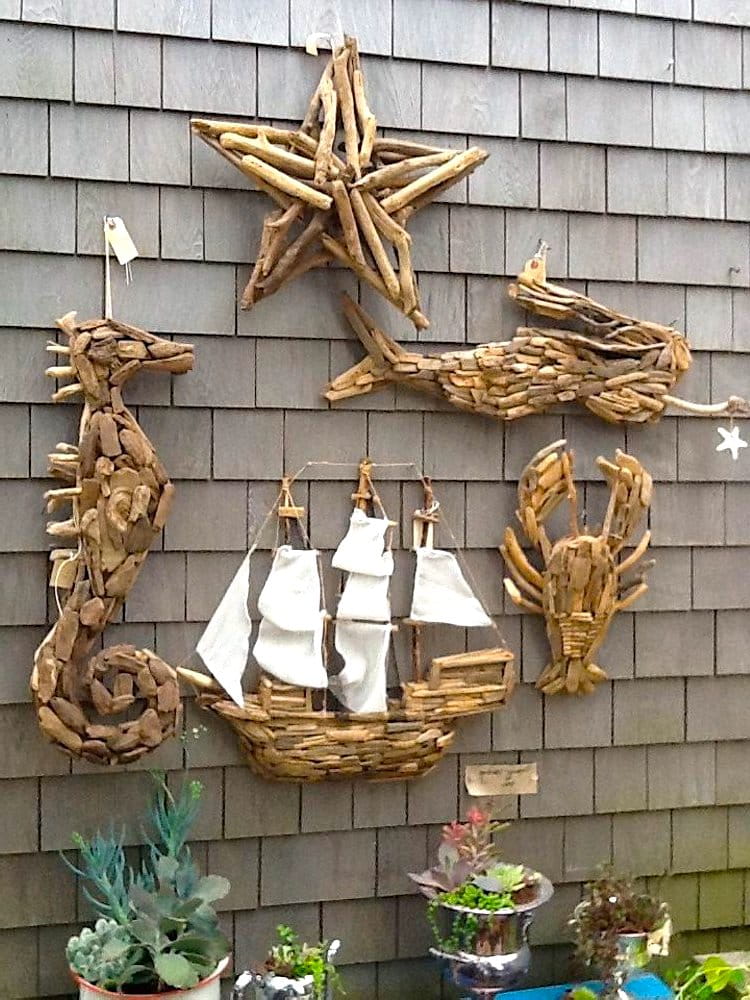
Crafts on the theme: “Sea and underwater world”
Marine crafts are given bright emotions and even a rosy mood cold winter. If you are lucky enough to collect a collection of shells during your vacation, hurry up to become the authors of three-dimensional applications, paintings, frames, a marine theater or an aquarium.
- Sea treasures are easily transformed into beads, pendants and pendants.
- Cold porcelain, salty dough will help complement the composition with starfish, corals, and colored pebbles.
- The ocean in a bottle is whole undersea world, allowing you to invent various stories, study marine life.
- On a cool day, boats made from scrap materials will also give you warm memories of summer.
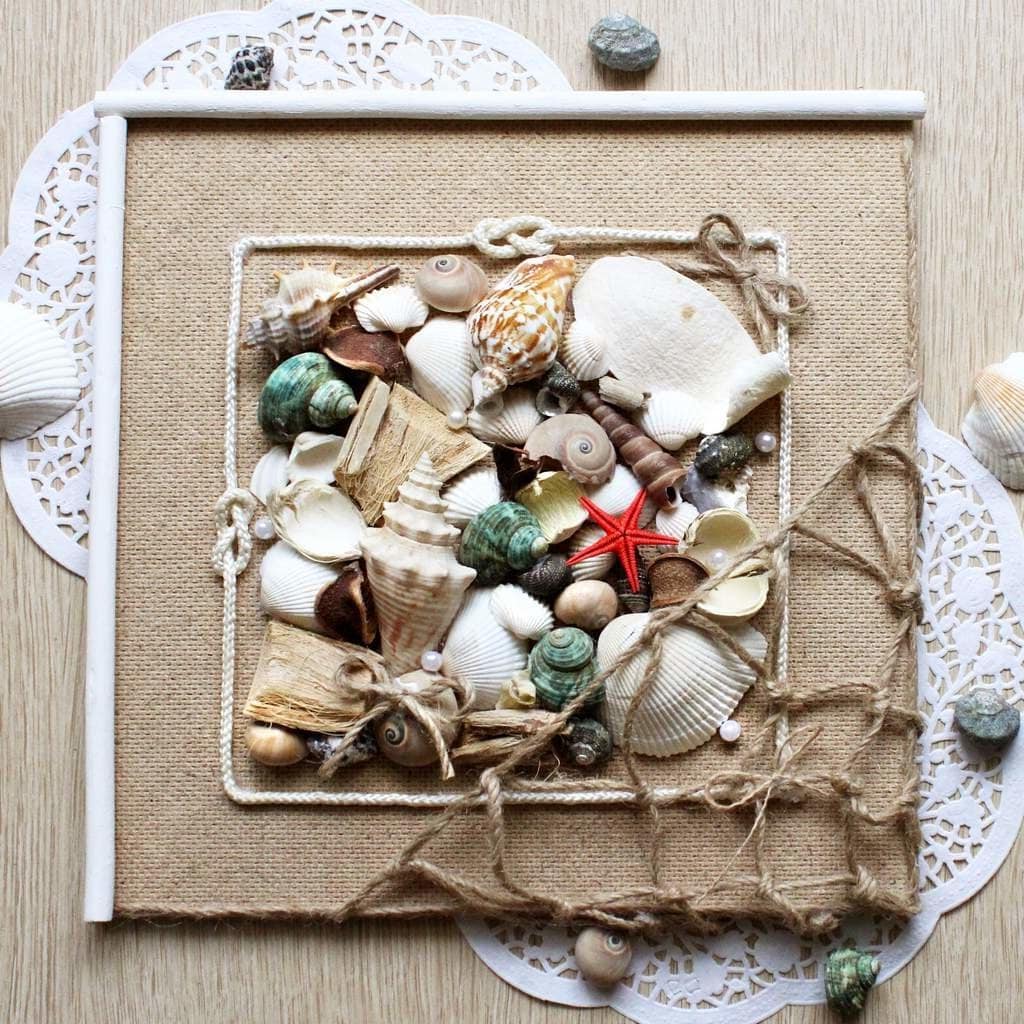

Making decor on marine theme Don’t limit yourself to anything - create, try, dare

When making products with a “sea” theme, you can use absolutely any natural material.
Feathers for needlework
- Bird feathers— used by craftswomen to create soft pillows, warm feather beds, decorations for hats, toys, and unusual souvenirs.
They also decorate the interior, complementing crafts with sequins, glitter, small ribbon bows and other decor.


Despite the fact that the pen is a very capricious material, working with it is quite simple and easy

Dream Catcher - magic talisman good luck attractor


Important! Bird feathers can cause severe allergic reaction in humans, so be careful when using them as decorative decorations for your home.
DIY crafts (step by step)
It’s easy to create crafts from natural materials with your own hands - the main thing is to get necessary tool and material. Listed below step by step instructions on creating universal decor for your home and garden will help you cope with this simple task.
Colorful panel
Panel - decorative, facades. Currently, three main genres are used for its production: sculptural, mosaic and appliqué.
An interesting solution is an artistic panel made from natural materials: dry leaves, straw, nut shells, dried flowers. Its production takes place in 3 simple steps:
- First you need to make a base. It can be made from wooden boards knocked together into a board or a piece of plywood.
- Next, you need to cover the base with burlap material or make a straw lattice on top of it, on which the applique will be applied. You can make an applique from flat elements (leaves, grains, seeds), or get a relief surface by combining three-dimensional parts. An unusual solution There will be dried citrus fruits, moss and leaves woven into the straw net.
- The final stage is to create a rope or wire loop for attaching the panel to the wall. Check out the result in the photo!
Advice! If desired, you can add a frame of driftwood or vine branches to the resulting composition. It will make your work more elegant


Eggshells for indoor plants
Creating small flowerpots from eggshells requires special care, since the shell itself is a rather fragile material and can easily be damaged if moved carelessly.
Procedure:
- Pin the top raw egg and pour the contents into the container.
- Finish the edges until you get an even cut or leave them chipped.
- Stabilize your vases by using a stand or egg carton. Alternative options may become a plasticine flagellum that complements the bottom of the shell.
- The resulting container is ready for seedlings of wildflowers, greenery, moss, and small succulents.
Interesting to know! Eggshell can also become an elegant candlestick, Easter craft or a miniature flower bed.


To create your own mini-garden, you will need very little time, the main thing is to do everything carefully and adhere to the rules described above.


Candlesticks made from sawn wood
Preparing an exclusive candlestick from a stump or wood cut will take a minimum of time and effort. Ensure necessary material and tools to perform the following actions:
- Impregnate the wooden base with compounds that prevent the formation of rot and insect pests.
- Using a drill and a special attachment, make a shallow hole in the center of the stump to install a standard candle. To ensure that the edges do not pose a danger, sand them with sandpaper.
- Decorate the item with burlap, tied with jute rope or a beautiful ribbon.
A wooden stand for 2-3 candles, made from simple driftwood attached to a wall, pendants or supports, will look unusual. Such an interesting hand-made product will become best attribute for romantic evenings.


Kitchen clock
A kitchen clock made from cutlery is very quick and easy to make. For this we need:
- clock mechanism with a beautiful dial;
- disposable plastic spoons and forks;
- glue gun.

Step-by-step master class
- First you need to disassemble the watch, separating the mechanism from the dial;
- Next, using a glue gun, we glue improvised arrows opposite each number so that the spoons and forks alternate and go one after another. This way the watch will look much nicer;
- All that remains is to let the glue dry, install the dial in place and insert the battery into the watch. Original and useful is ready!

Let's sum it up
It’s not difficult to make decor for your home, cottage, school, or kindergarten with your own hands, especially if you use natural material for this, which is a pleasure to work with.


You just need to enlist the help of your family and friends, use your imagination, and boldly create! Try, experiment, find your own!
Crafts made from natural materials for school- these are a variety of animal figures, appliqués and whimsical compositions for which you can use gifts of nature collected in parks, gardens or forests. For creativity, a child can use chestnuts and acorns, cones, all types of nuts, berries - barberry, rowan, rose hips, hawthorn, pine and spruce branches, as well as other conifers, maple seeds. In addition, you can use leaves of various shapes and sizes, dried flower petals. Let's not forget about the seeds, seeds and grains that can be borrowed from the kitchen. But they will be of interest to mothers, because you can make beautiful ones with your own hands. autumn bouquets for home decoration.
Crafts made from natural materials for school
There is an opinion that today materials for creativity are very expensive, but sometimes it’s enough to look around and you will see that nature itself gives us everything we need to create original crafts. In autumn, in the park and forest, and sometimes on the territory of a school or kindergarten, you can collect small pine cones, chestnuts and acorns with caps, hazelnuts and walnuts, colorful autumn leaves - different sizes and shapes. Crafts made from natural materials for school“Dragonfly” is made using small chestnuts and multi-colored plasticine. Such work will be available to preschoolers aged 4-5 years, as well as students junior classes.
It is best to select chestnuts of different sizes, but always small ones. When creating a dragonfly, chestnuts should be arranged in descending order: the smallest will be in the tail. The Dragonfly must also have wings; for this you can use oblong leaves or dried flower petals. And if you forgot to prepare autumn leaves for crafts, you can use colored paper and cut out the wings of the required shape. For each wing you need to make two blanks or prepare two oblong leaves.

The main decoration of the Dragonfly is its large bulging eyes, with which we will begin crafts from natural materials for school, photo The lesson of this simple craft will help the child cope with the work independently and will give all the tips on the main stages of its implementation. The eyes should be placed on the largest chestnut so that they are on the sides. For the eyes, you need to roll two large white balls and flatten them a little, glue a small blue ball on top of each. Ready-made plasticine eyes can be attached to a large chestnut.
In total, we will need five chestnuts and five plasticine balls, which will serve as fasteners between the parts. When we combine all the elements together, we get a long sausage. All that remains is to attach the wings - they will be bright and will be attached to plasticine. Zinnia leaves look very beautiful. The petals must be attached to the plasticine, two on each side (the wings should look like an X). Now they can be attached to the Dragonfly’s body between the second and third chestnuts from the head.

Crafts made from natural materials for school, grade 2
How about making penguins out of acorns? Crafts made from natural materials for school, grade 2 is an interesting creativity lesson where children can work together to create a composition on the theme “Autumn”. Penguins can also be used for, because these birds look more harmonious in a winter landscape.
For work you will only need acorns with and without caps, and plasticine to make all the small additional details - beak, eyes, wings. If desired, you can use paints to paint the acorns black and indicate a white belly. With the help of paints you can make it bright.

First you need to make a beak; for this we make a small cone using red or orange plasticine. The beak must be attached in the middle of the acorn. On the top, on the wide side, you need to attach eyes; for this you need blue (or black) and white plasticine.
Once our penguin's face is formed, you can make wings and legs to make the figure stable. For the wings you will need black plasticine; they must be made in the shape of an “eye” and attached to the sides of the body, bent or left straight for realism. The penguin can flap its wings or hold an object in them, for example, a small plasticine book.
Simple craft from natural material to school almost ready, but in order for it to stand steadily on the work surface, you need to attach the legs. Each paw should have a drop-shaped shape, and the claws can be distinguished by a stack. Now the penguin can try on his hat, on the tip of which you can also attach a plasticine pompom.

Crafts for school from natural materials “Autumn”
Walnut shells will help you make a craft from natural materials for school, you will get a cute turtle. You can use not only walnut shells, but also halves of pistachio and groundnut shells. The main thing is to make beautiful eyes, because this is the main decoration of our craft. You will need two small black beads and two white sequins.
The shell of the turtle will be half a walnut shell, you need to glue the legs - halves - to it pistachio shells. You need to glue two on both sides of the walnut shell. They should be directed slightly at an angle to the shell, as if our turtle is slowly crawling forward.

We have the body with legs ready, all that remains is to attach the head, for this perfect fit groundnut shell. It does not need to be split in half, but cut diagonally in the middle. You have a turtle with a large head and a long neck. Now you need to glue the eyes: first the sequins, and on top of them in the center - small black beads. With a red felt-tip pen you can draw the smiling mouth of our turtle.
In this craft we use glue to fix all the parts. If the child does it independently, then it is necessary to work with synthetic glue carefully.

For crafts for school from natural materials “Autumn” you can use the same materials, only this time you can make a clumsy bear. For the bear, we need to prepare four halves of a walnut, four halves of pistachio shells and one very small half, two more cherry or cherry pits, one acorn cap. Such a simple and accessible set of materials will allow a child to plunge headlong into the world of creativity, and from individual parts to create a cute bear - the owner of the forest.
Creating crafts for school from natural materials, video You can use it as an additional aid, but we are confident that using photo lessons, the child will be able to cope with this task independently.

For the body of the teddy bear, you need to glue together four nut shells in pairs. You can also use whole ones walnuts, but they are quite heavy, so the bear cub may be unstable. We recommend using a knife to carefully separate the two halves of the shell, remove the core, and then glue them back together. Of course, at this stage the student will need the help of adults. It is desirable that one nut be larger, the second smaller, which will become the head of our bear.
Two nuts should be glued together perpendicularly, so the bear will have a convex muzzle. The cherry seeds will play the role of ears; they need to be glued to the top nut. The acorn cap must be glued to the front of the head part, thus we will highlight the face of the forest animal. For the eyes and nose we can use small beads or sequins.

The pistachio halves will be our paws. On the upper part of the body they are glued on the sides, as shown in the picture, and the hind legs are glued from below perpendicularly. Thanks to such paws, the bear will be stable and will be able to take its place in autumn composition. You also need to glue the tail - it can be another cherry pit or half a pistachio. Don’t forget to add realism to the bear at the end by drawing claws on the paws with a black felt-tip pen and a red mouth on the face.

Exhibition of crafts made from natural materials at school
When is it carried out? competition of crafts made from natural materials at school, many parents take on the bulk of the work, believing that the more difficult they choose a craft, the greater the chance that it will be the winner. However, choosing complex idea for the child, thereby we protect the schoolchild from completing it, but creativity at this age is very important for general development schoolboy. Don’t be afraid to choose a simple, as it seems to you, even elementary idea, but a 1st or 2nd grade student will be able to independently work on his creative project and proudly demonstrate it to teachers and classmates.
Exhibition of crafts made from natural materials at school for 1st grade - an important part creative development first-graders. Working with the gifts of nature, he will be able to learn more about various plants, about the changes that occur in nature with the arrival of autumn.
Can be used to create berries - barberry, rowan, rose hip, hawthorn, pine and spruce branches, as well as other conifers, maple seeds, chestnuts and acorns, cones, all types of nuts that you can collect in the forest or garden. In addition, you can use leaves of various shapes and sizes, dried flower petals. Let's not forget about the seeds, seeds and grains that can be borrowed from the kitchen.

Autumn craft for school from natural materials
Autumn craft for school from natural materials can be made using glue, plasticine or salt dough - these are the two most popular ways of attaching parts to each other. If you have the offered forest gifts at hand, you can create various flying insects.
For example, you can roll up several plasticine balls and fasten them together with a toothpick, then attach wings - maple seeds - to the insect's body, and make eyes from rowan berries. For thin paws, you can take twigs or dry blades of grass.

If you want to combine the completed ones into a single composition, then you can use moss to decorate the area on a cardboard base or autumn leaves.
Hello everyone!
Welcome to the pages of the ShkolaLa blog! It's autumn outside. What kind of “School” would it be in the fall and without autumn crafts? That's right, none) Children bring all sorts of different crafts made from natural materials to school every year, around September - October. That is, right now! Therefore, right now an article dedicated to these crafts is being published on the blog.
Most of the works that you will see below were found by me on the Internet. I want to say a big hello to their authors and say thank you for their magnificent creativity and wonderful ideas, which, I hope, will inspire many little schoolchildren and their parents to their crafts.
Lesson plan:
From chestnuts
A huge chestnut tree grows right in front of our entrance. And when you leave the house in the morning, no, no, and you’ll get a chestnut on the head. It doesn’t hurt at all, it just happens unexpectedly) So we don’t have to go far for chestnuts, they literally fall from the sky.

Last year we made these “Checkers-Bugs” from chestnuts with our own hands, which we then presented to the kindergarten as a souvenir.

A master class on how to make this game is hidden.
You can also make these amazing snails from chestnuts. Very easy craft, which does not require much time.

A charming and not at all scary spider. True, making a hole in a chestnut can be problematic. Here the child will probably need the help of an adult.

If you add plasticine and a little imagination, you can make the whole of Africa!

Or a poultry yard.

And this caterpillar is just a sight for sore eyes!

I am sure that she could decorate more than one exhibition and win in some autumn competition.
From the cones
And for pine cones, my children and I go to Victory Park with a basket. But there you can only pick up pine cones.


The playing field is made of branches, and the chips themselves are made of pebbles, but they can also be made from chestnuts, and even from halves of shells walnuts.
From leaves, flowers, berries
Well, there are a lot of beautiful bright leaves in autumn. Collect - I don't want to. However, like berries, rowan, for example.

I remember when Sasha went to first grade, it was still in another life (before the blog), she and I made roses for school from autumn leaves. It didn’t work out for us, we tried many times. As a result, we managed. It turned out something like this.

You can make various applications from leaves and flowers.


Use them together with other natural materials.

Or you can try to create a real work of art.

Rowan berries are perfect for making jewelry, beads, for example.

From something strange
And while walking through autumn parks and streets, you can find something strange and, at first glance, completely unsuitable for crafts. For example, here is a piece of birch. What should I call it? Did you sleep, or what?

We found him and took him with us. They brought it home. Washed and dried. And they decided to turn it... into a watermelon! The shape is very suitable. Look what we got.

We needed:
- birch;
- acrylic paints (white, green, black, red);
- tassels;
- acrylic lacquer;
- PVA glue;
- plasticine.

First, we primed our entire future watermelon with PVA glue.

Then they painted the “crust” dark green.

And they walked through the middle dark stripe.

The “watermelon pulp” was first covered with white paint.

And then, retreating a little from the crust so that a white rim remained, everything was painted in a rich red color.

To make the transition from white to red, smoother ones were added between them pink stripe. When our watermelon dried, we coated it with varnish. After that it became even juicier.
The only thing missing is the bones! We molded them from black plasticine and glued them into place.

Now this birch watermelon stands in our room in the most visible place and delights us and our guests, who strive to touch this piece of summer.
That's how much various crafts can be invented and done for primary school with your golden hands. Nothing complicated, but how exciting!
And right now the singing kids will share with you their beautiful golden autumn mood)
What have you already managed to build from natural materials this fall? Will you tell me? We are waiting for comments)
Happy creativity!
Yours, Evgenia Klimkovich.
Making crafts from natural materials – good hobby not only for children, but also for adults. Making something beautiful from what you can find literally under your feet is a real miracle. Moreover, despite the simplicity of execution, such crafts often look very impressive and fit into any interior.
Crafts made from natural materials come in different varieties. If production involves working with tools, for example, saws or pruners, the child should not be allowed to do this. However, working with materials like pine cones, twigs or dry leaves for a herbarium is something that is ideal for children.

Eco-style flower vase
- You will need branches and a regular glass vase.
- Cover the vase with branches. The branches may be slightly deviated from the vertical position and cross each other.
Apple roses
- Slice the apples as thinly as you can.
- Gently boil them in sweet syrup (0.5 liters of water per glass of sugar).
- Roll the slices like a bud. The caramelized sugar will cause the apple pieces to stick together.
- Store the resulting craft in a muffin tin. You can simply serve apples as a dessert or decorate a cake with them.


