Rooster creative DIY craft. From salt dough. The procedure for making a toy rooster with your own hands for kindergarten
Holidays, especially New Year, become an inspiration for people who love to make home decorations with their own hands. And children, even more so, are always happy to have creative ideas. The most relevant will be crafts in the form of a rooster - the feathered symbol of 2017. This time it is associated with the fire element and the color red. Several product options, varied in technology and materials, will allow you to choose your own and experienced craftsmen, and those new to hande made creations.
Pompom cockerels
Making a figurine from pompoms is quite easy, even beginners can handle it. And it looks very presentable. This is a wonderful compact decoration for the Christmas tree and for the table, a gift for loved ones.
The basis of the bird will be two pompoms, a smaller one for the head and a larger one for the body. You can make a very young bright yellow chicken or a motley young cockerel. Show your imagination in choosing yarn and other materials so that you can create your own unique symbol of 2017. Sedate and sleek, perky and disheveled, or a cute and fluffy cockerel. Use natural or your favorite colors.

To avoid combining colors for a motley bird by hand from many threads, choose melange or multi-color yarn. Play not only with color, but also with texture. Take thin or thick threads, smooth or fluffy. Beautiful and varied decorative effects can be obtained from fancy yarn: “grass”, boucle, pile yarn (imitating fur, it also looks like feathers) and other types.
Here's what balls you can get from different threads:

To make pompoms, you can use a special template or cut two washers from thick cardboard. The larger the hole in the center, the fluffier the ball will be. Making pompoms:
- We wind the thread around the base until the hole is filled.
- We cut all the loops along the outer circumference, between the washers.
- We tie it tightly with a thread in the center.
- We cut through the cardboard or open the template and remove it from the pompom. If necessary, align the threads to the area of the ball.

We connect two pom-poms to form the body of a cockerel. Next you need to make the wings and tail. Real dyed feathers work best. You can also cut them along with the beak using templates from:
- felt,
- thin felt,
- thick colored paper.
Eyes can be purchased ready-made for soft toys or replace with knots, beads, buttons.
Legs are easy to make:
- from the same fabrics
- made of thick colored wire,
- thin wire intertwined with threads.
We fold the wire and threads into a bundle and twist or wrap the already formed wire. We attach all the parts to the body. Sew or glue (with super glue or hot glue from a gun) to the centers of the pompoms, between the threads.

Mosaic
Many people do not raise their hand to throw away their favorite vase with a crack, or a chipped mug. Give these things a second life by using them as material to make a rooster - the symbol of 2017. The mosaic made from fragments looks very impressive. You can also use tiles and ceramic tiles. If you want to create a more elegant and delicate work, use painted eggshells. To make such a painting you need patience and long time, but such needlework does not require special skills.
For the base of the mosaic, use durable cardboard or thin plywood. You can use this technique for finishing:
- decorative cutting boards,
- dishes,
- flower pots.
To break ceramic into small pieces, wrap it in thick cloth and beat it with a wooden or rubber mallet. Or metal, wrapped in a thick layer soft material(sintepon, wool, felt or similar). To obtain smaller pieces, hit with the narrow side of the hammer, attach a chisel and hit or break it. Use tile adhesive, liquid nails, plaster, or hot glue gun.
Use any illustrations you like as a template. Place with the pattern facing up, stretch well and secure to the mosaic base. Draw all the contours using moderate pressure with a pencil. Place the pieces on the base, and when you are happy with the resulting picture, start gluing.

Combine colors and patterns on fragments the way you like. Create a cockerel worthy to symbolize your coming year!
Panel and applique
Using the appliqué technique, you can get three very different options texture of paintings, due to the use different materials:
- buttons,
- covers,
- herbarium.
The printed template is applied to the base of the painting and the silhouette is outlined. If internal lines are needed, they are easily transferred to the base. Tint the reverse side of the sheet with the image using a softness pencil B-2B. Attach it to the mosaic base and secure it. Using a pencil lead, applying light pressure, go through all the contours.
Next, according to the resulting markings, the selected fragments of the panel or appliqué are attached. Elements should be selected in advance. It is necessary to calculate the quantity, taking into account the area of the final pattern and the size of each element.
Lids
Bottle stoppers or plastic lids suitable for large-scale images. The picture they make is quite sketchy; such a symbol would look good next year in the design of the facade of a house, country house or suburban area.
 For the base, use a sheet of OSB, hardboard, plywood or pressed cork 3-5 mm thick. The panel can also be laid out directly on a wooden fence or wall made of boards.
Draw or draw the outlines of the future image. Attach the covers to wooden surfaces better with nails. Or press liquid nails, polymer cold or hot glue into the plastic base of a thick layer, gradually applied to the surface.
Covers can be of different diameters and thicknesses for a more structured image. Use more prominent but smaller details for the rooster itself, smaller ones for the background.
Herbarium
It is necessary to collect and thoroughly dry the leaves of various trees in advance. Also use petals from different flowers. The more varied the material, the more colorful the applique will be.

For the base it is better to use thick paper or cardboard. It is optimal to glue the elements with PVA or office glue. Choose a bottle with two applicators, narrow and wide or fabric, or apply the composition with a brush to the mosaic fragments rather than the base. A glue stick is not very convenient because the leaves are fragile and crumble, sticking to the stick.
Even a child can make an applique in this way, using a simple silhouette of a rooster and not a large number of leaves. For older creators, if you make an effort and approach it with imagination, the picture will turn out stylish and original. Bright and eco-friendly applications will delight the eye all year long!
Buttons
Buttons are selected various sizes and shapes, with a contrasting structure, are complemented with beads and seed beads. Or, conversely, buttons of the same shape and similar colors are used. The result is a variety of panels: elegant, bright, voluminous.

For the background, when gluing with cold or hot polymer glue, cardboard, plywood, OSB are suitable. You can sew elements onto fabric stretched over an embroidery hoop, then place it in a frame or stretch it onto a solid base. Another convenient way- glue buttons onto pushpins and press them into the base (for example, painted or fabric-covered drywall).
It’s easy and fun to create such homely and cozy appliqués from buttons for your interior and as a gift to your loved ones.
Implement your ideas for the symbol of 2017 with your own hands using the technique you like and don’t forget about the sign: the year will correspond to its personification. It's up to you to decide whether it will be a proud and obstinate, but luxurious rooster, a cozy domestic hen or a charming little chick.
The symbol of 2019 is the Rooster and it should be in every home. It will not only decorate the room, but will additionally serve a good gift for family and friends. This is a difficult symbol, he loves comfort and cannot stand dull everyday life. You can make it at home yourself or with the help of your children. Joint work with your child will allow you to become even closer to each other and help you develop faster. Let's figure out how to make a rooster craft with your own hands from a variety of available materials - for yourself, for New Year's decor at home or with children for school or kindergarten.

1. Pillow in the shape of a rooster
A hand-sewn cockerel will be a good gift and decoration for your own interior. This pillow can be used in the living room, bedroom, and kitchen. By choosing materials by color, you can add coziness to any room. You can update an already sewn toy and add various applications, beads If you have even minor sewing skills, you can make such a toy yourself.

First, take sheets of A4 paper or old unnecessary wallpaper. Draw details on it. Choose a special fabric. You can make the pillow a single color, or vice versa. For example, the wings are one color, the body is another, the beak and crest are a third. For the pillow, fabric from which pillows or duvet covers were previously sewn is suitable. If desired, you can make not only a rooster, but also additional chickens.


2. Postcard with a cockerel
It’s always nice to congratulate family and friends, but giving something else and a handmade craft is much nicer. For example, it could be a postcard with a rooster - the symbol of the New Year. For this you will need very little.

You will need:
- Colored paper.
- PVA glue, but a glue stick will also work.
- Scotch tape, preferably double-sided.
- Scissors.
Add a little of your imagination.
Layouts with the image of a cockerel can be found in a very large number on the Internet. But if you can draw, then you can draw the image of this symbol yourself. If this is a New Year's gift, then a blue background will do. You can draw snowflakes on it.


You will need two more cockerel figures. You can do more - the postcard will turn out more voluminous. On reverse side Each card needs to be glued with double-sided tape and glued to the center of the card. Under the picture, write an inscription with a congratulation, For example, “Congratulations,” “Happy New Year,” or “Merry Christmas.”
Open the card and write your wish beautifully inside. Or choose a wish on the Internet, print it, cut it out and stick the wish on double-sided tape. Such voluminous postcard with a rooster will definitely please your family and friends. You can prepare such a congratulation together with your child.
3. We crochet and knit a cockerel
For women who know how to knit, this will be ideal option make a cockerel. Such knitted rooster It will decorate your kitchen or bedroom, and is also suitable for a gift.

To make this craft you will need:
- 4 black buttons.
- Textile. An old sheet or other one may come in handy thick fabric. You can choose the color you like best.
- The hooks are small.
- Threads 4 colors. You can recycle old sweaters that are no longer needed. These can be wool or cotton threads.
You can make a symbol as follows:
- First of all, make a pattern of a cockerel on paper or old wallpaper. Cut it carefully with scissors.
- Transfer it to the fabric, keeping a slight margin of 5 millimeters for the seam.
- Now tie the cockerel's head and body. Gray threads are suitable for this.
- Knit the tummy in brown.
- Make the comb and beak red.


You can knit individual parts or make the entire cockerel. Fill the toy with padding polyester, cotton wool or pieces of fabric that need to be finely cut. Sew buttons instead of an eye to the symbol of 2019. You can replace the buttons with beads from an old necklace. The craft is ready.
4. Rooster made of multi-colored scraps
This toy is ideal for decorating the Christmas tree, lifting the mood and just for decoration. home interior. You can do it at home yourself. During bad mood You can crush it in your hands and it quickly lifts your mood. Or put it on the window to look at it in the morning after waking up.

You will need pieces of multi-colored bright fabric. The best fabric is bright with beautiful design. Additionally, you will need threads to match the color of the fabric, small buttons or black beads.
In order to make a bright beautiful cockerel, you will need to do the following:
- Cut out a square from bright fabric. It can be small, medium or large, depending on the size of the toy you want to make.
- Separately, take red fabric. Any other color will not work as you will be making the beak and scallop.
- The details need to be sewn into the corner of the square. You need to put padding polyester or cotton wool inside the symbol's body. You can use the filling from an old jacket instead.
- The edges of the figure need to be sewn together to form a pyramid.
- You can sew a cockerel long legs and place it on the refrigerator.
- The tail can be made from thin strips of the same fabric. For a brighter, more cheerful betta, a multi-colored tail works well.


5. Plasticine cockerel
You can make this craft with your own hands, together with your child. This will help develop hand motor skills. For this symbol you will need play dough or plasticine different colors, a special board for this lesson.

Take plasticine of any color except red (this will be the beak and comb).
- Make three balls of different diameters. The head should be small, just like the head. The torso is the largest circle.
- Make a comb and beak from red plasticine; of white and black - eyes.
- The tail and wings can be made from several colors at once. The wings can be made specifically in the form of a droplet. They can be made simply from paper or thick cardboard.
- The place where the wings will be inserted must first be prepared. Make a mark with a knife and secure it with plasticine.


6. DIY paper rooster
Just as easily as using plasticine, you can make a rooster out of paper with your own hands. All you need is colored paper or regular paint or felt-tip pens and a little imagination. You can draw the cockerel yourself, or you can find ready-made stencils. It can also be either voluminous or flat. With children, you can make a cockerel from a yellow cone - look at the photo, and find some more complex and naturalistic solution as a New Year's souvenir.


7. Rooster made of ball and thread
Another very easy way to make a symbol of 2019 is to make a cockerel from a ball and thread. All you need is one or two balloon, bright yellow, orange or red threads, PVA glue, as well as buttons and scraps of fabric or colored paper to decorate the toy and give it a finished look.
How to do:
First we inflate to the right size ball. Then we dip the threads in glue and wrap our ball - tightly or not too tightly, as you like - there we will prepare a frame for our future toy. There is nothing complicated, so this craft can be done for the New Year with your children. By the way, this can be not only a cockerel, but also any other animal.

After the glue has dried, simply pierce the ball with a needle and pull out the remains from the frame. We have the body of the rooster and his head - if you decide to use two balls. Now we take buttons and make eyes out of them, gluing them to the frame on Right place. We make wings and a tail from scraps or colored paper and also glue them on. Paws can be made from felt, paper or wire and scraps. Here's what you might end up with:


8. Craft a rooster from felt

You can sew a cockerel not only from fabric or multi-colored scraps, but also from felt. By the way, this is almost the most popular idea, since felt does not crumble and does not need edge processing, which means it will be very easy to make figurines and toys. Simple crafts for roosters are made from multi-colored sheets of felt: just cut out the necessary parts and stick them on top of each other - you get an easy one. flat craft. But more complex ones three-dimensional figures You will have to sew from felt, and here it is better to use ideas already created by someone. Here are four ready-made diagrams on how to make a felt rooster yourself, all you have to do is download, print, apply to fabric and cut out:
Felt cockerel - ready-made diagram


And if you think that this is too difficult, then look at the photos of other figures made from this material, perhaps you will like some idea more. By the way, good does not mean difficult. There are very simple solutions for such crafts, which look very cute and are quite suitable for New Year's souvenirs. For example, pay attention to the heart-shaped cockerel.


9. Rooster made from plastic bottles
Plastic bottles are a very popular material for country and children's crafts. Here we have already written about what to make from bottles for your dacha, and today we will tell you how to make a rooster out of them. The easiest craft option is to take one bottle and use colored paper, buttons, disposable tableware and any other available materials to decorate it with the symbol of the New Year.

More complex options are creating voluminous cocks, with which you can decorate your cottage. Here you can no longer do without abstract imagination, the ability to create necessary forms and combine different colors, because ready-made schemes There are simply no such figures. You will have to cut out the “feathers” for the tail and plumage yourself, make a comb and assemble it all into a single shape. But for some, these birds look just like life-like ones - look at the photo for yourself:


10. Crafts from salt dough - rooster
Another popular material for children's crafts is salty dough. It’s not difficult to make, sculpting is as simple as using plasticine, but the figures are stronger and more durable—you don’t have to worry that your child will break everything just because he squeezed his fingers on the toy a little tighter than necessary.

Salt dough cockerel recipe:

Mix 200-250 grams of flour and half a glass or a little more fine sea or regular table salt in a bowl. Add about 150 grams of water and mix everything thoroughly. At the end, pour in 20-30 grams of glue - it is better to use PVA so that the dough holds its shape better and the figures do not fall apart.

Next, we begin to sculpt the figure - we make a body, add a head, attach wings and a tail to it, and also do not forget about the comb and beak. Afterwards we paint with gouache or some other special paints. We make all the parts separately, and then glue them together with glue or water. For the manufacture of small parts and shape them, use a scalp or a thin and sharp knife; when working with children, it is better to take safe plastic tools - a spatula or something that will help you make cuts and create the necessary elements.


Video: DIY Christmas rooster craft
Craft - fire rooster
Everyone remembers that 2019 is the year of the fiery rooster, which means that if you are going to make a figurine, then you should focus on these bright colors. It could be a red rooster, orange, yellow, or you can combine all these shades in one toy. You can make such rooster crafts from different materials - from felt and scraps, from fabric and paper, from plastic bottles, cups and other disposable tableware. You can also make a fiery rooster for the New Year from ribbons, tinsel and Christmas tree balls to decorate with such figures christmas tree or use as a craft for kindergarten.


Volume craft rooster with children
If a flat figure is not your thing, why not make volumetric crafts in the form of a rooster, which can also be kindergarten Give it to your children and give it to your friends for the New Year? We have already talked about how to knit a cockerel with hooks or sew scraps or fabric - this is the most popular way to do voluminous toys. Crafts for the garden for the year of the rooster are easiest to make from paper, napkins or plasticine, and if everything is clear with plasticine, then with paper you can use various ways, for example, first make a cone out of colored paper, and only then turn it into a cockerel. You can also use techniques such as volumetric quilling or plain or corrugated paper, origami, papier mache and use complex circuits and patterns. Does anyone even manage to make a rooster out of cotton pads and sticks, and for the Christmas tree - from Christmas balls, cereals, pasta, coffee beans, cones, chestnuts, acorns and more natural material.


Bonus: rooster made from cereals for kindergarten
And another bonus craft is a cockerel made from cereals, which can be made for both kindergarten and primary school. You can use a wide variety of cereals; this composition can be made from millet and buckwheat, peas and beans, semolina, rice and other cereals. How more options you have, the more interesting the craft will be - you have a chance to win the competition with your child.

The technology is simple: we draw a cockerel on a piece of paper - parents can do this, and if it’s difficult to draw it yourself, you can always download a ready-made stencil, print it and use it for decoration. Next, use a brush to apply glue to the entire surface that you will fill with natural material. All that remains is to pour in the cereal and let the glue dry. After that, just shake off the excess grains and get ready-made craft. Cunning: if you use several different grains, then so that they do not mix, it is better to apply layers one by one, “painting” with glue only the areas of the picture that are needed now. But laying out a panel of beans or peas is more difficult - here you will have to place the beans in even rows to each other, having also first applied glue to the paper. Here's what you might end up with:


Photos of rooster crafts
What else can a cockerel be made from? Yes, from anything, from buttons or plastic bottles (you can decorate your garden with such a craft). It can be made of wood or thread, from old things or some other improvised materials, for example, disposable plates. A painting using the quilling technique with a cockerel - the symbol of 2019 - can also be a great gift. From satin ribbons, feathers and beads, you can make decorations for a cockerel from paper or fabric.


Every year passes under the auspices of some symbol. The coming year 2017 will be under the auspices of Fire Rooster. Of course, it is customary to celebrate the New Year brightly and interestingly. In addition, on this day people make all kinds of crafts that are original gifts. Also, such products quite often become exhibits. In this article, we decided to talk about what crafts you can make with your children for the Year of the Rooster. Here you will find plenty of interesting ideas, which will be very easy to make with your own hands.
Children's crafts for the Year of the Rooster
Cockerel from chenille wire.
This cockerel requires minimal effort to create. In addition, children who like to make can take part in this process. various crafts. So, in order to make a craft, take:
- a couple of pom-poms yellow color,
- a couple of pieces of yellow and one piece of orange chenille wire,
- scissors and universal glue,
- eyes.
Progress:
First of all, two pompoms should be connected with one piece of chenille wire. This will be the body of the chicken. In this case, before connecting the pompom, the ends of the wire should be greased with glue.

At the next stage, you need to make blanks for the cockerel from yellow wire.

Make a beak and comb from a piece of orange wire.
Now attach all the pieces to the pompoms. But before attaching the parts, you need to lubricate the ends of the chenille wire with glue.

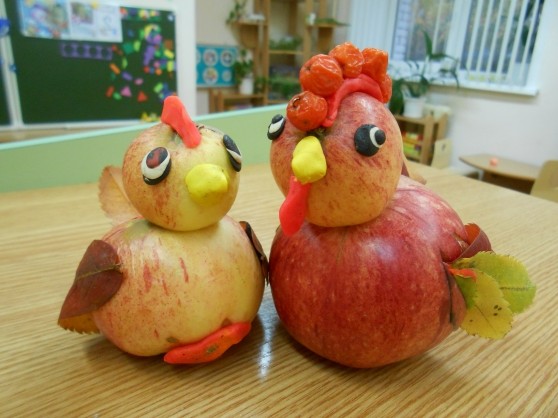
Rooster made from chestnuts.
As mentioned above, crafts for the year of the rooster will be interesting and bright. They are very easy to make with your own hands, if you look at the pictures of how they are made. To create the next craft, you should prepare:

- maple lionfish,
- chestnuts,
- disk,
- plasticine,
- gouache,
- openwork napkin,
- red and yellow paper
- piece of wallpaper,
- chenille wire.
Progress:
- Natural materials take part in the creation of our crafts, which should first be painted with gouache.
- After that, you should start designing the disk. The colored side of the disc should be covered with a piece of wallpaper.
- On front side stick an openwork napkin on the disk.
- Now, using plasticine, you should glue a chestnut into the middle of the napkin, which will be the body. Glue another chestnut above it. A small chestnut will be the head of a rooster.
- Draw the cockerel's eye, and use tape to glue the comb and beard.
- Glue the tail and wing to the body using plasticine.
- Then make legs from chenille wire and glue them to the craft.


The original cockerel.

A beautiful cockerel is quite easy to make if you prepare:
- cardboard egg cells,
- 2 foam balls, one larger and one smaller,
- colored corrugated paper,
- scissors and PVA glue,
- gouache and brush,
- wire and tinsel,
- decorative tape.
Progress:
Cut the cells into separate segments. Give these blanks rounded shape. Cut off sharp corners. After that, glue these blanks to the balls.

To make a comb, soak the scraps from the egg cells in warm water. Add PVA glue to the water. From the segments that you have prepared, you should glue the tail and wings.

Cover the resulting blank with colored corrugated paper. Cut the edges to give them the shape of feathers.

Glue the wing and tail blanks to the rooster. After the rooster dries, paint it with paints.

Now make a blank from the wire and wrap it with tinsel.
That's all. Your craft is ready. If you do everything correctly, your craft will become a worthy decoration of the exhibition.
Rooster made of plasticine.
 Modeling is great way develop children's motor skills. For the New Year, invite your children to make an interesting cockerel directly from plasticine. To make a cockerel, take plasticine of different colors. You will also need wire and mesh.
The pre-holiday bustle leaves very little time for creativity, but how could we be without it on the eve of the holiday. After all, handmade toys, gifts, room decor are great things that will help create the right atmosphere and great mood to all family members. Children especially need this kind of activity. Themed handmade crafts, namely rooster crafts for the New Year, are easy to perform and do not require specific skills or costs. Let's look at a few original ideas and make up detailed description manufacturing process.
How to make a rooster craft for the New Year?
Children are well aware of this domestic, but at the same time obstinate bird. The cockerel is a positive hero in many fairy tales and stories, so the idea of making a favorite character will appeal to the kids. You can make a rooster craft for the New Year from paper; for work it is better to use bright colors and unusual ornaments.
This wonderful cockerel would make a wonderful room decor or toy for a child:

Let's look at the execution scheme:

Three-dimensional rooster crafts for the New Year are considered more difficult to execute; using the example of the following masterpiece, we will see that this is not the case:

Oddly enough, you can make a rooster craft for the New Year using the most “unexpected” means at hand. This is how even an unattractive, at first glance, egg carton can find its use:

Now let’s look at a few more original ideas on the topic of making New Year’s symbolic crafts.
Felt is a wonderful material, kids and needlewomen create wonderful cockerels from it. You can use such crafts as Christmas decorations, small gifts to family and friends.


Crafting a rooster from a bottle for the New Year will impress everyone, but not only the child, but also the parents will have to work hard to create such a masterpiece. Such an original bird will be an alternative creative work for kindergarten or school.


It will not be difficult for real craftswomen to weave a beautiful cockerel from beads. A little diligence and dexterity and a wonderful souvenir for the holiday is ready.

Paper crafts can be very diverse; for example, such a wonderful cockerel will be a wonderful room decor for the New Year. The work is easy to make, even kindergarten students can handle it. Photo 17

A craft in the shape of a rooster is not only a decoration for a room or a New Year tree, but also wonderful gift, which can be presented to friends, relatives and acquaintances. It will be nice if you do the making of a cockerel with your children. There are many options on how to make a rooster with your own hands. Suitable materials include plasticine, fabric, paper, plastic bottles and much more.
Rooster made of plasticine
To make this simple craft, you need to prepare multi-colored plasticine. You need to roll balls from yellow material different sizes. Connect them to each other so that you get the body, neck and head of the rooster. Carefully smooth out the joints of the balls.
 Imitation of feathers can be done using longitudinal cuts. To make a scallop you will need a red mass. Next, attach the black eyes and orange beak.
The tail can be made from the most bright colors plasticine. To do this, you need to cut the mass into small pieces, knead each portion and roll first into a ball, then into a long sausage. Collect the resulting details into a bouquet - the tail is ready, all that remains is to attach it.
Wings are best made from triangular and teardrop-shaped cakes. Red plasticine is suitable for them. Draw feathers on the wings in a stack and stick to the body. To make the craft stable, the legs need to be made using matches.
Paper cockerel
To make a rooster with your own hands from paper, you will need the following materials:
- Scissors.
- Colored paper.
- Box.
- PVA glue.
 Cut off the part that covers it from the box. Make cuts along the fold lines that are half the height of the box. Bend two opposite parts along the cuts. These will be the wings. The remaining parts are the head and tail. Carefully round the wings and cut the tail into longitudinal strips. Cut the head in the shape of a triangle. All that remains is to decorate the craft, make a comb and earrings.
Product made from plastic bottles
To make a rooster from waste material need to:
- Three plastic bottles.
- Yellow ball from a dry pool.
- Disposable plates and glasses in yellow and red.
- Black marker.
- Stapler.
- The tape is simple and double-sided.
 Cut off the top of three plastic bottles, then connect them with tape to form a body with a neck.
Cut disposable cups into strips from the edge. Decorate the rooster's neck with them. To do this, place the glasses upside down one above the other, alternating colors. Glue the yellow ball head onto double-sided tape.
Cut off the edges of red and yellow disposable plates. Cut the resulting arcs with inside, imitating feathers. Collect the feathers into a bouquet and fasten them with a stapler. The result is a tail, which must be inserted into a cut on the rooster's body. The connection points can be masked using wrapping paper.
Wings, beak, eyes, comb and beard cut out from colored disposable plates are attached with tape. The craft is ready.
How to sew a rooster from fabric
To work you will need:

 Draw a sample of the craft on cardboard and cut it out. Then cut it into individual components. You can use a stencil. Match each detail with separate pieces of fabric and cut out in duplicate.
For the head white will do the fabric for the upper part of the wing and body is blue-green. Bottom part Cut the wings and tail from black fabric. Next, make a comb, beard, paws, beak and eyes from colored paper. All that remains is to sew all the parts together.
 There are many different ways how to make a rooster from natural material. It all depends on skill and ability. Simple craft It will work if you put a rooster template on a wooden sheet or plywood and trace the contours. Then cut out the design using a knife or jigsaw. Next, the product can be painted.
More difficult option consists of carving many strokes and details into wood. This is done using additional tools. Depending on your desire, carving a rooster from wood can be voluminous or flat. Having the skill and assembly diagram of the product, you can make a rooster from several parts.
Jute lamp
For the master class you will need:
- Jute threads.
- PVA glue.
- File.
- Pins.
- Paper.
- Pencil.
 First you need to draw the silhouette of a rooster. Place the resulting drawing in a file. Moisten the jute thread in glue and lay it along the lines of the drawing. Make another similar pattern in the same way. Thus, you will get two cockerels. To make the base, wrap threads around a plastic jar. When the glue dries, remove the jar. The jute tube is ready.
To connect electricity you will need a cartridge, a cord with a switch and an LED light bulb. Next, connect the wire and socket, screw in the light bulb. Place the cartridge in a jute tube. Glue the structure onto a tin lid, which is also covered with jute thread, to create a stand. All that remains is to assemble the cockerel - the lamp is ready.
Button panel
To create a craft you need:

It is important to choose the shades of buttons to avoid sharp transitions. For example, the paws and comb will be made of red buttons, the head will be yellow, and the neck will be orange. For the tail, it is better to use several colors: blue, purple, lilac. To decorate the body, you need to mix buttons of all these shades.
Cover the cardboard with fabric and draw the silhouette of a rooster. Then start filling the outline. Before gluing the buttons, they need to be arranged according to size. Empty places fill with beads.
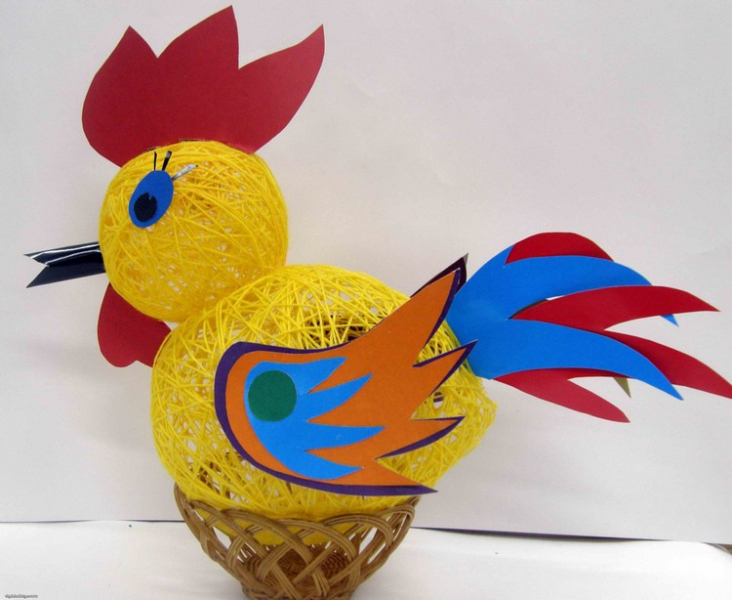
Balloon toy
A voluminous craft will be made from balloons and threads. For this you will need:
- PVA glue.
- The yarn is yellow, red and orange.
- Two balloons.
- Colored paper.
 Inflate one big balloon, the second smaller one. Moisten the yarn with PVA glue and wrap the balls.
After the glue has completely dried, pierce the balls with a needle and remove them from the thread frame. You will get the head and body of a rooster; they need to be fastened together.
To decorate the craft you will need colored paper. It is important that several bright colors are used when making the wings and tail. The comb, beak, eyes, earrings and paws are also made from colored paper. Attach all parts to the body. If desired, the paws can be made of wire, then the craft will be stable.
Making a candy bowl
Using carton boxes from eggs, you can make a beautiful candy bowl in the shape of a rooster. To do this you need:

 Cut the cones cut from the tray into four petals. These will be feathers. Cut each cone on one side.
The preparation of the head and throat is done according to the principle of extending feathers to a cone. For example, you will need 5 feathers for the head and 6 feathers for the throat. The third cone (beginning of the neck) of 8 feathers, then 10, 12. The sixth blank of 8 feathers will no longer be in the form of a cone, but in the form of a fan. This part will cover the beginning of the back. The feathers are attached to each other using tape.
 Next, draw a scallop on the box and embed it. To make a beard, you can take two side parts of the cells. For the beak, cut two cones.
To form the head and throat, you need to glue all the cones, starting from the smallest. Attach a beard, beak and comb to the head.
Cut out the wings from the box and cover them with feathers using the same cones. Tail feathers in the form of arcs are also cut from the tray.
 The candy plate (also known as the rooster's belly) is made using the papier-mâché technique. You need to inflate the ball, cover it with strips of paper and newspapers dipped in PVA glue. Make at least four layers, with the first and last layers being made of white paper.
When the glue dries, burst the ball and cut the workpiece into two parts. In this case, one half should be larger than the other. To make the bowl strong, you need to place the small part in the larger one. Glue the parts together.
Attach the head of the rooster to the bowl, then glue the tail and wings. Next, the candy bowl needs to be decorated. You can choose colors to suit your taste; shiny and pearlescent paints are suitable.
Continuation of the master class


