We create a costume for belly dance with our own hands. Do-it-yourself oriental costume
***"And what material (fabric) is better to prefer for the outer skin of the bodice and belt?
If the fabric is not completely sewn up with sequins and other decorations, then elegant - velvet, brocade, etc. It is better if on a knitted basis, but not necessarily.
If it is completely sewn up, then they usually take a plain fabric. It doesn’t really matter which one, ideally: inexpensive, on a knitted basis, so that the fabric itself looks decent, not slippery. If, for example, you prefer cotton as a base, then such a fabric should be washed first so that it does not sit down in the future. Color - usually taken under the main tone of the sequins or a little darker.
*** More fabric tips:
- there is a cool fabric - kashibo, good skirts come out of it, it is almost opaque and not heavy.
- I also suffer from this issue - I need a snow-white skirt 1.5-2 suns, in our city there is only crepe satin, chiffon or organza. Crepe satin is very white, but I know from experience that it is heavy, the rest is not white and is translucent. What can you think of?
Answer: if you sew from chiffon, a 2-layer skirt, 1 sun each, then it will not shine through. If 2 suns from crepe satin, it can be heavy, chiffon is just right. It is also possible as an option the lower layer is chiffon, the upper one is organza.
Silk, crepe-chiffon
You can’t use organza - it will stand like a stake, although some sew it all the same.
ABOUT SHAROVERS:
About the width of bloomers it is written like this: " the width of the pant is equal to the volume of your thigh. Above is a regular rubber band. """

the base is like this, only Nina cuts off at the level of the knee and sews on the sun. Where is the seam (dashed in the picture), makes a drawstring and inserts a light rubber band, that's all."
* - And tell me, what is the length accepted for harem pants (both the traditional silhouette and like Nina's harem pants)? The latter, I suppose, are literally 5-7cm from the floor? But on an elastic band or a cuff, which is better? And should this very elastic band / cuff be visible?
Answer: " In my opinion, first of all, convenience in dancing, as well as aesthetic appearance. And it's up to you to decide on cuffs or an elastic band, it's easier to sew with an elastic band. In general, bloomers should be slouchy, so that it is convenient to bend the leg, everything else depends on imagination ".
* There is a wonderful material for tailoring bloomers. I copy:
*********
"
|
You will need 1.5 - 2 meters of fabric (depending on how wide you want the trousers to be) with a fabric width of 150 cm, a height of 170 cm, a hip width of about 100 cm Cut the fabric in half, and fold both pieces in 2 times, attaching to each other (Fig. 13) Cut out a quarter circle, as shown in fig. 13. Unfold and attach both halves with the right side inward (Fig. 16, pay attention to the tops A, B, C, D). It turned out two legs, not connected on the sides. While from the top of A and B, C and D can be sewn completely, or you can grab it in several places, making charming holes on the sides of the trousers, from under which your beautiful legs will look through. The junctions of the holes and the holes themselves can be decorated with hanging beads, sequins, sequins. It remains to put the top of the bloomers on an elastic band, the diameter of which is equal to the volume of your hips, the rest of the width will go to the folds. Through the lower edge of the trousers, also stretch the elastic band (narrower than at the top), the diameter of which allows you to thread the foot (Fig. 17). |
|
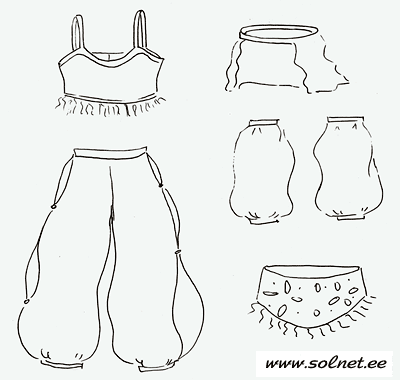
For the costume you will need: translucent fabric (chiffon) of any bright color, elastic band (elastic band), fringed braid, decorative coins (or ready-made monisto), bugles, beads.
Description of workTrousers. Sew wide trousers-harem pants according to any suitable pattern. At the waist and at the bottom of the product, make a drawstring, insert an elastic band. Do not grind the side seams, but grab them in several places using beautiful beads.
On the hips, you can tie a scarf made of the same or contrasting material, decorated with fringe and decorative coins.
Armlets. Cut out two rectangles, sew a pipe, make drawstrings from below and above, insert an elastic band.
Leaf. Cut out the bodice (you can arbitrarily, by eye), plant it according to the figure. Richly decorate with beads and glass beads. Sew a fringe on the bottom.
Head decoration. Sew a pipe from the main fabric - a cover for an elastic band (elastic band). Insert the elastic into the cover, connect into a ring (stitch), then manually sew the cover (when finished it will be gathered). Sew on a "veil", decorate with glass beads, beads, decorative coins.
Monisto. From decorative coins, glass beads and beads, assemble a monisto - neck decoration (like a large necklace). You can buy ready-made in stores selling dance accessories.
Decor. Bracelets (purchased or homemade) put on the wrists and ankles. Insert large earrings into the ears. "
********************************* How to make a BELT on bloomers is very well described. I copy again:
Sewing a belt for an oriental costume (says Elena Zubashenko)
I present to your attention detailed instructions on tailoring a belt for oriental Arabic dance.
The belt, on the example of which the whole sewing process will be shown, is sewn for my niece, Masha, she is now 5 years old :)
We will have a children's oriental costume, so the sizes may not match;)
I make a belt pattern according to a blank for absolutely any belt, and from it you can already make a shape that your imagination tells you.
STEP 1 - How to make a belt pattern for an oriental costume
I do the setup like this:
We measure the volume of the hips (for Masha it is = 64 cm), divide by 2, = 32 cm.

We draw on paper 2 parallel lines, 32 cm each, the distance between these parallel lines will be the width of the belt.
The width of the belt is chosen to your taste - as you like.
On each line, select the middle, put a dot there.
From the upper middle point we set aside 2-3 cm down, put a point, and draw a line, connecting the extreme points with the one lowered.
We do the same from below. After that, we round the line, make it smooth.
Now we are creating a simple belt, uniform in width, but you can sew a belt for an oriental costume of any shape: wavy, with corners (triangular), asymmetric ...
Now the most important thing is to make the belt round so that it fits around the hips.

draw a belt pattern for an oriental costume
To do this, you need to extend the smooth bottom lines, they will go up a little. (in the figure - pink dotted line)
We indent - set aside 2-2.5 cm and connect this point with top line, everything, half of the belt is ready.
cut out the belt
belt fitting
Be sure to try on how the paper belt fits!
If the bottom edge puffs up, you need to reduce the indent.
If the top - the indent needs to be increased.
belly dance belt pattern looks like this
Another subtlety of tailoring: you must immediately decide what kind of fastener on the belt will be - on both sides, or on one side, depending on this, you must definitely leave a supply of fabric for the gap.
The belt can be made with two fasteners on the sides. In this case, we simply duplicate the pattern, leaving room for fasteners on both sides. Such belt fasteners should be done if your belt is triangular in front and behind.
Such a fastener for a belt is also good because if you lose weight / get better, then the belt is very easily adjusted to the figure, does not move out, keeps its shape.
And in our case, the belt is simple, and we make one fastener on the side. The belt will be fastened with hooks, I like them more than Velcro, they hold better, they look neater.
STEP2 - How to sew a belt for an oriental costume
I made the sewing of the belt very easy. To make a belt you need:
1. Interlining - choose the hardest
2. A beautiful fabric is the background, it will be on the front side (it’s good to use a beautiful fabric for the background) shiny fabric(crepe satin, satin, beflex), it will be visible between the sequins.
3. Thick cotton.
cut out belt looks like this
We lay out the pattern cut out of paper on the dublerin. We use our pattern twice, because. the belt is double, do not forget about the place for the fastener.
We trace, cut out, put the doubler with the sticky side on the fabric that will be the background, iron it well with an iron so that the doubler sticks to the fabric, cut the fabric along the contour, leaving 2 cm to tuck the edges.
this is how the belt for the oriental costume turned out
We decided to make a background fabric white color, and the oriental costume itself - with bright multi-colored embroidery. These will be multi-colored daisies for little Masha :)
We sew with stitches, gently tucking the edge.
After that, we embroider the belt with everything we can - with beads, rhinestones, sequins, stones, sparkles.
We decided to decorate this belt with false flowers - daisies.
About embroidering a belt for an oriental costume is our next article.
Overhead elements - very good idea for an irregularly shaped belt, or for a belt with embossed edges, or with small cutouts closer to the edge ...
cut out false flowers for the belt
To do this, first we cut out the shape of the flower, and then we embroider each flower with sequins. Next, we sew the embroidered flowers onto the belt, and fill the space between them with sequins.
We add a hinge, in this belt we will make the hinge in a wave, for shine we put on sequins between the glass beads. Here's our costume:
Belt ready!
patch flower embroidered with beads and sequins for the belt
Copyright 2007-2009 All rights reserved.
Copying and use of materials is permitted only if indicated
an explicit hyperlink to http://johara.kiev.ua as a source of information.
*****************************
HOW TO ATTACH THE BELT TO THE SHAROVAR :
The easiest way, but it turns out to be common, is ordinary pins. They cut off the details of the costume in front and behind, so that the belt does not twist when moving. But the pin can open up and prick great! Therefore, there are more ways and they are more convenient, you just need to spend a little more time on it. This is what they wrote about: still attached with large flat buttons. buttons and Velcro on the inside of the belt.
on the skirt and trousers = harem pants there are cutouts for buttons and the second half of Velcro."
LIFE costume .
How to make it is well written. This information is for an adult costume, but you need to know for experience. I copy:
There are several ways to do upper part suit. The easiest way is to buy a ready-made bra that matches the color of your suit, and make it densely embroidered with beads, sequins, rhinestones or beads. It is enough to add a hinge of the desired shape to this - and the bodice is ready.
But it's not always possible to pick up a ready-made bra. desired color, shape, volume, etc. Then there is a need to correct and adjust what is. It's easy to do, it just takes a little patience.
Usually, the top is based on a ready-made bra one size larger (if you do not need to increase the size of the chest). Be sure to take this into account, because after tightening the material and embroidering former size bra will definitely decrease.
If the chest needs to be enlarged, then choose a workpiece two or three sizes larger, but also do not overdo it so that the chest does not turn out to be too disproportionate relative to everything else.
For the future bodice, it is better to choose a bra with dense foam cups: they hold the desired shape very well, and it is much more convenient to embroider a pattern on them. In the store you can buy ready-made cups with bones. True, they usually cost more than a whole bra, and to evaluate what the shape will be finished bodice, more difficult.
METHOD I. The easiest option. The bra is fully lined decorative fabric, on top of which a more or less dense pattern is applied with rhinestones and sequins. How smooth and with the least amount of wrinkling the newly fitted cups will result depends on the degree of stretching of the fabric and the density of the bra cup itself. The denser it is, and the fabric is more stretchable, the better the result will be.
For work we need: textile ( more suitable elastic fabric, for example, stretch velvet, lycra, supplex, knitwear, etc.), pins, scissors, thread with a needle, thick fabric or not wide bodice, trouser, twill tape for straps, hooks or decorative fastening.
Cut off the straps from the finished bra. We will replace them with dense, inextensible straps of the desired shape to match the suit.
You can sheathe the bra with two parts of the fabric or fit each cup and side parts with separate patches. It is important that a sufficiently long supply of facing fabric remains in the fastener area. Then, if necessary, it will be possible to lengthen the side straps by sewing a dense fabric or corsage tape inside.
We apply the fabric to the upper edge of the bra and pin it with pins along the contour of the entire cup, trying to stretch the material so that it fits very tightly to the bra.

Fig 1.
Where this does not work, we will lay one or two small tucks from the edge to the center of the cup.
We pin the fabric to the sides of the bra and cut off all unnecessary fabric, leaving a little for the hem for the seams.
We bend the allowances inward, pin them with pins and sweep.

Rice. 2.

Rice. 3.
We will do the same with the second cup.

Rice. 4.
We impose the edges of the fabric between the two cups on top of each other, chop off and make an inconspicuous seam.
It remains only to sew the fabric to the base manually or on a sewing machine, and sew the darts neatly blind seam. For fastening, you can take hooks or a decorative detachable buckle.
METHOD II. The option is more complex, but very beautiful in finished form.
From the finished bra, we will leave only cups with bones, we will completely cut off all other parts and replace them with more rigid ones.
Any fabric is suitable for work. It may stretch well or not have this property at all. For work, we also need a felt-tip pen, paper, cellophane or tracing paper, pins, cushioning and adhesive fabric, adhesive tape.
First, we will take a "cast" from the finished cup - a pattern made of cellophane or tracing paper.
To do this, draw a line with a felt-tip pen (chalk, soap) along the cup through the center.

Fig.5.
Take a sheet of cellophane (you can use tracing paper, but it can tear during work) and pin it with pins along the center line and along the edges of the cup, spreading it tightly over the entire surface.
At the same time, folds will definitely turn out in the upper and lower parts. We put them in tucks. Depending on the size of the cups, there may be several, but not less than two - one in each part.

Fig.6.
With a felt-tip pen or pen, and outline the contours of the future pattern on cellophane.
We draw the central line and be sure - as accurately as possible! - all darts to the center line.

Fig.7.
After that, remove the pins, lay out the pattern

Fig.8.
Clearly draw all the tucks and cut the drawing along the center line.
We transfer the pattern to paper. Be sure to label the top, bottom, middle, and sides on each piece. Otherwise, it will be difficult to figure out what to sew on later.
It should look like this:

Fig.9.
Now the tucks must be closed. To do this, we make cuts on one side of each tuck and move its edges.
Details finished pattern look like this:

Fig.10.
The layout of the patterns can be done separately for each cup or fold the fabric with the right side inward and make a blank for both at once.
Before cutting, it is better to check the accuracy of the pattern on a plain fabric. It may need to be tweaked a bit like this:

Fig.11.
The contour of the pattern on a light fabric is best outlined with a disappearing pencil, and on a dark one - with a white gel pen, fine soap or chalk (sharpen on sandpaper).
We leave seam allowances in the center no more than 1 cm, and along the contour of the cup at least 2 centimeters at the top and at least 3 cm on the side and along the bottom edge.
Cut out the blank and sweep it along the center line.
Now you need to make an example. We combine the seam on the fabric with the central line of the cup and cut them off with pins, and then all the contour lines

Fig.12.
If the fabric lay flat and does not wrinkle anywhere, then everything is in order, you can remove the workpiece and sew the central seam on the sewing machine. If wrinkles remain somewhere (this happens), they can still be removed in the central seam.
Now again we chop off the fabric and the cup with pins, bend the allowances to the wrong side, sweep and stitch the workpiece.
The finished cups look like this:

Fig.13.
Side parts, straps and connecting part between the cups we will replace the parts from thick fabric.
The connecting part can be given any shape, made of intersecting triangles, wide or narrow stripes

Fig.14.

Fig.15.

Fig.16
or replace with a decorative ring.

Fig.17
It should be noted that a wide jumper can visually reduce the chest.
The length and shape of the side parts(backs) depend on the design, the method of attachment to the cups of the bodice and fasteners (hooks or decorative buckle).
The side straps are cut from a dense fabric and a bead, glued together with adhesive tape or cobwebs, and sheathed with a decorative fabric.
The most common type of sidewalls is similar in shape to the side parts of a regular bra.

Fig.18
They can be used to cut out the sidewalls for the bodice. Place the bra on a sheet of paper and trace the side strap to the cup itself. Then the pattern needs to be adjusted in length and given the desired shape.

Fig.19
For sewing to the cups, we will make a margin of 5-7 cm (then the excess can be cut off). If the bodice is fastened with hooks, we will make the strap with loops 5-6 cm longer than the side with the hook. It is desirable for reliability to duplicate the hooks with Velcro.
The side straps can be made in the shape of a truncated triangle.
Example: base 7 cm, height to clasp 15 cm, hem - 3 cm

Fig.20
Explanation. If the fastener is a detachable buckle, the bead should be made shorter by the length of the hem - 5 cm.

Fig.21
We fit the same fabric as the cups. Sew on the clasp.

Fig.22
The next step is to connect the side parts of the bodice and cups. This can be done with one wide or several narrow elastic bands sheathed with decorative fabric.

Fig.23
Here you can also use decorative details: frames, large rings.
Very comfortable connection - lacing

Fig.24
It allows you to adjust the width of the girth if necessary. For lacing, you can use soutache braid or any decorative cords. Sew 4-7 ordinary loops from linen hooks to the cup and side of the back from the wrong side and pull the lacing. Very pretty and functional!
Straps we will make on the basis of corsage tape. We add 5-6 cm to the length of the straps for sewing. To the corsage ribbon (you can take trouser tape) iron the adhesive tape on a paper basis, remove the paper and apply the corsage tape to the wrong side of the facing fabric, glued side down. We iron. We cut out blanks with seam allowances, bend them and sew them. It remains to sew on the straps.
Please note that the bodice, after sewing on it with hinges, sequins, rhinestones and everything you are going to decorate it with, will be quite heavy. Narrow straps under its weight can cut very hard into the shoulders.
You can sew straps in different ways:
Like a regular bra
Almost the same, but much closer to the clasp on the back, so as not to fall off the shoulders,
Through the neck
Crossed on the back.
If the bodice is richly embroidered with beads, the chest looks more magnificent. Large elements and drawings also increase the bust. The pattern on the bodice should be combined with the pattern embroidered on the belt, but it is not necessary to duplicate it "one to one". It is enough to select and transfer only the main elements of embroidery.


Rosanova Olga 2007
Full or partial copying and reproduction of the article is prohibited without the written consent of the author
You can buy a book by Olga Rosanova
Ask questions to Olga Rosanova
Order a belly dance costume from Olga Rosanova .
About the top. The girl's mother wished not lacing, but ties on the top, as here:

Therefore, you can take any top pattern for a girl desired height and instead of the back, sew straps-strings. Then the girl will be able to wear a suit for another year or two, as her mother wants. Fortunately, the bloomers are also on an elastic band - this can be adjusted. And make the belt already laced. I don’t see another way, since there will be no fittings.
If you know how to sew dance costumes, festive children's costumes, then you can create something special, a robe that you can't buy in any store.
Bunny pattern for a matinee
This outfit is designed for a child whose height is 90 cm. Of course, you can use the services of a professional and sew such a suit to order. But the work takes a lot of money. Follow the detailed step by step description, and over time you will be able to make not only this, but also other outfits. After all, this hobby is very interesting and exciting.

Given in the photo detailed pattern. In order to redraw it, you need to prepare large sheets paper, newspaper or paper.
If you have only small sheets available, glue a few with tape, but skipping it from the back, as it is difficult to draw and write on a smooth tape with a pencil.
Let's start from the back. Draw her pattern based on the digital prompts. You can make it easier if you want. Enlarge the pattern so that there is 1 cm of the pattern on the monitor in 1 cm, redraw it from top to bottom, gradually scrolling the image up.
If this is not possible, first draw the base of the back - a large vertical line. It consists of segments: 14; 12; 16; 10; 27 cm. At the bottom, you need to leave 2 cm on the drawstring and 3 cm on the collar.
Now pass the horizontal lines through this vertical segment. Here's how to make the pattern next:
- Mark the rest of the values shown on the back diagram with a solid pencil line, connect the marks into a single piece.
- Designate the place where the lightning will be.
- In the same way, you need to make a pattern of the remaining parts, not forgetting to transfer the symbols to each.
In the place where the drawstring for the hood will be, leave 2.7 cm for the hem. Please note that this part is one-piece, where it says “fold”, attach the pattern to the fold of the fabric with this side.
Each ear is also one-piece, but this is if it is monophonic for you. If you want to make a two-color one, as in the photo, then cut out two of its reverse sides from gray fabric, and two inner ones from pink.
How to sew an animal costume for a matinee?
After you have cut out all the necessary details, we proceed to the main work. Sew on the wrong side of the back and front sides. In the photo, these lines are marked with a green line. Now you need to make step seams. Also, without turning the blanks on the face, sew the front with the back of the leg, first one, then the other.
Stitch the zipper into the back, first sewing with a basting stitch with a needle. Sew on the typewriter part of the back from the buttocks to the zipper. Now you can sew this snake also on sewing machine like the shoulder seams.
Sew each sleeve along the inside sides. Sew them to the armhole first using a basting. For better fit on the shoulder you can pick them up a little. Try on the costume for a child, if everything suits you, sew the sleeves on a typewriter. During the same fitting, decide on the length. Bend the bottom of the legs, sew, wrapping the fabric inward by 2 cm, so that you can then pass the elastic through here.
Do the same with the hood, tucking it in, stitch it. Sew it to the neck of the front and back.
Measure the elastic for trousers, insert them into two legs. In the drawstring of the hood too.
Thus, you can craft not only carnival outfits but also homemade costumes. In this attire soft tissue the child will be comfortable walking around the apartment.
For dancing, costumes are made from thinner fabrics. If your daughter or you want to do oriental, read how to make such an outfit.
We make oriental costumes ourselves
To practice belly dancing, you need harem pants or a skirt - better fluffy.

The first two models are the easiest to create. Measure your hips, add 5-10 cm to the free fit (this value depends on how fluffy you want to make trousers).

Divide the resulting figure by 4 - this is the width of each of the four legs (value A). Now you need to find out the length. To do this, start measuring tape to a point just below the navel, and the end - to the bottom of the ankles (value B).
Draw a rectangle. Its width is A, and its length is B. Place it on a fabric folded in half, cut it out, leaving 7 mm seam allowances on the sides, and 2.5 cm at the bottom and top.
Stitch the sidewalls from the sides, but not with a continuous seam, but like this.

Oriental dancewear is made from lightweight materials, often translucent. When choosing a fabric, pay attention to the fact that it almost does not wrinkle.
Process the seams on the side cuts, you can decorate them with metallic jewelry.
An oriental dance skirt is another version of such clothing. The semi-sun model is comfortable to wear and is suitable for various figures.

The semi-sun skirt will sit perfectly on the figure, since all the necessary calculations have already been made.

The pattern here is universal, suitable for sizes from 40 to 60. Find yours in the table and determine the values of the radii R1 and R2. The last column is the length of the belt, you will cut it out along the lengthwise so that you can fold it in half and sew it to the top of the skirt.
For its sewing, use a crepe fabric 1.5 meters wide. The length of the canvas, depending on the size - 2.05 m - 2.45 m.
Here is a list of what you need to get started:
- paper or cellophane film for patterns;
- pins;
- scissors;
- pen, chalk;
- crepe fabric;
- corsage tape;
- zipper 20 cm.

If the zipper is not hidden, then first sew the front and back of the skirt on the left, leave a gap of 20 cm at the top, sew in the zipper. Sew the right side. Iron the seams.
To sew the skirt further, insert the corsage tape inside the belt, iron its ends, directing them to the seal. Lay the workpiece so that the top of the skirt is inside the belt - between its two sides. Connect these parts with a line.
How to sew a belly dance top and belt?
To complete the Oriental dance costume, make these 2 last pieces of clothing. For beginner tailors, the following top model is suitable. If you want to sew an oriental costume with your own hands for your daughter, who needs it for classes or a matinee at school, garden, then this option will also be ideal.

Let the top also be made of crepe fabric. Take a T-shirt or T-shirt, this clothing should be the size of the dancer. Fold any of these robes in half lengthwise, fold the bottom. Attach the T-shirt to the fabric folded in half, redraw the outlines on the canvas.
If the top is sleeveless, don't cut it out. Sew on the shoulder straps that hold the product.
If a belly dance costume is sewn for an adult girl, then you can cut out the top in the shape of a butterfly. Do not forget to decorate it with sparkles, stones, sequins.
The belt also needs to be decorated, then during the performance of the belly dance, the jewelry will look beautiful, shine and tap each other in time with the movements.
Here's how to do it: measure your waist, cut a strip of fabric so wide that it covers your hips and you can tie a belt so that the ends of the fabric hang down. By the way, they should already be the main part. Strengthen the belt from the inside with a corsage ribbon, and decorate the front part as you wish, using beads, glass beads, beads, etc.
National costumes for a matinee

It is also not difficult to sew them, the main thing is to know what things each one consists of and how it is decorated. Yes, Russian folk costume for women includes:
- shirt;
- sundress;
- scarf or kokoshnik;
- bast shoes or boots.
If you want to quickly sew a sundress, then measure the line of the hips, add 10–30 cm, depending on the desired splendor of the product. Let's denote the resulting figure as P - this is the width of the product. Measure the length to the top of the chest to the middle of the ankle or to the heels. This will be the value of E.
Now fold the fabric in half so that the fold is on the left. From it to the right horizontally set aside? P, and down - vertically - E. Cut with a margin for the lower and upper gates, as well as for side seams.
Sew a wide braid onto this top of the sundress, at the same time attaching folds. Then tuck the bottom, hem it. It remains to sew the straps to size, and the sundress is ready.

Sew a shirt long, but shorter than a sundress. It is created from light linen and decorated with embroidery. The product is slightly flared from the armpits, the sleeves are straight, at the wrist they are intercepted by elastic bands.
In conclusion, it remains to tie a scarf or scarf, and Russian woman suit ready. But if you want to decorate your head in a different way, then read the next section of the article.
How to make a kokoshnik?
This idea will also come in handy if your daughter needs to represent a Russian folk costume or play the Snow Maiden at a holiday. In such an outfit, a woman can, for example, perform in a choir or shine at a theme party dedicated to national costumes.

On the pattern are the sizes of the children's and adult products.

As you can see, in order to make a kokoshnik from cardboard, you must first redraw its pattern on paper. The height of a child is 10.4 cm, and that of an adult is 13.3 cm, and their width, respectively, is 26 and 36 cm.
Please note that the width of half of the product is given on the pattern; when transferred to the fabric, this value will be twice as large.
Based on the measurements presented, draw one cutout of the dress, which will be located on the head, and on top - several small ones, they will decorate the top of the kokoshnik.
Now you need to prepare the materials, namely:
- guipure and crepe satin;
- non-woven interlining;
- textile;
- pearls, artificial flowers;
- bindweed braid (light green, dark green, gold);
- gum;
- satin ribbon (4 cm wide for children and 5 for adults).

According to the drawn pattern, cut out 3 parts: two from fabric with seam allowances, from cardboard - without allowance. Stitch the fabric with braid, decorate with pearls, flowers. Fold 3 blanks in this order: fabric wrong side down, cardboard, second, undecorated fabric, wrong side up.

Sew on the wrong side along the corrugated edge and on the sides, turn out. This is what you should get on the front, front side,

and here's what's on the back.

Here's how to make a kokoshnik from cardboard and fabric next. For the rim, cut out 2 pieces of fabric and one of interlining. The size is given for an adult kokoshnik. For a child, do according to the volume of the child's head, plus an allowance for a tie.

Attach these details on both sides of the bottom of the kokoshnik, putting interlining inside, chip off with needles, stitch from the inside. Turn right side out, iron.

Overlock the edge or fold the fabric inward here and sew.

It remains to sew the ties,

and the kokoshnik is ready. Create one with your own hands beautiful thing- pure pleasure!

If you want to sew not only a women's folk costume, but also a men's one, then you will be interested to see next video. It tells you how to make a blouse. It remains to tie it with a sash (belt), complement the attire with pants, boots, a cap, and the men's suit is ready.
You can learn more about how to decorate an oriental dance costume by reading the following visual aid:
Page content
Behind last years oriental dances have become very popular among female population Russia. Belly dancing helps not only to lose weight and form a beautiful figure, but also to learn how to move beautifully, keep your posture, feel yourself and your body - in general, they help to reveal your femininity. Of course, oriental dance can only be danced in a special costume. It is not always possible to find a wide range of outfits in stores, so the best option is to sew a suit oriental beauty with your own hands. Sewing a suit is quite simple, just sew a bodice and a skirt. The bodice can be remade from an old bra, and a light, flowing fabric, such as satin or chiffon, is suitable for a skirt.
If you have a daughter, then the oriental costume will become great option for a trip to a matinee or other costume party. Your child can do oriental dances - there is nothing better than sewing an oriental beauty costume for a girl with your own hands. This lesson should be approached with special trepidation and patience - the costume for the girl should be richly decorated and trimmed.
At the heart of any costume for oriental dances is at least two wardrobe items - a bodice and a skirt. A more interesting option would be a three-piece - bodice, skirt and harem pants. This master class will help you sew a very beautiful oriental costume with your own hands.
Let's start making the upper part of the costume - the bodice. You will need:
- bra of the desired color;
- dublerin;
- interlining;
- satin fabric to match the color of the bra;
- pieces of unnecessary fabric;
- iron;
- paper;
- pencil;
- PVA glue;
- needle and thread;
- sequins and beads for decoration.

We draw on paper patterns of future missing parts (straps).

We make a rigid basis for the straps - we apply the dublerin to the fabric and print it with the help of heat treatment with an iron.

We apply PVA glue and glue another layer of cotton fabric.

And another layer of non-woven fabric.

We transfer both patterns from paper to fabric.

Cut and sew blanks to the bra.

Sewing very carefully satin fabric, the edges are processed with a zigzag seam.

Here is such a bodice turned out. The only thing left is to decorate it to your liking.

As a decoration, you can use not only beads and sequins, but also embroidery with multi-colored threads. It all depends on your imagination and fantasy!

The next very important item, without which it is impossible to sew a costume for oriental dances with your own hands, is a fluffy sun skirt, beautifully fluttering during dance movements.

For a girl of average height of about 170 cm, for sewing, you will need to purchase a satin fabric of 3 meters of fabric with a width of 150 cm. The skirt is sewn according to the pattern attached below in just three seams.

For bloomers you will need about 2 meters of fabric 150 cm wide. It is recommended to take thin, light fabric such as chiffon.

The fabric is cut into two equal parts, which are folded in half. In the corner of the fold on both halves of the fabric, it is necessary to cut a semicircle as shown in the picture.

Then you need to attach both pieces of fabric close to each other with the wrong side out. The legs can be sewn at your discretion: either completely, or leaving flirty holes on the sides of the trousers, so that bare legs can be seen in the dance.

The pants won't hold up without the elastic - it should be about the size of your hips. It is also necessary to insert elastic bands of such a diameter into the lower parts of the trousers so that you can easily pass the foot through them. According to the proposed patterns, you can also sew an oriental costume for a girl with your own hands.

Of great importance in an oriental costume is a belt tied around the hips. Fringe, flowing beaded threads focus on the movements of the hips and belly of the dancing girl, emphasize the smoothness and grace of her body curves. So the final touch when making a costume for an oriental dance with your own hands will be exactly the belt.

First you need to prepare all the materials.

As a pattern and a sample of how the future belt will look like, you can use the following sketch, which you need to print in the actual size of the future product.

On the understudy we try on and figure out how the front and back side belts. After making sure that everything is fine, cut it out.

We apply the patterns to the interlining, cut along the contour and attach with pins. Then we apply cotton fabric to the resulting workpiece and fasten them together. Cut out.

Glue interlining onto the fabric with an iron. To make the belt more durable, it is recommended to lay the cotton fabric in two layers. All layers are sewn together with a zigzag seam, the edges also need to be processed.

We put aside the back of the future belt, now we only need front side. We put the workpiece on the wrong side of the satin fabric.

Carefully cut out with a small allowance, as shown in the photo.

We cut the fabric, as in the picture. We wrap and pin with pins to the workpiece. We process the edges on a sewing machine with a zigzag seam of about 0.5 cm.

This is what the future decoration looks like from the front side.

We pick up the deferred back part, we begin to work on it. Carefully make tucks, as shown in the picture.

Sew the edges of the undercuts with a zigzag stitch.

We put the workpiece on the wrong side of the satin fabric.

We wrap the edges in right places making cuts. We pin with pins, and then we sew by analogy.

This is what the front of the belt looks like.

Finally, you can move on to decorating the product. Embroidery with beads, stringing sequins and rhinestones is the longest and most painstaking work that will require perseverance and high concentration of attention from you. But in the end you get original costume for an oriental dance with your own hands, there is no other like it in the whole world!


Another simple version of an oriental costume for a girl with your own hands, which can be sewn according to patterns.


Traditionally, an oriental dance costume consists of long skirt or loose trousers with a belt and an embroidered bodice. To make it, you will need a light fabric such as organza, a dense fabric for the belt and a ready-made bra. You can decorate the costume depending on your own preferences and imagination. Beads, sequins, coins with drilled holes, beads of various sizes and textures, thin chains and much more can be used.
Making a skirt
As already mentioned, the suit may include loose trousers, but it is easier to sew a skirt. There are several traditional models of belly dance skirts, the simplest of which is the sun skirt. Made of light translucent fabric, it will drape beautifully and will not restrict movements during the dance.
It is better to make an ankle-length skirt. A floor-length skirt will interfere with dance moves, given that belly dancing is usually performed barefoot or in soft shoes without heels. A shorter skirt, of course, also has the right to exist, but it will not look so impressive.
Having cut out a sun skirt, it is enough to process the bottom edge and fasten the top. It’s not scary that it seems not too aesthetic - after all, the main decoration of the skirt is wide belt which is worn separately.
Belt making
The belt is made of dense fabric - it must keep its shape. You can cut it out, and sheathe the top with shiny brocade, satin or other elegant opaque cloth. When making a belt, it must be borne in mind that it will be attached to the hips, and not to the waist. The belt should be quite wide (about 2 palms wide), it can be given any shape: from the simplest to the pretentious, asymmetric, with beautiful curves.
The belt must be securely fastened to the hips, so it is necessary to provide a good clasp. The easiest way is to take a Velcro tape, so it will be easy to adjust the fit of the belt to the body.
You can decorate the finished belt with sequins, beadwork, in any other way. The main thing is that the belt is bright and elegant. Remember that he is one of the central details that will attract attention during the dance. Various pendants look very impressive on the belt. It is even better if they make a slight ringing, so it is good to use coins, chains, threads with beads or beads strung on them for pendants. The length of the pendants can be chosen at your own discretion, but such jewelry with a length of 15 cm or more looks the most advantageous.
Making a bodice
A ready-made bra as the basis for the top of the suit will save you the trouble of putting it on. It will sit tight and emphasize your dignity. It is better to take a model from a dense (can be satin) material, without lace and other decorations that give out underwear in this detail. As an option, it is good to use sports underwear: it is quite dense, fits well and does not interfere with movement. If you manage to match the bra to match the skirt, you can decorate it less intensively, but if the color is significantly different, you will have to close it tightly with beaded embroidery or sequins so that the base fabric is not visible.
It is also fashionable to decorate the top of the suit with pendants, similar to pendants on a skirt, along the bottom of the bra - this will add charm to the suit. Pendants can be both very short and reaching the waist.
Additional accessories
To complete the costume, you can complement it with ankle and hand bracelets, light sleeves made of the same fabric as the skirt, jewelry or a light head scarf.
Sources:
- Russian folk costume
Oriental dance costume has great importance.
It is he who turns you into a Shamakhan queen and takes you to oriental tale. It is easy to make it yourself from the materials at hand.
You will need
- Fabric (light and sheer, such as chiffon, crepe chiffon, satin)
- Bra
- Beads
- Sewing machine
- Threads
- Scissors
Instruction
The costume consists of several parts: top (bustier), bottom (skirt or harem pants), and belt (sometimes a scarf or shawl). The most difficult thing in sewing is to embroider the top of the costume with beads. For this step, we need a bra (necessarily with a hard cup), a needle with a strong waxed thread and beads of different colors. We begin to embroider with beads from the center of the cup in a spiral, we decorate the straps last, completing the work.
To complete the image of an oriental beauty, tie a scarf with tassels on your belt, or make a stiff belt embroidered with beads and coins.
Related videos
Helpful advice
For a complete entourage in oriental costume, use various accessories and decorations. Don't forget to complete the look with stylized makeup and hair.
Sources:
- What fabrics for tailoring an oriental costume are the most popular
You have long liked oriental dances, but you have not yet joined the group because there is no A? No problem! Even if, having gone around all the shops, you could not find what you need, do not be discouraged. Let's try to sew a costume, it's not very difficult! An oriental costume is a bright outfit, decorated with lots of shiny sequins. Even before the start of the dance, it is the costume that represents the dancer, and during the dance it emphasizes the work of the hips and the plasticity of movements, therefore, it must be perfect.

You will need
- Fabric silk, stretch satin or thick chiffon, beads, sequins, fringe, beads, pattern, thread, sewing machine.
Instruction
So let's start with the figure. Our goal is to emphasize the advantages and hide the flaws, so someone is more suitable, and someone - a skirt. By the way, plus skirts are her various ones, whoever likes and fits. But bloomers can only diversify decorative trim.

So, let's start with the skirt, it can be petal or "" (the cut resembles a year). Petal, stitched, will look easy and will emphasize all the movements in the dance. The number of petals and their shape is your imagination, it can be a regular rectangle or wedges.

To make a fish skirt, it is better to choose a fabric that will stretch a little, but return its shape well, for example, stretch satin. As a standard, such a skirt consists of six wedges, which are sewn together from the hip to, and additional wedges in the form of a semicircle are sewn into the resulting cuts.

The bodice and belt are best done in one. The belt is a kind of "corset" that will give amplitude to movements. Usually it is sewn in the form of a regular rectangle, but there may be completely different variations. The bodice can be both closed and not very. The easiest way is to sheathe the usual one with the same fabric from which the belt is made, embroider it with sequins, sequins and beads. Along the edge of the bodice, you can put fringe trim, make all kinds of beaded pendants.

Related videos
note
Additional details and accessories for the costume can give more charm and make the stage image brighter. And what pride will sound in your voice when you answer the question “where can I buy such a charm”: “Nowhere, it’s me myself ...”!
Helpful advice
By choosing the right elements of the costume, you can:
-Easy to increase the chest by 1-2 sizes with the help of stuffing;
- emphasize the waist with an angular hinge on the bodice or with a regular tassel between the cups;
- cover the folds or stretch marks on the stomach with a longer hinge;
- to make the hips wider with the help of more fluffy ruffles of the skirt.
Smoothness, softness, grace, femininity, sexuality of movements - all this is a dance belly. Today this dance direction is very popular among girls. Women can do it different ages and different builds. And a beautiful, well-tailored costume can make the dance even more expressive and spectacular. There are many options for costumes: harem pants, dresses, skirts. Moreover, each of these elements can be sewn in different ways.

You will need
- Fabric, scissors, chalk or remnant, centimeter tape, paper, pins, thread
Instruction
Half-sun skirts are very popular. They are suitable for almost any figure. And they can be modeled at your discretion. You can complete, or you can have the front part in the form of a half or a quarter, and the back in the form of one sun. It all depends on how much material you are willing to spend on skirt. In order to make a pattern, you need to know the waist circumference and the length of the product. Make the length so that later the skirt does not interfere with your dancing, and you do not get tangled in it. To build a pattern, you must first calculate the radius of the waist (R1) and the radius of the bottom of the skirt (R2). The radius R1 is calculated according to the following formula: divide the waist circumference in half and by the number "pi". And R2 is equal to the sum of the length of the skirt and R1.
Make on . Build a right angle, attach a centimeter tape to it and, holding it, draw an arc with a radius equal to R1. Then in the same way draw a line equal to the length of R2. The difference between R1 and R2 must be equal to the length of the product. Cut out the pattern and transfer it to the fabric. In order to have fewer seams in the future, try to place one side of the paper on the fold of the fabric. And so that it does not slip, secure it with pins. Circle with chalk or a piece of remnant. At the same time, do not forget to add a few centimeters to the top edge of the skirt so that you can then put in an elastic band, as well as a couple of centimeters for the hem and 1.5 cm for seam allowances.
grind side seams, process them and iron them. Fold the top edge of the skirt 2-3 centimeters and stitch it. Insert an elastic band into the belt. Hem the bottom of the skirt. Let her hang out for a few days. The skirt is ready.
If you want your skirt to have side slits, then you will need to make two patterns: one for the back, and the second for the front. For the back, you can take three quarters of the sun, and for the front, half or even one quarter. There is no need to stitch these parts together. Just work the sides of each piece, and thread the elastic through the top edges. If you are embarrassed by large cuts, then you can sew them together from above by 10 centimeters. But this is not necessary, since there will still be a belt on top anyway, and it will cover those places that you would not want to expose.
note
Costumes for belly dancing are best sewn from light, flowing fabrics. That's why in the best way fit chiffon, silk, crepe-chiffon, crepe and others. If the fabric is too transparent, then you can fold it in several layers. Colors are better to choose saturated and bright. You can combine several colors, it will give the costume special flavor. And here pale colors do not look very good, so it is better not to use them unless it is intended by the setting and the meaning of the dance.
Sources:
- Variations on the Theme "Sun"
Oriental dancing is a very popular fitness option. Girls come to dance to improve their figure and learn how to move beautifully. Of course, you can dance in the simplest suit. But for demonstration performances, you need a special outfit that will help create the necessary atmosphere and emphasize the beauty of the dance.

Instruction
Decide how much money you can spend on yours. If you do not have the opportunity to purchase expensive brocade, taffeta or silk, do not be discouraged. For the manufacture of stage attire, synthetic imitations of these fabrics are perfect. Additional decorations will help to give them the necessary chic - rhinestones, sequins, glass beads, beads, fringe and more.
Choice decorative elements and their location does not depend on the nature of the dance. The glitter and chime of the jewelry should draw attention to certain parts of the body. For example, bellydance performers should emphasize their bare belly and hip line. For this Bottom part the bodice is sheathed with a long fringe, and a scarf embroidered with sequins and coins is tied around the hips.
If it involves jumping, sudden movements and swinging legs, you need spectacular skirt and decorations on . Smooth curves of the upper torso should focus on the arms and neckline with numerous necklaces, long ones and bracelets.
When decorating a suit, estimate its weight. Think about how comfortable it will be to move in it. Perhaps it is worth replacing some of the glass ones with plastic ones, and instead of embroidering with a cord and appliqués, decorate the fabric with their imitation. The metallic paint applied with a thin brush looks like real gold embroidery from afar.
Combine stylized store-bought jewelry and homemade jewelry. For example, very spectacular hand and foot jewelry-wristlets can be made from embroidered fabric. These wristbands are fastened with Velcro, buttons or hooks. For man-made flexible bracelets, wire, twine bundles are used. Hair hoops are also made using this technology.
If you are not too experienced in making decor, do not be discouraged. Minor flaws will not be noticed by the public - much more important is how securely you attach the jewelry. To sew on details, use a strong synthetic thread, and collect beads and fringe from beads on a thin fishing line so as not to accidentally tear them in the dance.
When looking for suitable beads, rhinestones and fringes, contact not only specialized stores selling goods for. Look for an interesting butt in the sewing departments. Original brushes and fringe can be found in interior salons. And in accessories stores for florists and salons they sell original beads, garlands and metallic cords for embroidery.
Related videos
Among the obligatory set of hippie things, there are always original belts. Such a belt can be made from old jeans.

Instruction
First you need to draw a pattern of our belt on paper. We draw a rectangle with a length approximately equal to the circumference of your waist and a width of about 12 cm. We evenly narrow the ends of the rectangle on both sides to about 4 cm. Transfer to denim and cut out.

Cut out a long strip of colored fabric, fold in half and iron. We take it to the denim blank. You don't need to bend it. Thus, the fringe will make the image more extravagant.

Next, we cut out the ties for the belt from the same colored fabric. Sew with the front side inward, turn inside out, iron and tack to the belt. The ties should be long enough to tie a bow later.

Now we need to sew everything on a sewing machine. Use colored thread and decorative stitches to accentuate the hippie look. Our belt is ready!

Helpful advice
Depending on your taste and imagination, you can replace the multi-colored fabric with lace or thin skin while creating your unique image.
Sources:
- Dana's fashion blog
Homemade cheese is not difficult to make, and although it consumes a lot of milk, the result always pleases lovers. However, to make hard cheese at home, you will have to get a press, otherwise you will not be able to remove excess liquid.

You will need
- press;
- cheese mold;
- large clay pot;
- colander;
- long knife;
- 8 bricks;
- 2 large pieces of gauze;
- 2 cups fresh milk (for sourdough)
- 4.5 liters of cow's milk;
- 4 tbsp butter;
- 3/4 tsp baking soda;
- 2/3 cup sour cream;
- 1/4 tsp salt.
Instruction
Add the starter to 4.5 liters of warm milk, cover the container with a lid and leave in a warm place for 12 hours.
Place the container with the curdled in a large, filled warm water. Put them on a small fire, use a thermometer to monitor the heating of the water: you should heat the water to 38 ° C for 30-40 minutes and maintain this temperature until the mass reaches a sufficient density.
Determine when the mass can be cut with a knife, and cut with a long knife 3 by 3 cm, straight, then mix them with a long spoon, trying not to crush and prevent the cubes from sticking together. Check the pieces for tightness: squeeze gently with your fingers and release. If the piece easily breaks into pieces, does not stick to your hands, then you can finish heating (usually heating lasts from 40 to 60 minutes).
Drain the whey through a colander, line the mold with gauze cheese a (any container in the bottom), place the curd mass there. Tie the ends of the gauze on top, put the mold under the press. Place 4 bricks on the top board of the press, then add one brick every ten minutes, allowing it to drip freely. In conclusion, leave the mass under a load of 8 bricks for an hour.
Remove the mass from the mold, add butter and baking soda, chop with a knife into small crumbs to mix well with butter. Place in a clay pot, firmly pressing the mass to the bottom, leave in a warm place for 2.5 hours.
Add sour cream and salt to the mass, mix. Transfer to a warming dish (smaller container with cheese ohm in a larger one filled with warm water). Put on a slow fire, stir until the sour cream is completely combined with the mass. Then pour the mixture into a greased pot and refrigerate. withstand cheese within 2-3 months.
Related videos
Related article
Sources:
- Technology for making cheese at home
- make cheese at home
Alcoholism is a terrible disease, not a habit or promiscuity. Drinking is not easy alcohol intoxication, and long-term poisoning of the body with ethanol, which turns into a toxic substance acetaldehyde. Taking a dose of alcohol stabilizes well-being a little, but leads to even more grave consequences. Poison in the body accumulates more and more. The human body, working at its limit, cannot cope with it. The withdrawal procedure is aimed at cleansing the body of the decay products of alcohol.

You will need
- - water or tea with lemon;
- - rosehip broth, compote;
- - sour-milk drinks;
- - Activated carbon;
- - Corvalol, Valoserdin, Valocordin;
- - aspirin or "No-shpa".
Instruction
Reduce the dose of alcohol consumption to a minimum, especially if it was very long, not the first and the patient feels very bad. Many experts believe that a sharp cessation of alcohol in the bloodstream can provoke heart or epileptic seizures, as well as the so-called delirium tremens. If a person is very ill, it is better to give him 100 ml of alcohol on the first day, but not on subsequent days, otherwise a gradual exit from one binge can smoothly move into a new one.

Give the patient as much fluid as possible to help flush accumulated toxins from the body - this is one of the basic rules for self-detoxification. Suitable for simple or mineral water With lemon juice, tea, weak rosehip broth, unsweetened fruit drink or compote. Since acids neutralize the poison, sour-milk drinks are suitable: low-fat kefir or whey. Better cold. Remember, the more liquid the patient consumes, the better, especially if it begins to be excreted naturally. Thus, a person will be able to avoid dehydration, which often accompanies the exit from hard drinking.

To make the body faster, make the patient drink 500 ml of water room temperature with a tablet of "Furacilin" dissolved in it or a little salted water - this way it is easier to cause the vomiting necessary in this situation. Then give activated charcoal at the rate of 1 tablet per 10 kg of weight. This should be done 1 time, since frequent cleaning with sorbents removes not only toxins from the body, but also useful material, which are not many in the body after drinking.

Such drugs as Corvalol, Valoserdin, Valocordin will help stabilize the condition. Dissolve 20 drops in a small amount cold water and let the patient drink in one gulp. Motherwort tincture will have the same effect - 1 teaspoon per 100 ml of water. They contain a very small amount of alcohol, so that it will become easier for the patient to endure intoxication of the body. But stop your choice on only one remedy, otherwise you can do even more harm.
If possible, lay the patient on his side to sleep, for sleep is the best remedy in such cases. All organs during the period of binge worked at the limit of their capabilities, nervous system was overexcited, to improve the condition you need to rest a lot. In no case do not leave a person alone, especially if he is in a state of intoxication.

In between appointments medicines help the patient to accept warm shower or a bath with salt, coniferous extracts, if it is in a state that allows. The water should not be hot or cold. A contrast shower after a long binge can generally be harmful, since vascular tone is disturbed with constant alcohol consumption, as well as the work of the heart sometimes.
When the condition stabilizes a little, dissolve a tablet (maybe two) of effervescent aspirin in a glass of water. Give the patient twice a day for several days in a row. It will take off headache and body aches. Together with acetylsalicylic acid, "No-shpa" is also suitable. In addition, vitamin C, glucose, B vitamins, nicotinic acid will be useful, but it would be better if the doctor determines the dosage.

Let's drink the pickle sauerkraut, cucumber pickle. A day later, you can offer the patient a little low-fat chicken broth with crackers, cabbage soup from sauerkraut - such food is easier to accept by the body and will help stabilize digestive system. Start with small portions, as a heavy meal can provoke a new bout of vomiting, especially if a person has not eaten anything for a long time during the binge. It would be more correct to start with a few spoons of broth 5-6 times a day.
Remember about psychological support. Do not lecture while the person is trying to get out of the binge on their own, try not to raise your voice, do not argue, as the patient cannot adequately assess the situation and perceive any, especially moralizing information. Remember that he is trying to cope with fever, aches and pain throughout his body and is emotionally unstable, so he needs support and simple participation more than ever. Postpone the "debriefing" for later, if possible, distracting him with cheerful conversations, watching TV together, etc. Otherwise, the patient may start drinking again.
Spend more time on fresh air. A walk on the street will help to quickly restore the overall metabolism, and active work and muscles will remove the poison from the body. But strong physical exertion during this period is strict, since the heart worked at its limit for a long time. If you don’t have the strength to walk, just sit outside or at least on the balcony. If you follow the bulk of these recommendations, the toxins will leave the body, and all its functions will be restored.

Contact an ambulance if you notice a heart or epileptic attack in a patient, sudden changes in blood pressure, incoherent speech in the absence of alcohol in the blood during the day. The same should be done when a person complains of severe abdominal pain, which may indicate ulcers or pancreatitis.
Our face experiences a lot of stress every day: strong wind, rain, snow, frost, consequences of bad ecology, etc. As a result, the skin often looks tired and not young. give face fresh look procedures are very helpful beauty salons. However, doing this is quite expensive, and not always there is time for them.

You will need
- - 2 tbsp. l. hot milk;
- - 1 potato;
- - eggs;
- - hercules;
- - cottage cheese;
- - 2 tsp honey;
- - 0.5 cups of curdled milk;
- - 1 tsp leafy green tea;
- - sour cream;
- - 1 tbsp. l. rice work;
- - 1 tbsp. l. buckwheat.
Instruction
One of folk recipes beauty is a mask made from potatoes. Boil the root crop in the peel, peel and mash. Add to the bowl 2 tbsp. l. hot milk and one egg yolk. Apply the resulting mass in a warm form on face and neck, cover with a towel and leave for 20 minutes. After the time has elapsed, the product is washed off first with warm, and then cold water. Apply 2-3 times a week or as needed.
Refreshes the skin and sour milk mask. To prepare it, grind 2 tsp. hercules in a coffee grinder and mix them with 1 tsp. cottage cheese, honey and half a glass of yogurt. The mixture is applied in a thick layer and aged for 15 minutes. Then it is removed with cold water.
No less effective is the tea mask. At the same time, 1 tsp. leaf green tea is mixed with 75 g of mayonnaise. Mass is applied to face and neck for a third of an hour, washed off with warm water, and then treated with a moisturizing alcohol-free tonic.
Everyone likes oriental dances - both those who dance and those who look at them. The dancer's costume makes a special impression: colorful, charming, it arouses admiration from the audience and the desire to put on it as soon as possible from its happy owner.
Good news for those who want to make such an outfit with their own hands - this is not at all difficult to do. In addition, the process of choosing all kinds of jewelry will bring additional pleasure. Such a mysterious oriental costume captivates and amazes with its beauty. It's not hard to make your own! Let's do it today.
For work you will need:
The fabric directly from which the costume will be made;
- lining material;
- interlining;
- cotton fabric;
- a suitable bra;
- tracing paper or transparent polyethylene (for patterns);
- pins with comfortable heads;
- threads of the corresponding color;
- beads or beads, sequins.

It is more convenient to start work with tailoring the bodice. As a basis, you can take the cups of any bra that has the desired shape and size.
1.
Through the center of the cup you need to draw two intersecting lines: horizontal and vertical. Then attach tracing paper or polyethylene to the cup and pin with pins along a horizontal line. Wrap the cup with polyethylene in such a way that "grooves" form along the vertical lines, pin along the edge of the cup with pins. All lines: contour, horizontal, vertical (on two parts of the grooves), apply with a felt-tip pen to polyethylene.
2.
Remove the polyethylene and transfer the pattern to paper: cut along the contour, cut along the center line, close the grooves. Transfer the resulting paper pattern from two parts to the fabric.
3.
Cut out pieces of fabric and sew along the center line.
4.
Attach the workpiece with the wrong side to the convex surface of the cup. Bend the edges to the wrong side, capturing the cup. All together baste and stitch.
5.
You can sew two cups together in different ways:
- connect with a ring;
- use several narrow strips;
- or one wide strip of dense fabric.

6.
You can also show imagination about the design of the side part: use lacing, elastic bands. Now, the most interesting thing is the decoration of the bodice. Embroider side straps, cups with knots or scatterings of beads, beads, sequins and other shiny decorative elements.

Belt of oriental costume
The belt consists of two parts: front and back.
1.
Make patterns of both parts on paper (respectively measured standards). Cut out the details of the belt from the lining fabric. Then pin the resulting elements with pins to the interlining and cut out. Pin the resulting two-layer parts to the cotton fabric, removing the pins on the two layers. Sew all together with a seam: "zigzag" in the center and along the edges.
2.
Front end. From the main fabric, cut out a piece with an indent along the edge of 2 cm in relation to the lining blank. Turn the edges over to the wrong side and stitch in a zigzag pattern, forming a beautiful figure in the center of the belt.
3.
Rear end. Make grooves on the back of the belt, close them, stitch the grooves. Run a zigzag stitch along the edge. You should get a piece of a convex shape.
4.
As for the front, cut out an element from the main fabric with a margin around the edges. Wrap the edges and sew, forming a neat figure in the middle of the line.
5.
Belt decoration. From the inside, sew on a fringe of beads (ready-made, or made by yourself).

Finishing touch
You need to sew on a skirt. It can be formed from specially cut pieces of cloth or scarves.


