What a fun way to decorate Easter eggs. Decoration with dried flowers or branches of living plants. Gold leaf foiling
The tradition of decorating eggs for Easter with your own hands dates back to ancient times. The culture of Easter eggs is widely known, when they depicted various signs and symbols that brought happiness and relieved evil forces. Currently, there are many materials and options for decorating the Easter symbol. These are paints, lace, natural ingredients and even paper.
Decorating eggs and pysanka culture
Why did the ancients choose the egg as a symbol of Easter? This is due to the fact that in those days people considered it a miracle that a living creature hatched from them. It seems to contain the whole world.
Easter eggs were prepared in advance for some holidays, but mostly they were given as gifts during Easter. Both natural eggs and a dummy made of wood, plaster, etc. could be used as a basis for it. They applied to the pysanka special signs, which helped protect family and home from exposure negative energy. In most cases, these are dots, dashes, circles, and floral patterns.
Usually pysanky were kept in the red corner next to the icons. Gradually the protein in them dried out, and then they were replaced with new ones after Easter. The old eggs were not thrown away, but buried near the house in a place where people do not walk. Naturally, pysanka was a decorative gift and was not eaten. They ate dyed eggs - ordinary colored eggs with simple decoration.
Currently, there is a wide variety of materials for decoration. Eggs are decorated with lace fabrics, paints, paper, natural ingredients(grains, grass, decoction onion peel and so on.).
Easter symbol It was customary to prepare for the holiday with the whole family, everyone contributed to the preparation for this bright religious holiday.
Ideas for decorating eggs for Easter
Exists a large number of options for decorating eggs for Easter. Everyone can decorate the Easter symbol as they like. Here are the most popular options for creating paints. It is not necessary to follow them exactly; everyone can create something of their own.

A simple decoration option. All you have to do is buy beautiful stickers and apply them to pre-boiled eggs. You can also use a colored felt-tip pen or marker to make the sticker drawings look more interesting. It is better to use white blanks, since the stickers on them look more interesting. IN in this case, the egg displays marine motifs.

In this version of making eggs, they turn out to be a little New Year's. To prevent them from deteriorating over time, it is necessary to remove the “filling” from them - the white and the yolk. Then, as shown in the picture, coat them with glue and roll them in glitter. They can be the most different shades, whichever ones you like. Can be used not only chicken eggs, but also goose and quail. In an Easter basket, a variety of egg shapes and colors will look unusual.

Nice option decorating with paint and paper. The eggs need to be boiled in advance, then painted with matte paint that will have good adhesion to glue and paper. You can cut out the flowers yourself, or you can purchase ready-made ones from a scrapbooking store. After painting, the blanks must dry, only then you need to glue paper decorations onto them, so as not to look sloppy, try to maintain an equal distance between the flowers.


Even Small child. To do this, we need multi-colored sugar sprinkles for Easter cakes and pies, and paste. Coat pre-boiled eggs with paste and roll thoroughly in sprinkles. Then let them dry a little. You can use a variety of sprinkles. It comes not only in the form of small peas, but also in the form of stars, rings, etc. This way the craft will turn out to be more interesting and non-standard.

These beautiful Easter eggs are made using the decoupage method. To make them we will need paste, a brush and special napkins for decoupage. They differ from ordinary ones in that they have a softer texture and are distributed more evenly over the workpiece. You need to prepare a paste from corn starch, then apply it to the egg, and carefully stick the napkin with a brush. Then you need to apply varnish on top to fix the pattern and let the craft dry, for this it is necessary that they be in vertical position.

An excellent option for decorating with decorative multi-colored ribbons. They must be wrapped tightly around the egg and secured at the top with thread or glue. The bow on top can be decorated with beads, multi-colored stones or sparkles. Stands are purchased at specialized art stores.

This is a fairly simple option. We will need food coloring, paints and colored stickers. First, you need to boil the eggs, then dip them while still warm in pre-diluted food coloring, and then apply paint or stickers to your liking.

A beautiful, but labor-intensive option for creating paint. Decorated Easter eggs look very festive in their lace bags. To create such a decor, you need time and special patterns for knitting lace. Often such Easter eggs are presented to family and friends. Such eggs can also be seen at exhibitions.

Another option for creating a lace egg bag along with a knitting pattern. You can choose any one you like, and also make your own rationalization changes to existing schemes.

Non-standard decoration option. It is somewhat reminiscent of decorating using decoupage. It is necessary to cut the pages of old magazines into thin strips, then boil the paste, apply it to the egg, and glue these strips using a brush or soft cloth. After the blanks have dried, they can be decorated lace ribbons, decorative pendants, etc. In order for the Easter symbol to be varied, with this decoration option, use clippings from different magazines, maybe even foreign ones. Use only the font, do not touch the pictures.

An interesting way to decorate eggs. Here you can show all your imagination. For this, colors and the desire to create are enough. You can put a floral ornament on the shell, you can depict animals and birds on them, houses - whatever your heart desires. In order for the design to last longer, you can cover the workpiece with a layer of varnish on top.

Here, you first need to dip the eggs in food coloring, dry them, and then glue paper tape with a flower onto the shell. You can purchase it at any scrapbooking store or make it yourself. Hand-made, such flowers will look even more interesting.

Each egg can be used to make an individual gift. To do this, it is wrapped in multi-colored fabric or paper and tied with a ribbon on top. You can improvise and put something else in the package besides the egg, such as candy or soft toy.

Easter eggs painted not only with a brush, but also with a toothpick. Interesting flowers and patterns come out. You can mix paints using plastic plate as a palette. After applying the pattern, the egg should dry on a stand, it can be anything, for example, cardboard sleeve.

Another interesting option. For these purposes, you can use not only ribbons and woven flowers, but also rhinestones and beads. These eggs look very festive and original. However, you should not use too many accessories, otherwise they will look sloppy.

Modern version decoration. It is somewhat labor intensive, but the eggs come out beautiful and shiny. They can even be called a little glamorous. This decor option will allow you to diversify Easter basket. The most common rhinestones are used. They are lubricated with special glue and left to dry for some time. The shell can be decorated either half or entirely. It cannot be eaten in the future, since toxic substances from the glue penetrate through the shell into the white and yolk.

A simple way to decorate eggs for Easter. It is enough to boil them and “dress” them in lace. You can try different combinations. It can be brown with white lace or white with black lace. You can paint the shell in some way interesting color. You can buy a wide variety of lace at any sewing store. You can also tie it yourself, but it will be more labor intensive.

The original way. It is rare because it is very labor intensive. This technique called quilling. Thin strips of paper are twisted into some patterns and then glued on top of the shell. You can lay out any interesting ornament you like. However, you will have to work hard. It is better to use paste to glue curled paper.

Fun option decorations. It’s good to paint testicles with your child, it will be even more interesting. You can come up with any face or any cartoon character and apply it to the egg. For this coloring, markers or felt-tip pens are used. The testicles, if desired, are stained before painting. You can also create a design simply by wrapping the egg with threads, strips of paper, or applying a specific pattern.

Egg decoration option natural ingredients It looks very unusual, even somewhat oriental. For these purposes, you can use the grains of a wide variety of plants - rice, beans, peas, sesame, millet, seeds, etc. Most importantly, this method of decoration is one of the least harmful and interesting. If in stock limited quantity options for cereals, then you can get out of the situation by coloring them. For these purposes, you can use food coloring.

You can also use eggs to create various characters from your favorite cartoons. It is enough to cut out interesting figures from paper and stick them on the shell, as shown in the figure.
Where did the tradition of decorating eggs for Easter with your own hands come from, and why are they used? The egg itself symbolizes the origin of life; many esotericists associate the creation of the world with it. The ancients believed that the emergence of a living creature from a “non-living” egg was a miracle. Since it carries life, in order to add symbolism, it was decorated in every possible way, turning into paint. Over time, decoration options become more and more interesting and original, which is associated with the emergence of various new techniques.
Decorating Easter eggs using decoupage technique.
Eggs must be hard-boiled (10-12 minutes) and cooled completely. For decorating eggs paper napkins should be used primarily with a beautiful, not very large pattern. It is advisable to take smooth napkins, three or two layers. You will also need a brush for painting and fresh egg white. Before separating the white from the yolk, the egg must be washed well with soap and wiped with a napkin.
The whites must be beaten thoroughly with a fork. Egg white- This is the simplest "glue" you can use. You can also make a paste from starch and water (heat 50 ml of water and 1 tablespoon of starch to a thick, almost transparent mass), and you can also use gelatin glue (pour 0.5 teaspoon of gelatin into 100 ml. cold water, after 30 minutes bring almost to a boil and cool to room temperature). All three methods are environmentally friendly and safe.

Separate the bottom white layer of the napkin from the colored one. There are napkins where you can easily separate 2 white layers, and there are napkins where the colored layer adheres very tightly to the white layer. On initial stage You need to separate the part that comes off easily.

For further convenience of decoupaging eggs, it is convenient not to cut out fragments of the drawings, but to tear them out with your hands, then when gluing, fewer wrinkles will form.

When you tear out the design, you will see if your napkin has another white layer. If you are decorating eggs with white shells, this white layer of the napkin must be removed; if your eggs are not white, then it is better to leave the bottom white layer of the napkin so that the design on the egg is clearer.

In this simple way we prepare drawings for decoupage eggs. Fragments should be pulled out both larger, on the sides of the egg, and smaller, on the top and bottom of the egg.

To glue a pattern to an egg, you first need to grease the desired area of the egg with egg white, attach a dry piece of napkin with the pattern to it, and then use a brush to cover the top of the pattern with white. This should be done from the center of the picture to the edge.

First, it is better to glue small drawings to the top and bottom of the egg, and then glue the fragments bigger size on the sides of the egg. The drawings should be glued slightly overlapping so that there is no empty seats(especially if the egg is not white). For decoupage, it is advisable to use an egg stand (for me, a yogurt lid successfully plays its role).

For completely dry Place the covered egg on the grill. After 30 minutes the eggs will be dry.

The decoupage technique will help you not only make beautiful eggs, and also have fun with the children, because this is an exciting creative process.
 An express method for decorating Easter eggs with napkins.
But if you suddenly have no time left to decorate Easter eggs, napkins come to the rescue again. To decorate boiled eggs, you just need to wrap them in colored, or even white, napkins like in knots and tie these knots with colored ribbons, ribbons, serpentine, New Year's rain or just colored threads. Decorative Easter eggs are ready!
Well, here I am with you again, hello! Recently, you and I learned how to make and decorated them ourselves right at home. What are they for? Well, of course, for the smallest symbol of a magnificent holiday. Have you guessed it? It's Easter!
And of course we will talk about how to make something fragile and at the same time beautiful. original egg and put it in a souvenir package to give it to someone who is dear to your heart.
How do you like this idea? I think that you will be happy if you put together a cool souvenir from what you have on hand, because it’s so nice to give gifts and presents to your relatives and friends. Let's not waste time, let's start creating great toys.
What do you think can be used to make an egg for Easter crafts? Write your assumptions and ideas at the bottom of the article, share new ideas with me and other subscribers, if it’s not difficult for you.
Don’t forget that you can not only build an egg yourself, but also take an ordinary chicken egg and cool it
DIY Easter eggs for kindergarten and school
Well, let's start with the simplest and most uncomplicated products, because preschoolers and children school age, especially if it Primary School too much difficult jobs to nothing. They simply cannot cope with them and will be disappointed.
As a basis, you can take this beautiful masterpiece, which is made of cardboard and colored paper.
As always, plasticine will fit perfectly here, which can be decorated using quilling patterns. We'll talk about this technique in more detail below.

You can also sew an egg from fabric yourself.
Also, for variety, first cut out a shape from cardboard, and then, by smoothing it over the surface, lay it out and decorate it with any patterns.

Ball plasticine is now available for sale, you may have already heard about this one. So I propose to make such a craft from it, take the usual one as a basis eggshells. In this matter, you need the help of adults, so that the white and yolk come out, pierce the egg with a stick.

You can hide a note even with a message. Well, that's it, between the lines.

Well, now I actually decorated the egg with such a miracle.


In fact, you can simply decorate an egg beautifully using all sorts of decorative things, such as stickers, for example. Everyone without exception likes this kind of work.

You can use thermal stickers, but this should only be done at home and only with adults, so as not to get burned.

Schoolchildren high school you can build something more complicated, for example, such a composition for an exhibition.


For this, use cardboard, scrap paper and all kinds of decors, such as openwork ribbons.


Or even in this scrapbooking technique.

Or this one made from threads and coffee beans:
And if there is something simpler and at the same time unusual, then you should like this idea. Take colored plain napkins and cut them into small rectangles, and then you have to crumple each shape in your hands.

Cut out a chicken from paper and tie a ribbon or thread around its neck and tie a bow.

Now all that remains is to connect all the parts, glue them with glue.


It will turn out fun and beautiful!

You can create a whole composition.


Can be used big kinder egg, just cover it with paper napkins, or rather pieces, as if it were decoupage. You will need good glue - PVA.

Children will be happy to make such a souvenir.

It turned out great!

Do you need a glamorous idea for this craft? Then I am happy to offer you this option. I think you see something similar in stores, the other day I came across such a beauty in a fixed price.

How to make an egg from threads and a ball for Easter 2019?
It's very simple and easy. I think everyone has seen such a toy at least once, and maybe even made it themselves. If you want to learn this art, then read this master class.
We will need:
- foam egg
- threads
- tassel
- cling film
- liquid glass

Stages of work:
1. Prepare all materials for work, and then take the workpiece and wrap it in plastic wrap.
Important! If this is not done, the threads will stick to the foam form.
Stick the needles in this way.

2. Then start creating patterns by interweaving the threads in a random pattern. Notice that another row of needles has appeared.

3. After you have finished the work, first lubricate the threads with glue, and then go over it with liquid glass.

4. Let it dry well, and then remove the first piece - half.

5. Now build the second part in the same way; you can arrange the needles differently, depending on what you want the result to be.

Then you have to glue the two halves together or you can use adhesive tape.

Models can be completely different.

In this scheme it is used instead foam ball- balloon. Then it is simply pierced with a needle. Here you don’t need to use liquid glass; use glue.

Remember, last time we did this))).

If you inflate a small one balloon, then you can get this.

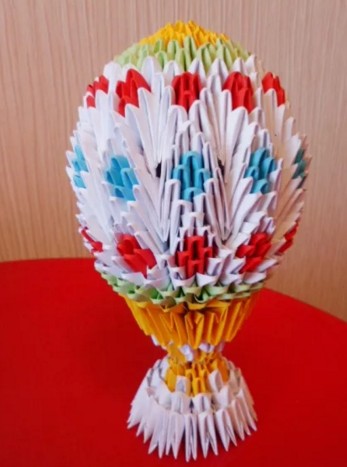
Egg using modular origami technique (step by step instructions)
Modular origami is a type of technique in which the craft is assembled from special triangles. The main thing is that no glue is used here at all.
The module is made like this.

And then you start combining them one by one, alternating colors and making imaginary patterns.

And in order for you to learn the whole technology more clearly, I suggest watching this video from the YouTube channel.
It can be a white egg, with multi-colored circles around its entire diameter.
You can write letters symbolizing the holiday.

It can even be done on a stand, using the same triangular modules.
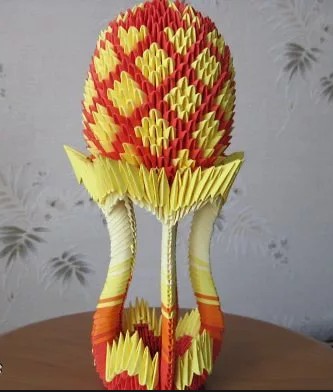
In general, you can do a lot of things, the main thing is that it will be beautiful and cool.

It will lift your spirits, and such a paper egg will definitely never go missing and will delight you on your shelf for years to come.

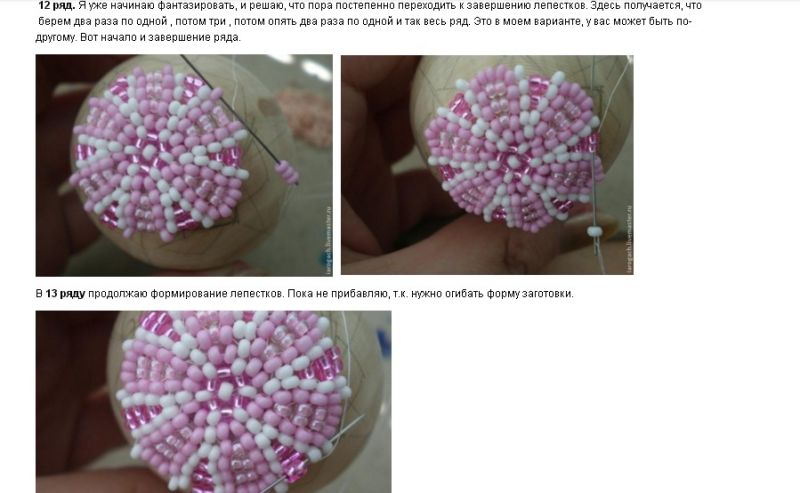
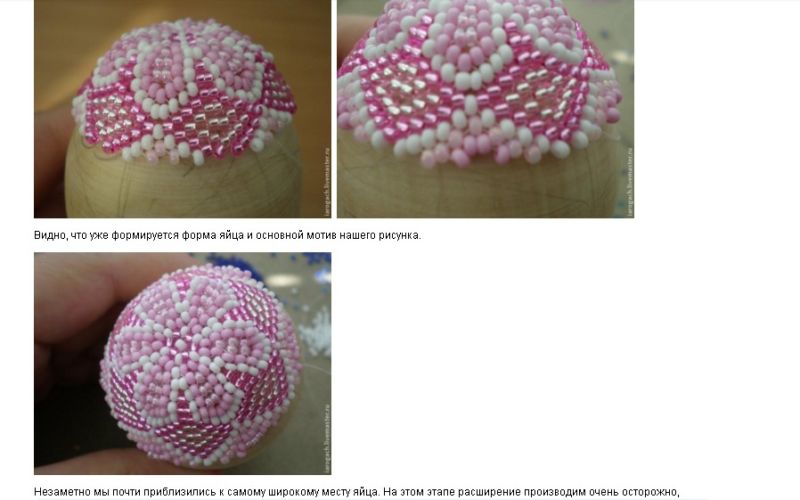
Beaded Easter egg with weaving pattern for beginners
Such cool things it’s very cool to do it and then give it away; it won’t be too difficult for beginners to master this technique, but it will require a lot of patience and perseverance. And you can easily compose a plot or composition yourself, the main thing is to think a little and everything will work out.
Take any workpiece, the main thing is that it is dense and not heavy in weight, so that it is convenient to work with. For example, you can take an oval-shaped wooden blank.

Stages of work:
Make a flower according to the pattern.


These are such cuties, bravo to the master!

The easiest option is to make it from wire; make an oval out of it and thread diagonal strips. Then use the beads.

Come up with patterns and weave. This is a children's version).

You can also make it from beads and rhinestones-sequins and a base - paralon or polystyrene foam.

Do this so that there are no empty holes.


Decorate the tray or cup as well.

Also use this step by step instructions, if you want to master this science.


And now knowing some basics, you can use these schemes. Such a blue decor, very cute and gentle.

You can even use large beads.
Or make an egg with charms.


You can also choose an ornament scheme.

Or just do the work in a zigzag style.


In any case, you should be satisfied and so should those around you.


After all, then you can start inventing masterpieces yourself.

It's purely a matter of your imagination.

And only to your imagination.

Or set a goal and do what you like most yourself, but for this you need to find the right weaving pattern. I liked this egg chick. And I finally found knitting patterns from her.

If you also need it, write, I will send it to your email for free.
Knitted souvenir Crochet egg with pattern and pictures
If you are a fan of crocheting and knitting, then you will be able to do these product options.

Still, this one looks wonderful and divine.

Can be used as a cover or worn on an Easter egg.


You can make it in the form of a souvenir, like a ball on a string and hang it on a decorated tree.


I personally liked this weirdo that just hatched. I found his master class on the Internet for you.


Making a craft from satin ribbons in kanzashi style for a school competition
The first thing I want to show you is to watch this video.
For all those who want to learn how to work with fabric in an interesting way I suggest you master this technology - kanzashi. Also take as a basis any product with a three-dimensional shape that resembles an egg. And from satin fabric cut into rectangular pieces.

2. Make a triangle out of a rectangle and stick it into the foam product with small special nails.


4. In principle, you can lay the fabric in any way, the main thing is that it looks aesthetically beautiful.

5. Take multi-colored materials, maybe with decorations and sparkles.

6. In the end, you will still reach the result you need, the style is called this artichoke.

7. What a beauty!

If you don't understand something, take another look at this step by step description, maybe here it will be more convenient and easier for you to understand.


You can go another way, arrange the triangles not like this, but like this, but for this the ends of the ribbon will need to be soldered a little, connected, do this using wax candle, or rather a light.


Choose the option you like and get creative!

Create new images and motifs.

It's so fun and funny.

Even in mosaic style it looks cool too!


You can also design it in the form of a postcard; in the previous issue we did one.

Eggs using quilling technique
For this work, purchase everything you need, first of all, this is special paper in the form of strips.

Then roll the strip into a spiral onto the stick.

Glue the end with glue.

There can be any number of such patterns, here is an approximate table.

From all this you can put together a whole composition, these include flowers and all sorts of things.

And then glue it onto any egg, for example a foam one or one made from papier mache.

You can also, when you gain experience, make products without a base.
In fact, this is not difficult to do either. Make the frame out of paper, and then get to work and hit the road.

Lubricate the parts well with glue.

After all the actions you will see a creative masterpiece.

Beautiful egg made from pasta and balloon
There are now many such masterpieces on the Internet, so you can also check out one of them right now.
We will need:
- balloon - 1 pc.
- PVA glue
- spray paint
- nail polish
Stages of work:
1. Take a balloon and inflate it to the size you need.
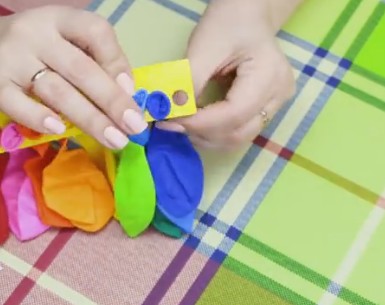
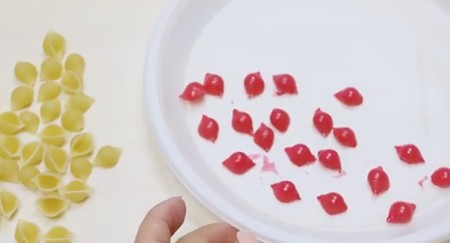
2. Dip round rigoton pasta in PVA.

3. Draw an oval on the ball, this will be the future hole. And start laying it out carefully with tweezers, like a frame.
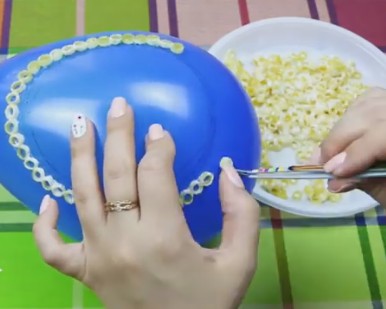

5. Let the product dry completely, and then deflate the balloon by piercing it with a needle.

6. Now you can start painting, spray.

7. You can paint shells with varnish - these are also noodles.
8. And then, how to make a headband by gluing it here.

9. In general, decorate as you please.


11. Well, that's all, it looks cool! Good luck!

All work, in principle, comes down to the same actions, only the images and backgrounds may be different.

Use different horns and you will definitely succeed, take several types, twisted and round, etc.


It is possible to make a special stand for such beauty, if there is a desire.

You can even post a brownie))).

How to draw an Easter egg + stencils for cutting and coloring
You can not only draw it yourself, but find a template and color it, plus make a chicken, cut the egg in half and another trick, it will open.

You need to color with any colored pencils or felt-tip pens. You can also use elements of gouache and watercolor.

It turned out wonderful for the students.

Now choose, take any model you like. It can be painted and decorated with anything. There are of course options for children of different ages.


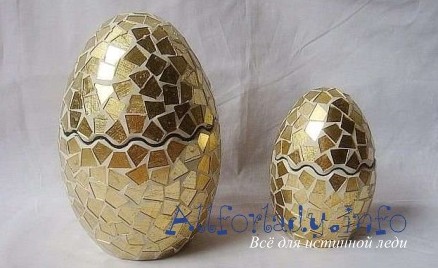
R.S Well, in conclusion, it turns out they are also made from mosaics and glass.
By the way, if you like felting wool, you can take this masterpiece as a basis.

This is how the note turned out, small, but with interesting and new ideas, may everything work out for you! Good luck and patience! Thanks everyone and bye! Like and subscribe to the group in contact.
What first comes to mind when talking about Easter? Of course, multi-colored Easter eggs, which take pride of place on our holiday tables on the holiday of the Resurrection of Christ. It is with eggs that the celebration of Easter begins, they are treated to relatives and friends, they are left in the church, and they begin festive dinner. That is why, on the eve of the holiday, many begin to wonder how to decorate eggs for Easter this year. Every year we try to come up with something new, take the same white chicken eggs, food coloring, use our imagination and involve close people, this is how real works of art appear on our tables.
How to decorate eggs for Easter so that it turns out beautiful, original, and not like the relatives invited to the holiday? It seems that it is no longer possible to come up with something fundamentally new in the matter of decorating eggs, because we spend so much time coloring eggs for Easter every year. However, nothing is impossible, and every year new ideas and new masterpieces appear. To begin with, it is worth abandoning the ready-made decorating kits that are sold in large grocery chains, because these are the kits that many people will use. You should also give up multi-colored thermal films, stickers and all kinds of cardboard boxes and stands. Instead, stock up on scraps of brightly colored fabric, wax crayons, acrylic paints, brushes, colored paper, sequins and even sugar confetti. All these things will definitely be used in the process of decorating eggs for Easter.

Spring is a time of renewal, and it’s not just about nature. During Holy Week When we tidy up our home, it's time to sort out our wardrobe. What could be the connection between how to decorate eggs for Easter and the need to revise your wardrobe? Indeed, the relationship may seem strange, however, check silk ties and scarves. Surely, among them there will be specimens with greasy spots, puffs and other defects with which you can no longer wear the item, and you don’t even dare throw it away. These are the things that should be used to create original drawing on eggs! So, choose silk ties and scarves with defects. Pay attention to the fabric, it should be silk. You will also need plain white fabric, white eggs, elastic bands for money, scissors and thread. Open the tie and separate it from the lining, cut the silk into pieces in which you can wrap the whole egg. Lay out pieces of silk and wrap them around the eggs so that front side tissue pressed against the egg. Wrap the egg tightly with thread, it should look like a tight ball. Wrap the eggs wrapped in this way in white fabric and secure with rubber bands on both sides. Fill a saucepan with 2 liters of cold water, add 1 tablespoon of vinegar and place the eggs wrapped in a cloth. Boil the eggs until tender, remove from the cloth and brush vegetable oil for shine.

If the audit in the closet did not lead to anything, do not be upset, there are others, no less original ways decorating eggs. So, how to decorate eggs for Easter so that the process is interesting and the result is pleasing to the eye? You can try new techniques for yourself, for example, find out what drapanka is and apply this technique on eggs. This strange name hides a completely simple procedure for applying a pattern to a painted egg by scratching it using a sharp object, such as a stationery knife. To master this technique, you will need white chicken eggs, egg paint, a simple pencil, an eraser and a utility knife. Hard boil the eggs, cool and color them with food coloring. Dry the eggs with a paper towel and draw the future pattern with a simple pencil. If you don't succeed the first time, use an eraser and correct the mistakes. The pattern can be absolutely anything, it all depends only on your imagination and perseverance, however, you should not do too much complex patterns, do not forget that they still have to be scratched. Using a stationery knife, scratch the outline of the design; to create halftones inside the design, use not the tip, but the entire plane of the blade, and scratch the necessary places in the same way. Each egg decorated using this technique will be original and different from the others.

If the previous option seemed too complicated to you, or you are thinking about how to decorate eggs for Easter with your children, and a stationery knife in this case is simply dangerous, then you should consider a similar decoration technique, but simpler and safer. You will need chicken eggs, no matter white or brown, wax crayons, black acrylic paint, a brush, glitter and toothpicks. Boil the eggs hard, cool to room temperature, dry and ask your child to color them with wax crayons. different colors. The more colors you combine on one egg, the more interesting the effect will be. The egg should be completely covered with crayons, the shell should not be visible. Paint over the painted eggs with black acrylic paint, which can be purchased at any art store. While the paint is still wet, sprinkle glitter on the eggs and wait until dry. This will take no more than 10 minutes. Black eggs themselves look very unusual, but arm yourself with a toothpick and carefully scratch any pattern. It can be just vertical or horizontal stripes, but black eggs with thin multi-colored stripes and sparkles will still look very original.

There are others, less radical ways egg decorations By the way, you can even do without food coloring! If you are thinking about how to decorate eggs for Easter so that they remain safe and can be given to a child, pay attention to the following decor option. You will need hard-boiled eggs, colorful paper muffin cups, colored paper, double-sided tape, glue and mini pom poms, which can be purchased at craft stores. If no suitable pompoms were found, then use fine yarn and using a four-prong fork, wrap yarn around the prongs, then tie tightly in the middle between the second and third prongs, cut the yarn along the edges, remove from the fork and straighten. Make small caps from colored paper, glue pompoms to them and secure them to the eggs with double-sided tape. Cut the remaining paper into thin strips, no more than 3 mm wide, and place in muffin tins. Place an egg on top. In this form, an Easter egg can be presented to any child.

Eggs can not only be given as gifts, you can also decorate with Easter eggs. festive table. How to decorate eggs for Easter so that they can be used as a main decoration Easter table? The first thing you need to remember here is the lack of time. The turn to decorate the table usually comes at the last moment, so decorating the eggs in this case should be quick and uncomplicated. For example, you can write a holiday greeting on them, place each egg in a poacher or, as in the previous version, in muffin tins, and place them in the center of the table. You will need hard-boiled eggs, sequin ribbon, a pencil, and a craft glue gun. With a simple pencil Draw the letters on the eggs, try not to make them too small, otherwise it may be difficult to stick the tape. Then apply hot glue along the pencil line, immediately glue the tape and cut. Place the decorated egg on a stand; when the inscription is ready, decorate the holiday table with the resulting eggs.

If you plan to use some of the eggs as table decoration, then you can remove the restriction on their edibility and use glue, beads, paints and other elements. In addition, before thinking about how to decorate eggs for Easter, it is worth remembering that it is not necessary to use whole eggs; you can get by with just the shell and use the contents for cooking. holiday dishes. To do this, carefully use a knitting needle to make a hole in the shell and remove the contents. Wash and dry the shells. Prepare glue, a brush, colorful sugar confetti and a tablespoon. You will need several packages of confetti; place it in a deep bowl. Lubricate the shell with glue and place it in a bowl with confetti, using a tablespoon, sprinkle the entire shell. Then scoop the egg with a spoon and transfer it to a flat plate until the glue dries completely. Instead of sugar confetti, you can use small beads or sparkles. Eggs decorated in this way will be an excellent decoration for the holiday table.

If the options proposed above do not seem original, and you are still looking for ideas on how to decorate eggs for Easter, pay attention to the next option. Decorating eggs in this way does not imply that they will be eaten, so this method should only be used if you are going to decorate the shell and use the eggs for table or room decoration. You will need a nest, moss, three eggs or, better yet, an empty shell, a flat brush, preferably with bristles, acrylic paints in two colors and a craquelure medium, which can be purchased at any art store. Apply paint to the egg and let it dry, then apply the craquelure product, trying to work with the brush in one direction. Wait until the product stops sticking, to check, wet your finger and press it against the egg, your finger should not stick. Then apply thin layer acrylic paint different color. A craquelure effect will appear on the egg. Place moss in the nest, place eggs on the moss and decorate the holiday table.

To turn the annual Easter egg decorating routine into interesting event, it’s worth giving up your usual painting methods and trying something new. You don’t have to use all the ideas at once; choose the ones that especially appeal to you, use your imagination, involve your loved ones, and let the eggs you decorate for Easter delight you with their beauty and originality!
Alena Karamzina
Hi all!
How are you? We are already waiting for spring! In central Russia, spring has yet to come. Although the sun shines every day and it warms our hearts. Just like the upcoming one Holy holiday- Easter.
In previous posts we looked at. Considered different variants. Today we will decorate Easter eggs in different techniques and in interesting ways.
For decoration, materials that are always available in the house are used. These are paper napkins with beautiful drawings, and threads, and ribbons, and even cereals, such as rice, lentils, buckwheat. Thanks to such simple raw materials, quite original compositions and souvenirs.

Interesting little things will brightly decorate the interior or you can use them to participate in children's competitions at school or kindergarten. And, most importantly, the children really enjoy the process itself. Therefore, we stock up on inspiration, patience, call the kids and get down to business!
Master class on decorating eggs with napkins in decoupage style
We start our needlework with decoration in decoupage style. This is a simple technique using napkins that allows you to decorate simple things in a bright and colorful way.

Let's take chicken eggs. If desired, you can take quail, guinea fowl or even ostrich)). The technology is very environmentally friendly; Then you can eat the Easter eggs.
They are named by the method of staining. A design is applied to the Easter egg, most often in the form of blooming flowers.
Decoupage is also somewhat reminiscent of this technique.
We need:
- Multilayer napkins with different patterns
- Brush
- Vegetable oil
Manufacturing:
1. Take the eggs out of the refrigerator. It is mainly better to take with a white shell, then the pattern on it is better visible.
2. We wash them with a sponge and place them in a saucepan to cook for 15-20 minutes until cool. Separate the white from the yolk of the raw one. This will be our glue.

3. Then we cool and dry them. At this time, you can pick the patterns of their napkins.
4. Separate the colored layer of the napkin and carefully tear the pattern in a circle with your fingers. It is better not to use scissors, because later when gluing the cut borders will be visible.

5. Place the torn pattern on the cooled egg and glue it with a brush using a white. Seal all the folds so that the pattern fits like a glove.

6. Leave the paintballs to dry. Now the dry ones can be greased with vegetable oil. This will give them shine and even more brightness.

7. We place the finished little ones beautifully in a box or on a plate.

Making beautiful patterns on wooden blanks
One of the most simple ways this is to paint egg blanks made of wood different colors. Fits well wooden surface goesuache, acrylic and oil paints. The situation is a little worse with watercolors due to their too transparent color.
To make such crafts, you need to purchase oval balls different sizes in hobby and creative stores. Several times we got testicles during Easter weeks before and after the holiday. Just at this time, events are held in city parks and squares. various master classes. Including painting wooden things.

So, we collected them with the children and began to get creative at home. The first step, of course, is to draw a drawing with a simple pencil.
Below are several templates that you can use for your rough drawing.
Therefore, you need to think about it in advance or look for the desired composition to redraw on the blank.

The smallest fidgety kids, 2-4 years old, can paint crafts in one tone. Indeed, they are not yet able to write beautiful patterns. They are still getting used to the brush.

Older children can make beautiful ornaments under your supervision. Russian ornaments in the Gzhel or Khokhloma style look very beautiful.

Applying such drawings and patterns is not at all difficult. The most important thing is to stock up on a large assortment of brushes, from the thinnest to the plumpest. It’s good if the hairs are natural and don’t fall out.
Acrylic and oil paints do not stain pens after drying. But gouache and watercolor can then be varnished.

Or you can create icon-painting masterpieces.

In addition to ornaments, you can do cool things. For example, paint the blanks as funny faces- emoticons. Such products can then be used for fun games.

Or you don’t have to use paint. It will not be difficult for wood burning craftsmen to create such beauty.

In addition, there are plywood blanks. If you paint them with beautiful designs and patterns, you can decorate a very bright and original Easter tree for Easter.

For example, this. You just need a twig without leaves that can be placed in a vase. Well, we decorate it with our amazing crafts.
You can also take it to a kindergarten or school for a competition.

And here are some drawing templates, as promised.


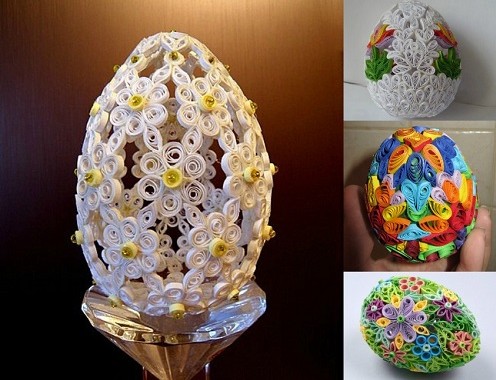
Openwork crafts using quilling technique
Have you heard about quilling? I think so, but I can’t resist explaining. This is one of the interesting arts and crafts - making arrangements from rolled strips of paper. Simply put, paper rolling.
So this technique was not ignored, so as not to decorate Easter crafts. I myself called them openwork, because they look so delicate and delicate.
You can make these strips from multi-colored paper yourself. But it is much more convenient to buy ready-made kits in the store. They are inexpensive, have instructions and all the necessary materials.

In fact, it is very difficult to tell in a photo how exactly elements are created from quilling style stripes. To remember everything, I suggest watching a short training video. And then we will look at different options for delicate and airy works.
Amazing! Now that you have become familiar with the elements, you can begin production. Here is a short master class on how to make a hollow Easter egg from two halves of a ball.
Isn't it beautiful?

Another visual MK. Here we glue all the paper elements onto the blank and create a decorative spring craft.

Cool! We learned how to make crafts using simple techniques. Now we can repeat (or do even better) Easter work.

These flat versions can be glued onto postcards. Or hang it on the Easter tree again.

A thing of two halves. You can hide a surprise inside and give it to a loved one.

Beauty with a duck. I think small children can handle this too.

Here is another openwork work, and even with a stand. Great gift grandmother or mother.

I hope everything turned out great for you. Let's try decorating with wax crayons!
Video on how to decorate with simple wax pencils
Have you tried painting with wax crayons (they are also called wax pencils)? No? It's simple, but you need patience and perseverance. A little painstaking work and you will have original specks on your hands. In the old days they were called Easter eggs, on which the pattern was applied with melted wax from a candle.
Watch the training video.
Foam crafts with patterned ribbons
Decorate the foam blanks with ribbons in the style of kanzashi and artichoke. They cost pennies, you can buy 10 or more pieces. Because, I’m just sure, everyone will like your creations and will ask you to give them as a gift).
Well, it’s very convenient to work with such material. Polystyrene foam is light in weight, porous, and it’s good to attach ribbons to it, either with needles or with glue.

And a small tutorial on decorating with fabric and wavy ribbon.

And here we’ll look step by step at how to decorate a foam blank with golden braid. I chose the simplest master class. Having completed several such works, it will be possible to begin more complex compositions.

We will need:
- DVD disc;
- Styrofoam egg;
- Cabochons with a diameter of 8 cm;
- Rose buds;
- Lurex braid with a diameter of 6 mm;
- White satin ribbon with a diameter of 12 mm;
- Glue gun.
Manufacturing:
1. Making the base. To do this, cover the disc with white tape. We fix it with glue.

2. Place rose buds on the glue in a circle in the center.

3. Pull the lurex ribbon tightly in the middle of the workpiece. We fix it with glue in the thick part of the mold. Then we wrap it with tape, crossing it in the narrow and thick parts of the testicle.

4. Apply a little glue to the resulting gaps through which the foam can be seen and adjust the ribbon even tighter.

5. We attach the covered craft using a glue gun to the base of the disk and buds. We lay out the letters X and B in cabochons. They will represent Christ is Risen.

6. And I also suggest watching a training video on how to make an artichoke-style work. This is the kanzashi technique. Miracle creations are also made from satin ribbons points, which are then a pleasure to look at!
The kanzashi technique came to us from Japan. This is a decorative art that is designed to create decorations from petals folded from fabric or ribbons.
Getting ready for Easter in kindergarten and making plasticine crafts
All kids, almost without exception, like to squeeze and crush a plastic substance - plasticine. Besides, it happens different colors that they like it that way too. That's fine! This excellent material for crafts, especially for kindergarten.
As a tradition, for every holiday, children are given tasks to do. Of course, not without the help of parents. I have to rack my brains a little about what to make. There is nothing complicated and here are a few simple ideas made of soft plasticine.

First, let's make a simple Easter egg step by step. We will need plasticine of different colors, a plastic knife, a rolling pin and a toothpick.
We cut off a small piece and roll it into a ball, and then flatten it into an oval.

From a different color we make a thin and long sausage, which we turn into a spiral.

We glue the spiral along the diameter of the oval.

We roll several balls from another color. We glue these peas to the craft using a toothpick.

The final touch is to add a bow. Here we will need a rolling pin to make flat strips. We wrap one strip around the bottom. We also make a few petals, something like this.

We glue them around, forming a cute bow. The egg is ready!

You can also make plasticine things from natural eggs. To do this, you need to blow out the white and yolk through 2 holes. And then glue Easter-themed patterns onto the blanks.

Well, another simple option is to stick strips and plasticine balls onto oval cardboard molds. The result is speckles, paints and paintjobs!

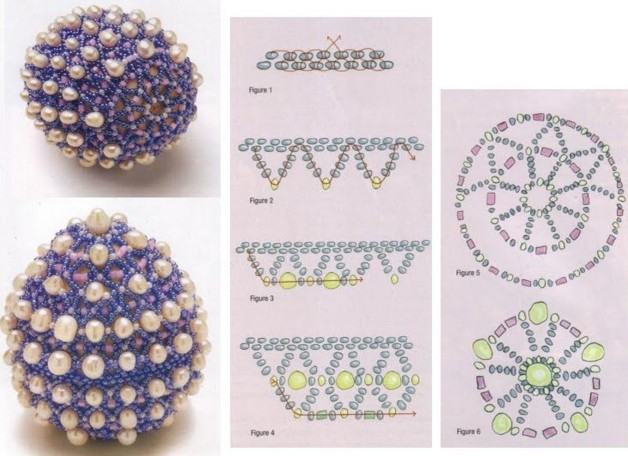
We weave beautiful beaded shirts for Easter eggs
Many craftswomen know how to make beaded shirts for Easter eggs. This is truly painstaking work and it requires perseverance and patience. But of course, the game is worth the trouble and look what wonderful masterpieces you can make.
Spring and butterfly.

Spring meadow.

To work you need:
- Choose a pattern for weaving;
- Stock up on an oval blank (wooden, plastic or foam);
- Buy beads of different colors, comfortable needles and thin fishing line;
- To find time.
We have all this and begin to weave. The process itself is quite difficult to describe in words and even in photos. I suggest you watch a simple master class. Below are some simple weaving patterns.
Scheme - Golden Domes.

Scheme - Slavic ornament.

That's all for me, dear readers. I won’t say goodbye to you for a long time. I wish you to do very beautiful crafts and have a good time with your family.
P.S. Almost all master classes, ideas and photos are taken from publicly available sources.
Happy Easter! Joy, health and prosperity!


