Kirigami simple patterns. Kirigami cutting templates
Kirigami or pop-up is the art of cutting out folding cards from paper. When you open one, like a jack-in-the-box, an image pops out. The postcards turn out to be unusual, but in fact, there is nothing complicated in making them. To help you, we have collected the most simple circuits and kirigami patterns for beginners.
We analyze kirigami schemes
Kirigami patterns for beginners are extremely simple: you will need to cut the paper along the solid lines, and bend it along the dotted lines. Where color markings are used, red lines usually indicate the hollow fold, green lines the bulge fold, and black lines the cut locations.
Tools for work
Unlike origami, the art of folding, kirigami allows for the use of a knife and glue. To make a simple kirigami for beginners, you will only need:
- breadboard knife or cutter,
- ruler,
- a self-healing mat or any dense backing that will protect your table from scratches,
- paper clips or masking tape to attach the template to the paper,
- thick paper or thin cardboard.
How to make a kirigami card
If you are taking on the task for the first time, print out a simpler diagram and practice on it. Place a mat under the diagram and use a ruler (preferably a metal one) to make neat cuts. If you are afraid of making a mistake and cutting something unnecessary, color the cut lines and fold lines with different felt-tip pens.
Happened? Then print new scheme, attach it to a sheet of colored paper with paper clips or masking tape and cut it out. Even beginners can handle the pictures from our selection of kirigami.
Experiment and you will always have original postcard for any holiday!
The simplest kirigami postcards
Kirigami with Christmas tree
These are the simplest kirigami cards - it will be convenient for beginners to practice with them. These postcards don’t even need a printer—you can redraw the diagram on a piece of checkered paper.
When you get your first Christmas tree, try drawing your own and cutting it out: you can make kirigami cards according to your own patterns.


Kirigami Birthday Cards
Such a card can be made for any occasion: a birthday, a wedding day... or even Cosmonaut Day! You can glue any image that suits the occasion to simple “stands”.

This card isn't much more complicated. For this you will need double-sided paper.


Cards with letters
Have you mastered the simplest postcards? Then learn how to cut out pop-up letters.

Kirigami Valentines
To surprise your loved one, you don’t have to wait for a special occasion. You can hide a kirigami card in a diary or a book that your loved one is reading - it will be a real surprise.


"Seasonal" cards
In this collection we have collected simple designs for kirigami postcards dedicated to the New Year or the onset of autumn. Once you get the hang of it, you can cut out several of these cards at once, just make sure that the sheets of paper do not move relative to each other.
For such cards, you can use double-sided paper.


Kirigami is the art of cutting out three-dimensional objects from paper, which has some general principles with origami and zhenigami. Thanks to your characteristic features Kirigami is often used to create cards. Postcards made in this way are distinguished by their originality and elegance of form. Making them is quite difficult, but to make this process easier for yourself, you can use ready-made templates Kirigami.
Kirigami - the art of cutting out three-dimensional objects from paper
Even children can use simple patterns in their creativity; the main thing is to make sure that they follow safety precautions when working with a knife and scissors. One easy project for beginners is to make a birthday cake card.
For this you will need:
- stationery knife;
- double-sided cardboard - colors should be different on both sides;
- rubber mat;
- ruler.
Manufacturing technique:
- The finished template is redrawn using a pencil onto the cardboard chosen for work.
- The blank is cut from the sheet along the perimeter of the template.
- Using a knife, cut all the solid lines.
- All dotted lines are bent. Special attention should be paid to the candles - they should be turned upside down.
- Using this technique, you get a two-color cake.

You can decorate the completed postcard in various ways. decorative elements. However, it is worth considering that they should not create a strong contrast, distracting attention from the main object of the card, made using the kirigami technique.
Gallery: kirigami (25 photos)


DIY 3D kirigami postcard (video)
How to make a New Year's card using the kirigami technique: master class
Kirigami is a technique that allows you to make a huge variety of cards, including for the New Year. In order for them to be as expressive as possible, it is recommended to use high-quality paper with prints or interesting textures. Kirigami allows you to cut both opening Greeting Cards, and 3D.
Volumetric Christmas tree using the kirigami technique
One of New Year's images is a Christmas tree. Therefore, as a postcard for the New Year, you can make a three-dimensional magic tree using the kirigami technique.

It is made from the following materials:
- double-sided green cardboard sheet A4;
- cling film;
- a silver or greenish napkin with an image of some background ornament, for example, polka dots.
Master Class:
- On 1 side of the green cardboard is placed cling film, and on top of it is a napkin (the top layer is with an image).
- Then the made pyramid is ironed until the napkin sticks to the main cardboard.
- The diagram is transferred onto cardboard.
- The template is cut around the perimeter using scissors.
- Then, using a knife, all the solid lines are cut, and the dotted lines are bent.
- The Christmas tree is placed vertically so that both parts form a single whole.
- The cut out half of the heart is bent to the side.
What makes this card original is its double-sided feature: the Christmas tree can be bent so that it is green or napkin-colored.
Kirigami: Opening Christmas Tree Card
Using the kirigami technique, you can also make an opening card in the shape of a Christmas tree.
For this you need the following materials:
- 1 sheet of double-sided cardboard, A4 size. There must be two sides different colors;
- stationery knife;
- decorative elements.
Cutting principle:
- First of all, the stencil for making a postcard is transferred to cardboard.
- Then a general card shape is cut from the sheet.
- On the future postcard, wavy lines are cut, located at the bottom of each tier of the spruce tree, as well as the trunk. A piece of the Christmas tree is also cut out on a rectangular base.
- Then both the rectangular and semi-oval base are bent in half along the marked lines.
- Next, the inclined lines of the spruce and the trunk are bent.
- The card is folded so that when it is opened, the spruce becomes voluminous; for this, the central line of the tree is bent forward.
- A piece of a Christmas tree on a rectangular base is bent to the side.

This postcard allows you to use a large number of decorations on its front part, since the main object is inside.
Pop up card: easy cutting template
Using the kirigami technique, or as it is also called - Pop up, you can cut a spectacular, but very simple postcard in the shape of a butterfly.
To do this you will need:
- sheet A4;
- scissors;
- stationery knife;
- a sheet of cardboard of your favorite color;
- pencil.
How to make a paper butterfly:
- First of all, you need to print the finished template on A4 sheet.
- All solid lines are cut with scissors so that the wings are almost completely free of paper, with the exception of their base.
- The ornament on the wings should be cut right through with a stationery knife.
- Then the base is folded along all the dotted lines.
- A piece of cardboard is selected according to the size of the cut base. It is worth considering that it should have an allowance of 0.5 centimeters on each side.
- A sheet of cardboard is folded in half, opened, and a cut out base is glued into its center. The fold lines of both elements must match.
- After the glue has dried, the wings are inserted into the slots to create a three-dimensional butterfly.
- The wings curl slightly different sides so that the card becomes more elegant.

This cut out card can be presented as a card for any holiday thanks to the universal image object.
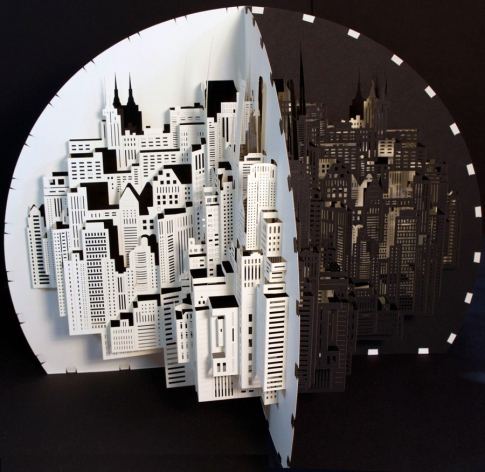
Kirigami: architectural diagram
Kirigami is not only easy cards, but also complex ones that can only be made by masters of their craft. There are a lot the most complex schemes, on which you can cut out an image of a castle, cathedral, bridges and other detailed elements. One of the simplest kirigami architectures is the cathedral architecture.. This template can be recommended for children who have already mastered the initial level of this technique.
How to cut out an architectural structure from paper:
- The first step is to transfer the template onto a sheet of thick paper.
- You should start cutting out SOBR from the dome: all vertical and semicircular lines are cut through. Horizontal lines remain for folding.
- Next, the side towers are cut using a similar principle.
- At the bottom of the cathedral, you should carefully cut the vertical lines of the columns using a stationery knife. You should also carefully cut through the triangular pediment.
- All rectangular, oval and round windows are cut through.
- After all the indicated lines have been cut, you can proceed to folding the remaining ones.
- The result is a three-dimensional architectural structure.

You can add originality to such a postcard if you install an LED deep into the structure contrasting color. Using this technique, you can achieve interesting openwork shadows, as well as a feeling of illumination of the building.
Volumetric kirigami card (video)
Pop-up, or kirigami, is a technique for the hardworking and diligent. It is worth considering that cutting out even the simplest postcard will require maximum concentration and accuracy, otherwise, uneven lines can completely ruin the overall impression of a handmade craft. To avoid this, you can use the instructions and master classes presented above to make interesting and memorable cards.
Finished products using the kirigami technique amaze with their beauty and airiness, with many carved windows and patterns. Interesting view Anyone can master a creative activity akin to origami—all you need to do is have scissors and a sheet of paper on hand.
Kirigami technique - the basics of creativity
What is kirigami? The fancy word comes from two Japanese meanings: “kiru” - “cut”, “kami” - “paper”. From the sound you can see that this technique looks like origami. Indeed, kirigami masters also create paper products, but, unlike origami, they can use scissors and, in some cases, glue.
Exact date of appearance kirigami unknown - most likely, creativity appeared simultaneously with the art of origami several centuries ago. However, since the 80s of the twentieth century, this creativity has been experiencing new wave popularity - it was at this time that the Japanese architect Masahiro Chatani invents one of the subtypes, which is called paper architecture.
The principle is the same as when working with other types of kirigami - the professor sought to cut out from one sheet of paper a three-dimensional image of a building with as many small details as possible that characterize famous architectural monuments. This principle helped make his works recognizable - they all have an incredible similarity to the original buildings.

Some people attribute the kirigami technique to similarities to the art of pop-up cutting. paper cards, when opened they appear three-dimensional figures. It is important to understand the difference here: Japanese creativity is made from only one sheet of paper and preferably without glue.
Kirigami cutting - types of products
Over the many years of its existence, kirigami has acquired many features, each of which characterizes a separate type of this creativity. To understand their differences, check out the classification of possible paper products.
Flat images
This variety consists of preparing a flat image with filigree patterns and fixing it on some bright background.

One example is the beautiful paper snowflakes that we decorate our windows with every year when winter comes.
Volumetric crafts
This includes postcards that can be opened 90 or 180 degrees and get a pop-up figure - a heart, letters, a gift.
The principle is simple: image details are cut out from one sheet of paper without separating them from the base, and folded into in the right places, forming three-dimensional pictures.
3D shapes
IN in this case With the help of cuts, holes, valves and folds, the master creates a full-fledged three-dimensional image - a figure that can be studied from all sides for a long time, examining the smallest details.

If you want to make something similar, use kirigami templates for cutting - without them, even professional craftsmen who work with paper may not be able to cope with this type of Japanese creativity.
Kirigami templates and diagrams
Each work using the kirigami technique is performed according to a specific template, previously transferred to working paper. And if professional craftsmen know how to develop drawing schemes themselves, based on the principles of adding figures, then it is better for beginners to use ready-made sketches.
Kirigami for Beginners
If you are just starting to learn art kirigami, give preference to creating flat crafts. Don't worry, they are in no way inferior in beauty to 3D ones, and some are even superior to them.
For example, you can practice using patterns for cutting out snowflakes! First, use ready-made templates, and after about 5-10 products, try to develop your own original design.

Alternatively, you could try making a cute, simple card with 3D stars inside.

The drawing diagram corresponds to the postcard standard size A4. Solid stripes indicate the cut points, dotted stripes indicate the fold lines back. And the dotted segments indicate that the picture needs to be folded forward.
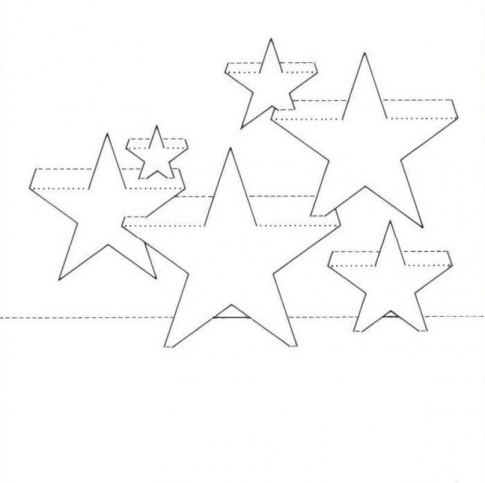
If you choose the right color of paper, you can make very beautiful image with an advantageous play of light and shadow on it.
Complex Kirigami
Those who find the kirigami patterns in the previous paragraph too simple can try more complex options paper crafts. For example, in Lately Popular are sheets folded in half with figures made from many folded strips.
One of the simplest is considered to be a kirigami postcard design called “Wave and Sail”. When performing the same element, turned in different directions, a beautiful imitation of a seascape is obtained.

- Print this template on half a standard sheet of paper.

- Fold the A4 sheet in half widthwise and unfold, leaving a fold line mark.
- Attach the template to the workpiece 2 times: the first time the way you printed it, and the second time turning it upside down.
- Cut into strips using solid lines as a guide.
- The dotted designation indicates the folds back, and the dotted designation indicates the place where the craft needs to be bent forward.
Such crafts with many thin narrow parts are difficult to cut using scissors, even manicure scissors. Therefore, prepare a stationery knife in advance.
New Year's kirigami - master class
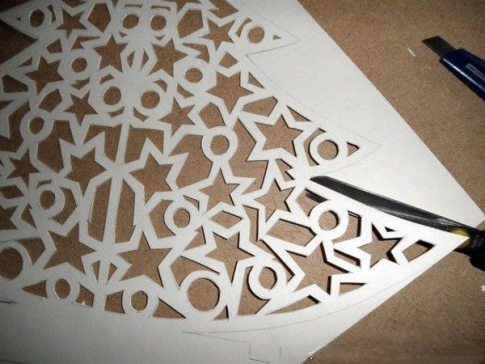
On the eve of the New Year, I want to plunge a little into a fairy tale and decorate the house with festive attributes. And white openwork patterns Kirigami are perfect for decorating an apartment - after all, they are so similar to Frost patterns on the glass!
For example, your desktop and shelves can be decorated with these homemade paper Christmas tree figurines.
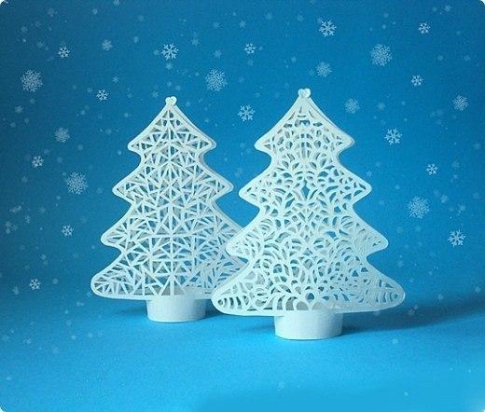
- On two A4 sheets, print identical diagrams of the future product.
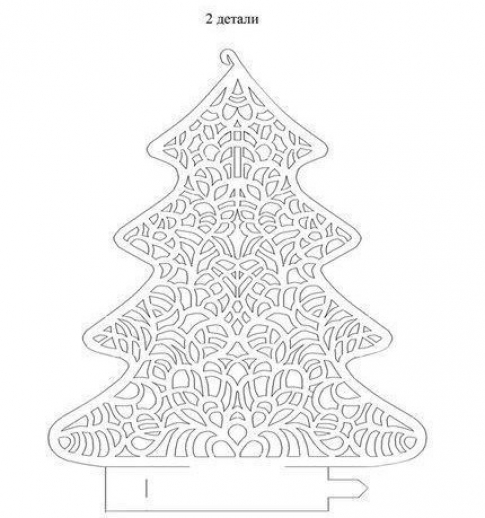
- First cut through small parts inside the workpieces.

- After finishing the work, cut out the parts along the edge.
- At the bottom of the tree - the stand - make a small slot in the place of the vertical line. Connect the pieces using flaps at the bottom and hooks at the top.
Your Christmas tree is ready! It can also be used as a New Year's toy, and if you increase the size of the product, as a festive headdress.
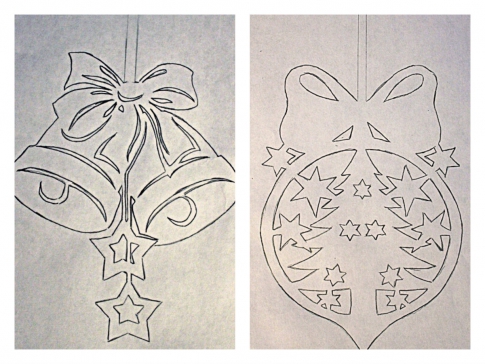
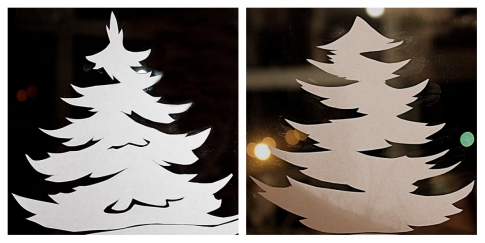
Don't forget about decorating your windows for the New Year! Beautiful patterns on the windows will create a festive atmosphere in the house and lift the spirits of those who see the composition from the street.
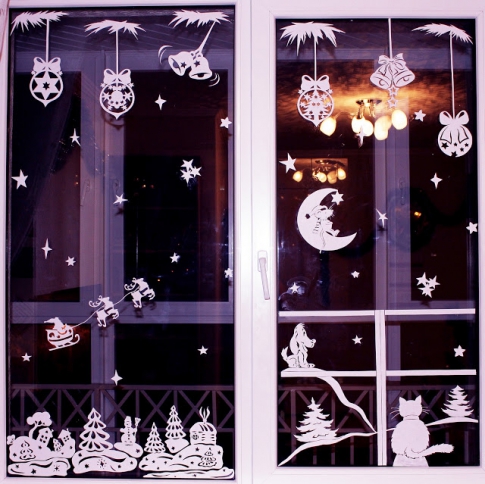
- Use the templates below to make beautiful paper cuts Christmas decorations, animals and winter landscapes.

- You can glue paper pictures using soapy water: generously moisten a paint brush and rub with it. solid soap to pick up some of the sticky top layer. Spread the paper and glue it to the window in the right place.
- You can also use tape as a fastening material, but after removing it, the window will be more difficult to clean from the sticky layer.

- If you don't have a printer at home, you can redraw the templates manually by holding a piece of paper to the glowing computer screen, which will have a drawing of the desired size.

One more example New Year's schemes kirigami for beginners you can see in this video tutorial - try using it to make a beautiful Christmas tree decoration.
New Year's kirigami - master class
How to make a snowflake out of paper? How to cut a beautiful snowflake?
Beautiful paper snowflakes will become good decoration at home on New Year. They will create a snow-white atmosphere in the apartment, winter's tale. And just by cutting out snowflakes of various shapes from paper, you can have fun, because it exciting activity and they should get their children involved too. If you don’t know how to cut snowflakes out of paper, or have forgotten how to do it, then this is not a problem. Next you will see that everything is very simple. Even a child can handle this. For the New Year's holiday, we invite you to make a lot of snowflakes and, moreover, in different shapes.
How to cut a snowflake from paper?
It's surprisingly easy to create a beautiful snowflake from an ordinary piece of paper. To do this, you just need to use scissors, paper, pencil, beautiful schemes, your inspiration and some free time.
First, we fold the blank for the snowflake from a square sheet of paper, as shown in the picture below. Using different beautiful patterns, you can cut hundreds, and sometimes thousands, of snowflakes of various, beautiful and unpredictable shapes from the created triangular base.

Using a simple pencil, we transfer the drawings shown in the diagrams onto the base, and then cut out the snowflakes.

At the end of the article you can find other patterns for cutting out snowflakes from paper.
How to make a 3D paper snowflake?

A voluminous snowflake looks much more impressive than a regular one, and creating it is also simple (a little more difficult). Similar fabulous 3D snowflakes can be hung in rooms, as well as on the tree itself to create an atmosphere New Year's holiday. You will need: 6 square sheets of paper, glue, scissors, stapler, inspiration and free time(15 minutes will be enough). A voluminous snowflake, if desired, can be made multi-colored, using to create it individual elements colored paper. But before you learn how to create voluminous snowflakes without instructions, it is better to use a regular one. white paper(practice on it first). And a snow-white voluminous snowflake will always be in fashion.
1. First we make 6 such square blanks for the future snowflake. You can download these blanks for small or large snowfields, and then print them on a printer. If you create big snowflake, then it is better to use high-density paper - this is necessary so that the snowflake can keep its shape. Fold each square in half diagonally and use scissors to make cuts, moving from the fold to the center line.

2. Open the square with the cuts, which was folded diagonally, and place it in front of us as shown in the picture. We twist the first row of strips into a tube and fasten them with glue.

3. We turn the snowflake over to the other side and begin to work with the next two strips: we also connect them and fasten them with glue. We continue to work in the same spirit: we turn the snowflake over and fasten the remaining strips together. As a result of these actions, we should have a twisted, fancy element like this.

4. We have created one of the rays for our volumetric snowflake, and we need to make six of them! Therefore, we do the same with the other 5 blanks. We connect three rays of a snowflake in the middle with a stapler. Similarly, we connect the remaining three rays of the snowflake. Next, we connect these two large parts together.

5. Our beautiful three-dimensional snowflake is almost ready! You just need to use glue to connect the snowflake in those places where the rays touch each other. This is necessary so that the snowflake holds its shape properly.

So we made it out of paper three-dimensional snowflake! What great fellows we are! Now you can make it in color!

How to make a three-dimensional snowflake using origami technology?
Here it will not be so simple and it is possible that you will spend at least one hour creating your first snowflake using the origami technique. Well, in the future, when you understand the algorithm for creating such snowflakes, things will go much faster. One nuance - the thinner the paper, the more elegant the snowflakes will turn out. Translucent snowflakes that transmit light will look great on the window. Well, at first you can practice on plain office paper.

Before creating a snowflake using the origami technique, you need a rectangular or square sheet turn the paper into a hexagon. This is one of the most important points, which will then influence whether our venture will be successful.

1. Fold the paper in half twice so that you can see sharp lines fold.

2. Fold one corner with the top towards the center. Bend the top flap towards the edge. Now we have 2 more fold lines.

3. We bend the paper in half again as shown in the picture on the left. To make the shape from the right picture, use two X marks as a reference point and bend flap A along dotted line.

4. Combining the blue and red lines, bend the valve. As a result of these actions, you should get a shape that looks like a heart.

5. Focusing on the X points, use scissors to cut off part of the workpiece along the blue line. In the future, we will only need the hexagon - part A.

If you have any difficulties with the hexagon, you can find tips and answers in the video:
6. Bend one of the sides of the hexagon towards the center to form a fold line. We do the same with all 6 sides. Now we have many lines inside our hexagon that form small triangles.

7. Again, bend the edge of the hexagon towards the center. Using the fold lines made in the previous step, we bend flap A to B, as shown in the left picture. Fold the other two sides of the hexagon in the same way until you create a shape resembling a pinwheel. The last valve can easily cause difficulty, since it will be hidden under the fold. It needs to be pulled out so that we have six valves sticking out, as shown in the picture on the right.

8. Lightly press the fold of each pocket with your finger to create something similar to the picture in the center. It does not matter which valve is on top.

9. Bend two blue corners on each laid out pocket towards the central part of the dotted line. This must be done to prepare the fold lines for the next step. The resulting figure should be externally similar to the image on the right.

10. Carefully unfold the folds made in step 8 to open the fold lines. In each pocket we combine the blue and red X dots. The fold lines obtained in step 9 will help us with this. When we perform this operation with all 6 pockets, our figure will look like the image on the right.

11. Turn the workpiece over and bend each corner of the hexagon towards the center. A small flap should form each adjacent fold. Do not hide the small flap under the fold. Let him remain on top. You have done everything correctly if you have a workpiece that looks similar in appearance to the picture on the right.

12. For all small flaps, press the fold line to create new fold lines, which will be needed in the next step.

13. We turn out the folds made in the previous step, hiding the valves from below.

14. We turn the figure over, turn each corner out from the center as far as possible and bend it. We should have 12 valves - 6 large and 6 small.

15. Turn the workpiece over. Between the two large valves you see small valves. We push each small valve forward. Now we have six diamonds.

16. For each half of the diamond, we pull the blue edge to the center of the diamond and press the fold to the edge. As a result, we get a figure like the image on the right. All that remains is to repeat this action 12 times and the origami snowflake will be ready!


How to fold an origami snowflake (video tutorial):
How to make a kirigami snowflake out of paper?
Kirigami is a type of origami in which, in the process of making a figure, you are allowed to use scissors and cut paper with them. From making simple paper snowflakes The method of cutting out kirigami snowflakes is not very different, but the result is much more interesting and creative.

First, you create this template, using which anyone, even a child, can make a six-pointed kirigami snowflake. To do this, we construct an angle of 60 degrees on a piece of paper. A protractor will come to our aid in constructing an angle.

We fold a square sheet of paper in half diagonally and place the blank on the template as follows:

We bend the corners of the triangle as shown in the picture:


You can apply lines of future cuts to the workpiece with a simple pencil, and then use an eraser to erase these lines, or attach a pre-printed and prepared template to the workpiece and cut it out. If at this stage the workpiece is folded in half again, then to cut out a snowflake you can use simple nail scissors rather than a stationery knife. In this case, even a child can be entrusted with the work of cutting out snowflakes.

Schemes for creating kirigami snowflakes:

To make the snowflakes created using the origami technique even more wonderful, colorful and original, you can decorate them with sparkles, cute pompoms, rhinestones, wool balls, and color them with felt-tip pens and pencils.

Our paper snowflakes are ready! Unlike ordinary snowflakes, they will not melt, but will decorate our houses and Christmas trees for a long time!
Schemes for paper snowflakes
In nature, there are no identical snowflakes. In order for our New Year's snowflakes they weren’t all twins, you need to use them when creating them different schemes(templates). Try to apply as much as possible more schemes. Experiment! Maybe you’ll even come up with your own scheme. You can use the following patterns for cutting out snowflakes from paper:


You can find many videos on how to make a paper snowflake on YouTube here. Well, or you can go to YouTube yourself and type in the search: “How to make a snowflake” or “How to cut a snowflake.”
Happy paper snowflake crafts!
Kirigami schemes

Kirigami- a separate type of origami that allows the use of scissors and cutting paper while folding the model. This is the main difference between kirigami and other paper folding techniques, as emphasized in the name: (Kira) - cut, (kami) - paper.
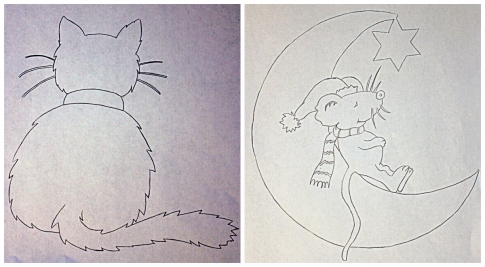
Dog astronomer.

This scheme is also very simple to implement. There will be a postcard a great gift for people who are fascinated by starry spaces. It will also delight young astronomers.

Postcard Kirigami Elephant. A simple 3D model of kirigami. This card gives lightness and ease, immersing us in the world of childhood and joy. A great gift for children and adults who dream of being one.

The scheme is easy to implement, just a few minutes and you have such beauty in your hands! Two swans have always been a symbol of good luck in love, hearts beating in unison. This card can also act as a talisman to attract your partner.

A beautiful kirigami postcard with dolphins swimming inside. The postcard is very easy to make and will definitely give you a sea mood.

Wedding carriage in kirigami style. When making this model, use thick paper, otherwise the carriage may turn out flimsy and unstable.

Wedding angels always look very cute and beautiful. By making them from paper in the kirigami style, you will definitely add some zest to a romantic evening.
3D origami – Reichstag

Another very complex model architectural 3D origami - Reichstag. To complete this model you need to be patient and have at least basic knowledge of the kirigami technique.
![]()
Pagoda - A multi-tiered tower used as a temple. Quite a complex kirigami model, but very original. The pillar pagoda contains small details and you will have to work hard to replicate it on paper.

Kirigami style deer


Magnificent 3D postcard with a pair of swans. The card is made in the kirigami style and does not have difficult steps. It will be a great gift for your loved ones.

The great paper art of architect Ramin Razani will be clear to everyone. The book presents many kirigami models. Artful objects are transformed into extraordinary 3D postcards: from mysterious geometric designs, impressive sculptures and images from art and architecture. The book contains precise development templates.
Fire Kirigami
A wonderful kirigami model - Fire. This classic example implementation of volumetricity and origami principles. This model cannot be folded into a postcard, but this in no way diminishes its sophistication.
Quetzalcoatlus Kirigami
Quetzalcoatl is a model of the deity of ancient America, one of the main gods of the Aztec pantheon. Made in the form of a postcard, it can simply be mistaken for the beautiful face of a dragon.
Stone on the water
This kirigami model can also be folded like a postcard. This composition imitates ripples on water when a stone falls.
Geometric Waltz
Great game geometric shapes and lines give this kirigami card rigor and sophistication. Use medium-weight glossy paper for best results.
Starry sky

A wonderful version of a postcard in the origami style. If you choose the right paper colors, the card will look very impressive.
Wave and Sail - Kirigami
The diagram of this kirigami model consists of two images that must be transferred to one sheet of paper, and then the necessary folds must be made.
Stairway to Heaven
Postcard Kirigami - Stairway to Heaven. Print the diagram and make the necessary folds.
Pueblo Dwelling – 3D model of Kirigami
This is a paper model simulating the living quarters of the ancient Pueblo people. Distinctive feature Their houses were located on ledges of 5-6 floors. The roof of the lower floor is a yard for the upper one.
Page 1 of 2
Finished products using the kirigami technique amaze with their beauty and airiness, with many carved windows and patterns. An interesting type of creativity, akin to origami, can be mastered by anyone - just have scissors and a sheet of paper on hand.
What is kirigami? The intricate word comes from two Japanese meanings: “kiru” - “to cut”, “kami” - “paper”. Thanks to the sound, you can see that this technique is similar to origami. Indeed, kirigami masters also create paper products, but, unlike origami, they can use scissors and, in some cases, glue.


Kirigami cutting - types of products
Flat images

Volumetric crafts

3D shapes

If you want to make something similar, use kirigami templates for cutting - without them, even professional craftsmen who work with paper may not be able to cope with this type of Japanese creativity.
Each work using the kirigami technique is performed according to a specific template, previously transferred to working paper. And if professional craftsmen know how to develop drawing schemes themselves, based on the principles of adding figures, then it is better for beginners to use ready-made sketches.
If you are just starting to learn art kirigami, give preference to creating flat crafts. Don't worry, they are in no way inferior in beauty to 3D ones, and some are even superior to them.

Kirigami is a Japanese word that consists of two words: "to iru" - cut + " kami"- paper. This is one of the techniques for working with paper to create three-dimensional images of objects, which consists of cutting and folding the paper in a certain way to create a three-dimensional shape. Kirigami is similar to origami in that it is a shape paper art. The main difference between them is the following: in origami you only fold the paper, while in kirigami you not only fold, but also cut the paper.
One of the directions of kirigami is “pop-up” cards, or folding cards. When it is opened, the folded form between its pages straightens and becomes three-dimensional. This technique is often used in children's books, where houses, castles, entire landscapes and characters in the book appear as if out of nowhere as soon as you turn the page. Impressive effect!
To design kirigami, you need to understand the basic principles of creating such three-dimensional forms. We will talk about this in a separate article dedicated to this topic.
Kirigami is a hobby that doesn't require a lot of expensive materials, but the effect that can be achieved with minimal materials - paper and a knife - is amazing. Below you will find a series free templates and patterns for creating kirigami castles in the style of a pop-up card.
Kirigami cards can be created on one sheet of paper. But you can also use two sheets of contrasting colors: one for creating the kirigami project itself, and the second as a base for the card, like in the picture below.

You can also tint the lock with pencils or a pen.

Below are 11 kirigami castle designs that you can print out. Below we'll discuss the principles of folding and cutting paper to create these locks.
Kirigami Castle No. 1.

Template for this castle:

Kirigami Castle No. 2.

Template for this castle:

Kirigami Castle No. 3.

Lock Pattern:

Kirigami Castle No. 4.


Kirigami Castle No. 5.


Kirigami Castle No. 6.


Kirigami Castle No. 7.


Kirigami Castle No. 8.


Several kirigami castle templates without images of the final result:


How to create a kirigami card with locks?
It is better to use thicker paper for printing templates. It’s easier to make the cuts by helping yourself with a ruler. Incisions can be made with a utility knife or scalpel. To fold paper, use the stylus as an aid.
Our templates contain two types of kirigami patterns: multi-colored with lines of different colors and black and white. Let's start with the first type of schemes - multi-colored. On these diagrams different colors lines mean different types folding and cutting paper, namely inward fold, outward fold and size line. Since the diagrams belong to different authors, the colors responsible for different types of work with lines are different. But looking at the finished projects with a lock next to the templates, it’s easy to figure out what type of line a certain color is responsible for. For example, in project #7, the red line is the inward fold line, the gray line is the cut line, and the blue line is the outward fold. In project No. 8, the red dotted line is the cut line, the pink dotted line is the inward fold, and the blue dotted line is the outward fold.
In the second type of diagrams - black and white - the following lines and their designations are used:
- solid line—size line;
- dotted - bend inward;
- line of dots - bend outward.
After printing out the template with a lock, place the sheet on a piece of cardboard or cardboard, and using a utility knife, cut along the lines on the template that are intended for cutting. A more difficult stage is the folds. First, carefully fold the card along the center line without touching the lock itself. Then, along each line in the lock template, bend inward or outward, depending on the type of line. At the same time, place your finger or stylus under the bending element for support.
3D PAPER CUT-OUT PAPER PAINTINGS BY ARTIST LISA RODDEN
The unusual art of artist Lisa Rodden(Lisa Rodden) is that she does not use pencils, brushes, or paints. Their three-dimensional paintings she creates from paper using scissors. Ordinary sheets of white paper are transformed into images of animals or fantastic birds, as well as fancy geometric patterns. These paper cut out pictures are eye-catching and captivating.
The artist’s secret is that she not only makes cuts with extraordinary precision, but also uses the play of light and shadow in her three-dimensional images, as well as color contrasts with background. Creating three-dimensional paintings from paper is a task that only at first glance seems simple. It requires extraordinary perseverance and extreme accuracy, reaching the point of pedantry. Lisa Rodden possesses these qualities to the highest degree.
Lisa's talent did not go unnoticed. The originality of the cut out paintings, their laconicism, minimalism visual arts made the artist’s art very popular: her paintings are shown in salons, large companies they order her original booklets and business cards.

Kirigami. Postcards for the New Year of the Dragon.
How to make a unique, three-dimensional Dragon card from colored paper for the holiday with your own hands.
Learning to do voluminous postcards in technique - kirigami. Spectacular, bright postcard— Year of the Dragon from colored paper.
Kirigami (Japanese: 切り紙?) is a type of origami that allows the use of scissors and cutting paper in the process of making a model. This is the main difference between kirigami and other paper folding techniques, which is emphasized in the name: 切る (kiru) - cut, 紙 (kami) - paper.
A handmade Dragon card can be decorated with beads, sparkles, pieces of fabric and fur, multi-colored braid, decorative laces, beads and rhinestones, satin ribbons. In a word, everything that is at hand at home or in the nearest store. Scissors, bright colored paper, sometimes glue, threads and jewelry, that’s all you need to create original, unique, designer cards. Read the full text...


