How beautiful to decorate a Christmas ball. Unusual decoration with corrugated paper roses. Balls of beads, buttons and threads
Summary: Christmas balls on the Christmas tree. Manufacturing Christmas balls from paper. How to do christmas ball together with the child with their own hands. Schemes of Christmas balls made of paper, photo of Christmas tree decorations.
1. DIY Christmas ball (option 1)
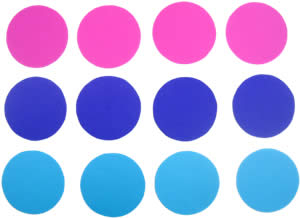
To make this Christmas decoration, you will need colored paper, thin wire, a stapler, and glue. The ball that you see in the photo above was made from paper three different colors(pink, blue and blue).
Work plan:
1. Take a small glass or glass (glass) and circle it on paper with a simple pencil 12 times. You should have 12 circles (4 circles of each color). Cut out the circles with scissors.
2. Fold each circle in half and stack them together as shown in the picture below. We use paper in three colors (A, B and C) to make this Christmas ball. Stack the mugs in next sequence- ABBCCAABBCCA. If, when making a New Year's ball, you used paper of two colors (A and B), then in this case the circles had to be folded in the following sequence - ABBAABBAABBA.

3. Fasten the circles of paper together with a thin wire, wrapping it around them along the fold line. Twist the ends of the wire together. If you do not have wire, then you can fasten the circles with a regular stapler.


4. Spread the circles and glue the adjacent halves of the circles to each other. Each half must be connected to one adjacent at the top, and with the other - at the bottom.

2. DIY Christmas balls (option 2)
Cut out three circles of the same size from colored cardboard or thick paper, but different color. In the first of them cut a cross (fig. a), in the second circle make a horizontal cut in the middle and perpendicular to it two cuts in the direction from the circle to the center of the circle (fig. b), and in the third - four cuts in the form of a cross, also along direction from the circle to the center (Fig. c). Pass the circle "c" into the circle "b". In circle "a", bend the corners formed as a result of its incision; you get a square hole. Pass the circles "b" and "c" into it, having previously folded them. Then straighten the corners again (fig. d). Attach a thread to the resulting ball.
3. Christmas paper balls (option 3)
From old postcards or colored paper, you can make such cute Christmas toys - Christmas balls. Detailed instructions for the manufacture of this New Year's decoration can be found at the link >>>>

It is not at all necessary to make a large, complex ball, you can make a small one christmas ball from fewer parts.


5. DIY Christmas ball (option 5)
To make these wonderful Christmas lanterns you will need to cut colored paper into strips of the same length and width. The length and width of the strips depends on the size of the flashlight you want to make. To make one paper lantern you will need an average of 14-16 strips of paper. For a detailed New Year's master class, see the link >>>>

When making Christmas balls, you can use strips of paper of different colors and beads for decoration. New Year's toys with your own hands. See link >>>>

If the strips of paper are bent in the middle, then you get such a New Year's decoration. Link to the New Year's master class >>>>

6. How to make a Christmas ball (option 6)
So cute and easy to make New Year's crafts from old postcards, we suggest you make it with your child.

1. Using a small glass or wine glass, draw and cut out eight identical circles.

2. Using another object with a round base but smaller in diameter, draw and cut out two small circles.

3. Fold each big circle in half, and then in half again. See photo below.

4. Glue four folded large circles on one small circle, the remaining four on the other. As a result, you will get two halves of your future Christmas ball.
It is very IMPORTANT to correctly place the quarters of the large circles on the small circle. Try to carefully straighten the "pockets" of the folded circles and in advance, before gluing, estimate the correctness of their location. At the same time, focus on the very first photo, which shows a finished ball.

5. Now you just have to glue the two finished halves together and, when the glue dries, straighten all the pockets. Christmas ball is ready!

7. paper balls do it yourself (option 7)

Making balls from thread:
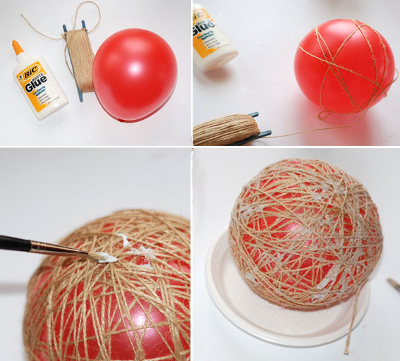
1. You will need: scissors, balloons, fat cream (Vaseline), any yarn, PVA glue, a bowl.
2. Dilute PVA glue with water, approximately 3:1.
3. Inflate the balloon to right size, give it round shape, tie with a thread.
4. Rewind required amount yarn, put it in a bowl and leave for 5 minutes.
5. We spread the ball fat cream and wrap it with yarn, for starters leaving a large distance between the thread.
6. Gradually reduce the distance between the threads until the whole ball is wrapped in yarn and resembles a cocoon.
7. Cut the thread and glue it to the ball. Leave it to dry (at least a day).
8. Gradually untying balloon, gently blow it off, after which we remove it from the thread cocoon; tie a rope to the thread ball on top for fastening.
9. The balloon is ready!
When making a ball, you can use yarn (threads) of any color or paint with any paint or sparkles (spray). Especially for the New Year, you can decorate this thread ball with tinsel and stars. Hang small balls on the Christmas tree, decorate the room with large ones. Fantasize more!
If you are unable to wind the glue-soaked thread around the ball, you can wind the dry thread, and then carefully soak it with glue with a brush or sponge.
Instead of glue, you can use sugar syrup or starch paste. To prepare the paste, take 3 teaspoons of starch per glass cold water mix thoroughly and bring to a boil. Instead of a thread, you can take a thin copper wire and also wind it around the ball.
9. New Year's do-it-yourself. New Year decoration
Old Christmas balls can be updated by wrapping each of them in a piece of beautiful fabric and tying it with a ribbon.

Our website publishes materials for those who want to make Christmas and New Year a real holiday for their children, a holiday that they will remember for a long time. long years. Here, to help parents, we publish articles and materials on the preparation and conduct of new year holidays. Including this New Year's master classes for the manufacture of original Christmas decorations and Christmas decorations with your own hands. If you start making Christmas decorations, Christmas decorations and gifts for friends and relatives in advance, then by December 31 your house will turn into a real New Year's fairy tale! We suggest making Christmas balls for the Christmas tree. You will learn how to make a Christmas ball with your child with your own hands, get acquainted with the schemes of Christmas paper balls, photos of Christmas tree decorations.
1. DIY Christmas ball (option 1)
To make this Christmas decoration, you will need colored paper, thin wire, a stapler, and glue. The balloon you see in the photo above was made from three different colors of paper (pink, blue and light blue).
Work plan
1. Take a small glass or glass (glass) and circle it on paper with a simple pencil 12 times. You should have 12 circles (4 circles of each color). Cut out the circles with scissors.
2. Fold each circle in half and stack them together as shown in the picture below. We use paper in three colors (A, B and C) to make this Christmas ball. Stack the circles in the following sequence - ABBCCAABBCCA. If, when making a New Year's ball, you used paper of two colors (A and B), then in this case the circles should have been folded in the following sequence - ABBAABBAABBA.
3. Fasten the circles of paper together with a thin wire, wrapping it around them along the fold line. Twist the ends of the wire together. If you do not have wire, then you can fasten the circles with a regular stapler.
4. Spread the circles and glue the adjacent halves of the circles to each other. Each half must be connected to one adjacent at the top, and with the other - at the bottom.
2. DIY Christmas balls (option 2)
Cut out three circles of the same size but different colors from colored cardboard or thick paper. In the first of them, cut a cross (fig. a), in the second circle, make a horizontal cut in the middle and perpendicular to it two cuts in the direction from the circle to the center of the circle (fig. b), and in the third - four cuts in the form of a cross, also along direction from the circle to the center (Fig. c). Pass the circle "c" into the circle "b". In circle "a", bend the corners formed as a result of its incision; you get a square hole. Pass circles “b” and “c” into it, having previously folded them. Then straighten the corners again (fig. d). Attach a thread to the resulting ball.
3. Christmas paper balls (option 3)
From old postcards or colored paper, you can make such cute Christmas decorations - Christmas balls.
You can print ready-made colored circles for making a colorful Christmas ball using this technique.
4. Making a Christmas ball (option 4)
Very easy to make Christmas paper ball. To make it, you will need colored paper and glue.
Work plan:
1. Cut out eight identical circles from paper of different colors. Although, in fact, the number of circles can be any, but not less than three.
2. Bend each circle in half, front side inside.
3. Glue the halves of the circles together as shown in the photo below. Glue is applied to the wrong side of the halves of the circle.
4. Before finally sealing the New Year's ball, thread a thick thread or ribbon through it. You can also make amazing Christmas garland from a large number paper balls.
Note: this Christmas decoration can be made not only in the form of a ball, but also in any other shape. To do this, use different stencils.
5. DIY Christmas ball (option 5)
To make these wonderful Christmas lanterns, you will need to cut colored paper into strips of the same length and width. The length and width of the strips depends on the size of the flashlight you want to make. To make one paper lantern, you will need an average of 14-16 strips of paper
When making Christmas balls, you can use strips of paper of different colors and beads to decorate Christmas toys with your own hands.
If the strips of paper are bent in the middle, then you get such a New Year's decoration.
6. How to make a Christmas ball (option 6)
We suggest you make such a cute and easy-to-make New Year's craft from old postcards with your child.
1. Using a small glass or wine glass, draw and cut out eight identical circles.
2. Using another object with a round base but smaller in diameter, draw and cut out two small circles.
3. Fold each large circle in half, and then in half again.
4. Stick four folded large circles on one small circle, the remaining four on the other. As a result, you will get two halves of your future Christmas ball.
It is very IMPORTANT to correctly place the quarters of the large circles on the small circle. Try to carefully straighten the "pockets" of the folded circles and in advance, before gluing, estimate the correctness of their location. At the same time, focus on the very first photo, which shows a finished ball.
5. Now you just have to glue the two finished halves together and, when the glue dries, straighten all the pockets. Christmas ball is ready!
7. Do-it-yourself ball of threads (spider web balls)
Thread balls look very attractive, do not require special skills and money. Many did them at school in labor lessons. And the use of these gossamer balls is limitless: just as an element of decor, and as a lampshade, and as New Year's toys. From several of these balls of thread, you can make all kinds of toys: snowmen, birds, fish. In general, everything that is enough for imagination.
Making balls from thread:
1. You will need: scissors, balloons, fat cream (Vaseline), any yarn, PVA glue, a bowl.
2. Dilute PVA glue with water, approximately 3:1.
3. Inflate the balloon to the desired size, give it a round shape, tie it with a thread.
4. After unwinding the required amount of yarn, put it in a bowl and leave for 5 minutes.
5. We smear the ball with a fat cream and wrap it with yarn, first leaving a large distance between the thread.
6. Gradually reduce the distance between the threads until the whole ball is wrapped in yarn and resembles a cocoon.
7. Cut the thread and glue it to the ball. Leave it to dry (at least a day).
8. Gradually untying the balloon, gently blow it off, and then remove it from the thread cocoon; tie a rope to the thread ball on top for fastening.
When making a ball, you can use yarn (threads) of any color or paint with any paint or sparkles (spray). Especially for the New Year, you can decorate this thread ball with tinsel and stars. Hang small balls on the Christmas tree, decorate the room with large ones. Fantasize more!
If you are unable to wind the glue-soaked thread around the ball, you can wind the dry thread, and then carefully soak it with glue with a brush or sponge.
Instead of glue, you can use sugar syrup or starch paste. To prepare the paste, take 3 teaspoons of starch in a glass of cold water, mix thoroughly and bring to a boil. Instead of a thread, you can take a thin copper wire and wind it around the ball in the same way.
Old Christmas balls can be updated by wrapping each of them in a piece of beautiful fabric and tying it with a ribbon.
Website: http://adalin.mospsy.ru
Christmas balls are an integral part of decorating a Christmas tree. Of course, you can always buy them in the store, but you must admit, DIY Christmas balls are something special! In addition, if you have the time and desire, you can easily make your own unusual New Year's toy, and we will show you several ways to make a New Year's ball with your own hands.
To begin with, let's make a reservation that in order to make a New Year's ball you will need a base: it can be an old New Year's glass ball, plastic, foam, foam, or even a papier-mâché ball. True, in the latter case, you will have to tinker, but I will not dwell on how to make a papier-mâché ball. Let's agree that you already have the base and talk about how you can decorate / change old ball or make a new one from transparent glass (plastic) balls.
Master class DIY Christmas balls photo
Everyone has old Christmas balls - therefore, we start with them. The easiest thing to do with last year's Christmas tree decoration is to wrap it in some kind of beautiful cloth, tie a thread for hanging, then at your request: tie with a ribbon, add some more decorations (spruce branches, berries, snowflakes, lace - whatever your heart desires). It turns out very beautiful New Year's toys, and most importantly for the next New Year you can remove all the decor and do something new.


Or you can use not a single piece of fabric, but strips or ribbons. And in this case, again, you can use the old New Year's ball or any other round base.


New Year's balls pasted over with round fabrics look good.

Or even decor with yo-yo flowers. By the way, they are made very simply. We cut out a circle template from cardboard, circle it on the fabric, cut out the circles from the fabric. We sew our circles of fabric along the edge with a thread (photo No. 3), then tighten the thread - the seam should be in the center, fix it and cover it with a piece of fabric and a bead. Glue the finished yo-yo flowers to the ball. We decorate the top with twigs, cinnamon sticks, roses, etc.

In addition, beautiful multi-layer Christmas balls are obtained from the fabric. True, in this case foam ball and tailor's pins. The manufacturing technique is shown in the photo. In principle, nothing complicated, and most importantly, you can create different color combinations.


In addition to fabric, you can also use a lot of materials to decorate Christmas balls. You can glue them with sequins, threads, acorn caps, pistachio shells, buckwheat, buttons, pieces of old CDs, strips of paper and even tree leaves.


And you can make charming New Year's cupcakes from old balls, as shown in the photo below.


Or from a foam ball and large sparkles.

Christmas balls with snow
Christmas balls with snow - (of course with artificial snow) are just great! Don't know how to do artificial snow with your own hands? In fact, everything is simple, in order to make artificial snow with your own hands you will need: semolina, white paint and glue. We mix everything together and the artificial snow is ready (experiment with the proportions, because there are no comrades for the taste and color). With the resulting mass, we cover the balls in whole or in part, let them dry, decorate from above with sparkles, beads, ribbons, etc. It turns out original Christmas toys - New Year's balls.


A similar effect (not so textured, but still) can be achieved using the usual white paint- just apply it with a sponge - in several layers.


Decoupage Christmas balls
Decoupage is always beautiful, and decoupage of Christmas balls is doubly beautiful. We glue “background” pieces on the ball, then the main pattern in the first photo is: an angel in front, and flowers in the back. Then we apply glue on the ball in places (on the top, in the center of the flowers) and apply the potal, “press” it with a piece of cotton fabric. Next, with light movements of the brush, we brush off the potal from the areas not covered with glue, in the end, you can cover everything with varnish. And, of course, we attach a beautiful loop.

Decoupage of New Year's balls can be done in different ways: using not only the potal, but also artificial snow or even coarse salt - unusual New Year's balls are obtained.


Another idea that deserves attention: not just decoupage, but decoupage with voluminous contours. In the first case, a napkin is glued, and then the same flower is glued on top, previously glued to thick paper (cardboard). Then, with the help of glue and sparkles, we create more voluminous bright accents- turns out nice.

In the second case, we use volumetric lace. Cut out the necessary details. We apply soil to the ball. Then glue the pieces of lace. After the glue dries, paint the ball white acrylic paint. Next is the most difficult: on the palette, mix the wax and oil paint dark brown. Apply colored wax to the surface of the lace with a brush. Then we rub the wax into the voluminous surface with a foam sponge or sponge, thereby revealing the relief. With a cloth with a solvent, remove excess wax, brightening the surface gaps between the lace and the protruding parts of the lace. Next, rub a colored wax patina into the decorative surface of the ball with your finger, giving an even more aged look to the product.
Now let the patina dry for a few hours. If desired, the surface can be protected with an alcohol varnish. The varnish must be applied in two layers, allowing each to dry properly. The varnish will allow you to wipe the surface with a damp cloth. We decorate the finished ball with ribbons and admire the result!

Decoration of transparent Christmas balls
WITH transparent balls no less interesting to work. Firstly, glass balls you can just fill it with what? Anything! With threads, strips of paper, pebbles, berries, cones or even sand with shells - you get an original sea ball.


And you can glue them on the outside. The palm print looks original; it can be made with paint or pure sparkles.


It turns out in an original way if you apply glue to the ball, let it dry, then wash it off - you get a slightly pale glass (frosted).

And you can paint them from the inside, and make a painting on the outside.


Those who have detachable balls can only be envied. You can make it difficult to paint Christmas balls, but work hard and do it inside unusual composition- a three-dimensional image as before was done with decoupage. Reuse gold leaf, artificial snow, beads, etc.


Styrofoam Christmas ball decoration
Above are beautiful layered fabric balls combined with tailor's pins. Using the same pins, you can beautifully wrap them with threads, ropes, twine.

The beauty of foam balls is that they are “soft”; you can make cuts in them with a clerical knife, into which you can stick fabric or paper with a nail file. You can immediately press paper or fabric without a preliminary cut. And then we glue the seams with beautiful lace, ribbons or beads. By the way, using this technique, you can make different images: stars, Christmas trees, cakes, etc.


And if you make a small basket of cardboard or wire and attach it to a balloon, you will get a charming toy in the form of a balloon.

By the way, such a New Year's toy can also be made from glass balls.

Good luck with your experiments and happy new year!
Someone before the New Year goes to the store to restock Christmas decorations or update the Christmas tree "wardrobe" in accordance with the latest fashion trends, others prefer to create all kinds of toys and Christmas balls with their own hands. The skill of some craftsmen can be envied, the decorations that came out from under their hands are so spectacular and original. But some of them favorably share their developments in master classes, which allows us to try to create something similar, having mastered a couple of interesting techniques. And there are actually a lot of techniques for creating Christmas tree decorations, even if we talk only about New Year's balls.
Thread products: knit and glue
One of the simple master classes shows how you can make a ball of thread. Probably, many have seen such toys, large and small, in shop windows, they like to decorate Christmas trees with them. shopping malls. Let's try to make a ball of thread and glue, especially since it is very simple.
You will need:
- balloon;
- PVA glue;
- brush for glue;
- scotch;
- Knitting thread.
| First, inflate the balloon to the correct size. Tie the end into a knot. | |
 |
Tape this protruding tip with tape so that the ball is round. |
 |
Wrap the ball with knitting threads. There is no special technique here. Just wind the threads in a chaotic manner to the desired density. |
 |
That will be enough. |
 |
Now you need to grease the ball with glue. Pour some water into the jar. Add PVA glue. The consistency should be easy to apply. |
 |
Lay something on the table and start lubricating the ball with diluted PVA glue. Try to miss all the threads. At this stage, you can sprinkle the ball with sparkles if you wish. |
 |
Thread the string and hang the ball to dry. |
 |
When the glue is dry, pierce the inside of the balloon. |
 |
Pull it out through the hole between the threads. The finished ball can be decorated with felt, ribbons, paper flowers. |
But that is not all. The ball is not only hung on a string, it can serve as the basis for a wonderful table composition. Inside the ball, if you make a larger hole, put tinsel, ribbons, crumpled paper and even sweets.


And if you take an ordinary skein woolen thread and knitting patterns, then it is easy to crochet or knit an openwork or tight ball with a crochet or knitting needles.
Video: lace balls - knitting technique
Video: Christmas ball on knitting needles


We put here a few interesting schemes for knitting:


Christmas tree ribbon balls: kanzashi and other techniques
To make a ball of ribbons, you will need a round base. It is most convenient to use foam balls for this purpose. They are sold in shops for needlework and creativity such as Leonardo. If you recall seeing items for embroidery, soap making or beading in one of the stores, chances are there will be Styrofoam balls of various sizes.
Let's try to wrap the ball thin tape two colors and decorate it with artificial spruce branches and natural cones.
Prepare:
- foam ball;
- blue ribbon and purple(length depends on the diameter of the selected ball);
- artificial spruce branches;
- several pine (spruce) cones;
- glue gun.
 |
This will be the result of the work done. |
 |
Set the glue gun to heat up. Take a styrofoam ball in your hands. |
 |
Squeeze out some glue. |
 |
Glue the end of the tape to the ball. |
 |
Start winding the ball, crossing the layers. |
 |
Every few rows, if necessary, secure the tape with glue. |
 |
When you're done with one color of ribbon, cut it off and glue the end. |
 |
Apply glue again and glue the tip of the tape in a different color. |
 |
Layers next color you will have to glue more often, because a protrusion has formed at the intersection, from which the tape is slipping. |
 |
After wrapping the ball, cut the tape with a margin for a loop. |
 |
Use glue to make a loop for hanging the toy. |
 |
It remains only to decorate the ball with decor. Glue it on with a heat gun. |
Balls made of ribbons made of small segments look interesting. The layers of ribbons make them look like a bump.
Video: making a bump ball
You can also make a ball using the kanzashi technique from ribbons. Craftswomen who work in this technique know how to fold pieces of ribbon in the form of petals, and then collect flowers from them. To make such christmas balls with your own hands you will need:
- rep ribbon of two colors;
- candle;
- glue gun;
- beads;
- tapes;
- foam ball with a diameter of 10 cm.
 |
Cut a square of tape 4x4 cm and form from it round petal kanzashi. Fold the square diagonally. |
 |
Then we bend the corners to the middle. |
 |
Fold in half along the middle line, as shown in the photo. We cut the tip a little, process it with a candle flame. |
 |
Then we cut the back of the petal, process it. We straighten the petal. |
 |
White petals need 90 pieces. Glue 5 petals together. |
 |
Glue a bead to the center. You will get 18 flowers. We do not glue a bead in the middle of one of the flowers. |
 |
From narrow tape 20 cm long, make a loop and glue it to the middle of the ball. |
 |
From wide tape cut off 5 segments of 10 cm each. Fold the segments, gather the edge and spread it with glue. |
 |
We glue all five blanks in a circle on the ball next to the loop. |
 |
We take a flower without a bead, stretch a loop tape through the middle. Wrong side smear the flower with glue and glue it to the ball. |
 |
Glue the rest of the white flowers in a circle. |
 |
Doing already known way flowers from lilac ribbon. 115 petals are needed. You will get 23 flowers. We fill free place flowers. |
Perhaps a ball with roses will seem more attractive to you. It is assembled in the same way, it is only necessary to master the technique of making roses.
Video: a ball with ribbon roses
See what gorgeous balls from tapes you can do it yourself:


From paper and cardboard kusudama and pom-poms
Making paper balls is even easier. Paper and cardboard keep their shape better, they can be used to make different compositions with children.
Pompom balls will enliven the interior. They are made from thin cigarette colorful paper. In addition to it, you will need scissors, a pencil and soft wire.
 |
Prepare everything you need. Sheets of tissue paper should be as wide as the diameter of the future ball. |
 |
For one pompom you need 8 sheets. Place them carefully in a pile. |
 |
Then fold everything together with an accordion, cut off the excess. |
 |
Take a piece of wire about 10 cm long and fasten the accordion in the middle. Use a pencil to make a loop out of the wire. Wrap the free end of the wire around the base of the loop. |
 |
Trim the edges in a semicircle. Irregularities can be removed with small scissors. |
 |
Bend and straighten each sheet. |
 |
The more carefully you straighten the sheets, the fluffier and neater the ball will be. |
Did you know that you can make a ball out of paper strips? Yes, even they can be rounded if you know how. In fact, there is nothing particularly tricky here. To make such a product, you will need:
- thick paper or cardboard;
- thread;
- two beads;
- awl;
- scissors.
 |
Keep in mind: the shorter the stripes, the smaller the ball will be. |
 |
Cut 10 identical strips. |
 |
Take an awl and make a hole in paper strips from one side and the other. Pass the thread through the hole. |
 |
Then thread the thread through the bead, tie it into a knot. |
 |
Insert the thread into the hole from the opposite end. |
 |
Attach another bead. |
 |
Here is the ball. If you want to make a ball of a larger diameter, take more long strips. The width and number of stripes can be chosen at your discretion. Such toys are decorated with ribbons or left without decor. |
Even from book pages, carelessly torn into strips, New Year's balls are collected. And it turns out very cool and stylish.

The technique for making balls according to the patterns is similar, which you can see below. Having cut out the vytynanki, it is enough just to collect the details on the thread and slightly pull the edges to each other, giving the toy the shape of a ball.


Try to collect these paper balls.


You will need templates to make them. You can print them in any size.


After cutting the blanks, the middle will need to be connected in the form of rays diverging from the center and glued paper circles on top and bottom. Then simply bind the pieces of paper together. The form will form itself.
Paper balls from modules differ significantly in techniques. There are modular origami balls that are assembled from small modules. They are quite difficult to perform. But if you still want to try, watch the video tutorial.
Video: herringbone modular ball
Below we give a master class that even a child can use.
A lot of balls are also made from paper, for example, Chinese or Japanese. The technique for making a Chinese ball is quite simple, but you will have to carefully monitor what the master is doing.
Video: Chinese paper balls
But kusudama balls are very difficult to manufacture. It depends on the folding technology base element. We have selected two relatively simple master classes.
Video: making a kusudama ball
Video: simple kusudama ball
How original Kusudama can be, judge for yourself:


What to make from a foam blank and fabric?
Balls made of fabric are very popular among lovers, especially those made using the artichoke technique. This specific technique allows you to make the balls of the most various shades, dissimilar to each other. How to make such balls is not easy for a beginner to figure out, so you need step-by-step instruction.
To make a ball you will need:
- fabric of different colors;
- foam blank (in this case a ball with a diameter of 8 cm is used);
- pins with a hat (similar to carnations);
- ribbons for decoration;
- lighter;
- marker.
 |
You get a ball trimmed with a fabric with a jagged ornament. |
 |
The first step is to mark the ball so that the fabric lies flat. There is a technological line on the ball, it divides the ball in half. Stick a pin into this line anywhere and measure the circumference with a measuring tape. Divide the resulting number in half, so you will find the opposite point. Measure this value and stick a second pin into the ball. Duplicate the circle line with a marker. |
 |
To measure the horizontal circle - the “equator”, you need to divide the first value by four and set aside along the circle line on one side and the other of the pin. Attach to points measuring tape and draw a second circle. Now it remains to set aside along this circle again the same distance (the circumference divided by four) and draw a line. We divided the ball into 8 equal parts. |
 |
The fabric must be cut into square shreds with sides of 7 × 7 cm. The first layer will require 10 shreds, the second and third - 16 shreds each. Each piece must be folded in half and ironed. This will greatly facilitate the subsequent work. |
 |
First of all, we make the substrate. We take one piece. We fix the center with a pin and stretch the corners, pinning them with pins. |
 |
Then we take another shred, stick a pin into the center, fold the fabric in half so that the pin's head is inside, as in the photo. |
 |
We stick a pin in the center of the ball. We remove the pin fixing the center of the substrate. |
 |
We bend the corners to the middle, fix with pins. The middle line should exactly repeat the line drawn with the marker. |
 |
In the same way, we fix the flap opposite. |
 |
Then add two shreds-triangles between. We pull the corners, but not all the way, and fix them with pins. It is recommended to immediately repeat the steps on the opposite side of the ball. |
 |
Now we mark with pins where the tops of the triangles of the second row will be. We measure one and a half centimeters along the line formed by different details. We stick pins. |
 |
We fix 4 blanks with pins. |
 |
Then we measure one and a half centimeters along the lines of the midpoints of the triangles white color and stick the pins in again. Fill in the gaps with triangles of red fabric. |
 |
In the same way, we make a row of green fabric. Don't forget to repeat the rows on the opposite side. |
 |
Then we measure the circumference of the ball. It will be slightly larger than when measured foam ball through layers of fabric. We cut a strip of fabric 3.5 cm wide, the length according to your measurements plus an allowance of 1 cm. We bend the edges by half a centimeter, iron. We pin the beginning with two pins in the corners, wrap the ball, covering the edges of the shreds, bend the end of the tape and pin it up. The main work has been completed. Now you can decorate the ball as you wish. |
And it’s also worth making balls for the green beauty with stuffing the fabric in the foam slot - kimekoni. Everyone can master the principle of manufacturing. From the materials you will need:
- foam ball;
- a little fabric, you can trim;
- paper;
- narrow tape.
From tools:
- pencil or marker;
- scissors;
- ruler;
- pins;
- glue gun.
 |
Take a styrofoam ball. |
 |
Draw the desired ornament. In our case, the ball was simply divided into sectors. |
 |
Wrap the ribbon around the balloon. Thus, measure the circumference and cut off the excess. |
 |
Cut the tape in half. Measure with a ruler. |
 |
Find the midpoint of the segment. Measure the length to the middle. |
 |
Draw a template on paper. Consider the allowances that will refuel. The length of the template should be slightly longer than the length of the piece of tape. Find the middle. Measure the sector drawn on the foam ball at its widest point. Add three millimeters on each side and, according to the measurements, make a template. |
 |
Cut out of fabric right amount"petals". |
 |
Make cuts on the foam ball along the lines. |
 |
Attach patches with an overlap. At the intersections, secure with pins and drown them in the slots. |
 |
If necessary, use a flat tool to thread the fabric. |
 |
Take the ribbon until cut off from the skein. Glue the tip with a glue gun. |
 |
Close the seams of the fabric. use glue if necessary. Cut the tape. |
 |
Make a bow out of ribbon. |
 |
It can be small, modest or lush. |
 |
Glue a loop of tape. |
You can fill the fabric without pins. How to do this is shown in the video:
Thus, you can make a ball with any ornament.
Video: kimekomi ball with a complex ornament


Other balls: rhinestones, sequins
It is impossible not to mention other ways to make beautiful Christmas tree decorations. For some of them, a foam ball is again used as the basis. For others - glass or plastic balls. Continuing the theme of decorating foam balls, we suggest looking at how to decorate a ball with lace and rhinestones.
Video: a ball of lace ribbon and rhinestone ribbon
You can make a ball with sequins. Insert the pin through the hole in the sequin and then into the Styrofoam ball. If you have sequins with an overlap, you get such a beautiful ball.

And if you combine several techniques: kimekomi, decoration with ribbon and sequins, then such a miracle can be created.

Handmade from beads and beads
If you really like to work with beads, then try to weave a "cover". It can be solid or cover the ball only from above. But this work will take long time. If you want to make several balls, it is better to start well before the New Year. It is best to make such a ball as a gift, the efforts will fully justify themselves.
Dense covers are made using the crochet technique. The middle is stuffed with padding polyester. In principle, it’s simple, but the main thing is not to make a mistake with the count of beads if you are knitting a pattern, otherwise you will have to dissolve it.
Video: one-piece bead ball
Openwork covers are made with a needle and fishing line. Here, too, it is easy to make mistakes in the calculations. For this work, you will also need a one-color Christmas ball - plastic or glass.
Video: beading a Christmas ball
By the way, the beads can be simply glued. Then something like this will happen.

Look at the intricate bead decor the craftsmen do.


Simple and complex decoupage
Incredibly beautiful balls made using decoupage technique. Of course, much is determined by skill and imagination. But now there are many really original decoupage cards on sale. In addition, you can use a regular printed picture. For next master class will need:
- glass balls;
- sandpaper of varying degrees of graininess;
- acrylic primer;
- acrylic paints;
- acrylic lacquer;
- brushes synthetic and natural;
- a piece of foam rubber;
- image;
- one-step craquelure;
- decoupage glue;
- potal;
- glue for potali;
- glue Moment-Crystal;
- scissors;
- file;
- Toothbrush.
 |
This work is admirable. |
 |
For work, we use pre-primed glass balls. |
 |
We paint the place under the picture with white paint using a piece of sponge. We dry. |
 |
We varnish the printout in three layers. Each layer must be applied in a perpendicular direction to the previous one. Dry well. |
 |
Cut out the picture and place it face up in the warm water for about 30 minutes. |
 |
We process the dried ball with a medium-grained sandpaper. |
 |
We spread out the printout. The tip can be picked up with a needle. |
 |
The place where we will stick the picture is covered with decoupage glue. |
 |
Attaching a picture. We smooth out the wrinkles on the main details of the picture as much as possible. |
 |
We dip our finger into the glue and draw it from the center to the edge, simultaneously gluing and expelling the air from under the image. |
 |
The folds are sanded with a medium-grained sandpaper. |
 |
We cover the image with varnish. |
 |
After the varnish has dried, we pass with a fine sandpaper. |
 |
We paint over the damage with paints. Let's dry. |
 |
Then we paint the back section of the ball in golden color. This color will show through the cracks in the craquelure. |
 |
Sand with a fine sandpaper after drying. |
 |
Apply with a brush one-step craquelure. We dry. |
 |
Cover with paint with a sponge. |
 |
Varnishing the ball. |
 |
Glue lace on Moment-Crystal glue. We dry. |
 |
We paint in the desired color. |
 |
We apply glue for sweating. |
 |
We glue the potal. Smooth with a brush. |
 |
We varnish the potal. |
 |
Now you can varnish the entire ball. Decorate with lace and ribbons. |
The edges of the lace can not be glued, but left free.

They also do decoupage with snow: balls are decorated with ordinary salt.

Of course, you can limit yourself to just a picture, without craquelure, lace and other details.

But if you stick half-beads in the form of toys on a Christmas tree on the ball, then it will look more original.

By the way, you can completely limit yourself to lace. Lace ornament on Christmas balls looks amazing.


felted wool balls
Even if you've already tried different techniques making balls, be sure to try to felt a wool ball. This is an environmentally friendly technology. It doesn't even use glue. All you need is wool, felting needle and thread. Felted balls are made in the technique of wet and dry felting.
Video: red and white roses - wet felting technique
Video: dry felting technique for Christmas balls
The easiest way is to make a ball, and then decorate it with beads and beads, or sew on an appliqué made of felt:


When you fill your hand, take on the manufacture of balls with complex patterns:


Decor option: polymer clay
If you have the skill of sculpting from polymer clay, then you will definitely like the idea of decorating balloons with this material. There are several techniques: from using multi-colored circles of clay to sculpting convex plots.


Painted curls. Is paint work just for artists?
In stores, sometimes there are balls with beautiful hand-painted. They are very beautiful, but they are prohibitively expensive. Making such a ball at home is not only easy, but also not burdensome for the wallet. You will say that for this you need to be able to draw well ... It is not necessary at all. On the Internet, you can download any ornament or pattern you like, transfer it to a ball, then draw the borders with a special contour and fill in the gaps with acrylic paints.
View a selection of photos of hand-painted Christmas balls:


Snowstorm at home
One of the options for Christmas balls is not to hang on the Christmas tree, such a ball is used as a table decoration. It's about about a ball of snow.

Let's try to make it.
 |
For the manufacture of snow globe you will need a jar and a figurine. You can take any jar that you like in shape. If there are traces of glue on the jar that are not washed off with water, try washing them off. sunflower oil. The fact is that such glue is most often fat-soluble. |
 |
We try on the figure to the lid. It should not cover the thread that secures the lid to the jar, but should freely enter inside. |
 |
To make the figurine look good inside the jar, you need to put it on a dais. |
 |
To do this, you can use plasticine. Blind a small mound on which you put the figure. The figurine inside the jar can also be made from plasticine, but wax should not be taken. The disadvantage of plasticine is that sparkles stick to it, so it is advisable to cover such a figure clear varnish for nails. |
 |
When the mound is ready, squeeze the glue from the glue gun onto the inside of the lid. Glue the pedestal. |
 |
Attach the figurine on top with a glue gun. By the way, good for snow globes figurines from kinder surprises. |
 |
Try on how the figurine fits into the jar. |
 |
If the plasticine prevents the lid from twisting, remove the excess. |
 |
We prepare the liquid with which we fill the jar. We take glycerin and pour a quarter, a maximum of a third of the can. The more glycerin, the thicker the liquid will be. And the slower the glitter will move inside. Now add distilled water to the jar. Please note that the figurine will displace some water, so do not fill the jar completely. In addition, you need an air bubble inside, which will mix the sparkles. Mix everything well. |
 |
Add glitter, you can take more pieces of white plastic. these materials are easy to purchase in a store that sells everything for manicure. Don't overdo the glitter. Stir the liquid again. |
 |
Take a tissue and wipe dry the neck of the jar. Coat the neck with Moment-Crystal glue and screw on the lid. |
 |
If desired, decorate the neck of the jar, for example, with lace. Cut off the desired piece and use a glue gun to attach it to the lid of the jar. |
We wish you successful preparations for the New Year. And let the process of making Christmas balls bring pleasure to you and your loved ones!
The New Year is getting closer, so I want to touch this magic already. Of course, it’s still too early to decorate the Christmas tree, but you can get creative, for example, make Christmas balls with your own hands. There is an article on the blog about it, there are a lot of interesting ideas.
by the most popular decoration balls are considered, of course, they can be bought, the choice is huge - small, large, plastic, glass. But the items self made- not an easy decoration, it is a mood, a piece of the soul. Such a toy will stand out on your Christmas tree or be a great New Year's gift.
Now the English expression has become popular - handmade ( hand made), which means "hands do". And it's not easy buzzword, now handmade things have become appreciated. Huge supermarkets are opening, where you can buy a lot of goods for hobbies, creativity, needlework, there would be a desire.
I suggest to look different ideas design - from simple, which anyone, even a child, can handle, to more complex ones.
DIY Christmas balls for 2019 - 2 step-by-step master classes
2019 will be the year of the Yellow Earth Pig, which means that on the New Year tree there must be a toy in the form of a Pig. There are many ideas on the net, we will consider those that will have a round shape.
Did you know that ordinary apples were the predecessors of the balls. In Europe, Christmas trees were decorated with this biblical symbol in ancient times. In one of the lean years, glassblowers came to the rescue, making apples out of glass. This innovation caught on quickly. IN glass products the light of candles was reflected, which made the decorated Christmas tree more festive.
Christmas ball pig
Remember pig Nyusha from the cartoon, she is round, but very cute. You can make such a cute pig yourself from an ordinary Christmas tree toy.

Necessary materials:
- Christmas tree toy with a diameter of 6, 8, 10 cm
- pink and black acrylic paint
- polymer clay - white, light pink, dark pink colors
- acrylic lacquer
You will need a hot gun to glue the parts, but if there is none, then you can use second glue.
Tip - do not use Moment-Crystal glue, as it can dissolve the paint on the ball.
Step-by-step instruction:

Such a cute toy will be a wonderful decoration for your Christmas tree.
The pig can be any color, choose the one you like best.
Video on how to make a Pig pom pom ball
If you have leftover yarn in your bins, then you can make Pig's cute face out of a pom-pom, detailed step-by-step instructions in the video. Children will like this Christmas decoration, because they love soft toys so much.
Schemes for collecting voluminous Christmas balls from paper
It's easy to make beautiful Christmas decorations out of paper. You can use colored paper or white paper, drawing your own drawings, snowflakes or sticking on it. interesting pictures. Children will like such creativity, such balls can be made not only for the home, they can be attributed to kindergarten or to school. For manufacturing, you will need ordinary office paper, multi-colored or white, glue, scissors.
Modular paper ball
Such a product is made from modules that are glued together, they can be of different colors or plain, it all depends on your preferences.

Description of work:

Large do-it-yourself honeycomb ball (step by step instructions)
Looking at such a product, it seems that it is very difficult to make it. In fact, even a child can cope with such work, the main thing is to understand the manufacturing principle. 
Learn better at big model, it can then be used to decorate the interior, take it to a kindergarten or school to decorate a large Christmas tree. Having understood how it is made, you can easily repeat the steps on small products.
The main rule: do not get confused with the order of applying glue.
How to do:

Ball-honeycombs can be made from fewer halves, then honeycombs will be rarer.
DIY Christmas balls in shabby chic style
Shabby chic balloons can be very different, because this is not a technique, it's just a style.
The founder of this style was the Englishwoman Rachel Ashville, who initially bought old furniture, decorated it for herself, and later began to sell her work. Accordingly, a common interior was created for such furniture. The peculiarity of this style is tenderness, warmth, and not pretentiousness of expensive things. 
Today "shabby chic" is fashion trend, based on the principle of giving things a “shade of antiquity”.
Chic style is often compared with Provence style:
- it is characterized by angels, soft floral motifs, mainly roses, peonies;
- from geometric patterns a slightly noticeable cell or strip is allowed;
- the color scheme is light, soft, mostly white, beige, peach, pink color. You can add shades of lilac, salad, lavender, blue color, the main thing is that they are not bright;
- shabby chic is lace, organza, satin, linen, delicate chintz.
Not surprisingly, handmade items (hand-made) fit perfectly into this style, New Year's toys were no exception.
Scrapbooking technique for decorating balloons
Scrapbooking is the best fit for the shabby chic style, as this technique involves decorating. 
To make such balls with your own hands, you don’t really need a master class. It is enough to buy ready-made inexpensive plastic New Year's toys or foam blanks in the needlework departments.

For decor, find in your bins that every needlewoman has, pieces of fabric, lace, ribbons, jewelry, interesting buttons, beads and, showing imagination, make exclusive decoration on the tree

Decoupage Christmas balls
The now very popular decoupage technique is perfect for the shabby chic style. 
It is not difficult to master it, in the article mentioned above there is detailed master class for newbies. It is enough to choose pictures, decor in the right tone and unique works will catch the admiring glances of your guests. 
In the video, I propose to watch a master class on making a New Year's ball in the shabby chic style using the reverse decoupage technique.
Decoration of Christmas balls with beads
Craftswomen working with beads do not disregard Christmas decorations. From small beads, delightful works are obtained - Christmas trees, angels, cones and much more. Iridescent reflections of small colored beads create a sense of a fairy tale in the house.
Balls are also decorated with beads, and the most different ways. Fully braided, creating beautiful drawings, make exquisite openwork ornaments.


To make such beautiful toys you will need beads, nylon thread or fishing line, a needle, and perhaps most importantly, patience.
And the master class in the video will help you, good luck!
How to make a ball on a Christmas tree with a photo with your own hands
Now you can order different toys- registered, with a logo, with a photograph, but for creative people It will not be difficult to do such things with your own hands. Read on and you will see that everyone can make a balloon with a photo. 
For manufacturing you will need:
- detachable transparent ball
- acrylic paint - white and colored
- glue "moment"
- sequins
- photo
Description of work:

Christmas ball of satin ribbons and fabric
The fantasies of needlewomen have no boundaries; ribbons and pieces of fabric are used to decorate Christmas tree decorations.
And it’s already not easy “blinded, from what was”, different techniques are used, kimekomi, kanzashi, artichoke. Balloons decorated with these techniques are simply a work of art.
Kimekomi technique for fabric Christmas decorations
Products made using the kimekomi technique are somewhat reminiscent of our patchwork technique. 
We use it for the manufacture of quilted bedspreads, blankets, sofa cushions, and other products, but not for New Year's toys. But it turns out that balls made from scraps of fabric also look very original and beautiful. 
In Japan, kimekomi was used to make dolls by pressing strips of fabric into slotted wood blanks.
Materials for work:
- foam blank
- glue stick
- stationery scissors
- shreds of fabric
- sharp object with a rounded tip table-knife, knitting needle, crochet hook)
- various items for decoration
The principle of operation is simple:

Fabrics for such work use a variety of both elasticity and strength. Easiest to work with elastic fabrics, more difficult - with loose fabrics with rare weaving.
Christmas balls kanzashi
Kanzashi is a technique similar to origami, only paper is not used for it, but satin ribbons. This art came from Japan, women used kanzashi to decorate their hairstyles. Now this technique is used not only to decorate hair clips, but also to decorate clothes and objects. 
According to the craftswomen, if you figure out how to make kanzashi, it becomes clear that this is not at all difficult.
Like it or not, you can find out by watching a video on making a Christmas ball using this technique.
Decorating balls using the artichoke technique
Artichoke - another technique patchwork, which is actively used to decorate Christmas balls. 
The meaning of the technique is simple - you can draw an analogy with origami - we add pieces of fabric and attach to the base.

Candy Christmas ball
New Year, sweets, sweets - these concepts are inseparable. Imagine how happy your child will be when he sees a delicious toy on the Christmas tree, although it is unlikely to hang for a long time. Sweet balls can be an original New Year's gift.
For the manufacture of sweet toys, you can use a foam blank and use glue, tinsel, pieces of fabric, ribbons to form a ball. 
Another option is to use split balls. This option is quite simple - you just need to fill the transparent blanks with sweets and decorate them beautifully. 
New Year - magical holiday and you can touch this magic with your own hands, creating real masterpieces. Charge your loved ones with inspiration, let each member of your family make their own New Year's ball so that your Christmas tree is the most elegant. Good luck and a fabulous New Year.
Elena Kasatova. See you by the fireplace.


