DIY fake for Grandma on March 8th. Sweet gift - candy grapes. Fresh flowers in original pots
The task of all men is to provide their women with attention on March 8th. If a husband or loved one can buy a gift, then the sons can make their own wonderful gift from under manual means. The most beautiful crafts Doing it yourself is very simple and takes little time.
Such work has become traditional in schools and kindergartens. The most popular gift material for mom is colored paper. It is most convenient to make a pleasant surprise to a spring day.
Every child wants to surprise his mother, especially on such a spring day. For the holiday, children do in schools various crafts. Anything can be used as a material. In second grade, children can be asked to make clay figures and then paint them. Mothers and grandmothers will put such toys as a souvenir on a shelf or attach them to the refrigerator (magnet).

Crafts made from colored paper
Option #1
You can create a very beautiful craft from colored paper. It is suitable for children junior classes. It is done quickly, but it turns out very beautiful.
To create a craft you will need:
Colored paper (green, red, white and yellow);
PVA glue;
scissors;
purple felt-tip pen;
simple pencil.
Creating a masterpiece:
First, lay out all the tools and materials in front of you. First of all, we will make weed. Take a whole sheet of green paper. Now start folding it into an accordion from any edge. You can start from the top or from the bottom, as you wish. Make sure each fold is the same size. When you reach the end, connect the conics to make a fan.
Now he will make tulips. Draw the simplest tulip on red colored paper and cut it out. Fold the red paper four times to make 6 more flowers. Place the tulip on the paper and trace with a simple pencil. Cut carefully. The result should be 7 tulips.

Next, cut out the daisies from white paper. We do it according to the same principle as tulips. But in addition to the flowers, we also cut out the centers from yellow paper. We also make 7 flowers. We attach the centers to each daisy using glue.
All that remains is to assemble our composition. Glue tulips to the ends of the fan, alternating with an accordion. And scatter daisies in the center and glue them too. Our craft is ready!
Option No. 2
Also, children in first grade can easily make flowers using the origami technique. Since Women's Day is celebrated in the spring, you can make a bouquet of tulips. These will last a long time and delight the mother’s eye.
Colored paper (5 sheets of red and 5 sheets of green);
scissors.
Progress:
Let's start creating festive bouquet from the bud. Take a sheet of red colored paper and place it in front of you. Grab the top right corner and fold the sheet diagonally to the end. Draw a line and cut. The result should be a square and a wide strip.
Bend the square diagonally, then straighten it. Take the upper left corner and also bend it diagonally, then straighten it again. Now reach out so that both fingers are on right hand kept one diagonal, and left hand– the opposite. Bend the square into a triangle.
Now take the left corner of the first triangle and flip it to the right. Then turn the craft over. Now there are 3 corners on one side, and 1 on the other. Where there are 3, turn one corner over to the opposite side.

Look carefully. There should be a hole at one end and 4 petals at the other. Blow into the hole as if you were inflating it Balloons. Then bend the tips of the petals.
Take a piece of green paper and cut a strip the same size as the red paper left over. Then wrap it lengthwise into a thin tube. So our stem is ready. All that remains is to stick it into the hole on the bud. Thus, you need to make the remaining flowers. The result should be 5 tulips. You can experiment with colors and make tulips different colors(yellow, red, orange).
Option #3
By March 8th, all women are usually given a mimosa. From these yellow flowers Not only does it lift your spirits, but it also gives off a wonderful aroma. You can make such flowers with your own hands. They will delight mom and grandma all year long.
Required tools and materials:
Colored paper (green and pink);
simple napkins yellow color;
PVA glue;
a simple pencil;
ruler;
paints;
scissors;
disposable cup.
Progress:
Let's start making the stem. Cut off long strip from green paper. Then twist a thin tube. Apply glue to the ends and wait until they dry. If you don't have glue on hand, use a stapler.
Let's start making flowers. Mimosa flowers resemble fluffy balls. Take yellow napkins and cut 3 cm strips. Fold each strip in half. Next, make cuts along the entire length and roll it up.
The opposite side should be fluffy. Make a lot of these balls. Do the math at the end. It is necessary that the number of flowers be odd. Then glue the fluffy balls to the stem. You can install them tightly to each other, in small piles.

But we will just end up with a bare stem with flowers, so we need to attach leaves. Cut out two long ovals from green paper. Fold in half and make cuts. Spread the leaves, apply glue to one end and attach to the stem.
Original beadwork
By March 8, boys in junior classes for mothers and grandmothers can make their own crafts from colored paper, and girls from beads. Now we will show several ways to create a souvenir.
Small bouquet of flowers
Even a first grader can handle this craft. But basically, only from the 3rd grade do they begin to teach beading. There is nothing complicated in this technique, the main thing is not to rush.
Required materials and tools:
Round beads (pink, green and purple flowers);
wire (not thick enough to fit twice into the beads);
yellow beads;
small, decorative vase.
Progress:
First we make the buds. Each flower will consist of 5 identical petals. Take a piece of wire, about 10 cm. Insert one pink bead into one end. Wrap the other end and insert the end into the hole, but from the other side. This way you will fix the beads. Now string two pieces and go through them with the other end. Then do the same with three pieces.
The result should be a small pyramid. You should also do up to 5 beads, then go down. That is, first: 1, 2, 3, 4, 5; and then: 5, 4, 3, 2, 1. At the end, twist the two ends of the wire along the entire length.

Use the same principle to make the remaining petals. We need 10 petals Pink colour and 15 purple. By the way, the leaves are made according to the same pattern as the petals, but from green beads. It's not difficult to count, we need 10 leaves.
For the centers, take a 10 cm wire and secure the bead. There should be 5 centers in total.
The next step is to collect our bouquet. Take 5 petals, place the middle in the center, and twist everything. Take two leaves and also twist them around the stem. Then straighten everything out. Also add all the flowers. Place the finished bouquet in a vase or tie it up beautiful ribbon. This is how easy it is to make small souvenirs. To add spring mood, all petals can be made multi-colored.

Creative works made from salt dough
Souvenirs made from salt dough will be a wonderful surprise for mom or grandma. This safe way, since piercing and cutting tools are not required here. In order for you to get beautiful figures and not fall apart, you need to properly prepare the salty composition. First, we will describe the recipe for salt dough, and then we will describe the process of work.
Required ingredients:
Wheat flour;
fine salt;
water.
Preparing the dough:
Take flour and salt in equal quantities and mix. Add some water and knead the dough. Then you need to put it in a bag and place it in the refrigerator for a couple of hours. After which you can safely begin sculpting. If it seems to you that the dough is not elastic at all, add a little cream. This will be useful for your hands, and it will be more convenient to sculpt figures.

For a souvenir:
Ready salty dough;
gouache paints;
brush;
water;
magnet.
Progress:
Now it's up to your imagination. You can make small flowers in a basket. First, make a round basket and attach a handle. Place 7 or 9 small flowers inside, like a chamomile, but with 5 petals. Leaves may stick out on the sides.
When everything is ready, you need to wait for the dough to dry and become stone. Then dip your brush in water and start painting. You can make a basket Brown, the flowers are pink, and the centers are yellow. Accordingly, the leaves are colored green color. You can sprinkle glitter on top.
Our advice to you! Do not wet the brush too much in water, otherwise the paint will run off and the whole craft will be ruined. Next, when the figure is dry, you will need to reverse side stick a magnet. Like this original souvenir can be done by March 8 for mothers and grandmothers.

All children want to surprise their mothers on this wonderful spring day. They come up with various souvenirs with their own hands. Kids can make gifts from colored paper, and older kids can do serious things. In general, crafts can be made from anything. You can sew a pillow and embroider a picture of your mother on it. All you have to do is take a photo on a flash drive to a photo salon, and they will transfer the image onto paper.
You can use more simple advice, especially if you don't have time. Make a card out of cardboard by folding the sheet in half. Then cut out a big figure eight and glue it to the card. Glue flowers around the entire perimeter of the number. Inside you can write beautiful wishes mommy.
Such gifts are always appreciated as they are made by hand. Your soul was put into their preparation. Use your imagination and surprise mothers and grandmothers with your surprises on this magnificent International Women's Day.
International Women's Day on March 8th is approaching, I would like to express my love, respect and gratitude to my mother. The best way to please your mother on this day is to give good gift made from the heart with your own hands. In this article we have selected best ideas gifts for mom on March 8th.
You will need: colored paper, scissors, glue.
Master Class

creative indoor flower

You will need: pot, foam plastic, skewers, artificial grass, glue gun, candy bars, chewing gum, gift cards, etc...
Master Class

Creative indoor flower ready!
Coffee mug

You will need: mug, coffee beans, cotton pads, thick white thread, brown acrylic paint, superglue.

Master Class

Coffee heart

You will need: coffee beans, paper, wire, thread, glue, cardboard, jute thread, sponge, can, brown paint, ice cream sticks, decorative elements - flowers, ribbons...
Master Class

The coffee heart is ready!
Ship made of money

You will need: 7 sheets of A4 format with images of different banknotes(euros, dollars, hryvnias, rubles), white sheets of A4 format, silicate glue, scissors, glue gun, thick cotton threads, skewers 20-30 cm long, polystyrene foam, flat box half as wide as the bottom of the ship.

Master Class
- Fold a boat from a sheet of paper as shown in the photo.

- Carefully turn the boat inside out so as not to tear it.
- Fold and iron the boat.
- Trace the outline of the boat on another sheet, then draw a dividing line and cut out 2 parts.

- Coat them well with glue and glue them to the inside of the boat to make two-layer sides.
- Cut the money sheets into 1.5 cm wide strips.

- Cover the boat with money stripes.
- Carefully coat the entire boat with glue for strength and leave for 2 hours to dry completely.
- Place identical bills side by side and glue them together. Make 3 of these - from five, from three, and from four bills. These will be the sails.

- Carefully thread the sails onto skewers and secure the joints with glue so that they do not slip.
- Take the boat and glue 3 pieces of foam inside.
- Insert skewers into the foam for the front and back yard. The front yard should be 1/3 longer than the back. Make sure the lines are level, then secure with a glue gun.
- Insert skewers with sails, placing them at the same distance. It is worth noting that the deck should be smaller than the stern.

- Fold the threads in 2-3 layers along the length of the sail and additional centimeters for the ties.
- Tie the threads to the skewers as shown in the photo.
- Cut 2 bills diagonally and fold the edges 0.4 cm.
- Glue the bills (sails) to the raking threads.

- Make sails on the stern in this way: do not twist the bill into a tube too much, bend the edge, then glue it.
- Fold 3 bills in half, shape them into flags, then glue them.
- Cover the deck with bills.

- Make a stand for the ship from a flat box.
- Glue the desired background onto the box.
- Glue the ship.
Vase from a bottle

You will need: glass or plastic bottle, magazine, PVA glue, decorative elements (beads, buttons, sparkles...).
Master Class


You will need: a transparent glass, a ball, scissors, markers, a sheet of white paper, glue.
Master Class
- Cut the ball in half along the wide side.
- Pull the ball onto the glass so that the hole is centered and pointing down.
- Draw a cute picture, cut it out and stick it on the glass.

You will need: tin, wooden clothespins, flowers, water, hearts for decoration.
Master Class


You will need: a sheet of paper 100x15 cm or glue A4 sheets together, 2 thick sticks, felt-tip pens, tape.
Master Class

Bookmark "Nibbler"

You will need: cardboard template, scissors, glue, decorative elements - felt-tip pens, paints, buttons, beads, glitter...
Master Class

We present to your attention original and creative packaging for gifts! You can put sweets, magnets, jewelry, money and other small gifts inside them.
Candy tulips

You will need: corrugated paper in your favorite colors for buds, green corrugated paper for leaves, Raffaello candies, double-sided thin tape, green tape, satin ribbon, packaging material for a bouquet, scissors, wire, pliers, wooden stick, optional transparent beads to create dew, glue gun, tweezers.
Master Class
- Prepare the wire by making required quantity stems of equal length.

- Cut long strips corrugated paper, cut a long strip of corrugation into 2 parts, then cut into 4 parts. You should get 8 strips, 6 of them will be needed for the tulip bud.
- Turn each strip over the center, folding it so that the right sides of the strip are pointing in the same direction.

- Make 6 blanks in the same way.
- Attach double-sided tape to the tip of the wire.

- Attach the candy to the tip of the wire.
- Assemble a tulip bud in this way: take the first petal and attach it to tape. Place the second and third petals near the candy and, holding them with your fingers, secure with tape.

- Attach the remaining petals in the same way, forming a tulip bud and securing with tape.
- Trim the excess ends of the crepe paper at an angle at the base of the bud.
- Wrap the stem with tape.

- Cut a strip of green crepe paper.
- Cut into two almost equal parts.
- Fold each part 4 times and cut out the leaves.
- Pull each leaf out in a spiral using a wooden stick.

- Place a short leaf and a longer one below. Secure each leaf with tape. The tulip is ready! Make the required number of tulips of different colors.
- Assemble tulips into a bouquet in this way: connect 2 tulips and tie them with tape, then add one tulip at a time, placing the colors in a checkerboard pattern.
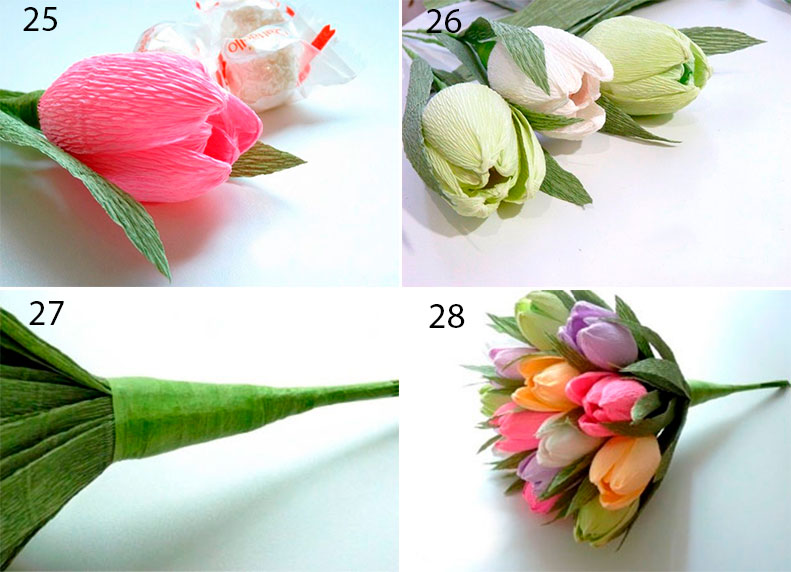
- Cut 20 leaves and place them around the perimeter of the bouquet, securing with tape.
- Wrap the bouquet in wrapping paper and tie with ribbon.

- Create dew drops on tulip buds by gluing clear beads using tweezers and hot glue.
Spectacular bracelet made of ribbon and beads
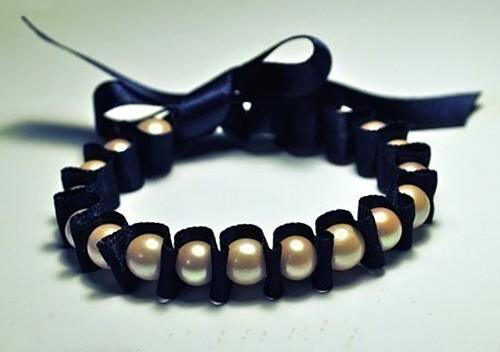
You will need: ribbon, beads, thread and needle.
Master Class


You will need: a cardboard template, scissors, decorative elements - felt-tip pens, paints, buttons, beads, glitter, ribbons...
Master Class


You will need: a printed bag template (listed below) or a redrawn one, scissors, decorative elements - felt-tip pens, paints, buttons, beads, ribbons, glitter...
Master Class

Paper shoes

You will need: a printed shoe template (listed below) or a redrawn one, scissors, glue, decorative elements - felt-tip pens, paints, buttons, beads, glitter...
Master Class

Paper cake

You will need: cardboard template, scissors, decorative elements - felt-tip pens, paints, buttons, beads, glitter...
Master Class

Head wreath made of foamiran

You will need: foamiran 0.5 cm thick (orange, yellow, cream, light green, dark green and red), scissors, toothpick, curly scissors, Oil paint autumn shades, sponge, sheet of paper, iron, floral wire, ruler, super glue, lighter, clay lilac color(for blueberries) or beads, tape, foil, wire at least 2 mm thick and 60 cm long, ribbon or string, mold (leaf shape).
Master Class
- Print or draw leaf templates, then cut them out.

- Trace the templates onto foamiran with a toothpick, then cut them out.
- Make a sufficient number of multi-colored leaves, for example 60, remember, the more there are, the more magnificent and beautiful the wreath will look.

- Add realism to some of the leaves by trimming the edges with scissors.
- Scratch a small part of the leaves with a toothpick.
- Tint the leaves in this way: apply a little on the sponge oil paint, blot a sheet of foamiran, then remove the excess with a piece of paper.
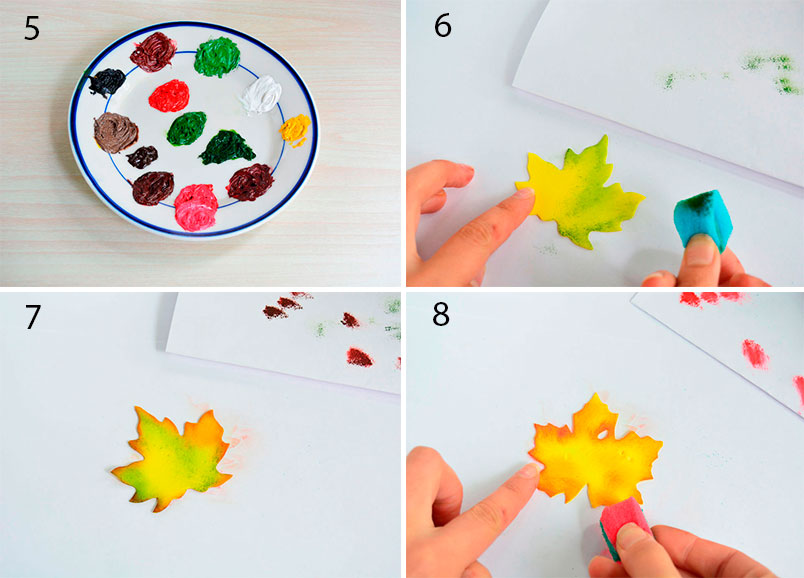
- Combining colors: tone the yellow foamiran leaf with light green and brown paint. Also, tone some yellow leaves with orange, red and light green paint. Protonate the red leaves brown, green leaves - burgundy, brown and dark green.

- Preheat the iron on the second setting, apply the sheet for 2 seconds, remove it and press it onto the mold to make an impression of the sheet. Repeat this process with all the leaves. Please note that this should be done quickly and very carefully, as foamiran is highly flammable. If you are new to this business, it is better to skip this point and proceed further.

- Cut the floral wire into 7 cm long pieces and make a loop at the end.
- Glue floral wire to each leaf with front side using super glue.

- Treat the edges of the leaf with fire using a lighter. The edges should be realistically curved. Repeat this process with all the leaves. Do this carefully, I remind you that foamiran is highly flammable.

- Roll a clay ball purple with the size of a blueberry. Make 15 berries, put them on a greased wire with a loop super glue every blueberry. Using the tips of a pair of scissors, score the tops of the blueberries and set aside to dry. Beads can be used as blueberries.

- Start assembling the wreath in this way: form small bouquets of leaves and berries, secure them with tape.
- Cut rose petals in the shape of a drop from red foamiran. One bud will require 10-15 petals. The number of buds depends on your desire; you can make from 3 to 7.

- Tint the edges of the petals with brown oil paint.
- Make the petals thinner in this way: heat the petal on the iron for 2 seconds, then fold it into an accordion and rub the petal with your fingers. Open the petal and create an indentation and curl the edge of the petal outward. Repeat this process with all the petals.

- Finish the edges of the petals using a lighter.
- Roll up a foil drop, make a loop on the wire, apply super glue and put on the foil drop.
- Glue 2 petals opposite each other and form a bud by gluing the petals in a checkerboard pattern, opening the flower slightly. Form the desired number of roses in the same way.
- Make the base for the wreath by cutting 60 cm of wire. Make loops at the ends.

- Cut the tape into 15 cm long pieces, fold each piece with the sticky side inward and cut lengthwise into 2 halves.
- Open the end of the tape, apply it to the base 10 cm from the edge and wrap the wire around it.
- Attach bouquets of leaves and berries, securing with tape.

- Weave them in the order you like best.
- Don't forget to insert roses in the spaces between the leaves.
- Attach a string or ribbon to the ends of the wreath.
Book safe

You will need: book with hard cover, pva glue, water, stationery knife, brush, pencil, ruler.

Master Class

Salt dough pendant

You will need: salt dough, glass, acrylic paints, glitter, tassel, ribbon for hanging, cocktail tube, dog paw for imprinting on dough or your fingers, clear glue, rolling pin.
Master Class

Cup made using papier-mâché technique

You will need: cardboard, scissors, newspaper sheets, tape, pva glue, brush, paints, clear manicure polish.
Master Class

International Women's Day March 8 is not only wonderful holiday with the kindest and brightest traditions, but also great occasion to demonstrate the child's talents. It’s not for nothing that in kindergartens and schools, on the eve of the main holiday of all women, classes on making themed crafts, which are great as gifts for mothers and grandmothers. Most often, children's crafts for March 8 are made from simple materials: colored paper, cotton pads, cardboard, napkins. Well, most popular topic For children's DIY crafts on March 8th, flowers are, of course, a must. In their beauty, such homemade bouquets are not inferior to real flowers, and in their touching woman's heart exceed them many times. More details on how to do original craft on March 8, learn from simple materials at hand in our article today with step-by-step master classes for the junior and senior groups of kindergarten.
DIY craft from cotton pads for March 8th in kindergarten for the younger group, step by step with photos
We suggest that you be the first to master crafts made from cotton pads with your own hands on March 8th for junior group kindergarten. The craft itself is a bouquet of beautiful flowers that can be given to your mother or grandmother. Find out how to make crafts from cotton pads with your own hands on March 8th kindergarten in the younger group from step-by-step master class with photo below.

Materials for crafts from cotton pads for March 8th for the younger group of the garden
- cotton wool cosmetic pads
- green drinking straws
- ear sticks
- yellow paint
Instructions for DIY crafts from cotton pads for March 8th for kindergarten

Do-it-yourself crafts for March 8 in kindergarten for the older group from paper, master class with photos
Another touching bouquet for March 8, but already in senior group kindergarten, you can make it yourself from colored paper, which is ideal for children's crafts. Such a bouquet will be made in the form of an applique, with which you can decorate a memorable card or present it as an independent gift. Learn step-by-step instructions on how to make crafts for March 8th with your own hands in kindergarten in the senior group from paper from the following master class with photos.

Necessary materials for crafts for March 8 from paper for the senior group of the garden
- colored paper
- simple pencil
- cardboard
- scissors
Instructions on how to make a DIY craft for March 8 from paper for kindergarten

DIY children's crafts for March 8th for mom - master class with step-by-step instructions for a child
Another option original bouquet- DIY children's crafts for March 8th for mom can be found in next master class with step-by-step instructions for the child. This craft more suitable for senior and preparatory groups kindergarten, as well as for younger children school age. The peculiarity of this DIY children's craft for March 8th for mom (master class with step-by-step instructions for the child below) is that the flowers for the bouquet are made from the most ordinary cardboard packaging for eggs.
Necessary materials for DIY children's crafts for March 8th for mom
- egg carton packaging
- wire
- green electrical tape or paper tape
- paints and bones
- scissors
- yellow paper
Step-by-step instructions for a child on how to make a DIY March 8 craft for mom
How to make a craft with a photo for your grandmother on March 8th with your own hands, step-by-step master class
But probably the most memorable and touching crafts DIY souvenirs for March 8th for both mother and grandmother with a photo of the child. These can be homemade photo frames, pendants, cups, or just memorable souvenirs. From our next step-by-step master class you will learn how to make a craft with a photo for your grandmother on March 8th with your own hands from salt dough.

Necessary materials for DIY crafts with photos for March 8th for grandmother
- salt - 1 glass
- flour - 1 cup
- water - 1/2 cup
- red paint with brush
- photo
- heart-shaped, for example, pasochka
Instructions on how to make a craft with a photo for your grandmother with your own hands on March 8

3. Using the same form, cut out a suitable template from the photo and insert it into our dough piece. Gently press down with your fingers so that the photo stays well in place and does not fall out in the future. We send the workpiece to dry in the sun or radiator. 
Another simple and popular material for an original DIY children’s craft for March 8 is regular napkins, from which you can make beautiful flowers. Despite the fact that in appearance such flowers cannot be immediately distinguished from real ones, making such a craft with your own hands is easy and quick, even small child. Learn more about how to make a DIY children's craft “Flowers” for March 8 from napkins in the following video tutorial with step-by-step instructions.
DIY crafts for March 8th are original children's gifts that have long become traditional in kindergartens and schools. Our article contains quite simple master classes with photos and step by step instructions, which a child can master in both the junior and senior groups of the kindergarten. Thanks to the use of simple materials, such as colored paper, cotton pads or napkins, your child will be able to make an absolutely unique and inimitable craft. This means that each of the presented options for crafts for March 8th can become a worthy gift for a mother or grandmother. We are confident that our master classes will be able to inspire creativity in adults, whose help will never hurt children.
International Women's Day March 8th is the day when everyone congratulates our lovely ladies: mothers, girls, sisters, grandmothers, wives and everyone else. It is time to recognize the strides and achievements made by women throughout history and in all countries. Every woman in your life deserves kindness and recognition, no matter who she is: a working woman chasing success or a stay-at-home mom. And you can show your love by making beautiful crafts for March 8th with your own hands, so we have collected 20 cool ideas, which are easy and quick to make at home or in kindergarten.
New crafts for March 8, 2019
Looking for a unique, thoughtful gift to DIY for the special woman in your life? We've rounded up some of our favorite ideas, many of which can be accomplished with minimal time and budget. These gifts are amazing for mothers, daughters, teachers, wives and any other female member who will thank you.
Paper carnations
- Cupcake pans different sizes(small, medium and large);
- Wire;
- Toothpick;
- Sponge;
- Red paint;
- Stack the muffin tins - 3 small ones with inside, 3 medium ones in the middle and 3 large ones with outside. Secure the molds in the middle and use a toothpick to poke two holes near the center, about 3 centimeters apart.
- Pass the wire through the holes and tighten from the bottom to compress the shapes slightly.
- Fold the entire flower into a crescent shape.
- Separate the layers to allow the flowers to “bloom.”
- To finish making the flowers, dip a sponge in red paint and blot the edges of the shapes.

To make a gift you need:
- Glue;
- Finished drawing;
- Cardboard;
- Pencil;
- Glue;
- Clear nail polish;
Step-by-step instructions for production:
- Take a profile photo of yourself or your pet.
- On your computer, enlarge the photo so it fills the entire screen, then tape a piece of cardboard to the monitor.
- Trace the image with a soft pencil.
- Remove the paper from the monitor and cut out the silhouette with scissors.
- Use glue to glue the silhouette to the back of any colored design, then carefully trim around the silhouette.
- Flip the silhouette over, then glue it to the white paper.
- Let the painting dry and then apply a final coat of clear varnish.
Paper ball

To make a gift you need:
- Ready pictures;
- Buttons;
- Needle and thread;
- Beads;
Step-by-step instructions for production:
- Cut the paintings into 12 strips 18 x 1.5 centimeters wide.
- Use a pushpin to make a hole at the end of each strip.
- Thread the needle with 45 cm thread. Tie a few knots at the end and add a bead.
- Fold the strips over, then pass the needle through all the holes on one end.
- Bend the strips into a C shape. Pass the needle through the other end.
- Place another bead and tie a knot.
- To create a hanging loop, bring the end of the thread back onto the bead, then tie a few knots in the thread to secure the bead.
- Branch the strips evenly to form a ball.

To make a gift you need:
- Pencils;
- Scotch tape or glue;
- Paper;
- Notebook;
Step-by-step instructions for production:
- Lay open notebook reverse side.
- Using a pencil, trace the notebook onto the patterned paper, leaving a 1.5cm border. Cut out this silhouette.
- Cover the outside of the notebook with glue.
- Hold the notebook open by pressing down on the back of the cover. Smooth out any uneven areas.
- Cut a notch at the top and bottom of the cover curve and trim a diagonal line at the four corners.
- Glue each corner, then fold and glue each edge along the inside of the book.

To make a gift you need:
- White mug;
- Acrylic paint for enamel;
- Brush;
Step-by-step instructions for production:
- Wash and dry the mug completely.
- Using a brush, apply your design to the cup.
- Leave to dry for one hour.
- Place the cup in a cold oven, heat to 150 degrees, and “bake” for 30 minutes.
Remove from the oven and let it cool completely.
Greeting cards for kindergarten
A cute card made by little children's hands is the most desired and expensive gift for any mother. To receive such a beautiful masterpiece is a great joy and happiness.

- colored cardboard;
- colored paper;
- comfortable scissors;
- PVA glue;
- a simple pencil;
- stencils of flowers of different sizes, hearts and cores of a lily.
Progress:
- Take the heart template and trace it on green cardstock, then cut it out.
- Take a template of flowers of different sizes, we have three of them, outline and cut out three flowers.
- Draw a circle template for the heart of a lily from yellow paper.
- Glue in the center of the heart big flower, then stick the middle one on it and finish with the smallest flower.
- Centered smallest flower stick on the yellow core. Our holiday craft card is ready.

For production we will need:
- cardboard sheet;
- pasta of various shapes;
- gouache;
- PVA glue;
- water;
- apron;
- napkins.
Progress:
- Start by processing the pasta. Take a large number of paint, add a little PVA glue, dilute with water if necessary.
- Take a cardboard sheet, cut a circle out of it and decorate the frame using pasta horns, spreading glue on each of them. Let it dry.
- Using red and pink pasta shells, we form a flower in the middle of the leaf. Glue the first layer of petals with the convex side down, the second layer with the convex side up.
- Next, glue on the green stems and leaves. To do this, use feather pasta (stem) and shell pasta with the convex side up (leaves).
- To decorate the craft, you can also glue scallop pasta and spiral pasta in blue and pink. Here you can dream up. Our bright pasta craft card is ready.
DIY flowers for mom
March 8 - spring holiday, which is associated primarily with huge bouquets colors. In kindergarten, one of the most common types of crafts is flower-themed crafts.
Application “Flower for Mom”

To make the application we will need:
- cardboard;
- a simple pencil;
- comfortable scissors;
- PVA glue;
- paper napkins or colored corrugated paper;
- sample large flower in a pot.
Manufacturing process:
- Outline ready-made template flower in a pot on cardboard.
- Cut napkins or corrugated paper of the required colors into 2x2 cm squares, then roll them into balls.
- Take glue and each ball desired color dip it in it and glue it onto cardboard.
- Fill the drawn area of cardboard with circles of the desired color. Our beautiful DIY craft is ready.
Snowdrops made from plastic spoons for mom

To make this craft you will need:
- plastic spoons;
- plasticine;
- old unnecessary plasticine;
- small flower pot;
- green cocktail straws;
- green plastic bottle;
- green napkins.
Progress:
- Roll out old unnecessary plasticine big ball, put it on the bottom of the pot.
- Roll seven small carrots from green plasticine; perform the same steps from yellow plasticine, only smaller in size.
- Connect green carrots with yellow carrots with large sides.
- On cocktail straw put on the resulting plasticine yellow up, secure well.
- Repeat this procedure with all seven tubes.
- Cut off the handles of disposable spoons and insert each spoon into the stem into a plasticine carrot. Thus, we insert three spoons, we get a snowdrop with three petals.
- As a result, we get seven snowdrops.
- From green plastic bottle cut a leaf 15-20 cm. Make seven pieces of leaves of different lengths.
- Insert one snowdrop at a time inside the plasticine that is in the pot. Next, insert the flower leaves into the plasticine.
- The bottom of the pot must be covered with green napkins to make it look beautiful. Our beautiful DIY snowdrops are ready for mom, all we have to do is hand them over.
Paper rose for mom

To make a flower you will need:
- multi-colored double-sided paper;
- green corrugated paper;
- aluminum wire;
- comfortable scissors;
- PVA glue.
Progress:
- Take a pink or red sheet of colored double-sided paper and trace a large circle.
- In the circle, draw a spiral towards the center up to the loop.
- Cut out a circle, then cut in a spiral also to the loop.
- Twist in a spiral to the same loop.
- Spread PVA glue on the loop and place our rolled rose on the glue, holding it a little to secure it. Let dry.
- Take double-sided green paper and cut out a circle and leaves like a rose.
- Glue each leaf to the center of the circle, four leaves in total. Let dry.
- Glue the rose bud to the leaves.
- Take aluminum wire and wrap it with green corrugated paper. At the end, secure with glue. Let dry.
- Take a rose and pierce it in the center with something sharp, maybe with a knitting needle. Insert the flower stem there and secure it. Our charming rose for mom is ready.
Craft “Daisies from cotton pads”

For production we will need:
- double cotton pads;
- white threads;
- watercolor paints;
- PVA glue;
- comfortable scissors;
- colored cardboard;
- plasticine;
- colored paper.
Manufacturing process:
- First you need to learn how to make a chamomile. To do this you need to take cotton pad and bend it on both sides towards the center in the form of a little bag and wrap it well with thread at the bottom so that it does not unravel. We have a chamomile petal. In the same way, make 7-8 petals.
- Take all the petals with the curved edges up and connect them together with a thread.
- To prepare the chamomile center, you need to take a disk and dip it in yellow paint on both sides. Dry thoroughly.
- Spread the center with glue and form a daisy. Make three daisies in the same way.
- Make a cardboard base for the craft, cut out a rectangle, and form an oval from it.
- Cut stems and three or four leaves for daisies from green paper.
- Place daisies with stems and leaves on a cardboard base, and glue them one by one.
- For greater effect, you can create a frame. Our cute daisies for mom are ready.
Craft “Vase with flowers for mom”

For production we will need:
- White list;
- watercolor paints;
- brushes for painting and glue;
- comfortable scissors;
- colored strips for quilling.
Manufacturing progress:
- Paint a sheet of paper with bright paint. Let it dry.
- Glue on a vase cut out of white paper.
- Take colored quilling strips and stick them on the vase one by one. The result is a cheerful multi-colored vase.
- Take strips of three colors and glue them at the ends, forming flower petals.
- Twist green stripes onto a pencil; these will be flower stems.
- Cut out the centers for each flower and form a flower from the petals and the center, which is glued on top of the petals.
- Now you need to place the flowers on the leaf. If they go beyond the contours, it will even be very interesting.
- Glue the stems of the flowers that were twisted onto the pencil onto the base.
- To hide the end of the stems, glue another colored stripe for a vase. Our cheerful and holiday craft ready. Mom will be delighted.

To make this craft we will need:
- plasticine;
- cotton buds;
- comfortable scissors;
- felt-tip pen;
- colored cardboard.
Manufacturing process:
- Take a sheet of colored cardboard, this is our basis.
- Cut the cotton swabs in half using scissors.
- Make the center of a daisy from yellow plasticine.
- Cotton swabs must be inserted into the plasticine in a circle, forming a flower.
- Press the resulting flower onto the cardboard and secure it.
- Using a felt-tip pen, draw the stem and leaves of the flower.
- Take green plasticine and fill in the drawn leaves and stem. It turned out beautiful flower with your own hands for your beloved mother.
Original gifts for March 8th with your own hands
Children's imagination is very rich, so kids are happy to make gifts for their mother, grandmother or girlfriend and will be even more happy to give them to them.

To make a frame we will need:
- cardboard;
- PVA glue;
- paper for decoration of your choice;
- comfortable scissors;
- a simple pencil;
- multi-colored beads, bright buttons, rhinestones for decoration.
Frame manufacturing progress:
- First you need to prepare the frame itself. To do this, you need to cut out the front and back of the frame from cardboard. In the front part, you need to cut out a place for the photo, and also leave stripes for decoration. If it is difficult for the children to cope with this work, the teacher can give each child a ready-made frame, which only needs to be decorated.
- Trace the front part of the frame on colored paper with a pencil and cut it out, then glue it to the cardboard. Glue two pieces of cardboard together, do not smear the top with glue, you can then insert a photograph through it.
- You must also glue a stand to the back of the frame on which the frame will rest.
- Next, the finished frame needs to be decorated. Here every child can show his imagination, the teacher shows possible options, and the baby is given the right to choose. Each frame turns out bright and unique.
- With the help of multi-colored beads, bright buttons, and rhinestones for decoration, each child creates his own individual masterpiece, which he will give to his mother on March 8th. Decorative elements must be soaked in glue and decorated with a frame. Let the work dry thoroughly. A unique DIY craft for photographs is ready.

To prepare you will need:
- salty dough;
- magnet;
- PVA glue;
- corn grits.
Manufacturing process:
- First you need to prepare salted dough, for which you need to take two parts flour and part salt, for example 400 grams of flour and 200 grams of salt. Add water and pink egg dye. The result was pink dough. Mix well and cut off a piece.
- Roll out a flat cake and squeeze out a heart with a mold. Ready product should dry thoroughly.
- Spread the dry heart with glue and sprinkle with corn flour, let it dry.
- Lubricate the other side of the heart with glue and glue the magnet. Our holiday magnet craft is ready.
Beads for mom

For production we will need:
- salted dough of three colors;
- beautiful ribbons or fishing line.
Manufacturing progress:
- First, prepare the salt dough by taking flour and salt in proportions of two to one. Dilute with water by adding food coloring. We need to make dough of three different colors.
- Make beads and holes in them so that later you can thread a ribbon or fishing line.
- Leave the beads to harden. Small beads need at least a day for this, large beads need several days.
- After the beads have dried, all that remains is to thread ribbons or fishing line through them.
Candy bouquet craft for mom

For the product you will need:
- lollipops;
- multi-colored foil;
- scissors;
- scotch;
- colored paper;
- cup;
- pencil.
Preparation method:
Let's take it colored paper you can take a wide variety. Attach a glass to the sheet and circle it. The outline of the circle needs to be cut out. There are a lot of similar preparations that need to be made. Preferably multi-colored. Next, each candy needs to be wrapped in foil. After this, we stack the colored paper circles in a stack of 4-5 pieces. It can be one color, or you can alternate several shades. You need to make a small cut in the center and insert a stick with candy. We bend the ends of the circles upward. Secure with tape. You should get a “flower” on a stick, and in the middle there is a candy in foil. We do the same with the rest of the candies. We collect them in a bouquet. We fix the “legs” together with tape. Beautiful decorative paper We wrap our “bouquet” and tie it with ribbon. A wonderful DIY gift for mom on March 8th is ready.
Vase with mimosa crafts in kindergarten

We have to:
- colored paper;
- glue;
- yellow napkins;
- ruler;
- a simple pencil;
- paints;
- White paper;
- scissors;
- plastic cup.
Manufacturing process:
You need to take a sheet of green paper and fold it in half. From the place where the “little book” opens, step back one and a half centimeters and draw a horizontal line. From it, draw stripes 1–1.5 centimeters wide. They need to be cut. Do not cut all the way, just to the line. When you unfold a sheet of paper, it should only be cut in the middle. After this, the green paper must be glued together, but this must be done in such a way that one half is a little longer. It is on this that you need to apply glue. After this, you need to twist the workpiece into a tube. The result will be a product similar to a bush. Strengthen the base with tape or a stapler. Next, we move on to the design of the cup. It is better if it is completely white without additional decorations or relief. When suddenly you don’t find one, cover the multi-colored glass with white paper. After this you can start making art. What to depict on paper depends on your desire and skill. Maybe something in the theme of a women's holiday, for example, some spring flowers. When the paint dries, place a green bush in the glass. Next, cut or tear the yellow napkin into small pieces and crumple them. The resulting balls must be carefully glued onto green leaves.
The holiday atmosphere begins with the idea of a gift. Today you can buy anything you want, but homemade gifts always replace finished products. This is especially true for crafts made by little children’s hands for their beloved mother.
If you are serious about surprising the main hero of the occasion, then don’t forget to stop by a store with craft supplies and stock up on materials. But first, decide what kind of crafts you will do on March 8th. We offer some useful and inspiring ideas.


They always remain not only in memory, but also in the most visible place. And if you decorate them correctly, they will become the main decoration of the interior. For a handmade idea you will need a photo, not necessarily a modern one. As a gift for mom, it is appropriate to choose pictures of the children in the very early age or bright and cheerful moments where the whole family is together.
Grandma will be happy to see her children and grandchildren in the photo. Black and white photographs that can be framed in the style of vintage postcards will remind you of your youth. Use homemade holders and stands. Any materials are suitable for this - wood, glass, stones. You can find dry branches in the garden, take ordinary laces to make your own family tree.

Bouquets - traditional and not quite
At a women's holiday, bouquets are never superfluous. And if they look different than usual, even more so. It's about original ideas bouquets of sweets. Making them is not difficult at all. You will need:
- candies;
- corrugated paper;
- wire;
- paper ribbon;
- threads;
- scissors;
- scotch.

If you have a hot glue gun, you can use it.
- Glue the flower candies onto the wire without piercing it.
- We form petals from corrugated paper.
- Secure with thread.
- Trim off the remaining paper at the base of the flowers.
- We wrap the wire stem with green ribbon.
- We form leaves from green corrugated paper and attach them.
- You can decorate flowers with beads or use beads. These will be impromptu dew drops and decoration.
- We form a bouquet and wrap it in paper of a contrasting color.

Origami ideas
The art of origami remains relevant. At first glance, a simple way to give your mother a gift on March 8 with your own hands turns into a complex one. creative process. The origami technique allows you to make beautiful flowers.
Even one flower made by a child is already worthy gift. It's worth hundreds of flowers in my mother's garden. For origami, regular office paper is suitable. The origami technique is easy to master, but it makes you look at the art of paper crafts in a completely different way.
Fresh flowers in original pots
Even if your mother or grandmother has her own garden, she will always be happy to receive flowers as a gift. And to surprise her, you can play with this idea beautifully. Everything is very simple.
- Use small bouquets of primroses.
- Choose an original pot. You can take a regular large tea cup.
- Transplant flowers into it.
- Don't forget to attach a mini card with Best wishes. You can cut it out of craft paper and sign it.
Small plants in pots look fresh and beautiful if you use eco-friendly craft paper, corrugated paper and colored ribbons for decoration. Wrap the pot with the plant and tie a ribbon. Such a gift is not inferior to armfuls of expensive flowers and looks very cute.

New design of familiar objects
Any item can be designed beyond recognition if you use a little imagination. Using felt applications, sequins and ribbons, you can create an original vase. As a basis, you can take an ordinary jar or a small bottle of an original shape.
If mom keeps notes and often uses a diary, it can also be designed in an original way, wrapped in felt. This will make the notebook pleasant to the touch and lift your spirits. Simple jars can be turned into garden lanterns or beautiful candle holders.

Handmade postcards
If in labor lessons schoolchildren are taught to make cards for their mothers, it means that the most women's holiday per year. Today you can make not only traditional paper postcard, but also:
- voluminous pop-up card with flowers made of corrugated or plain colored paper;
- postcards using decoupage and photo techniques;
- with felt applique;
- decorated using quilling technique.

Mom and grandma will be happy to receive one children's gift from your daughter or son. More more ideas and master classes on postcards for March 8, see .
Gifts from needlewomen
Those who do handicrafts can always please with a handmade gift for the holiday. Some people crochet napkins, others can make them in an evening. warm stole on knitting needles, and some are fond of felt crafts.
Felt is a very beneficial material for needlework. He is easy to work with. Felt does not fray, does not stretch and does not require pre-treatment. In stores today you can easily find felt in different colors. Using soft material you can make a postcard beautiful stand under a cup, sew a felt pot holder and even a handbag.

For this it is enough:
- patterns;
- pieces of felt in the desired colors;
- thread, scissors, needle or heat gun.
Felt toys
If you want to sew a toy as a gift, choose felt. Even beginners can work with it. Don't be afraid that your gift will seem very childish. Toys self made are highly valued today. Even adults love to decorate the interior with childhood memories, especially when the idea is implemented with love and effort.

Beaded gift ideas
Beads can be used as a base for a gift or as decoration. In small quantities, beads are useful when decorating a vase, decorating lanterns for the garden, decorating paper flowers, and making felt crafts. Just imagine how cute a card will look with a cute piece of felt with beaded embroidery glued on it.
A simple heart made of red beads will evoke the most pleasant emotions. If you know how to make flowers from beads and more complex compositions, you should definitely use this idea to create a gift. You can make jewelry from beads - necklaces, bracelets, earrings. Even in a children's card, beads will find their place. A student can use it to make a paper postcard.

Pompoms to the rescue
Funny soft lumps can do everything, but few people know that pompoms make very cute crafts. The simplest gift option is for women who love to read. You can make several colored bookmarks with pompoms for them. Different colors threads can be intended for different literature: green - for books about gardening, gray - for detective stories, red pom-poms - for novels.
From large pompoms You can form an original scarf without even holding knitting needles in your hands. And what funny figures animals are made from pompoms! Pom poms make great flower arrangements, curtains, three-dimensional paintings and many other interesting things.

We are sure that you already have a lot of ideas. It doesn’t matter what material you take as a basis - felt, beads, paper, use the already familiar origami technique or come up with something of your own, it is important that it conveys your idea and helps express your attitude towards the person you plan to congratulate.


