Autumn crafts and vegetable salads. How to make crafts from vegetables: a flower from a radish. Crafts from vegetables instruction: flower decorations from vegetables
Summary: Unusual fruit crafts. Vegetable craft ideas. Crafts from vegetables and fruits with their own hands. Crafts from fruits and vegetables for the autumn holiday. Photo of crafts from vegetables and fruits.
In this article we will tell you about unusual crafts from vegetables and fruits. They are unusual, first of all, because we are used to using vegetables and fruits for their intended purpose, for food. In addition, crafts made from vegetables and fruits with their own hands are short-lived and deteriorate quickly. To make such crafts, the use of a sharp knife is required, so the child should only work under the guidance of an adult assistant.
We note in advance that in most crafts it is required to fasten together parts cut from vegetables or fruits. It is best to use ordinary toothpicks for these purposes.
1. Crafts from vegetables. DIY crafts from vegetables
eggplant penguin
As an option, you can try to make another such penguin, only to make it you will need much more vegetables: 2 eggplants, 2 carrots and one sweet pepper. See link >>>>

From a curved eggplant and a head of Chinese cabbage, you get a duck. The beak and breast of this vegetable craft are made from green sweet peppers.


2. Crafts from vegetables photo. Autumn crafts from vegetables
Many interesting crafts can be made from zucchini. We list only some crafts from zucchini.
Zucchini penguins. Not only from eggplants you can make cute, cute penguins. Such a vegetable craft for kindergarten easy to make also from small zucchini. Decorations for penguins are made of carrots.

Zucchini Zucchini Shark

Here is such a sea predator can be made from a harmless zucchini. If there is no zucchini, then a large cucumber will replace it. See instructions on the links:
Shoes from zucchini. Girls should especially like this craft. Painfully, these shoes resemble Cinderella's shoes

Cucumbers can be used instead of zucchini.

Piglet from zucchini. Ears and patch are made of cucumber, eyes are made of chokeberry berries. See link >>>>

You will find a large number of crafts from zucchini on the site delkipodelki.ru >>>>


You can talk endlessly about vegetable crafts, because vegetables are a very fertile material for children's creativity. See what original craft from vegetables with our own hands we made for the Autumn Festival in kindergarten. To make the same turtle, you will need: a large head of cabbage and a few thin zucchini. Zucchini should be cut into rounds. Cut the head of cabbage in half, then decorate it with zucchini rounds using toothpicks. The head and paws of the turtle are also made of zucchini.

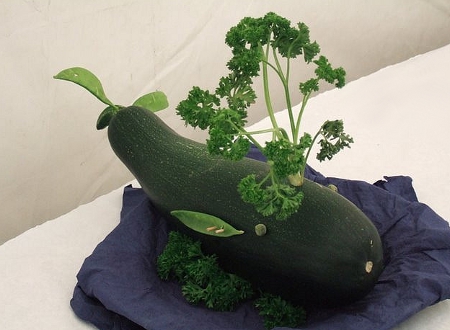
And one more craft from zucchini - Whale. The tail and fins of this vegetable craft are made from pea pods, the fountain is made from the so-called. curly parsley.
3. Autumn festival in kindergarten. Children's crafts from vegetables
It will be interesting for boys to make racing cars out of cucumbers and carrots. The racer's helmet will be replaced by a radish. For a video instruction on how to make this vegetable craft, see the link >>>>

In our article we want to tell you about the best and most interesting crafts from vegetables and fruits. You can take our crafts as a basis for creating your own masterpieces by combining several interesting ideas in one craft, like the author of crafts from vegetables and fruits in the photo below. He made a racing car out of cucumber, zucchini and carrots. The head of a mouse - from a radish. Basket - from the peel of an orange. Mushrooms - from carrots and radishes.

Speaking of cucumber crafts, we must definitely mention such a popular craft from this vegetable as Gena the crocodile from cucumber. You will understand how to make a crocodile Gena from a cucumber by carefully examining the photo below.

For the company of the crocodile Gene, you can also make Cheburashka from potatoes.

If this children's vegetable craft seems too complicated for you, try making a cucumber frog princess.


From ordinary carrots you can still make a cute giraffe. specks finished craft draw from vegetables with a felt-tip pen.

Decorate the flowers by making them a core of small pieces of beets or corn kernels. By the way, you can also make a wonderful bouquet of flowers from corn cobs.

4. Crafts from natural material. Crafts from vegetables and fruits with their own hands
Carrots and cauliflower make delicious ice cream in a glass.

But if the conversation turned to crafts from cauliflower, then it is best to make a cute sheep or poodle out of it.


5. Crafts from vegetables and fruits. Crafts from vegetables and fruits photo
Very simple crafts can be made from ordinary radishes.
Radish Mouse


More difficult option crafts from this vegetable - radish flowers. See the master class on the website of the Country of Masters >>>>

We told you and showed you a large number of crafts from vegetables photo. But our review of children's vegetable crafts would be incomplete without mentioning such crafts as a green pepper frog.

Having trained to cut pepper frogs, you can make crafts from vegetables for kindergarten as in the photo below.

6. Crafts from vegetables photo. Crafts from a pumpkin
If you set yourself the goal of definitely winning the competition of children's vegetable crafts, then we recommend that you make this particular pumpkin craft. Of course, you have to work hard, the result is worth it.

We suggest you make a pumpkin craft - a carriage for Cinderella. You can supplement it with toys and a doll - the Princess.

7. Crafts from fruits. Crafts from apples
Apple craft - Baba Yaga's head
This wrinkled head of Baba Yaga is made from an ordinary apple. To make a cute creature, take a hard apple, peel it. You can leave a small "island" of peel around the tail of the apple. After that, outline the features of the future face with a marker: eyes, mouth, nose. All edetals should be large enough not to disappear after the apple shrivels.
Now cut out the face with a knife.

In parallel, squeeze out one small cup of lemon juice and put a teaspoon of salt in it. Mix thoroughly. Soak the apple in the resulting solution for 30 seconds.
Take out an apple, wipe it, then put it in a warm, dry place for a week.
After this time, the apple will wrinkle and you will get a wonderful apple craft - the head of Baba Yaga. You just have to plant it on a branch and put it in a vase.
Another way to make adorable apple faces is instead of soaking them in lemon juice with salt, you can bake apple blanks in the oven for 3 hours at the minimum temperature. After that, they should also be placed for at least a few days in a dry, warm place.
If desired, you can decorate the heads, for example, insert teeth into them - rice grains. See link >>>>

apple swan
The most elegant apple craft is a swan. For a video instruction that will show you in detail how to make this fruit craft, see. Two mandatory conditions that must be taken into account when making a swan from an apple: 1. the apple must be of hard varieties; 2. The knife must be sharp.

Craft from apples and grapes for kids - a machine from the site Krokotak.com

Hedgehog from an apple
To work, you need an apple and a pen ink pen. With the help of a pen, it will be necessary to "dress" the hedgehog with thorns. Pierce an apple with a pen, turn it - you get the first needle. We take out the needle and carefully insert the blunt end into the hole formed in the apple. In this way, you can make a lot of needles. Next, we will decorate the muzzle of the hedgehog (we will make a nose and eyes), and another apple craft is ready.

A very simple fruit craft - an apple caterpillar.

8. DIY fruit crafts. fruit crafts
We will finish our article on crafts from vegetables and fruits with banana crafts.
Banana octopus. The eyes are made from black peppercorns.

A banana dolphin will decorate a dessert at a children's party.


Banana dachshund dog

To make this fruit craft, you will need 2 bananas. From one make the body of the animal. For the body, it is better to choose a small but thick banana. You will need to carefully cut out the paws of the dog with a knife. From the second banana, make the dog's head. The head is made as follows: peel the second banana about half, cut off part of the pulp and peel so that the ears of the future dachshund are obtained from the remaining peel. Bend the ears to the sides, attach the eyes - black peppercorns, and then attach the head to the body. Fruit craft - the dog is ready!
Material prepared: Anna Ponomarenko
Other publications on the topic of this article:
Marina Suzdaleva
The participants of "" have already spent the first week with their kids according to the fairy tale "Turnip". And the most creative mothers made crafts from vegetables and fruits with their own hands together with their children. According to the reviews, this creative occupation was not only good, the development of the imagination, but also had a positive effect on the appetite of the players!
vegetable car
Craft materials:

The idea to do it came up pretty quickly. Son loves it very much different technique! In addition, I wanted to come up with something that he would really be interested in doing. And also something voluminous, not flat, so that you can play with the craft a little, and not hang it on the wall. Everything else was my dad's idea.
At first they thought to collect for toothpicks, but then they decided - we have a man growing! The son, with great enthusiasm, scored all the carnations and glued the headlights. Then he gathered the driver: Chipollino.

As a machine, the craft did not last very long. But after the game, Yura cooked vegetable soup for a very long time and fed everyone with it.
Danilova Olga, son Yura, 2.5, St. Petersburg.
Vegetable Crafts: Butterfly and Racing Car
My name is Maria and I have two children Vasilisa 6.5 years old and Mark 11 months old.
My daughter designed and made the craft herself. Vasilisa decided to do butterfly. It consisted of the following vegetables:
- carrot - body;
- lettuce - wings;
- basil - decoration.
The butterfly also had legs and a face.

The second piece is flower. Unfortunately, the photo has not survived. consisted of the following vegetables:
- chopped cucumbers - stalk;
- lettuce leaves and radish - flower petals;
- tomato is the middle.

Mark helped dad with racing car. The wheels were a carrot on toothpicks, the hull was a cucumber, and a tomato sat in the driver's seat. As soon as everything was done, they came up with a fairy tale about new characters. A whirlwind of fantasy took her daughter far, far away. And in the end everything was quickly eaten!
Reproduction of a painting by Giuseppe Arcimboldo
I thought for a long time what would be so unusual and interesting to do with fruits and vegetables in order to surprise and please my daughter. I remembered Giuseppe Arcimboldo and his painting "Portrait of Emperor Rudolph II in the Image of Vertumn"! The ancient Italian god of natural abundance and Vertumn, was considered the god of transformations. And the Italian painter captured the image of the emperor from a variety of vegetables and fruits, for which he was awarded the title of count palatine.
The theme of vegetables and fruits fit perfectly into the scenario of a fabulous week, and we decided to make a reproduction of a picture of their real fruits. At the same time, we will touch a little beauty by harvesting the grandmother from the "Turnip".

We found aesthetically looking products in the refrigerator, viburnum, cones and chestnuts just lay on the balcony. My daughter was able to lay out part of her hair and beard.
Of course, we don’t pretend to be similar, we got our own colorful character, but, in my opinion, it’s also very cute :)
Svetlana Klichova and Lera, 2 years 4 months old, Moscow
I thought for a long time what to do. In one of the tales, Vanya especially liked the fox. So we decided to make it from boiled carrots and fasten it with toothpicks. 
Cooked 3 carrots different size, cleaned it, made a torso and a muzzle out of a large one. When they fastened the torso with the muzzle, Vanya kept trying to tear off his head. Then they also stuck the handles and legs of the chanterelle with the help of toothpicks. When Vanya realized what happened, he laughed! In general, she did not live long. Vanya began to take it apart and eat.
Geido Olga and son Vanya (1 year 3 months), from Novosibirsk.
The idea of creating an edible car did not come by chance. My son is still introduced to all new things through his mouth, and he just raves about cars, especially tractors. So we tried to make an edible car: it’s tasty and you can play. Because My son doesn't have many skills yet, so we decided to focus on something not very complicated. To complete the machine, we needed:
- Apple;
- Toothpicks;
- Cucumber;
- Grape.
Instead of an apple, you can take a pear, then the silhouette will be even more interesting.

It is necessary to cut the apple in half and then cut lengthwise into slices. The axis will serve as toothpicks. But the wheels - cucumber and grapes. Everything is ready, you can start ...
I assembled the first typewriter myself, showing and telling my son what to do and why. The son collected the second typewriter on his own, but with the help of his grandmother. First, he stuck one toothpick into an apple slice, after which he began to string on it on one side, first a circle of cucumber, and then half a grape berry. Then he repeated this procedure on the other side. Having made the front wheels, we turned the car over and he stuck a second toothpick into the apple, marking the second axis. On which he first strung slices of cucumber, and after grapes.

The most difficult thing in the work was not to let my son eat all the details of the machine in the process. But the result exceeded all expectations. After finishing work, the son took his typewriter and purred, rolling it on the table.
Kosteva Oksana, son Sashenka 1 year 8 months old, Dolgoprudny.
Still life "Forest clearing"
To create a still life you need:
- Potatoes - a few pieces, depending on how many and what size the mushrooms will be;
- Greens to create grass. In our case: parsley and cabbage leaf;
- Box lid is desirable Brown like earth.

Process of creation:
- Together with the child, start tearing the cabbage leaf and tearing off the parsley leaves to create “greens” at the bottom of the lid from the box;
- While the child is passionate about this process, peel one part of the potato and shape it into a column (this is the stem of the mushroom), and cut the second part in half (this will be the mushroom cap) and cut out the container inside to keep the cap on the leg;
- Collecting still life.
Work is ready!
Gavrilova Faina and daughter Taisiya, 1 year old, Arkhangelsk.
Hedgehog made of pear and counting sticks
We created a hedgehog from a pear and needles - counting sticks, which we stuck into this very pear with a baby. I made hedgehog legs from apple slices.

Misha hosted Active participation, but only for getting needles :)
Kudryashova Nadezhda and Misha (1.2 years old), St. Petersburg.
We made a hedgehog and a fox out of fresh potatoes, carrots, matches and beans. While peeling potatoes, I accidentally stumbled upon two very curved potatoes that looked like animals. She inserted the eyes from beans and fresh carrots herself, cut out holes for the ears of the chanterelle, Olesya, with my help, inserted ears from fresh carrots there. We inserted needles into the hedgehog, first from toothpicks, then from matches.
Do you want to play with your child easily and with pleasure?

The clearing was sprinkled with green grass (dill), the hedgehog brought apples (pieces of carrots) and pears. Then they painted our animals with brown gouache. cotton buds.
Olga Antonenko from Yaroslavl and daughter Olesya 1 year 4 months.
Preparing necessary materials:
- Potato - 1 pc;
- Carrots - 1 pc;
- Plasticine black, white, red, green;
- Spaghetti.

Manufacturing process:
- Mixing red and green plasticine until brown;
- We attach brown plasticine to the potato and draw out the muzzle;
- We roll 2 balls from white plasticine and attach eyes;
- From black plasticine we make 3 balls: 1 larger and 2 smaller. From them we make a nose and pupils;
- Cut out 2 circles from carrots. We make longitudinal holes in the “head” of the mouse and insert the ears;
- We make a ponytail and antennae from spaghetti and our mouse is ready.
You can play!
Victoria Pechieva, mother of 2 kids: Anastasia (2 years 5 months) and Matvey (8 months). Krasnodar Territory, Belorechensk.
We needed:
- Pear -1 pc;
- Grapes - 10 pcs;
- Toothpicks - 10 pieces.
We decided to make a hedgehog. To begin with, we examined the pear - touched, smelled and nibbled a little. They unscrewed her tail (stalk), and for strength I put dough under it so that the pear would not roll. Then, similarly investigated grapes. We already know toothpicks.

Manufacturing process: Put a pear on the dough. Then I gave my daughter toothpicks, took her hand in mine and we inserted the toothpicks into the pear. Of course, it was not without pulling out the toothpicks back. They touched everything, felt it, the prickly needles of the hedgehog ... Similarly, they planted grapes on toothpicks, bit them a little in the process, well, that's nothing ... And to top it off, they put a bunch of grapes on top. Here we have a hedgehog.
Alla Shuvalova, daughter Lenochka, 10 months old. We are from Samara.
On creative competition crafts from vegetables, they decided to make characters of the same fairy tale: a dog, a cat, a mouse.
For crafts you will need:
- carrot;
- beet;
- potato;
- toothpicks or matches;
- plasticine;
Wash vegetables, dry. Body parts are fastened together with toothpicks. Eyes, ears, tails are plasticine, they need to be attached to a toothpick, because. plasticine does not stick to the peel.

Our dog is made of carrots, the cat is made of potatoes, the mouse is made of beets. They did it with the whole family, the daughter chose the colors of the plasticine and pinched off the pieces. As soon as they made all the characters, they immediately played a fairy tale! Formerly DIY they didn’t make it from vegetables, and without your competition, they probably wouldn’t have done it either.
Gulnara Gazizova, daughter Leysan (2.3 years), Chelyabinsk.
Craft idea: the horse is carrying the heroes of the fairy tale "Turnip" from the harvest in a cart and stopped to smell the flowers on the stump, where the hedgehog is still sitting.
Materials:
- vegetable marrow;
- carrot;
- potato;
- cabbage leaves;
- toothpicks;
- eye stickers.
The process of creation: cut out the insides of a zucchini, cut it into a muzzle and torso. The part that was not included in the composition became a stump. Indentations (hooves) were cut out from potatoes. Carrots were cut into 4 rectangles (these are legs), another carrot into circles (cart wheels). They cut out plates (ears), thin straws (flower stems). All the components of the horse were put on toothpicks (my daughter stuck them in, I stringed them).

Cabbage leaves were placed around the plate and my daughter stapled them together. And on the toothpicks she attached the wheels.
Autumn is a beautiful and sad time: nature says goodbye to warmth and sunny mood. But do not rush to yearn for the outgoing summer. The gifts of autumn will delight you with exquisite and unique taste, bright colors and irresistible aroma. And the kids will be able to make crafts from vegetables and fruits for the exhibition at school with their own hands. Dear Moms! Get ready to create with your children, and our step-by-step instructions will help you create based on ordinary vegetables, fruits funny heroes fairy tales, cartoons.
What crafts to make from vegetables and fruits for the exhibition "Gifts of Autumn"
Exhibitions and fairs, traditionally held in schools, are an occasion to rejoice at the children, admiring the creations of others, and “ headache» to mothers who in the evenings, and sometimes at night, bring to perfection children's masterpieces for the competition. In order to have time to fulfill your plans, to purchase the necessary things - from natural materials to cardboard - discuss with your child in advance the idea of crafts from vegetables and fruits for an exhibition in a school, made by yourself.
You will find a rich selection of plots and characters in printed children's educational magazines, online publications on children's creativity. Free YouTube channels on needlework will tell you how to decorate crafts beautifully, helping your child (and mother) understand the intricacies of craftsmanship. The theme of the exhibitions "Gifts of Autumn" is multifaceted: heroes of popular cartoons, fairy tale characters, animals, birds are cheerfully placed in the autumn glades in the middle fairy forest.
For crafts you will need: vegetables; fruits; natural materials; glue, scissors traditional for needlewomen; varnish to preserve and preserve the craft; various textures, quality paper; cardboard; plasticine. Here is a forest beauty - a “nutty” squirrel is stocking up for the winter, somewhere a “pineapple” owl hoots at a bitch, a “carrot” horse is carrying a pumpkin carriage with Cinderella, a “potato” Cheburashka is playing merrily with the onion boy Cipollino, and the “lemon » Gold fish performs the most cherished desires.
Crafts in honor of All Saints Day - Halloween look bold, stylish. Pumpkin - the queen of the garden - is certainly present in all sorts of guises: like a vase for maple bouquet"roses"; like a magic lantern that drives away evil spirits; like an exquisite carriage or ship for travelers. The sketch will not do without a black cat and a funny witch in a pointed hat.
Step-by-step instructions for crafts from fruits and vegetables to school
Your child dreams of making a bright, unusual DIY craft for autumn exhibition fairs at school? Our step by step instructions tell you, your child is easy, fast, quality way do real masterpiece using seasonal vegetables, fruits, natural materials, tools, handicrafts. You will need a little imagination, diligence, a huge supply of patience in creating "works of autumn art" for an exhibition at school.
"Hedgehog" of pear and grapes
Hedgehogs, although glorious, kind creatures, are still very prickly. Playing with them is very problematic, but cute, affectionate and not at all prickly kids, for which you need pears and grapes that are not only funny, but also edible. We will analyze step by step the method of preparing these pear-grape crafts for an exhibition at school with our own hands:
- Take a large plate, garnish with lettuce leaves, creating a forest entourage.
- Cut each pear in half, placing the cut on a plate.
- Prepare the "grape spines": cut toothpicks in half, clean the uneven edges with sandpaper. “Dress” the grapes on the halves of the sticks so that the sharp edge of the toothpicks remains free.
- Insert soft needles, leaving room for the head.
- For the eyes of the Hedgehog craft, elderberries, chokeberries or peppercorns are suitable for an exhibition at school.
- A small but curious spout will be a pea of allspice.
- The dish for the exhibition at school is ready!
"Giraffe" from carrots or potatoes
"Autumn" giraffe - funny and fun craft with their own hands, which even small schoolchildren will be able to prepare for the exhibition of the fair at school. You will need:
- carrots - 7 pcs.;
- potatoes - 2 pcs. (for carrot and potato crafts);
- matches;
- peppercorns for the eyes - 2 pcs.

- Wash all vegetables thoroughly and pat dry.
- A larger carrot or oblong potato will be the giraffe's body.
- Smaller - head. If the giraffe is completely "carrot", prepare 4 rectangular figures for the legs.
- A long thin carrot will serve as a neck for the Giraffe craft with your own hands.
- It remains to connect the parts with toothpicks.
- Cut off half of the match, leaving the part with the sulfur head for the horns. Gently push into carrots or potatoes.
- For eyes, use pepper or acrylic paints. Do not forget to draw beautiful spots with them. Leave the craft to dry and boldly take it to the exhibition to school!
"Caterpillar" from apples
autumn fruits – perfect option for creating unusual crafts. Juicy, ripe, fragrant apples will be an excellent basis for the miracle masterpiece "Caterpillar". You will need 5-6 apples of approximately the same size, toothpicks for fasteners, 1 carrot, several rowan berries, a grape, a flower for decoration.

- Cut the carrots into thin - no more than 5 mm thick - rings.
- Prick an apple with a toothpick in the place of the tail, thread one ring of carrots and connect with another apple. Repeat the process, forming the body of the "insect".
- When there is 1 apple left to serve as the head, attach it vertically as shown in the photo.
- The remaining vegetable rings will serve as the legs of a leisurely caterpillar. Attach the carrots with toothpicks to the bottom sides of the caterpillar.
- We attach a grape as a nose.
- Chokeberry will replace the eyes, and will also serve to create funny antennae horns.
- A dried flower will turn a caterpillar into a flirtatious lady, and a stylish top hat into an elegant gentleman.
- Autumn fruits, rowan berries as a decor will provide an opportunity to show imagination when making crafts.
How to make "Racing cars" from vegetables and natural material
The easiest way to do race car- cut a half of an apple peeled from the core into equal large strips, as shown in the photo. Four grapes will pass for the wheels. Having ensured the "mass character" of such crafts, you can recreate rally races or an autumn city with cars scurrying through the streets.

Vegetables will serve as an excellent material for a racing car. Such a craft can be done by a student of an average or high school and the kids will need the help of their parents. Cut out the driver's seat in an open super car with a knife, making the steering wheel out of a small "round" carrot or cucumber. Rings of vegetables are suitable for wheels: zucchini, carrots, attached with toothpicks.
"Turtle"
To make a do-it-yourself Turtle craft for an exhibition at school, you will need the following vegetables:
- round pumpkin of small diameter;
- 4 gherkins and one cucumber with a rounded end for the head;
- pumpkin seeds- 2 pcs.;
- sunflower seeds - 2 pcs.;
- toothpicks for fastening.

- Wash and cut the pumpkin in half. Remove seeds and pulp.
- Carefully cut out the pattern with a knife, repeating the shape of the turtle shell.
- From the four sides of the body, make small arches-cuts of a semicircular shape, into which attach the gherkins. These will be the legs of the animal.
- Using toothpicks, attach a small piece of a rounded cucumber - this will be the head.
- Fasten the pumpkin seed and half of the sunflower husk with plasticine, forming eyes. Glue with double-sided tape or plasticine to the head.
- A wonderful handmade vegetable turtle will certainly impress the kids on autumn fair exhibition at school!
"Vase"
Volumetric vegetables with a dense skin - zucchini or zucchini, eggplant, pumpkins, melons; "wonderful" fruit - pineapple will become ideal basis for creating autumn crafts"Vase with flowers" for an exhibition at school with your own hands. To make the vase stable, you need to cut off a small circle at its base. Decide on the required height by cutting off the excess part. Then, using a knife, remove the core of the vegetable or fruit.

If desired, decorate the surface of the craft with intricate or simple pattern. Autumn flowers will look beautiful in a vase - oak trees, asters, marigolds. Do you want your DIY craft for an exhibition at school to look really autumnal? Collect yellow maple leaves and make magical roses, as in our photo. Form flowers by fastening with thread or wire.
How to make "Piglet" from zucchini and rowan berries
A small, plump zucchini; a circle of cucumber for the ears and a thin strip of peel for the tail of the spiral; a patch of radishes (carrots), chokeberry berries - a small list of easy-to-do, but such a fun craft "Piglet" based on vegetables for a school exhibition:

- Cut the cucumber slice in half. Attach the ears as shown in the photo.
- With the help of two matches back side zucchini, attach a "piglet". Matches will simultaneously perform the role of nostrils and fasteners.
- Attach rowan berries with toothpicks. They will be the eyes of the pig.
- It remains a funny tail and your creation is ready!
"Hare" from cabbage
You will need:
- white cabbage - 2 pcs.;
- zucchini - 2 pcs.;
- carrots with tops - 1 pc.;
- plasticine.
"Cabbage stalk" - cheerful and funny craft, which at the exhibition at the school will delight the kids. It is easily made by students with their own hands. lower grades based on seasonal vegetables:

- Connect both cabbages with toothpicks. The one that is larger will serve as the body.
- Cut the zucchini in half lengthwise. Then divide the larger one into 2 equal parts: these are the paws of the toy.
- A smaller zucchini will serve for long, long ears.
- Fasten the paws and ears with toothpicks, as shown in the photo.
- Using plasticine, make eyes, a muzzle and a mouth for a bunny.
- Do not forget that this "beast" loves raw, healthy vegetables. Therefore, one cannot do without juicy carrots in the paws of the “oblique”.
Do you want to make a funny and absolutely kind Babka-Hedgehog for an exhibition at school with your own hands? Get vegetables, fruits in advance:
- banana - 1 pc.;
- 3 potatoes;
- 1 apple.

- Cut off the rounded part of a large stupa potato and one medium one for stability.
- Smaller potatoes will go on the nose and hands of the "sorceress".
- Fasten the stupa, the body with toothpicks, attaching the arms and the apple head.
- Cut off 6-7 cm of the banana from the side of the tail. You can eat the insides, and cut the peel into small, narrow strips, imitating unique hairstyle Baba Yaga.
- Put the peel on the apple.
- Matches are suitable for the eyes, and a broom will become long strip all the same banana skins.
Cartoon characters "Smeshariki"
Favorite "Smeshariki", made from vegetables, fruits and improvised materials with their own hands, will bring great joy to the children and will quickly find their buyer at the fair at the school. For the wise Sovunya, you will need beets; Nyusha "fits" a tomato; orange / lemon Losyash, potato Kopatych, onion Hedgehog, apple Krosh will make up cheerful company. Plasticine or polymer clay will serve as a material for hands, feet, decor elements. Small twigs will become Losyash's horns, and mountain ash, chestnuts, leaves will be emphasized autumn mood.

Video
Vegetables, fruits, natural material will be needed for a variety of handicrafts with their own hands to the exhibition in the school. Exquisite apple-basket will be a decoration children's table. An indispensable attribute of All Saints Day - a luminous pumpkin - will emphasize the mysterious, mysterious atmosphere of the holiday. "Carrot" flowers, apple-grape Princess Frog can be made with your own hands even by kids.
The fruit season has begun, which means you can start making interesting fruit crafts that can be taken to kindergarten or school - young children really like this, as everyone loves fruits. No need to buy expensive toys, in order to develop the motor skills of the baby's hands, you do not need to spend money on all sorts of things that develop thinking, imagination and perseverance. Just take care of your child, whether it's a boy or a girl, doing fruit crafts with your own hands. Now you will learn what can be done quickly and beautifully from fruits, because it can be crafts in the form of animals, still life and much more. When a child makes, he first of all remembers their name, learns colors and shapes, develops his thinking, imagination, associations. One of the most simple crafts can be considered an application. Just show your child what to put on a fruit plate. Make funny animals, a boat or a flower with it. He really likes to build and come up with new interesting compositions. If the child does not eat well, then such a game will interest him, and he will eat with pleasure! Well, if you don’t have time to read the entire article, I advise you to watch the video, which presents fruit crafts.
Fruit Owl
A very simple craft will be an owl, which you can do with your own hands together with your child. Such an owl can be taken to kindergarten, and most importantly, it can be made at any time of the year, even in autumn, because all the required fruits can be bought at the store. You can see detailed instructions on how to make such a craft. 
You will need:
- Pear
- Grapes (dark and light)
- Strawberry
Progress:
- We cut a piece of pear almost to half. This will be our foundation.
- From kiwi cut out two circles and peel the peel with a knife. We put the circles on the wide part of the pear to make eyes.
- We cut one dark grape in half and fasten the kiwi on top, like pupils, with a short toothpick.
- Cut the strawberries into 4 pieces. A sharp piece, more like a beak, is attached to a pear.
- We divide the dark grape in half, and then cut each half into 3 parts. This will be our paws and we fasten them down the torso.
- From the same grapes we cut out the eyebrows. Divide the grape into 4 parts and prick two pieces with toothpicks over the eyes.
- From light grapes we make small wings. We divide the grape in half, and make one cut in each half. We need 4 such halves, 2 on one side and 2 on the other. With the help of toothpicks, we fasten them on the sides tightly to each other. Our cute owl is ready.
Video master class owl from fruit
lemon mouse
For children of kindergarten age, I want to offer such a cute mouse that can decorate your festive table. Such a craft will not take much time and effort, but it will cause a storm of emotions among the guests. To make your own crafts, see the detailed instructions below. 
You will need:
- Lemon
- sprig of parsley
- Scissors
- Knife (small for carving and large for slicing)
- Toothpick
- Black pepper
Progress:
- We cut off a small side piece of a lemon for stability.
- From the cut piece we cut out thin and round ears.
- The muzzle of the mouse will be on the side where the elongated tail of the lemon is located. With a small knife, make indentations for the ears and insert them into the holes.
- We also make holes for the eye and antennae. To make the holes more even, you can finish them with a toothpick.
- We cut the dill stalk lengthwise and insert it in place of the antennae, resorting to the help of a toothpick.
- Insert pepper in place of the eye.
- From the rest of the lemon, cut the peel in a circle and cut out the tail with scissors. For the tail from the back of the mouse, we make an incision and insert our blank. Our wonderful mouse is ready.
Video how to make a mouse out of a lemon
Hedgehog in the fog
You can make a funny hedgehog out of a pear, and both you and your child will enjoy working together with your own hands. It is good to make a hedgehog in the fall as a craft for kindergarten or school. You can see how to make such a hedgehog in our master class with detailed instructions.
You will need:
- one pear
- Grape
- toothpicks
Progress:
- Using a knife, peel the pear from the sharp side. This will be the muzzle of a hedgehog.
- Now take a grape and insert a toothpick into each berry. This should be done so that the sharp end of the toothpick peeks out a little.
- Now the prepared toothpicks with berries should be evenly stuck into the pear. It is in the unpeeled part of the fruit.
- We make a hedgehog nose, for this we take one black grape and string it in place of the pear tail.
- Hedgehog eyes can be made simply from matches or cloves.
How to make a fruit hedgehog with video instructions
That's all your funny hedgehog is ready. Please your baby with a funny and tasty toy. You can come up with a whole fairy tale and tell it to your child while eating.
typewriter
You can make many of these cars for a child's birthday and impress the little guests. We are sure that more than one child will not refuse such a treat made by himself. Fantasize together, and we wish you a tasty and entertaining lesson. And to make such a machine is very simple, your baby can help you with this. 
You will need:
- Grape
- Banana
- Apple
- toothpicks
Progress:
- Take an apple and cut it in half so that you get a semicircle.
- Now peel the banana and cut it into rings in the same way. Each ring must be cut in half.
- Take toothpicks and pierce the apple where the wheels should be. Do it evenly.
- It remains to put cooked banana slices on both ends of the toothpicks and fix it all with a grape.
banana dachshund dog
If your child loves bananas, then our funny dog. Make it nice for the baby and for dessert, present him with a craft made by yourself, and possibly together with the child. In order to understand how to make a banana dog, we will now describe in more detail. 
You will need:
- Two bananas
- toothpicks
- peppercorns
- Black marker
- knife
- Carrot
Progress:

That's all our funny dachshund ready to please the whole family. Look carefully at the photo and follow the instructions, it's very simple. We wish you a fruity mood!
A simple children's craft from apples - funny little men
It is very easy to make such funny little men with your own hands with a child. This craft will not take you much time, but will interest the child for a while. Such little men can be used to decorate a children's table, for exhibitions.
You will need:
- green apples
- Apple seeds
- Toothpicks or matches
- sharp knife
Progress:
- Take two apples, one should be larger than the other. Stack the apples on top of each other so that the small apple is on top of the big apple. Fasten the craft with toothpicks or matches.
- Now take the third apple and cut 4 pieces from it. Two of which will be the legs of a little man, fasten them at the bottom of the body. And the two remaining on the sides in the form of hands.
- Cut a small apple into two pieces. One will be your man's hat.
- The seeds will serve as eyes, they can simply be pressed into the apple. The mouth can be cut out with a knife or made from leftover apple slices. At your discretion.
your simple and funny craft ready. She will please the child, he will be able to play with her or put on the table during lunch. Have fun and do small holiday baby.
Children's craft - rat Larisa from radish
Enough interesting craft for kids, which you can do with your own hands together with the baby. It is not difficult to make it, the main thing is to apply imagination and skill. This craft can be done in kindergarten to the exhibition.
You will need:
- big radish white color
- Lettuce, but better than cabbage
- One small radish
- Olives
- sharp knife
- toothpicks
Execution process
- You need to rinse and dry the large white radish well. Remove all the roots, leaving only the tip of the radish, they will serve as antennae. The tops should not be removed either, it will be the tail. But if there is a lot of it, thin out, cut off the excess.
- After that, you need to cut off the front of the radish and use a toothpick to fix the radish in this place. This will be the nose of the craft
- We make ears with the help of notches, we make them small. Carefully insert lettuce or cabbage leaves into them.
- Now it remains to make the eyes of our rat, for this we take olives. We cut the olives into circles and with the help of toothpicks we fix them in a radish. Eyebrows can be made from the remaining radish.
Here is a funny girlfriend ready. Give it to your grandfather to please him for the holiday. After all, he already has Shapoklyak.
Original eggplant and carrot helicopter
If your child loves helicopters, then you can surprise him joint craft from vegetables. Such a craft can be imagined, both for kindergarten and for grade 1 school. With detailed instructions, you will succeed easily and quickly, you can also watch a video master class. 
You will need:
- Carrot
- Eggplant
- toothpicks
Progress:
- We take an eggplant and cut off a beveled piece of peel - this will be our windshield.
- From carrots we cut two circles for wheels with a thickness of about 1 cm.
- Using toothpicks, we attach the wheels to the eggplant. The tail of the eggplant should be facing up.
- Cut the carrots lengthwise into strips so that they look like blades. From the same carrot, we cut out a cylinder with a small diameter, about 4 cm high.
- We fix the cylinder with a toothpick on upper part helicopter. Part of the toothpick should be visible in order to attach 4 strips-blades to them.
- We cut off a circle from carrots, and from a circle we make a screw, cutting 4 triangles out of it. Our helicopter is ready.
Videos eggplant and carrot helicopter
Craft little mice
If your child does not eat cucumbers well, then we can offer you an interesting way out. Make a quick and appetizing little mouse craft with a vegetable from a vegetable. It won't take long, but we assure you, your child will love eating cucumbers. Moreover, they contain so many useful substances and vitamins. 
We want to note in advance that in most crafts it is required to fasten together some parts of the product carved from vegetables or fruits. It is best to use ordinary toothpicks for this. Well, on extreme case- matches.
1. Beautiful children's crafts from apples with their own hands - little men
In order to prepare crafts in the form of such unpretentious guys, the following components will be needed below:
- Big apples.
- Some apple seeds.
- Simple toothpicks.
- Knife.
The process of making this children's apple craft:
- you need to take two apples, one of which will be larger than the other, and put on top of each other. Accordingly, a small apple will be on a large one. Fasten them quite easily with an ordinary toothpick. These two apples will serve as the body of our future man.
- after that, four pieces must be cut off from the apple. Two pieces will serve as legs and need to be fixed at the bottom of the body. And accordingly, the other two pieces will be the hands of a person and they need to be fixed on the sides.
- you need to take a small apple and cut it into two equal parts. Each of the parts will serve as a little man's hat.
- pumpkin seeds will be needed in order to make the eyes and, accordingly, the nose of a person. The mouth can be cut with a knife right on the apple. However, there is another way: you can cut off a separate piece and fix it with the same toothpicks.
2. Crafts from vegetables and fruits - a giraffe from carrots or potatoes

In order to make a giraffe from vegetables with your own hands, you will need two potatoes of different sizes. Accordingly, the one that will be larger will act as the body of a giraffe, and the one that will be smaller in size will act as the head. In order to make a neck, carrots are perfect, from which you will need to cut off the tip. The torso with the neck will need to be fastened with toothpicks. Of course, any giraffe has ears and they can be made using small leaves or even seeds. In order to make legs, you can take small twigs from any trees, and the tail itself can be made from grass, which you can also look for dried for beauty. The easiest way to make eyes for a giraffe is with grits. Most often, buckwheat is used. You can also make a giraffe from a carrot, such as shown in the photo above.
3. Simple children's crafts of animals from fruits - a mouse from a pear
What to make such an unusual mouse? From very simple ingredients like the pear itself, a couple of pumpkin seeds, a small piece of wire that has a plug and, of course, with a knife.

The process of making fruit crafts with your own hands:
First of all, we will make the ears of the mouse: First, using a knife, you need to make cuts in the pear in those places where the ears themselves will be. After that, you should slightly bend your ears, which you will get back.The next step: we make the eyes of a mouse from a pear. Let's take pumpkin seeds, which we wrote about earlier, and you need to draw black pupils on them with a felt-tip pen or a marker, respectively (whichever you prefer). After that, you need to make incisions where the eyes will end up and insert pumpkin seeds. There is nothing complicated about this fruit craft.
The last step in this fruit craft is the tail of the mouse. In order for the mouse to have a tail, you will need the wire that was mentioned at the very beginning. We stick it on the other side of the eyes with the plug outward.
4. How to make children's crafts from pears - funny little men
If you suddenly feel sad in the fall, you can make such unpretentious little men. To prepare the second of them, you don’t even need any additional ingredients. It will be enough just to take a knife and cut out their eyes and a smile. If you want your little man to have legs and arms, then you can simply take ordinary toothpicks and insert them in place of the arms and legs, respectively.

For cooking the first little man, in addition, you may need another pear, a lettuce leaf and grapes and a banana. In order to make the eyes, you will need two circles, which we will cut off from a banana. On the circles themselves, we make pupils with a marker or a black felt-tip pen and, accordingly, attach them with toothpicks. The role of the nose of the little man's nose is performed by grapes, and the role of the hat is a circle cut from the second pear. A leaf of lettuce is just for beauty, and a smile can simply be cut out with a knife. By the way, if you want, you can also fix raspberries or blackberries with a toothpick at the tip of the pear.
5. Crafts from vegetables with their own hands - rat Larisa from radish
An interesting enough rat will turn out for anyone who has a radish in the garden. You can’t distinguish it at all from the one that the well-known old woman Shapoklyak had. How to make yourself such a girlfriend? And it's very simple.

To make such a children's craft, You will need :
- one large white radish
- a few lettuce leaves or, if none, cabbage
- one radish
- some olives to be stuffed with paprika
- knife from the kitchen
- five toothpicks.
Process:
- the first step is to properly wash and dry your large radish accordingly. After that, you need to remove all the leaves from it. You can leave only those that are in place of the tail of the future Lariska rat. You also need to remove all the roots, leaving them exclusively in place of the future antennae.
- after that, the front part of the radish should be cut off, and at the end, with the help of one of the toothpicks, the same radish should be fixed big size. Immediately it is worth sticking a couple more toothpicks so that they later act like hair on a rat's beard.
- in order to make the ears, you will need to make two rather large notches on the left and right, respectively. They will need to stick the same lettuce or cabbage leaves. There really is no difference. Maybe just the lettuce leaves are a little brighter.
- at the very end we will make eyes for the rat Lariska. We cut the olives into small circles and stick each one into the radish with a toothpick (as you can see, we would not have been able to do almost anything without toothpicks). But what is a rat without eyebrows? They can be made using the leftover piece of radish.
6. How to make an apple and orange teapot and cup

With the help of apples and an orange, you can make a real tea pair or, if you want, a whole tea-set. Here it will already be a matter of dexterity and accuracy, since the only tool that you will use is a knife. With it, it will be possible to make the base of the cups by removing the pulp from apples or, as in this example, use for a cup of orange.
7. Children's crafts from vegetables - eggplant penguin
Making such a penguin is quite simple and you only need an eggplant and, accordingly, a knife. In order to make the eyes of a penguin, it will be possible to take beads and pins, with which they can then simply be fixed.

First, you just need to cut the eggplant into two even parts. Each of their parts will become a separate penguin. After that, you need to take the beads and fix them in place of the eyes. However, what is a penguin without wings? They can be easily made with a knife. It is enough just to cut them in shape with a knife.
You can also try to make a slightly different penguin, for which, in addition to eggplant, other vegetables will be required. You will need to take a couple more carrots and one pepper. The carrot will be used for the penguin's legs and nose, and the pepper for the wings. That's all, then we will consider children's DIY fruit crafts, but for now, about eggplants.
8. How to make duck from cabbage and eggplant?

If you take a curved eggplant and one head of cabbage, which is called Beijing, then you can easily make a duck. There is already a beak and, accordingly, her chest will be made of green sweet pepper.
9. Children's crafts from vegetables and flowers - a beautiful vase

You can also use eggplant beautiful vase for flowers. Using a knife, you will need to remove all the eggplant pulp, and beautiful pattern can be cut with a knife. By the way, the pattern can be absolutely anything and as varied as your imagination allows.
10. Shark from zucchini - vegetable crafts for kindergarten
A shark can be made from a simple zucchini and sleight of hand.

It will be enough just to take a knife to cut out the fins and, accordingly, the tail. By the way, if you don’t have a zucchini, then a large cucumber can easily replace it.
11. Zucchini shoes - vegetable crafts for children
Beautiful shoes can be made from all the same zucchini.

This craft is most to the taste of girls. It is not surprising, because they are maddeningly similar to the beautiful shoes that Cinderella dropped at the ball. Of course, shoes can also be made from cucumbers, but here you have to look for the right cucumber, since it must be really large.
12. Crafts from zucchini - pig
In order to make such an interesting piglet, you will need the zucchini itself, a small cucumber, and a couple of rowan berries.

The process of preparing crafts from vegetables:
- You need to clean the skin from the zucchini.
- Cut cucumber into slices and take five of them
- One circle, cut into two equal parts, can be used as ears.
- The other two mugs will serve as the nose of the piglet.
- Rowan berries should be fixed in place of the eyes.
13. Cucumber Train

With the help of cucumbers, you can also make a train. For this you will need four cucumbers. Two of them will serve as wagons. One will need to be fixed on the car of the first for beauty. And the remaining two cucumbers need to be cut into circles. They will act as train wheels in this craft, which will need to be fastened with toothpicks and pieces of cheese.
14. Crafts racing cars from natural material - cucumbers
With the help of all the same cucumbers, you can make cars for racing.

Additionally, you will need radishes, carrots and the most ordinary toothpicks. The radish in this craft will act as a helmet for the racer, and the carrots, cut into circles, will replace the wheels of the car. To attach the wheels, you will need a toothpick that is already familiar to everyone, which will connect the wheels, both to each other and to the body of the racing car.
15. Craft flowers from vegetables with your own hands - you need corn and carrots
Without exception, all girls will like flowers that can be made for the holiday for mom with toothpicks and carrots.

With a knife, you need to cut out the desired shape of the flower and then string it on the toothpick itself. Carrots can also be safely replaced with corn. Then the core can be made brighter from beets or corn kernels. If you make about ten flowers, you will get a rather beautiful bouquet.
16. Cabbage and carrot ice cream for kindergarten and school

To prepare such a craft, you will need:
- Cauliflower
- Carrot
17. Craft sheep, from natural material - cabbage

You can also make a pretty cute sheep from cauliflower, for the preparation of which you will also need currants and, accordingly, ordinary matches or toothpicks, with which you will actually need to fix your eyes. The figure of the lamb and its legs will need to be cut out with a knife.
18. Man and vegetable cheburashka for kindergarten and school
It is quite simple to make a hand-made craft of a person from vegetables with your own hands. For the body, a medium-sized carrot is perfect. Ideally, of course, it will be if during the harvest you can notice carrots that have a forked end. In this case, even the legs do not have to be additionally attached, since they will already be ready. For a human head, you can take a small potato or even an onion.

In order for a person to be like a real person, of course, he will need eyes. From it can be made either from black peas or from any grains at all. For the mouth, no additional vegetables are needed, since a smile can be cut out with a simple knife. It is only advisable for an adult to do this, since not all children will be able to cut it out neatly, and in the end I want to get the ideal figure, of course. What is a man without hair on his head? They can be made using threads that can be woven into absolutely any hairstyle, or even using straw or even grass. If you didn’t get a carrot with a forked end, then the legs can be made from carrots. Just in order to secure them, we will need toothpicks or matches, depending on your preference. For such a person, a child can come up with a name, and girls can even prepare clothes.
19. DIY fruit crafts - pear hedgehog
Craft Ingredients:- Large pear
- Almond spikes or the most simple toothpicks
- Cherry in sugar
- Some raisins.

- at your choice, the pear can be peeled or directly with the skin. However, you must understand that if you decide to leave the pear without the skin, you will need to sprinkle it with a little lemon juice, otherwise the “naked” pear will darken quite quickly.
- then you need to cut the pear into two parts exactly in half and reflect the very end of it.
- after that, you need to stick almond spikes into the pear (if they are not there, then the most ordinary toothpicks). It is they who will serve as needles on the body of the hedgehog.
- Of course, the hedgehog will need to make both the eyes and the nose. For the nose, we just took a cherry in sugar, and the eyes can be made very simply by fixing a raisin in their place.
20. Cucumber crocodile - beautiful children's crafts from vegetables and fruits with their own hands

In order to make a crocodile, it is best to take a sufficiently curved cucumber, which will act as a torso. On the cucumber you need to make small cuts. After that, another cucumber must be cut into two equal parts, one of which will act just like a head. In order for the crocodile to turn out with beautiful teeth that will be as similar as possible to real ones, you need to arrange it quite carefully, complete it by cutting them on both sides of the notch of the figure in the form of triangles. Crocodile legs are best made from the other half of the cucumber. They are also best attached with matches or toothpicks. For the eye, as well as for all other figures, you can use any berries that you like. You can even make pupils with peas or even a piece of carrot. Only at first it will be necessary to get rid of sulfur.
21. Vegetable Dog - Banana Dachshund
also in Lately banana fakes are becoming very popular.

This banana craft is quite simple to make and even little child. For the body of the dog you will need a large banana. By the way, it’s better to take a couple of bananas for a fake, since at least one more will be needed to make a muzzle for a future dog. Using a knife, you can cut the dog's ears out of the banana peel, the main thing is to remove all the pulp first. The head with the body is simply fastened with simple matches, but the main thing: do not forget to attach eyes. For this, you can use, for example, raisins.
Beautiful children's crafts made from fruits and vegetables from natural materials, in fact, make it possible to cook a huge number of a wide variety of items and animals, and most importantly - this is your imagination. It is she who will allow you to decorate the dinner table with such beauty that you can then eat!


