Group decoration in the garden for the New Year. Designing the VKontakte community: the most detailed guide in RuNet for a group or public page
Project “New Year, at the Gates”. New Year's decoration groups in preschool educational institutions.
Winter has brightened up...
Winter has brightened up:
The headdress has fringe
From transparent ice floes,
Snowflake stars.
All covered in diamonds, pearls,
In colorful lights,
The radiance is pouring around,
Whispers a spell:
Lie down, soft snows,
To the forests and meadows,
Cover the paths
Leave the branches down!
On the windows, Santa Claus,
Scatter crystal roses
Light visions
Tricky gossip.
You, blizzard, are a miracle,
Round dances of the backwaters,
Take off like a white whirlwind
Turning gray in the field!
Sleep, my land, sleep,
Keep your magical dreams:
Wait, she’s dressed in brocade,
New dawn!
M. Pozharov
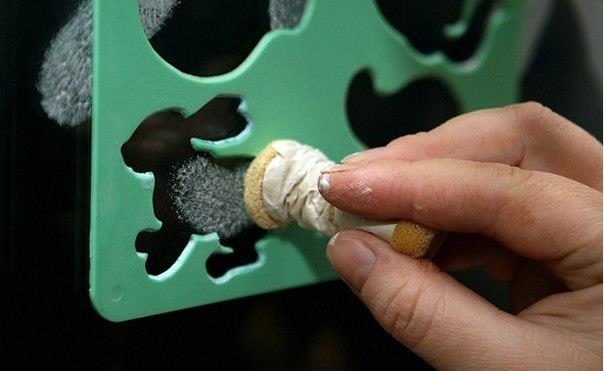
Every year, in anticipation of New Year's holidays, our group’s premises are dressed up in festive decorations. In December 2015, with the help of our parents, we decorated the windows with carved paper snowflakes and protrusions. Ideas and templates were drawn from Internet resources. There seemed to be an atmosphere in the group New Year's fairy tale. Everyone gave us rave reviews and took pictures in front of the group's windows.
However, as teachers, we did not receive complete satisfaction from the work done. After all, all this beauty was made by the hands of adults, and we would like every child to be able to take part in fabulous decoration groups. We understood that the children were 5 summer age, will not be able to cut beautiful ones, carved snowflakes, their mastery of cutting techniques is far from perfect. It was then that the idea was born - in next year, let the children do what they can, and our task is to combine the result child labor into the overall composition.
A year has passed. In December 2016 in preparatory group The project "New Year at the Gates" was launched. In a conversation with the children, we remembered how wonderful the children used to decorate cards for their grandmothers with palms cut out of colored paper. What if you cut out palms from white paper and make them into window decorations? Everyone liked this idea. We stocked up on white paper, hard work and patience, and together with the children we got down to business. Our preparations were outlined with a simple pencil their palms and diligently cut them out with scissors.

And then, together with the teachers, they glued them onto cardboard templates.


We fantasized a little, and as a result we got a snowman, a Christmas tree, and bunnies.


We decorated the figures on both sides so that our winter's tale was visible not only from the group, but also from the street.
We placed a snowman, a Christmas tree and two bunnies on the windows in the bedroom. The boys, going to bed, listened to tales about New Year's miracles and looked at the hand-made paintings on the windows. Every child understood that this was the result general work, and he is also involved in it. You won’t believe it, but the children even remembered where and whose palms were.


Our parents did not remain indifferent and kept bringing us openwork snowflakes. Well, what's the New Year without Father Frost and Snow Maiden? Here we are, in group room, on the windows there are Grandfather Frost and the Snow Maiden, in fur coats from openwork snowflakes.


I'll tell you little secret, the face of Grandfather Frost was printed on a printer, painted, the outline of a fur coat was drawn on the window (by hand, without templates), and then all the details of the figure were attached to the window with tape. I keep asking myself: how did we manage to live and work before the invention of scotch tape?

And here comes the Snow Maiden


The Snow Maiden's braid was drawn and attached separately.
The fur coats of Father Frost and the Snow Maiden were also decorated with an edging of palms cut out by children.

We live in Russia, our children should know and love their country. Therefore, it was decided to decorate the central window of the group with the symbol of the Russian New Year - the Chimes on the Spasskaya Tower of the Kremlin. And also, the symbols of Russian winter - red-breasted bullfinches.
We found a template for the Kremlin Tower on the Internet, modified it a little, made a stencil, transferred the outline to the window, and painted it in our own way.


We painted the pictures on the windows with white water-based paint using red and orange flowers. The frames were painted on all the windows with the same white paint; in our opinion, this made it possible to combine all the windows of the group into a composition in the same style.


The final point in New Year's decoration windows, there was an openwork curtain made from snowflakes cut out by parents according to a single template.

Admire our windows.


On New Year's Day it is customary to give gifts, such a gift to all employees, children and parents kindergarten“Gifting” was made by the hands of teachers Antonova T.G., Amirova G.R. and Chapurina N.A., fireplace from cardboard boxes. We installed a fireplace in the hallway of the group; everyone can come up to the fireplace to admire and take New Year’s photos.


Decorating a nursery for the New Year is a fun and rewarding activity. After all, only children are capable of rejoicing, not because it is customary, and not in order to please someone. No. The children's joy is sincere, not for show. That’s why I want to create such small miracles for them more often and more. And what about the New Year? And you can do it yourself. Don't believe me? See photos of an already decorated children's room, get ideas and act.
For room decorations for the New Year you can choose any style. The main thing is that it is festive, beautiful and... safe.
- For baby's safety New Year's decor They need to be hung at such a height that the child cannot reach them.
- Toys and decor should not be glass. Plastic, foam, fabric, wood - these are the materials you should prefer.
- Make sure that the decoration does not consist of small parts. After all, everything sparkling, new and strange just wants to be pulled into your mouth.
- Electrical garlands should be checked, or even better, probed to ensure there is no short circuit.
- Electric garlands can be easily replaced with paper.
- If you are planning to put a Christmas tree in the nursery, secure it securely, you can even tie it to the battery so that it does not accidentally fall.
- You can decorate the Christmas tree with paper, knitted or fabric toys. And we will share ideas and photos.
Advice! Think in advance, or better yet, draw in a sketch or create a visualization map using a photo of what it will look like children's room interior, decorated for the New Year. But you need to decorate it when the child falls asleep. So that when he or she wakes up, they find themselves in a fairy tale.
Want to do interesting design kindergarten groups? Look for ideas in the article.
For preschool children, kindergarten is a second home. Here they eat, study, play games, and relax.
- Therefore, all areas in the room where the crumbs are located should not only be cozy and beautiful, but also attractive to the child, as this forms the mental and physiological state crumbs.
- The development of the child as an individual, aesthetically and artistically, also depends on the interior design.
- Decorating areas in a group in kindergarten is an important component pedagogical work. Every teacher should remember this.
- In this article you will find ideas for the correct and beautiful design of walls, cabinets and other blocks of the room where children are. It is also important that with the change of seasons, the design of the group also changes. We will show you photos and templates that will help make the group beautiful, depending on the age of the kids.
Beautiful group design in kindergarten: design rules, recommendations
Each teacher knows the characteristics of children at a certain age. This should be taken into account when decorating different blocks and corners in the room. Here are the rules and some recommendations for beautiful and proper decoration groups in kindergarten:
- When decorating, take into account not only the age of the children, but also the size of the room, its features and the equipment you have available. The room should be bright, spacious and cozy, and this can be achieved by creating a bright and colorful interior.
- Use ready-made stands for decoration. You can make them yourself using the templates that you will find below. The stands are easy to work with; you can hang menus, children’s daily routines, group lists and other useful information on them.
- There should be little furniture, more play space for children. But at the same time, you need to create a study area with tables and chairs.
- Create an interior in a group in a single thematic direction. For example, it could be a sea, space, fairy-tale or forest theme. But combinations are also allowed different options. This will depend on the imagination and materials that are available.
- Themes from fairy tales and cartoons are suitable for decorating the room.. It is important to pay attention not only to the aesthetics of decoration, but also to modern educational purposes.
- Create a corner where children can display their creative achievements: crafts and drawings. He should be in the field of view of mothers and fathers coming to pick up their children, so that they can admire their child’s achievements and praise him.
Advice: Involve parents in organizing the group. This will help create creative ideas and decorate the interior uniquely, brightly and beautifully.
Parents who know how to paint real landscapes, take unique photographs or work with computer programs, should help teachers decorate the kindergarten group.
Ideas for beautiful spring decoration, junior, nursery, middle and senior groups: photos, templates
In the spring, after a long and cold winter, I want to create festive mood and therefore the interior of the children's room should be made in warm colors. Here are ideas for beautiful spring decorations, junior, nursery, middle and senior group, with photos and templates:
The spring mood is created by hanging garlands of green paper leaves and a girl made of fabric in the role of spring. Excellent design for a group of children of different ages.
This design can be done on any wall. Flowers made of bright fabric and swallows made of paper - everything is simple and quick.


Original design walls by March 8th. Find paper flower templates below. The number 8 is covered with fabric on which beads and rhinestones are sewn. Flowers are attached to the wall using double-sided tape.

 The idea of a beautiful spring decoration for junior, nursery, middle and senior groups for March 8
 "Red spring has come." With this design you can organize a spring celebration. The vines attached to the ceiling are strips cut in a circle, and on the wall there are flowers and butterflies drawn and cut out by the children.


This is how you can decorate a group for Easter. Children will be happy to help you draw and cut out small parts: flowers, Easter eggs. Great decoration for toddlers: large objects that you can touch with your hands and a fairy chicken - she brought Easter eggs.

 The idea of a beautiful spring decoration, junior, nursery group for Easter
 Here are the decoration templates:


Beautiful summer design ideas for junior, nursery, middle and senior groups: photos, templates
For summer decoration Any cartoon or fairy tale plot will suit the group. Insert palm trees, green grass and bright sunny colors into the landscape - here you have summer - warm and carefree. Photos and templates with beautiful summer design ideas for junior, nursery, middle and senior groups:
This wall design is suitable for children in the nursery and younger groups. Ask creative parents to draw animals and just sit them next to each other. Now we have the plot of our favorite cartoon. On the left in the picture is a whole life that “boils” in a big fairy-tale city.


Ordinary indoor flowers act as palm trees on the wall. The butterfly templates are below and the turtle template can be found below. Simple design, but very creative and original.


Marine theme- this is summer, sun, fish and sea. In such an interior, the child will seem to find himself in the middle of the ocean with its inhabitants and fauna.


Cartoon design for a nursery group. Summer theme, fairy-tale heroes, cartoon plot - all this will appeal to any child from 1.5 years old. Naturally, either the teachers themselves or creative parents can paint the walls this way.


Creative design learning corner for kids. Multi-colored sun and frames with pictures - simple, but how eye-catching.


Here is a turtle template for the second interior design option. She will settle down perfectly on a hill, between the palm trees, and will delight with her cheerful appearance. Just print it on a color printer on paper the right size and stick it on the wall.


Ideas for beautiful autumn decoration, junior, nursery, middle and senior groups: photos, templates
Autumn pleases with its bright colors. This can be used in interior design. Below are photos, templates with ideas for beautiful autumn design, junior, nursery, middle and senior groups:
Such crafts can be made with older children, and then they can be used to decorate the room. Ordinary yogurt glasses, leaves cut out of colored cardboard and decorated with beads and satin bows. Add a smile to the leaves and they will delight you with their cheerful mood.


Again, crafts, but children of the middle or junior group can do them. These leaves and birch trunks can be used to decorate a wall in a group.


Autumn in the form of a girl is symbolic and perfect for decorating a kindergarten. This “picture” can be used to decorate a wall or a separate corner in a group.


The umbrella on the ceiling does not at all remind you of rainy weather. It complements the leaf decorations. The only thing is that you need to securely attach it to the ceiling so that it does not fall.


In this design, a whole autumn plot unfolds - bright, colorful, with forest inhabitants. Decorate any corner in a group like this: a play area, a study area, or in the entrance area.


Here are the leaf and mushroom templates for crafts:


Ideas for beautiful winter decoration, junior, nursery, middle and senior groups: photos, templates
Children associate winter with snow and New Year. This should be used in decorating the group’s interior. Photos, templates, ideas for beautiful winter decoration, junior, nursery, middle and senior groups:
Any teacher can make such a tree. Templates for bullfinches are below. All you have to do is print them out, cut them out and give them to the kids to color. Snowflakes will add a winter mood.
 Ideas for beautiful winter decoration for junior, nursery, middle and senior groups
 Here's the original winter decoration entrance group of the children's room. Add a few drawings or applications that the children made to the wall, and it will be clear that creative and well-rounded children are growing up here.


This decoration can be made in a nursery or younger group. The main thing is to draw a hare on a large sheet of paper and make blue background. Children will make real snow themselves using white paint. The little ones' handprints look like a real snowstorm in the forest.


“Even though we are kids, we decorate the group with all our hearts!” - this is how you can sign the application made by the teacher with the children. The snowman and the hare are glued together from paper blanks using children’s hands - it’s original, and you’ll never immediately think that these are children’s hands.


This decoration is real winter, made by a creative teacher. Here you will need a little tulle and thin white lining fabric. Everything is simple, but how original.


How to beautifully decorate the walls in a kindergarten with your own hands?
Many ideas for decorating group walls in different seasons have been published above. Choose any one and create real masterpieces yourself or together with your children. Below are a few more photos that will help you beautifully decorate the walls in a kindergarten with your own hands:

Applications on the walls can be made together with children, but to create drawings, you will have to involve parents.


Beautiful design for the “Pochemuchki” group in kindergarten: ideas, photos, templates
The name of the group can be hung above the door in the entrance group. You can print ready-made templates on a color printer, stick them on cardboard, and hang them where needed. Beautiful design groups "Why Chicks"

 Beautiful decoration for the “Pochemuchki” group in kindergarten: ideas, photos, templates
  Beautiful decoration for the “Pochemuchki” group in kindergarten: ideas, photos
  Beautiful decoration for the group “Pochemuchki” in kindergarten: ideas
 A beautiful decoration for the group “Pochemuchki” in kindergarten
 A beautiful decoration for the group “Pochemuchki”
 Beautiful design for the “Rowanka” group in kindergarten: ideas, photos, templates
Group "Pock" should be decorated in the style of nature: natural materials, forest dwellers, berries. Involve children and their parents in the design of the room. They will definitely suggest something creative and beautiful. Beautiful group design "Pock" in kindergarten - ideas, photos, templates:  Beautiful decoration for the group “Rowanka” in kindergarten: ideas
 Beautiful decoration for the group “Rowan” in kindergarten
 Beautiful decoration for the group “Rowan”
Beautiful design of the “Rainbow” group in kindergarten: ideas, photos, templates
The “rainbow” group should be bright and beautiful. It should stand out from other groups with its rich interior design. Beautiful group design "Rainbow"  Beautiful decoration for the Rainbow group in kindergarten: ideas
 Beautiful decoration for the Rainbow group in kindergarten
  Beautiful decoration for the Rainbow group
 Beautiful design for the “Firefly” group in kindergarten: ideas, photos, templates
Even if you get an unkempt group, don’t be upset. Name her "Firefly" and do original decoration interior Print the templates on a color printer and hang them on the walls. Beautiful group design "Firefly" in kindergarten - ideas, photos, templates:

 Beautiful decoration for the “Firefly” group in kindergarten: ideas, photos, templates
 Beautiful decoration for the “Firefly” group in kindergarten: ideas, photos
 Beautiful decoration for the Firefly group in kindergarten: ideas
 Children are the most valuable wealth for every person. You should try and use as many of your creative resources and imagination as possible to ensure that the kids in kindergarten feel comfortable.
Video: Design of kindergarten groups
Parents always think about how to decorate a kindergarten with your own hands, after all, it’s not uncommon to see a situation where teachers receive a group room in “pristine condition.” Of course, in such a room there will be wallpaper, there will be cribs in the bedroom, etc., but at the same time, both parents and teachers need to work hard to create the proper comfort.
How to decorate a kindergarten group with your own hands
Corner fine arts
Each kindergarten has a corner of fine arts, which will only become more beautiful with the help of “homemade crafts”. In order to create wall decor in the form of pencils, you will need to stock up on colored cardboard. Multi-colored pencils will look very cute, and you can make either a couple of pencils or a whole bunch - it all depends on the quantity free space on the wall. The finished craft looks quite colorful and will certainly attract the attention of preschoolers.

The finished pencils will be equal in width to a cardboard sheet. Choose a suitable color and draw 3 cm stripes across the entire width. You should have 6 stripes in total. Along the drawn lines, bend the cardboard from the inside out and glue the resulting base using Titan glue.
Take a sheet of cardboard with a metallic sheen and cut out a pencil tip. Glue the blank with “Titanium” and stick it on top paper cone the same color as the pencil itself. The cone on the tip will act as a stylus. Using the same adhesive composition, connect the cardboard base and the metallized tip together.
For decoration finished crafts cut out cardboard eyes, legs and arms, glue them to the “body”. Also, an additional detail will be a brush or palette; let the pencil hold them in your hands.

Corner of nature
Naturally, it is necessary to take care of the proper design of the corner of nature, because this is where children will study careful attitude to animals and plants. Also here teachers will store didactic materials, which will allow preschoolers to learn the time of day and the change of seasons. That's why we recommend that you make a toy house that will turn learning into fun game. The house itself can be made of chipboard or cardboard, and then covered with fabric. A picture should be installed in the window of the house that will clearly demonstrate to children the change of seasons. By the way, an excellent pedagogical technique would be to hide this picture behind a curtain, because curious children will certainly want to look behind it and find out what is hidden there.
Sports section
Registration process sports corner- this is quite creative process. So, for example, you can decorate the shelves on which the inventory is placed using colorful stickers, you can also decorate them using paints. Sports supplies usually placed in plastic buckets, which can also be decorated. An excellent choice would be colored paper with sticky layer- you can cut out a wide variety of details, for example, leaves or flowers, and then simply glue them into in the right places on the outer surface of the bucket. You can also use corrugated paper.

It’s very good if parents can sew orthopedic rugs that will only bring health to their children’s feet. Such paths are very easy to sew - certain fillers are placed inside, for example, chestnuts, buttons or round pebbles. It will be very useful to run on such a rug after a night's sleep - it will be a real hardening process.
To make such a rug, you should make several fabric squares; the more there are, the longer the path will be. On one side, the squares should be left unsewn - this way they can be filled with the necessary items, and then sewn together. In order to succeed not only useful device, but also to decorate the group, you need to take fabric of different colors.
How to decorate a kindergarten with your own hands - photo
Naturally, we cannot ignore decorating the group for some holiday. For example, you can decorate a group for the New Year, and by May 9, together with the children, you can build a thematic composition.

To create carnations, you need to take corrugated paper, cut a rectangular piece from it, fold it into a square and staple it in the center. Cut out a circle - it is best to use for this purpose curly scissors. To the center of the round workpiece with different sides make cuts and straighten the bud. Cut a strip of green corrugated paper and wrap it around a stick to make a stem. Glue the flower to the stem, and attach paper leaves. You can do required amount such carnations.
To make a vase, you will need colored paper - cut out a rectangular piece of black 12 cm wide, as well as orange stripes, the width of which will be 2 cm. Glue the parts to a toilet paper tube.

To make flags, you need to cut out a red rectangle (12 cm wide) for the first flag, a rectangle of the same color 4 cm wide - this will be the second flag, you will also need blue and white elements, respectively 12 and 4 cm. Glue red and white elements onto the white element. blue stripe. Glue the finished flags to cocktail straws.

To make a star, make a circle on a cardboard sheet and make the necessary markings, then cut out the circle and make cuts. Fold the star along the lines and glue it together, insert the “fire” into the very center (use corrugated paper for it). Now all that's left is paper sheet draw a dove, cut out a bird of peace and create a festive composition.
And you will find best options crafts for the New Year, be sure to make “homemade crafts” with your children on the eve of the holiday.
How to decorate a kindergarten veranda with your own hands
Of course, not only while they are indoors, children should enjoy bright colors and interesting artistic solutions. So, you can decorate the veranda with a cute garland of flags and then every day the children will be in a festive mood.

The first step is to print a triangle on a piece of paper; its size should be exactly equal to the size of the flag in full size. Cut out this triangular template.
Prepare a lot of scraps of fabric for work; the more colorful they are, the better and more fun. Attach the template to the fabric and trace it with chalk, then cut out the resulting flag. Do similar manipulations with all the other scraps.
Prepare brown yarn, as well as a needle and white thread. Hem the flags with white thread so that one edge is picked up and the flags are held on with brown yarn. Sew the elements one by one to create a beautiful garland, now all that remains is to stretch it out on the veranda.
How to decorate the kindergarten yard with your own hands
During a walk, children also want to see interesting and fairy tale characters- for their manufacture we recommend that you use waste materials, because there are many original ideas on their use. decorated, will attract maximum attention. How to decorate a kindergarten, areas with your own hands This is exactly what our publication will tell you.

So, for example, you can make a cute ladybug - for it you should prepare a pile of sand, into which you stick the bottoms of plastic bottles. The final stage will be painting it red and black so that the craft looks like a real one. ladybug. By the way, exactly plastic bottles will optimal material for creativity, because there are many of them in every home, they are very easy to process, giving the required form. You can use our ideas, or you can dream up your own “makeshift”.
You can make a cute caterpillar using an old hose from a vacuum cleaner (agree, it’s enough creative solution), aluminum wire and ball.
If you fence small area using identical bottles, and placing cut grass and a couple of cute pigs inside, you will get a barn. By the way, the pigs are made from the same plastic bottles, only in a larger capacity, and then painted with pink paint.
You can attach a cute little sun to any tree or porch support. The basis for it will be plastic cover boxes (for example, from a cake). Of course, it’s not enough to just cut out identical rays; you also need to draw a cheerful face.
How to decorate a kindergarten playground with your own hands
Another “ladybug” can be made from old tires - such a bright flowerbed will serve as an excellent decor for a kindergarten.

To do this, take an old tire and paint it red, wait until the piece dries.
On a regular A4 sheet, draw a pair of identical circles with a diameter of 15 cm, then cut them out - these will be the templates. Using a piece of foam rubber, black paint and slits in the sheet (templates), stamp black circles on the surface of the tire, like a real bug. Wait until it dries again.

Take two springs, open two Kinder Surprise containers and put the parts on the springs, make a loop for fixing on the end of the wire, and then put on the remaining parts of the containers to make ladybug horns. Paint the horns with black paint and wait until dry.
Drill a couple of holes in an old bucket without a handle and insert the horns into them. Make a loop at the end of the spring and secure it with a rivet to create a head with horns. Draw a mouth and cheeks on the bucket, glue on the eyes and nose using hot glue. Using two self-tapping screws, carefully attach the head of the bug to the tire.

Now all that remains is to fill the soil inside the tire, installing it in a permanent place, and plant flowers that will delight you with bright colors throughout the summer. And in the cold season, use original ones to decorate the site. For example, you can make a strawberry out of snow, and then paint it with dyes in suitable colors.
Now you know, how to decorate the territory of a kindergarten with your own hands, we haven’t forgotten about decorating the group - let your kindergarten always be bright and colorful thanks to skillful hands and an inquisitive mind!
If you liked our site, express your "thank you"
by clicking on the buttons below.
Content
Are you a responsible mother who has volunteered to decorate a kindergarten for the New Year, a teacher entrusted with this solemn and festive mission, or just a lover of handicrafts who will be happy to help make your child’s second home beautiful in a New Year’s way? In all these cases, our tips and ideas for decorating a kindergarten will come in handy. We have collected the most cool ideas, so stock up on material, there is still time to prepare everything.
We decorate the walls
For New Year's wall decoration, you will need as much as possible following materials and tools:
- colored paper;
- colored cardboard;
- felt;
- ribbons;
- twine;
- Christmas balls;
- twigs;
- cones;
- paints;
- scissors;
- PVA glue;
- paper in silence;
- glue gun;
- ruler;
- patterns and stencils.
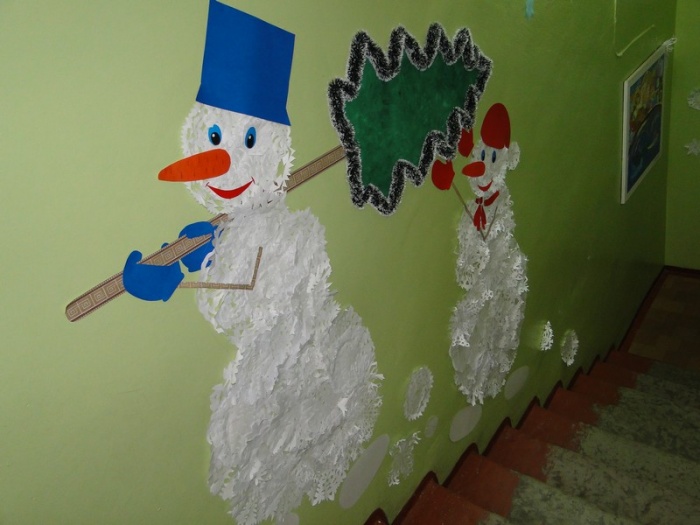
What can we do with this entire list? Paper applications on the wall, for example, a Snowman made of several round white balls, a Christmas tree, paper garlands, snowflakes, garlands with felt toys, garlands made from natural materials. A group's decoration for the New Year might look something like this:
You need to cut out openwork circles from white paper, prepare a hat, eyes, mouth, and you can make a carrot nose from felt.

A Christmas tree is made using approximately the same principle. Attach the parts with tape. The garland can be made from rectangular narrow pieces of paper or from round pieces that need to be stitched with a machine.

You can create an entire installation from wooden sticks for the wall - volumetric Christmas tree with balls, bows and children's toys. Complete the composition with an electric garland and hang it somewhere on a narrow wall.

Twigs can be collected with children on the street. You can even give parents a task so that they and their children bring a Christmas tree toy for decoration.
The walls can be painted. If, of course, the management allows and you feel the talent of an artist. Although you can always use a stencil and paints, which can then be easily washed off from the glossy surface of the wall.
The stencil must be carefully cut out with nail scissors and using spray paint. Use a combination of paint+paper+felt and other materials to create an interesting New Year's composition on the wall.
Painting the windows
How to decorate a kindergarten for the New Year? Use your windows! To begin with, you can paint them. Use glass paints or folk remedies:
- water;
- toothpaste;
- natural dyes.
In a small amount of water you need to dilute a few peas of toothpaste, add the desired natural dye and feel free to go decorate the windows in a group. The design will last all holidays, and if desired, it can be easily washed off with water.
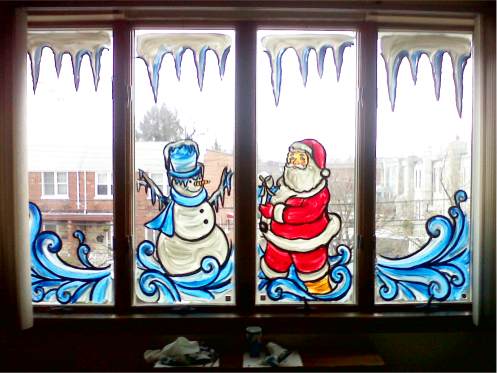
Or you can use a regular children's drawing stencil and a dishwashing sponge.
Decorating windows and window sills
Don’t forget that in addition to painting the windows, you can also decorate them with various garlands, decorate the curtains, and also use the window sill. Various paper installations with garlands are great option how to decorate a group for the New Year.

You can arrange a whole exhibition on the windowsill New Year's works guys.

A window in a kindergarten group can also be decorated with ribbons, pine cones and spruce branches with Christmas tree toys. Use any ideas and materials that come to mind for decoration: acorns, chestnuts, walnuts, bows, beads, paper snowflakes, paper flowers in silence. In our articles we have repeatedly told how to make flowers from different types paper, take ideas for decorating a kindergarten for the New Year.

Decorate with paper flowers in silence

Making a Snowman from disposable cups
Children like volumetric figures so that you can come up, touch, take pictures. For the New Year, a Snowman from plastic cups. Stock up on materials:
- plastic glasses - 200-300 pcs.;
- stapler;
- black paint or material for eyes and buttons;
- orange material or nose paint;
- red paper for the mouth;
- scarf;
- Christmas decorations.
First, you need to make a base from plastic cups - connect them together into a circle of the same diameter as you want the Snowman to be in volume. The cups are easily connected to each other with a stapler.

You need to stack rows of glasses on top of each other, creating a dome. Use a stapler to connect not only adjacent glasses, but also rows.
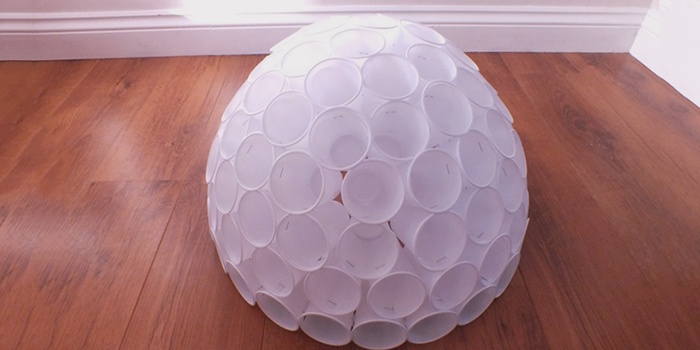
Step by step you will need to make two or even three such domes. After which the Snowman needs to be decorated, given, so to speak, human face. You can use colored glasses, you can paint them, use fabric, Christmas decorations or colored paper. You can place a garland in the middle of the product so that the Snowman glows beautifully - here you have a kindergarten group decoration for the New Year.
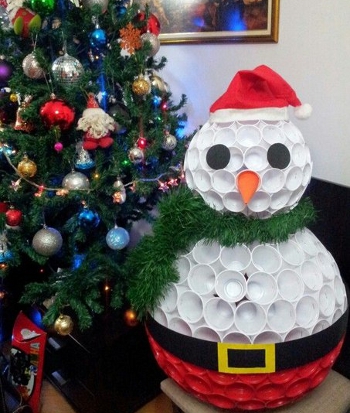

Using the same principle, you can make Santa Claus or come up with some other character. Twist, think, maybe you can make a symbol out of plastic cups the coming year- a dog.

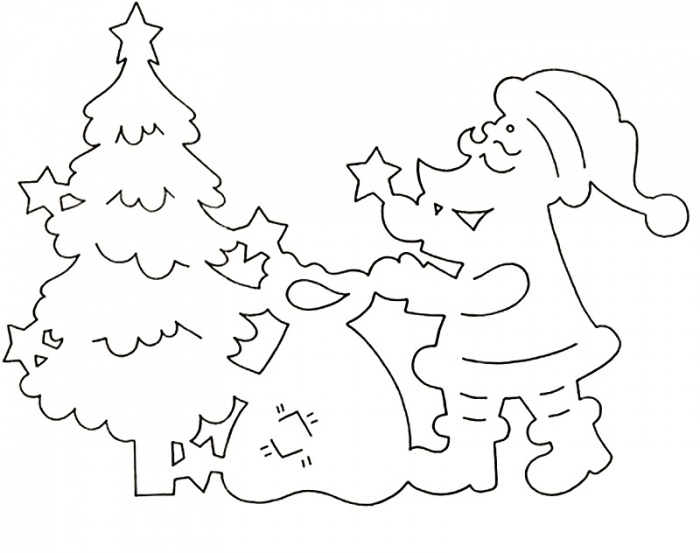
We create festive figures from cardboard
But not from regular cardboard, and from the one where they bring electronics, they sell shoes. In general, you need very thick brown cardboard. Let's make a deer out of it, for example.
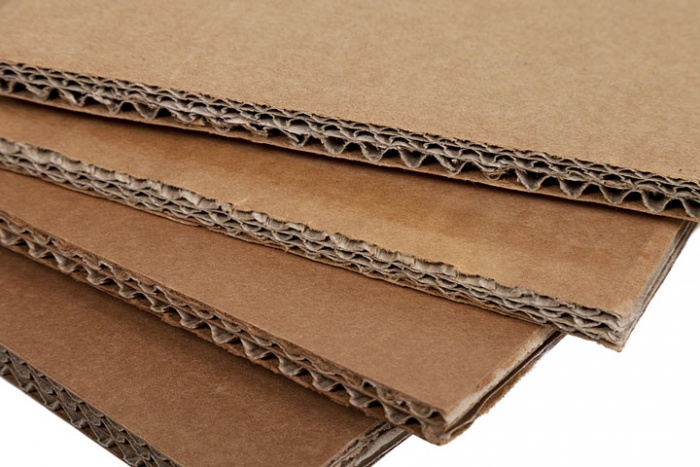
You can also use plywood for a deer or elk, but then you will need a little more resources - a jigsaw and strength. To assemble such a figure you will need a stencil.
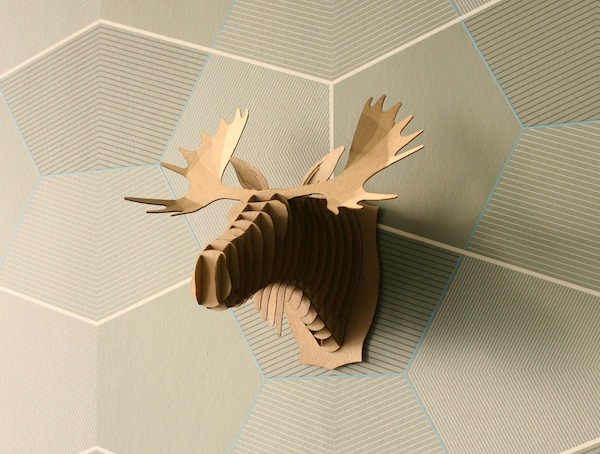

You need to carefully cut out all the parts and cut the grooves so that you can later assemble the installation. You don't even need glue to work. You can use a simpler design to decorate a group for the New Year and not spend a lot of time.
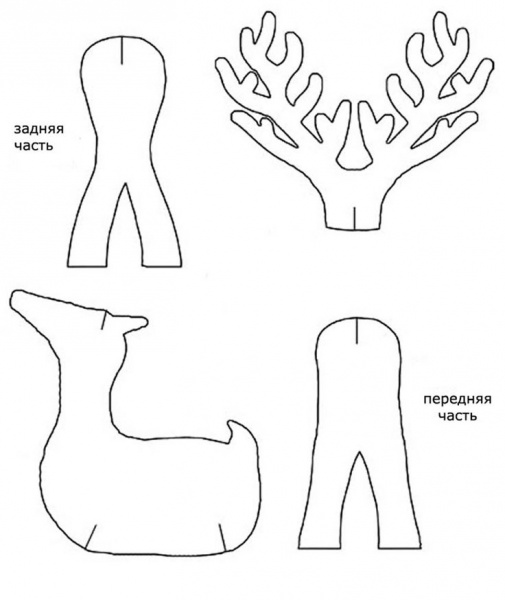
And literally from three parts you can make a deer like this:
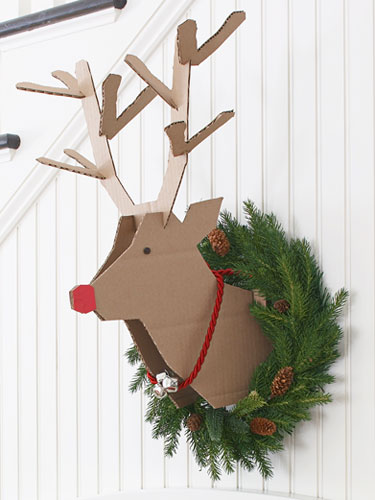
Decorating a group for the New Year in kindergarten does not have to be pompous, using all possible materials. Sometimes it is enough to secure such a simple cardboard composition and hang a few stylish garlands and the group will already be transformed.
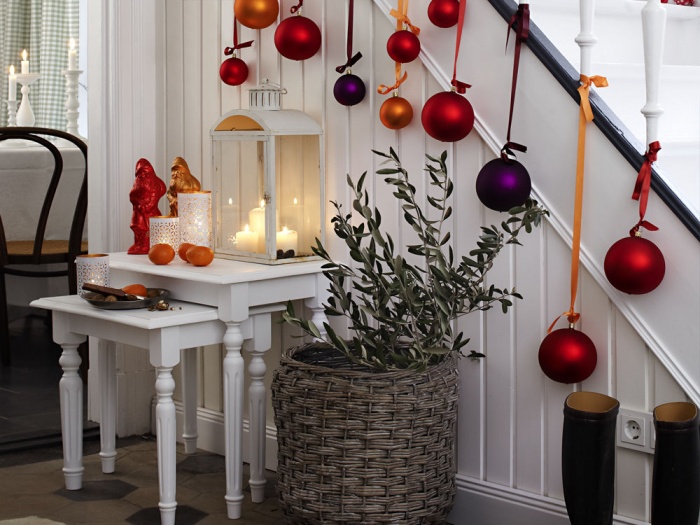
Decorating the stairs
There is one more area for activity that we did not take into account - these are stairs. New Year's decorations in kindergarten can be placed on a flight of stairs or the handrails of the stairs themselves can be decorated. And here rain, decorative Christmas tree branches, ribbons, and bows with pine cones can come into play. We have selected several interesting ideas on the picture:

Look luxurious natural materials- twigs, berries, cones. Of course, you need to take into account the fact that the decoration is being prepared for a kindergarten where there are a lot of mischievous people.

As an example, take the following option - simple, but very elegant. Use plastic or stuffed toys.