Interesting DIY Christmas trees. Christmas tree made of beads. DIY sisal Christmas tree
To become the owner of a Christmas tree, you don't have to buy it- you just have to look into useful tips and find out how you can do it beautiful Christmas tree with your own hands.
Today you can find many Christmas trees in shops and on the street.
You can put it in the house a natural Christmas tree or branches from a Christmas tree for scent, but to decorate the house, or a gift to a loved one can be done if you know a few interesting tricks.
Find out how to make a Christmas tree from paper, food, fabric and even pasta.
Make a craft like this not difficult at all, and your home will be decorated with unique decor, and friends and acquaintances will be happy to receive a Christmas tree made by you as a present.
DIY paper Christmas tree. Christmas tree made from scraps of magazine pages.
You will need:
Unnecessary magazine or book with bright drawings
Cardboard or thick sheet of paper
Glue gun or PVA glue
Shaped hole punch, optional
Pencil or pen
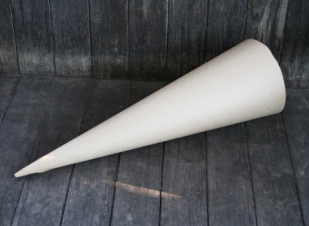
1. Make a cone out of a thick sheet of paper and secure it with glue.

2. Prepare pages from a magazine with bright pictures and cut out many circles of the same diameter from them. If you have a shaped hole punch (shaped like a flower or a large circle) it will be easier.
3. Wrap the cut circles around a pencil so that they curl a little.


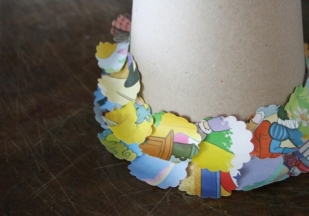
4. Starting from the bottom of the cone, begin gluing the folded circles.
Make neat rows. The circles should be tightly glued to each other so that the cardboard is not visible.
5. Make a small cone from one circle and glue it to the top of the cardboard cone.
The Christmas tree is ready!
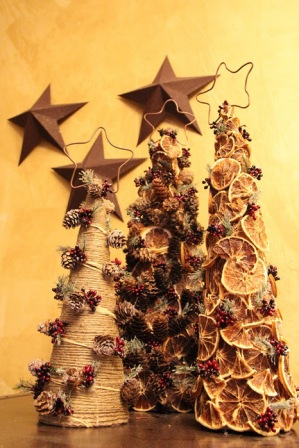
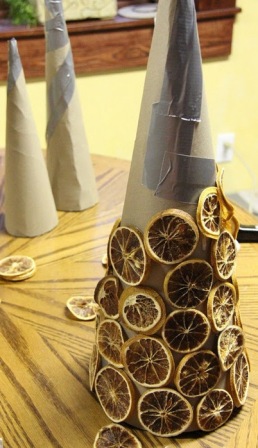
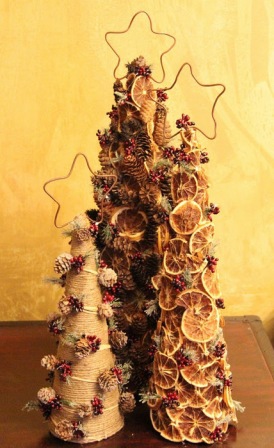
DIY Christmas tree made from pine cones and dried citrus fruits


DIY Christmas tree (master class). Christmas trees made of wrapping paper.


You will need:
Large thick sheet of paper
Wrapping
Double tape
Scissors
Decorations
1. Make a cone out of a sheet of thick paper.
* If your wrapping paper is quite thick, you can bypass step 1 and make a cone out of wrapping paper.

1.1 Fold the paper diagonally, holding one end to keep it sharp.

1.2 Secure the paper rolled into a cone with tape. You don't need to do everything too carefully, since you will cover the cone with wrapping paper.

1.3 Trim off the excess at the bottom of the cone to create a smooth base.

2. Prepare a colorful wrapping paper and cover the cone with it. To do this, place the paper on a flat surface with the pattern facing down.

2.1 Using tape, attach the end of the construction paper to the top of the cone.
2.2 Begin to slowly twist the cone while wrapping it in the wrapping paper. You need to wrap the cone tightly.

2.3 Measure the paper and cut it before completely wrapping it around the cone. Glue double tape to the edges and connect to the other end. You need to cut off the excess at the base so that the paper is even.


3. All that remains is to decorate the Christmas tree as desired. You can make paper stars, use glitter, stickers, glue on beads and/or buttons, wrap with ribbon, etc.

Similar Christmas trees:


DIY fabric Christmas tree. How to make a Christmas tree from felt.


You will need:
Glue or double tape
Scissors
* Try using two colors of felt to make the Christmas tree even more beautiful. IN in this example yellow and orange felt was used.
1. Make a cone out of cardboard. Secure the ends with glue or double tape.
2. Prepare felt and cut circles of different diameters from it, from small to large (see picture). You can use pre-prepared circle templates made from cardboard.


3. Glue Christmas tinsel to the bottom of the cone.
4. Now you need to make a crosswise cut in the center of each circle cut out of felt. Do not cut too much to prevent the felt garment from falling off. Make the cut just enough to fit the circle tightly onto the cone.
5. Start gradually putting circles on the cone. If you are using two colors, then put on the circles sequentially, first one color, then the other. Also worth noting. What to put on the next circle is not only on the cone, but also on top of the tips of the cuts of the previous circle.


6. We decorate the top of the Christmas tree. To do this, simply add tinsel, onto which you will need to add a pre-prepared small felt cone. Secure the tinsel and crown with glue.
* If you wish, you can hide a sweet gift inside the cone.


Original DIY Christmas trees. Glowing Christmas tree.
You will need:
Floral mesh (preferably several shades of green)
Scissors
Cardboard for cone
PVA glue
Cellophane
Pins
Garland
Floral wire
Decorations upon request

1. Make a cone out of cardboard.
2. Wrap the cone in cellophane.
3. Take any container and make a solution of PVA glue and a small amount of water in it
3. Prepare floral mesh. Cut it into small pieces and place each one in a container with the solution.
4. Start gluing the pieces onto the cellophane-covered cone. Glue different shades mesh sections in different directions. The joints should be coated with another layer of glue for a more durable attachment.
5. Secure the entire structure with pins and wait for the glue to dry.
6. You have now created the first layer of the Christmas tree. Now you need to make a second layer in the same style. After gluing the second layer, leave the structure to dry.
7. Now remove the Christmas tree from the cone - the glue should quickly come away from the cellophane.
8. Place a garland inside the tree, which must be secured with floral wire.
9. All that remains is to decorate the Christmas tree to your liking.
DIY Christmas trees (photo). DIY pasta tree.

You will need:
A cone made of plastic or foam (or you can make it yourself from cardboard)
PVA glue
Pasta various forms and sizes
Spray paint, acrylic paint or gouache
Brush.
1. Prepare a cone and paint it in desired color. Wait for the paint to dry.
*If you are using spray paint, you can skip this step.
2. Prepare the pasta. Start applying glue to each piece and gluing the pieces to the cone. Design your Christmas tree as your imagination dictates.
After applying the glue, press the piece a little and hold it so that it sticks well to the cone. It's okay if the glue is visible from under the pasta.
Continue until you have covered the cone with pasta. Wait for the glue to dry.

3. Start adding color to the pasta. In this example, acrylic paint was used. Try to paint all the parts carefully so that there are no empty spots.
* It is advisable to paint in two layers.
* If you paint it with white paint, the Christmas tree will look like a porcelain product.
Helpful advice: If you want to remove the craft, then put it in a plastic bag first, so you can immediately find the part that might have come off the cone.
We make a Christmas tree with our own hands. Bright paper Christmas tree.

You will need:
Colored cardboard or designer paper
Thick cardboard
Glue moment or glue gun (with hot glue)
1. Cut a square base for the tree from thick cardboard.
2. Insert the skewer into the cardboard and secure with glue.
3. Now you need to cut from designer paper or colored cardboard circles of different diameters. You need to make 3 circles of the same size.
For example, if you want to make 10 different sizes of circles, then you will need to cut out 30 circles (3 for each size).


*If you don't feel like cutting out a lot of circles, just shorten the skewer and you'll end up with a cute mini Christmas tree.
4. Make a small hole in the center of each circle.
5. Before you start putting the circles on the skewer, lubricate the hole in the middle with glue.
6. Start placing the circles on the skewer, leaving a little space between them.
7. Cut out stars from paper and attach them with glue to the top of the tree. You can use another part for the crown and not necessarily paper.
Crafts. DIY Christmas trees made from thread.


You will need:
Thick yarn
Yarn with pile
Cone (cardboard or foam)
Pins
Decorations, to taste.
1. Do paper cone or buy a foam cone in specialized stores.
2. Take both strands and pin their ends at the base of the cone.


3. Start wrapping the threads around the base of the cone, securing with pins approximately every 5 cm.
4. Now start moving towards the top of the cone, carefully wrapping both threads around the future tree. At this stage there is no need to attach the thread to the cone.
5. When you have reached the crown, pin the threads again by wrapping the threads around the crown several times.
6. Both yarns now need to be pulled down, also wrapping the cone in a second layer.


7. At the base of the cone, cut the threads and secure them.
You can leave the tree like this or you can also decorate it.

In this example, artificial berries were used for decoration, but you can use colorful beads, snaps, buttons, etc.


Try also making a decoration for the top of your Christmas tree. The top of the head can be decorated the way you like.
You can leave the tree like this, or you can also decorate it.
You can make just a paper hat or a star, or you can make something more complicated. If you chose the last option, then below are instructions for you.
You will need:
Flower wire
Nippers (for wire)
Sequins
PVA glue
Fine wire (calibrated wire)


1. Bend the wire into a star shape (see pictures) and cut off the excess.
2. Cover the star with glue and sprinkle glitter on it.
3. Attach a thin wire to the star, as shown in the picture:
4. Attach a star to your Christmas tree.
Creative DIY Christmas tree

If you want something original, or you just don't have enough space for... big Christmas tree At home, you can try to make such a simple design.
It is worth noting that such a Christmas tree is suitable for any room. It can be done both at home with children and at work.
This tree can rise 1.5-2 meters and takes up almost no space in the house. In addition, it is a good background for New Year's photography.
You will need:
Foam base or matte cardboard
Scissors
Corrugated paper
Masking tape
Adhesive tape
PVA glue
Stationery knife
Marker, optional

1. Place foam or cardboard on a flat surface to obtain large rectangle(see picture).
2. Use duct tape to connect all the parts.
*This example used black duct tape for better visibility, but white tape is better.
3. Mark the size of your future Christmas tree using masking tape.
4. Using a utility knife, carefully cut out the shape of the future tree.
5. Prepare corrugated paper, fold it in half and cut the fringe. You should have many sheets of fringed paper to cover the entire tree.
6. Begin carefully gluing the corrugated paper to the foam, starting at the base of the tree. The fringe should hang slightly below the base to cover the foam (or cardboard) and also cover slightly top part tree trunk, which we will make later.

7. Work your way up to the top, covering the entire tree with a bright green coat of crepe paper.
8. WITH reverse side Christmas tree, add a hook so that the tree can be hung. Instead of a hook, you can use double tape to cover the perimeter of the tree.
9. To make the trunk you need to cut out a small rectangle from foam or cardboard.
9.1 Cover the rectangle with brown paper, just like the Christmas tree, i.e. cutting fringe onto paper strips and gluing them.
Summary: How to do christmas tree with your own hands. Original Christmas trees made of pine cones and tinsel. Photos and templates of paper Christmas trees. Homemade origami Christmas tree. Christmas tree made of candies.
Even kids can take part in preparing for the New Year and making New Year's crafts with your own hands. For example, Christmas tree Even a two-year-old can make one out of an ordinary cone and plasticine. You just need to teach him how to roll balls different colors from plasticine and secure them to the pine cone. The base of the Christmas tree is a spool of thread wrapped in foil.
Here's more complex options Christmas trees made from pine cones. In the first case, the bump was painted acrylic paint in green and white colors. In the second version, the pine cone was decorated with beads.


You can make a Christmas tree like this with your own hands from a large number of cones. The basis for the Christmas tree is a cone made of thick paper or cardboard, which is then covered with cones on all sides using a glue gun. Decorate the finished Christmas tree with beads and large beads.

Another very simple homemade Christmas tree made from tinsel. You can make it in literally five minutes.

To do this, you need to make a cone out of cardboard and stick tinsel on it in a spiral.


Christmas tree made of candies. DIY candy tree. How to make a Christmas tree out of candy
If before wrapping cardboard cone tinsel, using tape, attach candies to the future Christmas tree, you will get a sweet Christmas tree made of candies. Detailed New Year's master For a class on how to make a Christmas tree out of candy, see the photo below or follow the link. When creating a Christmas tree from candies, it is convenient to use double-sided tape.


A large number of You can make Christmas trees with your own hands from paper. Let's start with the simplest New Year's crafts.
DIY paper Christmas trees
DIY Christmas tree made of paper (option 1)

Print on thick paper or cardboard and cut out the blanks with scissors >>>> Bend each Christmas tree in half and glue them together. This Christmas tree is made according to the same principle as Christmas ball from our previous article. See link >>>>

Made on the same principle openwork Christmas trees from the website Country of Masters.

Epson's Singapore website offers ready-made templates your Christmas trees:


DIY Christmas tree toy (option 2)
If you have unnecessary cardboard box, then you can use the same technology to make a Christmas tree like this.

DIY Christmas tree toy (option 4)

Or you can make a curly Christmas tree by gluing a cardboard cone base with strips of rolled paper.


DIY Christmas trees made of paper (option 10)
To make such a Christmas tree, you must first cut out circles of different diameters from paper. You will also need wire and a stand, which can be successfully replaced by half of a large Kinder Surprise. The Christmas tree is easily assembled with wire, and, most importantly, it is easily disassembled. See link >>>>


Origami Christmas tree from a magazine
This origami Christmas tree is very easy to make with your own hands. Small format magazines that can be found in any home are suitable materials.

Work plan:
The procedure described below must be done with each page in the magazine. If the cover is thick, you can simply detach it (tear it off).
1. Fold the page, upper right corner, at an angle of 45 degrees to you.

2. Once again fold the sheet in half diagonally.

3. We go through all fold lines with a fingernail or other object so that they do not open, especially thick pages.
4. bottom corner, which goes beyond the boundaries of the magazine, we turn it up.

In this way we add up all the pages in the advertising magazine.

The result will be cute New Year's origami Christmas tree.

Origami Christmas tree from a magazine
Another origami Christmas tree model for the New Year. Unlike the previous origami Christmas tree from the magazine, the pages here are not folded, but figuratively cut out according to a template.

The manufacturing principle is very simple. You need to prepare a template for half of the Christmas tree, circle it on one page and cut it out. Further, the cut out page will itself serve as a template for other pages. You can cut out several pages at once, but you shouldn’t cut a lot at once, as the cut line will turn out uneven (crushed) and the tree will not open well.

The tree itself turns out to be more one-sided; to achieve volume, you can fold and glue 2-3 magazines together. But believe me, she looks good anyway.
Origami Christmas tree made of modules. Modular origami Christmas tree
Collect from triangular modules Origami Christmas tree is not at all difficult. It consists of individual branches, so you can make Christmas trees of a wide variety of shapes and sizes. In addition, from such branches you can make New Year's compositions, make toys, snowflakes, and stars. See the New Year's master class at the link >>>>

Christmas tree coloring on the wall
Large Christmas tree painted on the wall. The individual parts of this New Year's beauty must be printed on 22 A4 sheets and pasted on the wall in the correct sequence. The advantage of this New Year's paper craft is that the Christmas tree is made in black and white, so the printer's ink consumption is low. In addition, this New Year coloring book with many small parts will captivate the child for a long time. Link >>>>

DIY napkin tree
Master class on making very beautiful, unusual Christmas tree from napkins can be found at the link >>>>

How to make Christmas trees from corrugated paper
The Country of Masters website invites you to make two Christmas trees with your own hands from corrugated paper.
Option 1. The candles and the Christmas tree itself are made of corrugated tubes. Link >>>>

A small Christmas tree made from improvised materials is great for decorating a home, a classroom at school or kindergarten. Simple and cool crafts can be made from any materials. For example, a Christmas tree made from cotton pads and cones. Such a craft made from sheets of notes or ordinary table napkins will look original. You just need to choose suitable instructions, which will help you determine what is easier to make holiday trees from, and how difficult such work can be. Among the proposed master classes with photos and videos, you can learn how to make a Christmas tree with your own hands from any materials. Such lessons are suitable for both teenagers and children: they describe all the steps of work step by step. At the same time, you can make Christmas trees using them not only in labor lessons, but also at home.
How to make a Christmas tree with your own hands at home for school - master class with photos

A small Christmas tree craft can be made from different materials. At the same time, it can be assembled on a frame or without using it. The most convenient way to make cute Christmas trees is a foam cone. It can be covered with paper, fabric, and thread. But in order to give the craft being made original look, it is recommended to replace the commonly used materials. In the next master class you can learn how to make beautiful Christmas tree do it yourself at home for school from old sheets of music.
Materials for making a DIY Christmas tree at school and at home
- sheets of music;
- scissors;
- foam cone;
- silicone glue.
Photo instructions for a master class on how to make Christmas trees yourself at home and at school
- Cut sheets of music into long strips.

- Cut each strip into a fringe and twist the whole part of the leaf.

- Prepare all strips for use.

- Apply silicone glue to the foam cone.

- Glue the first row of fringe.

- Repeat similar work for the next rows.

- Cover the foam cone completely with paper fringe.

How to make a Christmas tree out of paper in a kindergarten, at home with your own hands - photo instructions

Using plain paper and shiny ribbons or tinsel, you can make a very beautiful and cool New Year tree. This craft can be used to decorate a home or garden. At the same time, even kids from the primary group will be able to make cool decor. Learn how to make it yourself original Christmas tree from paper at home for kindergarten, the master class below will help.
Materials for making your own paper Christmas tree in kindergarten and at home
- green, blue, red paper;
- sheet of cardboard;
- glue;
- pencil;
- floral ribbons;
- scissors.
Photos from a master class on how to make a paper Christmas tree yourself in kindergarten and at home
- From green and blue paper, cut out many palms according to the blank, or simply by tracing your hand.

- Cut a pyramid out of cardboard and glue a couple of paper palms to it.

- Glue the first row of paper palms.

- Completely cover one side of the pyramid with green and blue palms.

- Paste over back side pyramids with palms.

- Cut out a couple more palms from red paper. Make a small hole at the top of the pyramid.

- Thread a ribbon through the hole made.

- Glue a pair of red palms at the top of the pyramid. Additionally, decorate the Christmas tree with tinsel or ribbons.

How to make a Christmas tree with your own hands at home for a school competition - photo tutorial

To win in school competition New Year's crafts, the child needs to make a cool and unusual Christmas tree. At the same time, the work on its manufacture should not be particularly difficult or long. For example, using following instructions You can learn how to make your own Christmas tree for a school competition at home from foam sheets for crafts and bright sparkles.
Materials for home-made DIY competition Christmas tree for school
- green and yellow craft foam sheets;
- glue in a can;
- glitter;
- beads;
- glass beaker;
- scissors;
- skewer.
Photo master class of schoolchildren making a Christmas tree at home for a competition
- Prepare materials for work: cut out shaped squares of different sizes from green foam sheets.

- Thread the foam squares onto a skewer, forming a layered Christmas tree.

- Rotate each square to different sides so that they really look like Christmas tree branches. Cut out a small star from a yellow sheet.

- Apply glue to the prepared Christmas tree.

- Sprinkle the Christmas tree with glitter and wait for the glue to dry.

- Pour beads into a glass glass and place a Christmas tree in it. Glue a star to its top.

How to make a Christmas tree from cotton pads with your own hands at home - master class with video

Even from ordinary cotton pads you can make a real Christmas tree, which is suitable for decorating a room or classroom. This task can be done by both children in kindergarten and school students. You just need to know about the rules for the step-by-step assembly of crafts. The following video tutorial will help you learn about this, telling you how to make a Christmas tree from cotton pads at home easily and simply.
Video tutorial on how to make a cotton Christmas tree at home with your own hands
The following master class describes step by step how easy it is to make a cotton Christmas tree. Optional ready-made craft You can decorate it as in the video example or use other materials for decoration.
How to make a Christmas tree with your own hands at home from threads - photo from the master class

You can make a cool Christmas tree from both ordinary and woolen threads that will look beautiful in a child’s or living room. Moreover, all the work on making such a craft at home will take no more than half an hour. Simple instructions, listed below, will help you make such decor easily and simply. You just need to study in detail how to make a Christmas tree with your own hands from threads and beads at home. Using the prepositional pattern, you can also make a Christmas tree from ribbons: to do this, replace the threads satin ribbons or organza stripes.
List of materials for making your own Christmas tree from wool threads at home
- foam cone;
- wool threads;
- scissors;
- glue;
- red beads and other decor.
Photo from a master class for making a Christmas tree from threads at home

How to make a tinsel Christmas tree with your own hands at school - step-by-step video tutorial

New Year's tinsel in itself can create festive atmosphere: This is why many parents use it to decorate living rooms, children's rooms and their bedrooms. But such materials are also suitable for making cool bright crafts. For example, the following master class with photos describes how to make a tinsel Christmas tree with your own hands at home, step by step. These instructions are suitable for both preschoolers and teenagers.
Video on a master class on how schoolchildren make a Christmas tree from tinsel with their own hands
Using the following instructions, you can easily make a beautiful shiny Christmas tree from tinsel. If desired, it can also be made from ribbons or fabric strips. You just need to choose the best option for decorating the frame and repeat the work described in the video tutorial.
How to make a Christmas tree with your own hands from available materials - master class with photos for kindergarten

Bright patterned napkins are great for making simple and very cute Christmas trees. For the base, which will be covered with pieces of paper, you can use foam cones of any size. You can also further decorate the craft using ribbons, tinsel or shiny beads and chains. Making such colorful decor at home will not be difficult at all. The following master class with photos will tell you more about how to make a Christmas tree with your own hands using improvised materials step by step.
List of materials for gluing a DIY Christmas tree from scrap materials
- foam cone;
- multi-colored napkins;
- glue;
- scissors.
Photo instructions for gluing a Christmas tree from scrap materials yourself

What to make a Christmas tree from with your own hands - a master class on making decorations from pine cones

Using pine cones, you can make a Christmas tree of any size. This can be either a full-fledged figurine or a small craft that will decorate the table. At the same time, such simple material is optimal for quickly and easily preparing Christmas trees for the holiday. Therefore, when choosing what to make your own Christmas tree from, you should choose pine cones. They can easily be collected in the required quantity, and both a teenager and a child can work with such material.
List of materials for making a Christmas tree from pine cones with your own hands
- cones of different sizes and shapes;
- red beads;
- spruce branches;
- cardboard cone (ready-made or made yourself);
- glue gun;
- glitter glue.
Master class with photos on making a pine cone Christmas tree with your own hands

Video tutorial on making a Christmas tree craft from pine cones
The instructions below are great for creating another festive Christmas tree to decorate your home, kindergarten and school classrooms. A simple master class will help you do original craft which will have amazing appearance. It will help create a real festive atmosphere and therefore can be used as a gift for the New Year 2018 for your loved ones and friends.
What to make a Christmas tree from for crafts for the New Year 2018 - a step-by-step master class with photos

Since you can make any New Year’s crafts at home, you shouldn’t limit your imagination. It is better to invite children to create a unique Christmas tree. First you need to find out what you can make such a craft from easily and quickly. For example, it can be assembled from beads and balls. But the simplest and most entertaining can be considered assembling a Christmas tree from felt and felt toys. To do this, you just need to glue the blank to the wall and make a very cool one out of it. New Year's decor. In the next master class with photos you can find out what to make a Christmas tree for such unusual crafts for the New Year 2018, and how best to decorate it.
Materials for making a cool Christmas tree for the New Year 2018
- felt of different colors;
- scissors;
- double sided tape;
- chalk;
- glue.
Master class with step-by-step photos of making Christmas tree crafts for the New Year 2018

How to make a Christmas tree from plastic bottles with your own hands - step-by-step master classes with photos and videos

Assembling a plastic Christmas tree for home and classroom decoration is quite easy and simple, even for a child. Therefore, when choosing the most simple materials To make New Year's crafts, you should choose containers with different volumes: this will help you make figurines of different types. They will help you learn how to make a Christmas tree with your own hands quickly and easily from plastic bottles. next master classes with photos and videos.
List of materials for making plastic Christmas trees from bottles with your own hands
- acrylic paints;
- plastic bottle;
- sequins of different colors;
- glue;
- White paper;
- brush;
- scissors.
Photo instructions for making your own Christmas tree from a plastic bottle
- Paint the bottle with white acrylic paint and wait for it to dry.

- Trim bottom part bottles.

- Cut fringe at the bottom of the bottle and carefully lift these pieces up.

- Round off the end of each fringe by trimming them with scissors.

- Place the prepared top part of the bottle onto the previously cut bottom.

- Prepare multi-colored acrylic paints.

- Paint the bottle with dark green paint and leave until completely dry.

- Use white paper to make a cone for the top of the Christmas tree.

- Carefully cut off the bottom of the paper cone and then cut it into a fringe.

- Using a sponge or toothbrush, apply green paint to the paper top of the tree.

- Fold long strips of paper in half and cut into fringes.

- Glue the fringed paper strips to the bottle in a spiral.

- Paint strips of paper with green paint.

- Spray the prepared Christmas tree with white paint to imitate snow on its “branches.”

- Paint the bottom part of the stand red.

- Reassemble the Christmas tree and put spots-circles on it with paint of different colors.

- Cover the Christmas tree with light green glitter.

- Additionally, glue multi-colored sequins onto the bottle.

Video on a master class for making a plastic Christmas tree with your own hands
Another cool Christmas tree from plastic bottles can be made in another master class. The instructions with video below will allow you to assemble simple craft with children at home is easy and simple. You just need to carefully study the proposed lesson and repeat the work done.
Cool crafts in the form of Christmas trees can be made from any available materials. For example, assembly unusual decor can be carried out from plastic bottles. Or you can use a foam cone as a base and cover it with paper, ribbons or tinsel. The craft will turn out to be quite unusual when using cotton pads. They can be covered with multi-colored paint and glitter. You just need to choose what to make a craft from and study the master classes offered above with photos and videos. They will help you learn how to make a Christmas tree with your own hands at home, school or kindergarten. The described instructions are suitable for children of any age: preschoolers and primary and secondary school students.
Universal choice gift ideas for any occasion and reason. Surprise your friends and loved ones! ;)
DIY Christmas (and not only) trees: master classes
Almost all the Christmas trees presented today are made using different materials. Some are very unusual, artsy, rich. I would even say elite. And others, on the contrary, are as simple and minimalistic as possible in their design. A la Ikea, so to speak.
DIY paper Christmas tree
The largest group today. You will see many representatives of the beautiful spruce species. Each one is different from the others, so choose
Origami
The simplest version of a paper Christmas tree is using a square. Fold the square in half (diagonally), bend the opposite sides to the center (like in an airplane) and that’s it.
Tip: Use this simple trick to decorate a greeting card or fold napkins beautifully.

Angular
First of all, fold a square of paper as shown in the photo. Then:
- Fold the structure so that the side corners are inside. This will result in a square four times smaller than the original one.
- Bend the right corner to the center,
- And left.
- Fold the right corner to the right.
- Fold this corner under yourself.
- Do the same with the second one.
Now turn the structure over and repeat steps 2-6 only for this side. All that remains is to trim the sharp lower tip and make a few cuts on both sides. Then bend each cut end and place the Christmas tree on the table)
Circles
To create this spruce, take paper and draw a circle on it, outlining it as necessary, as in number 1. Next, cut out the circle and cut each section to a small circle. Now wrap each of these small sections on both sides with the tips inward and glue them together. Process the entire circle in this manner.
For spruce you will need several rows. In the photo, for example, you see a beauty made of 15 layers with a cone top. The layers, by the way, are assembled onto wire by piercing the centers of the parts.

Panel for kindergarten
In kindergarten, were you given the task of making a spruce tree together with your child? Then this option is the simplest. Take thick cardboard And colored paper. Cut out triangles from cardboard, cut the paper into strips and overlap them. Even a child can handle this. Cut off the excess. You can glue a skewer at the bottom and stick it into the padding polyester.
Tip: the resulting product can be used as a bookmark.

Making crafts using available materials
To create this semblance of a fluffy-coniferous creature, you will need a long metal pin on a stand and lots and lots of scrap paper. Feel free to use newspapers, old magazines, etc.
Tip: Additional decoration of the Christmas tree can be done using paint in a can, which can be sprayed on the leaves. This will make them stronger and more durable.

Big tree of knowledge
The next beauty will be the spruce tree that brings knowledge. For it you just need to stack all the available books in a pyramid. I highly do not recommend hanging an electric garland, as in the photo: fires in New Year happen very often, do not neglect it. It’s better to put regular tinsel and balls on the ledges.

From tubes
Incredible simple technology. Suitable for decorating cards and walls. Prepare several tubes rolled from paper rectangles. Glue each one in the intended place. The tubes can be made gradually smaller or with a “brush” (sometimes placing longer elements higher than necessary).
Glue button or sequin decorations on top.

Fluffy
For this you will need a lot of paper strips, which will need to be glued in layers to a paper cone. And put on a cute cone hat on top. An excellent craft that can be done with children too.


For those who are passionate about quilling
Do you like to twirl paper spirals? Then prepare several strips of paper of the same thickness. Roll 17 pieces into a spiral and narrow one end of each. For the trunk, simply roll 4 tubes and place on a skewer. Glue all parts according to the photo. The ends of the “branches” can be decorated with cylinders of a different color, similar to Christmas tree decorations.

Vytynanka
I remember my sister once mentioned that she liked the so-called vytynanki - one of the types of Slavic folk art in which paper is cut out amazing beauty things. They are often glued to glass to enhance the festive atmosphere.
And they are made like this: the desired pattern is drawn on paper in advance. IN in this case- spruce, folded in half. And then, using a well-sharpened stationery knife, all unnecessary parts are cut out. For the spruce you will need two parts folded in half, which can later be sewn in the center on sewing machine or manually.

Corrugated paper
Continuing paper theme, I want to show you three simple Christmas trees. First, with blue roses, which are made from tissue paper (like corrugated paper, but much thinner). Each rose is created using a strip that is tightly curled at the center and slightly looser towards the end. Thanks to the properties of paper, roses easily straighten and become lush.
The base is again a cone.

The next spruce tree is very similar to the previous one, but here the strips used to create the flowers are cut along the edge, making them very fluffy. They are again rolled into a flower, but they do not try to give the appearance of a rose, but simply soak them as much as possible.

From cupcake tins
Well, that's an interesting idea. I have just a bunch of these molds that seem to never be useful to me (I would rather buy silicone ones). Cut the bottom off each and cut from one edge. And stick it on a paper cone.
By the way, you can use scraps to make a flat Christmas tree for a postcard, as in the photo in the master class.

Fabric Christmas trees
Floral
This beauty will require a lot of circle flowers. For them, cut out several circles of fabric and burn the edges. It is better to take organza, veil or something similar. Then collect each flower on a string and decorate the center.
Spruce again from a paper cone at the base

From felt
To create these tree pendants, use soft (for the base) and thick (for other elements) felt and beads. Patterns can be made directly from the photo. All that remains is to cut out the parts from felt, which then need to be sewn with a running stitch and stuffed. Well, decorate, of course
You can give such a Christmas tree to a guy - it will be very touching

From satin ribbon
Prepare beads, satin or grosgrain ribbon(or maybe even lace?), thread and needle. All you need to do is string beads and ribbon loops onto the thread alternately. The main thing is not to forget to secure it at the beginning and end of the product.

From balls
The essence of creating this wonderful Christmas tree is to create a huge number of fabric balls. For each of them, cut out circles and tie with thread, laying a running stitch. Put a little padding polyester inside and pull it off. Each such ball must be glued to the base.
The base can be a foam cone, a paper cone, or sewn from fabric. You can also decorate the spruce in the form of a topiary; for this you will also need a pot of polymer clay and sprinkles to create the effect of an earthen mound.

This is such a beauty nautical style I got:

Other materials or need for invention is cunning
Sorry, dear readers, I in no way want to offend anyone. It's just an expression the best way describes the impossibly diverse number of materials with which people manage to create Christmas trees :))
From beads
A rather complicated, but interesting Christmas tree. To create it, prepare chopped beads, a couple of beads and thin wire for working with beads. First, string the top, as in photo 1. Then make four upper paws- this will be the top.
Now prepare the branches, in each of which make several loops - smaller for the upper branches, larger for the lower ones. Collect them all into one trunk, wrapping it across with thin wire.
From plastic bottles
I respect this master class for careful attitude to nature and waste recycling. Take plastic bottle, cut off its smooth central part, which is cut into fringe. The lid will go on the top, the bottom can be used as a supply. Glue all the cut elements to the central rod.

From spools of thread
My friends, if you have a number of wooden thread spools, then know that you are the owner of a treasure with which you can make an amazing tree. To do this, clear all the spools of thread and glue the very bottom row onto the round dense base. Then glue row by row onto the existing ones below. Simple and stylish

From candy
The base will again be a paper cone. Attach a row of regular tinsel to it, then a row of sweets, then again tinsel, etc. On the top you can glue the most delicious candy(as a star). One minus - there will be nothing left of the tree quickly

From the bark
Strict Nordic Christmas trees. Which can be made if you have a paper cone and a little (okay, a little more than a little) bark on hand. The pieces need to be glued in rows so that the tree looks like a spruce.
I just ask that you don’t spoil living trees for this. Better look for something that has already been knocked down by a thunderstorm. By the way, the method with small pieces can also be used with CDs.

From sticks
Let's continue the theme of nature. This time we are decorating holiday boxes. Use chopsticks to lay out a semblance of a tree, which, in turn, decorate with threads, buttons and other decorative details.

From clothespins
I definitely need to make one like this for the New Year))) I have a dozen or two clothespins with hearts, it will be cool) In general, all you need is to build a rod with a stand. For example, a lid with a spoke. And put “branches” on the knitting needle. You can insert lollipops into the edges.

Bohemian
And we will make this spruce using feathers. The principle is the simplest - glue the feathers in rows from the bottom. By the way, feathers can be purchased in woven ones. But I don’t know what they used to paint it green. Maybe someone can tell me?

From wire
Build the frame like this: wrap three circles of wire around something round (cans, buckets, etc.), so that each next circle is smaller (or larger) than the previous one. Then take three pieces and use thin wire to tie them together at the top and in the same place on each circle.
All this can be turned around a beautiful garland. If you get creative, you can even hang a few Christmas tree decorations.

Made from mesh (and sisal)
Such a Christmas tree can be built in a few minutes. To do this, take a mesh or a sheet of sisal (read what it is). Place on a paper cone and wrap in several layers. Secure the top with a cord, wrapping it in a spiral around the spruce. Decorate with Christmas tree decorations.

And now is the time for the most minimalist Christmas trees, which will decorate the house and won’t take up much space.
From... Christmas balls
Here's a pun - a Christmas tree made of Christmas balls. Nevertheless, it looks great. For some reason I immediately imagined such a structure at some cool corporate event of a large company - it looks very status-worthy.
Making one is not at all difficult: take several dozen green (or whatever you want) balls and tie a thin thread or fishing line to each one. The most difficult thing is to measure the length correctly. Do this: Determine for yourself required quantity balls for each row and, based on this, estimate the length of the thread. The higher the ball, the shorter the thread.

Symbol
This is exactly what the next two coniferous trees can be called. The first is located on the wall and is made up of pieces of tinsel imitating fir branches. You can attach it with double-sided tape so that the ends do not stick out.

The second one was simply skillfully assembled with the help of many paintings, badges, souvenirs, etc., which were collected in the likeness of a spruce tree. Notice how some elements seem to imitate toys that are located on the tree. Interesting idea By the way, for an original gift on February 14, winter will still be in force, so a Christmas tree will be quite appropriate.

Well, dear readers, it’s time for me to say goodbye to you. The spruce hit parade is over, share your impressions: what inspired you, what you will take note of, etc. Be sure to tell your friends on social media. networks using the buttons below. Bye!
Sincerely, Anastasia Skoracheva
Useful tips
The Christmas tree is a symbol of the New Year, so many people want to make a Christmas tree with their own hands and give it to loved ones or decorate their home and/or their New Year tree.
There are many options on how you can make a Christmas tree with your own hands.
In this article we will look at the most interesting options small Christmas trees from various materials that you can make at home.
Christmas tree from an old book

1. Prepare an old, unnecessary book (the thicker the better), carefully remove the cover.
2. On the first page, draw the outline of the Christmas tree and cut out along the contours (see image).

3. Using the Christmas tree template, trace the tree shape onto all the sheets and cut out. You can cut out several pages at once.
4. Paint the edges of the pages.

5. Cut out two stars of the same size from colored paper or candy wrappers, glue them to each other and at the same time to the top of the Christmas tree.

Christmas tree craft made from thread and buttons

You will need:
Styrofoam cone (can be made from cardboard and wrapped in film)
Thick thread
Buttons different shapes, sizes and colors
Hot glue
Pom poms (if desired)
Scissors.
1. Use glue to secure the end of the thread at the bottom of the cone. Start wrapping the thread around the cone, adding glue from time to time to secure it.


2. Glue the pompom to the top of the head and the buttons to the Christmas tree.

Christmas tree made of pine cones (pictures)

You will need:
Acrylic paint or gouache and brush
Sequins
PVA glue
Hot glue or play dough, stars and small pots (if needed)

1. Wash, dry and paint the pine cone.

2. Decorate the cone with glitter. You can add a little glue and sprinkle with fine salt to imitate snow.
3. You can buy small pots and use hot glue to glue the pine cone to them. Instead of pots, you can use colored cardboard. If you don't have hot glue, you can use plasticine.
4. You can make stars out of paper for the top of the head. You can also buy stars.
How to make a Christmas tree from funnels and fabric

You will need:
Wide ribbons from any fabric
3 funnels
Hot glue
Colored cardboard
Small foam balls (3-5 pieces) to glue to the tip of the funnel
Small Christmas tree decorations.
1. In order to place one funnel evenly on top of another, and they will not wobble, you must first glue it to the spout of one funnel with hot glue foam ball, and glue the next funnel to it.

2. For the base you can use the sleeve from toilet paper or paper towel. It needs to be cut, painted or wrapped in colored paper or tape, and glued to colored cardboard. You can also use other items of similar size.

Christmas tree made of colorful ribbons (master class)

You will need:
Foam cone
Several ribbons of different colors (width about 1 cm)
Scissors
Pins
Any decoration for the crown (star, pompom)
PVA glue.

1. Cut a circle out of felt to glue to the bottom of the cone, thereby ensuring its stability.

2. Start cutting 10cm pieces of ribbon.

3. Fold each piece of ribbon in half and thread a pin through it. Make several of these.

4. Starting at the base of the cone, attach the ribbon pieces with pins to the cone (see image). Make one row first, then a second row with a small overlay (to cover the pin) and so on.
The last row can be glued down to avoid using pins.

5. Glue the top of the head. It could be a bow, a star, a pompom or something else.
DIY Christmas trees made of felt

You will need:
Felt of any colors
Crepe paper
Thread and needle
Hot glue.
1. First, cut out a few felt squares. You should choose 3 colors and cut out a few squares different sizes for each color.

2. Place all the squares in one pile, alternating colors, and thread a needle and thread through them.


